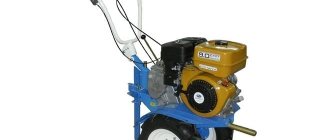
Today, not only farmers, but also more and more owners of suburban land plots prefer to mechanize soil cultivation using walk-behind tractors. A large number of types of various mounted and trailed equipment allows these units to be indispensable assistants in almost all types of earthworks.
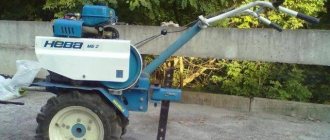
As for the plow, this device is not only in demand, but also necessary when cultivating the soil. In this article we will talk about plows for the Neva walk-behind tractor, which is popular in our country, which is widely used when cultivating small plots of land.
You can install the plow for this walk-behind tractor yourself
Types and types of plows for Neva walk-behind tractors
It was hard to imagine agriculture in ancient times without a plow.
Now absolutely nothing has changed. And it is still a popular product. But unlike ancient times, the principle of its use has changed. Nowadays, walk-behind plows are used to cultivate relatively small areas. The purpose of their work is to turn over the top fertile layer of soil for the winter period, this is done so that it absorbs moisture as much as possible. Thanks to this, the amount of harvest increases significantly.
How easy it is to plow with this plow model, watch the video:
Let's look at what options for plows for plowing are offered by the official manufacturer of Neva walk-behind tractors.
Mounted plow PN
Mounted plow PN
The manufacturer of this model is Joint Stock Company "Energia". They confirm the quality of the product in compliance with all standards of the Euro-Asian Union.
This is a relatively small model that allows you to work on small plots of land in gardens, vegetable gardens, greenhouses, etc.
Here is an overview, the principle of coupling and operation of this model:
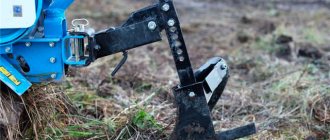
The plow is a structure consisting of a base and a body and a stand with holes attached to it.
It has one blade. That is, when using it, the soil will be thrown to one side.
The plowing depth can be adjusted manually. The maximum immersion depth of the plow is up to 22 cm. And the maximum working width is 18 cm. This is more than enough for most soil cultivation cases.
Single-body plow N
Single-body plow N
This plow is produced by JSC VRMZ. Outwardly they are very similar to each other, but differ in quality. VRMZ has long established itself as one of the best manufacturers of various metal structures. Their distinctive feature is the high quality of the entire range of products.
How easy it is to plow the land with a Neva walk-behind tractor, watch the video:
Based on sales experience, the single-body plow N produced by VRMZ is one of the most popular. Therefore, the company immediately developed 9 different modifications of this plow. They differ in their dimensions, weight, working width and depth of arable land.
That is, every owner of a Neva walk-behind tractor can choose exactly the plow that is most suitable for his particular case.
- Weight can vary from 3 kg to 15.
Overall dimensions are presented in a wide range from wide to narrow, from low to high.
- If you look at the working width, it can be 15 or 22 cm.
- The depth of the arable land, depending on needs, can be either 20 or 14 cm.
That is, they are universal and can be used in any area and for any needs.
When choosing a plow, you should know the condition of the soil you plan to cultivate. In particular, this model is suitable for softer and already prepared fertile lands.
Their use on virgin lands or rocky soils is unacceptable.
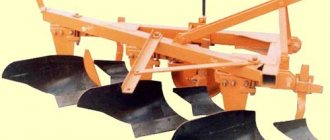
Reversible plow
The material for the manufacture of this type of device is durable structural steel, since the use of this device involves high loads on it. The soil cutters of the reversible plow for the walk-behind tractor are multi-directional, so that after completing the furrow it is enough to turn the unit around and continue working without having to return to the beginning, as is the case with a single-furrow plow. The ploughshare and heel have a universal shape, which allows this equipment to be used on any soil, including heavy soil.
Important! The presence of two multi-directional plowshares in the design not only allows you to work in both directions, but also to use the device when harvesting potatoes and other root crops.
Installation and configuration of the plow
Before you start plowing the land, you should attach the plow to the walk-behind tractor. To do this, you need to connect them using a special hitch (usually it is not included in the package and is sold separately).
Here is a detailed video instruction on how to prepare a walk-behind tractor for plowing:
The plow should be connected to the walk-behind tractor only on a flat surface. Thanks to this, proper grip can be achieved. Otherwise, the overall structure will be assembled at an angle and the plow will not function properly.
Then the plow should be adjusted for plowing. In its correct position, the field board should be parallel to the furrow line.
Here is a detailed video instruction about the main problems and nuances that may arise when adjusting the plow:
The depth of the arable land can be set using special bolts by moving them in a vertical longitudinal plane. The depth can be adjusted after you have started plowing. However, you should be careful and be sure to follow safety instructions.
The plow can be operated both when the walk-behind tractor moves forward and when it moves backward. Due to the fact that it can rotate around its axis.
The most common drawback in the operation of the plow is the fact that it is pulled to the side. How to solve this issue, see below:
For better grip, the walk-behind tractor should be equipped with metal lug wheels. They serve as additional stabilizers during plow operation. Craftsmen make their own versions of such wheels. They simply pull chains onto standard tires, and the result is a design that, in terms of its characteristics, is in no way inferior to special metal wheels.
Safety restrictions
- work with a plow under the influence of alcohol or any other substances that reduce reaction speed or attention;
- work with a walk-behind tractor in case of malfunctions in the plow;
- work with a walk-behind tractor with loose fastenings;
- carry out repairs or any manipulations while the plow is moving.
These rules are simple and more than understandable to every sane person.
How to install and adjust a plow for a walk-behind tractor?
In this section we will tell you how to set up a plow on a Neva walk-behind tractor. The plow and hitch are the most important parts, without which you will not be able to plow the field with a walk-behind tractor. They need to be assembled and adjusted correctly.
Each walk-behind tractor model has its own characteristics. Sometimes preliminary work on its fastening is required. You can learn how to attach the hitch from the instructions for the walk-behind tractor. The original coupling guarantees a reliable connection of the unit with the attachments.
Adjusting the plow also requires certain knowledge and takes place in several stages:
- adjusting the depth into the ground;
- adjustment of the slope of the field board in relation to the nose of the ploughshare;
- adjusting the tilt of the plow blade.
Owner reviews
Often, before making any purchase, we consult with friends or acquaintances who have already purchased a similar product or service. But what to do if no one you know has bought a plow? If you have the Internet, you can always read reviews from those who have already bought a plow for the Neva walk-behind tractor.
As for the reviews about this model on the Internet, there is no obvious criticism of this walk-behind tractor on the forums; most of the reviews are positive.
Here are some reviews from the forums.
Yuri:
“The problem with plowing the land has always been in our family. Either the tractor drivers don’t have time, then they break down, or some other nonsense will happen to them. And as a result, plowing the ground before planting was extremely difficult. So not only do you go and humiliate yourself in front of them, but you also pay them money and buy fuel. It's simply unbearable! Therefore, I decided to buy myself a Neva walk-behind tractor and immediately a plow to go with it. In the end, I was a million percent satisfied. I am always confident that my land will be prepared for sowing and cultivated after the harvest, so I also do not depend on anyone.”
Igor:
“I bought a VRMZ plow and am completely satisfied. Easy to install, without unnecessary parts, it does the job 5+. I've been using it for 3 years now. After work, I washed it, lubricated the joints with Litol, and installed it until the next season.”
You can also help other readers of our site with your reviews on this model, if you own this model of walk-behind tractor or attachments for it, you can leave a review about it, or ask any question you are interested in about this model below in the comments.
Milling cutters for the Neva walk-behind tractor
Milling cutters for the Neva walk-behind tractor. Let's look at how to assemble a cutter. The Neva walk-behind tractor includes 8 cutters with a diameter of 36 cm, which allows them to loosen soil up to 1.2 m wide and 20 cm deep.
Mills for the Neva cultivator come in the following types:
- With saber-shaped legs designed for virgin soil (active cutter). The most popular and in demand cutter for the Neva walk-behind tractor, aimed at processing virgin soil or viscous soils.
- A crow's foot cutter for the Neva walk-behind tractor, which will allow you to process harder soil, since it has a solid structure.
To increase the cultivated soil in one pass with a walk-behind tractor, and accordingly reduce the time for cultivating the entire area, you can purchase additional cutters.
Flat cutter for walk-behind tractor Neva MB. This type of attachment is designed to control weeds while simultaneously loosening the soil. The flat cutter has several holes for adjusting it to work at a certain depth.
Homemade options
The concept of the plow itself is extremely simple and has not changed since ancient times. Only with a slight difference, previously horses and a wooden plow were used, but now a walk-behind tractor and an iron plow.
They differ, in fact, only in the material. Now every man should be able to work with iron and welding.
Therefore, on various forums you can find drawings of plows that were manufactured. There is a discussion of the concept and any shortcomings or amendments that may affect the final result. And, in the end, people achieve their goal, and the result is very good.
And the most patient people make step-by-step video instructions on how to make a plow with your own hands at home.
As a result, they manage to assemble structures that are absolutely in no way inferior to an industrially produced plow. And often they are superior, because what you make with your own hands is always better than what you bought.
How to make a plow for a walk-behind tractor with your own hands?
You can make a plow for a walk-behind tractor yourself. This will save you a lot of money. To do this, you will need tools and materials that every owner has in their garage.
First you need to make a drawing. Without it, you may have problems and ultimately nothing will work out.
ploughshare
You need a piece of steel about 5 millimeters thick. A removable plowshare can be made from a circular saw blade. The working part of the part, which will cut the ground, must be processed on an anvil and then sharpened.
Blade
You will need a pipe with a diameter of 0.5 meters. In this case, the wall thickness should be no more than five millimeters. The part is cut out from a pre-made cardboard blank, also processed on an anvil and sharpened.
After this, the parts are assembled. To begin with, you can do all this using cardboard blanks. And if all the parameters are met, and the plow itself turns out to be correct and reliable, then you can proceed to the metal parts.
How to adjust a homemade plow? Exactly the same as the factory one. The only difference is that if the work is incorrect, you can bend and adjust the parts yourself using a hammer.