There are many reasons why farmers and gardeners plow the soil in their fields and plots.
But plowing, even if it is profitable to buy a walk-behind tractor in Ukraine, presents some problems and costs. However, this fits into the business strategy of ensuring future harvests.
Investments in machinery should be made in proportion to the farmland of each individual farmer.
A successful gardener or farmer knows why they till the soil and pays as much attention to the soil as possible, which means minimizing compaction of the topsoil and ensuring adequate water supply (during drought) or drainage (when it is too wet).
Setting up a walk-behind tractor
Working with a walk-behind tractor begins with setting it up. It depends, first of all, on the area of the plowed area, as well as on the quality of the soil. Some universal rules will help you set up your equipment correctly:
- The recommended diameter of the lugs is 50-60 cm, and the width is 18-20 cm. If the dimensions are smaller than those specified, the equipment will not make it possible to make an even furrow; it will be driven on different sides.
- It is preferable to choose a solid wheel rim so that earth does not accumulate on it.
- The weight of the unit must be less than 70 kg, otherwise it will constantly slip.
- The position of the machine itself when plowing should be such that its entire base is completely in contact with the soil. Otherwise, the plowing depth will either be too great, or, conversely, plowing will not work at all.
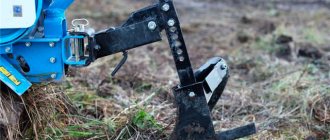
- When attaching the plow to the coupling device, the fastening nuts are not fully tightened. This leaves the possibility of further regulation. Using just two pins, you can easily connect the plow to the mounting eyelet.
Benefits of using a plow
Using mechanical tools to plow a field greatly simplifies farm work. According to statistics, the yield almost doubles if the field is processed using specialized devices.
The following are the advantages of using motorized plows:
- saving time and getting better results by applying a minimum of effort;
- additional loosening of the soil and subsequent fertilization using one tool;
- uniform cultivation of the land and, as a result, improved structural quality and condition;
- saturation of the soil with moisture and oxygen;
- slowing down the growth of weeds through land cultivation.
Important clarifications
Plowing with a walk-behind tractor occurs vertically; when it begins to deviate, the farmer, using his own strength, redirects it in the right direction and then monitors the correct movement of the tool. To make this task easier, the nuts in the adjustment groove are loosened and tightened again when finished.
Walk-behind tractors are often used for hilling potatoes , for which they attach another attachment - a hiller. It cuts the ground to the same depth as a plow. There are two types: regular and disk. More convenient to use is the disc-shaped one, but it is significantly more expensive.
The walk-behind tractor is known as a convenient tool for harvesting. Instead of a hiller or plow, an object is hung, which is a mixture of weeding paws and a lattice. His job is that he lifts the ground, takes root crops and pours the soil back so that the harvested crop remains on the surface.
The advantages of homemade “gadgets”
When making a homemade plow, you can get advantages that are not available in factory models. By creating a plow with your own hands, you can adjust it to the required values necessary for cultivating a certain soil on the site, for example, hard or soft. Such parameters may be different: the angle of inclination of the ploughshare, the width and depth of plowing of the field, and the efficiency of loosening.
If the engine power is taken into account when creating, the resulting product will not produce additional load on the motor cultivator, the wheels will not slip during operation, and plowing efficiency will be optimal. Moreover, if you make single-body or rotary plows with your own hands, the material can be adjusted to the required quality, and thereby increase the service life of such a unit several times. By making the plow yourself, you can provide the possibility of attaching additional “gadgets” for plowing the land.
How to prepare for work?
Preparing the unit for work includes installing lugs, as well as hanging and adjusting the plow.
- Installation of lugs. These devices are metal wheels with a diameter of up to 60 cm and a width of 17-20 cm. Thinner samples are also available for sale, but it is not recommended to buy them. This is due to the fact that it is very difficult to make an even furrow with thin hooks: the walk-behind tractor will swing in different directions and it is quite problematic to cope with it in such conditions. In order to install the lugs, the unit is placed on a flat surface, the original wheels with rubber tires are unscrewed and the hubs are removed.
The hubs of the hooks are put on the drive axle, secured with pins and secured with cotter pins.
The hitch hubs are slightly longer than usual, so their use leads to an increase in the track width, which makes the walk-behind tractor more stable. After the hubs are securely fastened, lugs are mounted on them. When attaching metal wheels, you must ensure that the tread tapers forward. It is advisable to select hooks in such a way that after hanging them, the total weight of the unit is more than 70 kg. Otherwise, the machine will slip and the processing will be uneven and of poor quality. If you purchase lugs that are too light, you need to take care of additional weighting of the structure. To do this, you can purchase a set of additional weights, the installation of which will provide the required weight.
- Installation and adjustment of the plow. The plow is secured using hitches that are attached to the unit using a king pin. It is recommended to make the connection of the hitch and the unit with a backlash of 5-6 degrees. If you fix the plow motionless, then when plowing it will begin to swing the walk-behind tractor from side to side, which is due to the uneven influence of the soil on it. When connecting the hitch to the plow, it is not recommended to tighten the nuts completely. This is due to the fact that there is an adjustment process ahead, during which they will have to be tightened and loosened more than once.
To make adjustments, you must install the unit on bricks or stacked boards. The height of such a structure should be equal to the plowing depth and be 20-25 cm. The lugs should be fixed, thereby ensuring complete immobility of the walk-behind tractor. Then the plow is positioned so that the entire length of the field board lies on the ground. In this case, the plow stand must be located strictly perpendicular to the ground and parallel to the inner end of the toe.
Then the slope angle of the field board is adjusted, while the distance from the nose of the plow (ploughshare) to the heel should be 3 cm. If the slope adjustment is neglected, then during operation the plow will begin to dig into the ground, the engine will overheat and work will have to be stopped. Next you need to adjust the track width. To do this, the right edge of the ploughshare is aligned with the inside of the right lug.
With this arrangement, the soil will be cut absolutely evenly, and it will become easier to operate the unit.
- Starting the unit. Before starting a gasoline or diesel engine, you need to check the oil level and fill the tank with fuel. Two-stroke gasoline models run on a mixture of gasoline and motor oil, while powerful four-stroke models “use” pure gasoline of the A-92 and A-95 brands. When refueling a walk-behind tractor with diesel fuel, you should take into account the temperature conditions and fill in winter diesel fuel in the cold season. Also, before starting, you should check the functionality of the steering wheel, gas, reverse and clutch, after which you can start it.
To turn on a gasoline engine equipped with a manual starter, open the valve on the fuel tank and set the choke lever to the “Start” mode. Then, without turning on the ignition, perform 3 to 5 starter movements, after which the ignition is turned on and the engine is started. As soon as the engine starts, the choke is immediately switched to the “Operation” mode. On walk-behind tractors equipped with an electric starter, starting the engine is even easier. To do this, simply turn on the ignition, the electric pump pumps fuel into the carburetor and the engine starts.
Before starting the diesel engine, all air in the system is expelled with an electric starter, and after diesel fuel takes its place, the engine is started. If the engine is equipped with a manual starter, then simply open the diesel fuel supply valve, set the gas and press the decompressor. Then the starter is pumped several times, the decompressor snaps into place and the engine starts.
How to start
After a long winter break between field work, the unit must be prepared. Check:
- fuel level in the tank;
- oil level in the engine and gearbox;
- battery charge level (if installed).
The oil level should be in the working area of the dipsticks and the above-mentioned filling containers.
Carry out an external inspection of the walk-behind tractor, the condition of the transmission belts and protective elements. After this, the cultivator can be started after winter by performing the following manipulations:
- open the gas tank tap;
- close the air damper;
- set the carburetor throttle lever to minimum speed;
- turn on the ignition switch;
- press the starter button or pull the starter cord.
As soon as the first pops of the engine into the muffler occur, slowly open the air damper. When you hear a steady exhaust note, open the throttle slightly, increasing the speed slightly. Warm up the engine, gradually reducing engine speed to idle. Only after the engine has warmed up can you engage the gear and move the unit.
Mini, medium or heavy?
In order for plowing with a plow to be effective, it is necessary to choose the right equipment. When choosing, it is necessary to take into account, firstly, the area that will be processed with its help, and, secondly, the tasks that it must perform.
There are three types of walk-behind tractors:
- light (mini);
- average;
- heavy.
Mini or light walk-behind tractors
Used to work in small areas, they are also called motor cultivators. The engine power of these devices is up to 4.5 horsepower.
Among the advantages of motor cultivators are:
- lightness (weight does not exceed 40 kg);
- low price (from 6000 UAH);
- the ability to process hard-to-reach places thanks to the small grip of the cutter.
However, light walk-behind tractors do not work for a long time, since they have an insufficiently powerful engine, which quickly overheats, and do not bury themselves well in the ground due to their insufficient weight.
Medium walk-behind tractors
Unlike light ones, they boast rear-wheel drive and are great for working on large areas (up to 0.5 hectares). Weight varies from 45 to 65 kg, the cost of such equipment, on average, is 10,000–12,000 UAH. Engine power - 4.5–12 liters. With. Many models of medium walk-behind tractors can be equipped with additional equipment.
Main advantages:
- presence of a front headlight and two gears;
- the ability to attach a plow;
- Compared to heavy ones of this type, medium walk-behind tractors are more mobile and easier to turn.
Among the weak points of monoblocks of this class are the processing depth of up to 11 cm, which is insufficient for many crops.
Heavy walk-behind tractors
Suitable for professional cultivation of land on plots whose area exceeds 0.5 hectares, since they have an engine power of 12 to 30 hp. With. and many advanced features. The cost of heavy walk-behind tractors is at least 12,000 UAH. The ability to attach a trailer or plow is one of the main advantages
walk-behind tractors of this type. They break through easily and cover the area many times faster than motorized cultivators.
Heavy walk-behind tractors have additional options: the ability to adjust the pneumatic wheel and steering wheel (higher and lower), reverse. Noticeable disadvantages are bulkiness, which requires a lot of force to turn the equipment; the need for reinforcement, because under high loads, the cutter or steering handle may break.
A Question of Choice
Owners of small dachas with an area of up to 6 acres are unlikely to need a walk-behind tractor - it’s better to get by with a walk-behind cultivator.
Land area
For processing medium and large areas, walk-behind tractors are produced in three classes: light, medium and heavy.
| Land area | Walk-behind tractor class | Engine power, hp | Weight, kg, no more | Working width, cm |
| up to 40 acres | easy | 5 — 7 | 40 | up to 85 |
| 40 acres - 1 ha | average | until 9 | 120 | up to 100 |
| 1 - 4 ha | heavy | 9 — 17 | 180 | 100 — 135 |
Walk-behind tractor with cutters
Functionality
The second criterion that you should pay attention to is functionality. If the main type of planned work is plowing the land with a walk-behind tractor, then it is better to give preference to heavy, middle-class units weighing more than 100 kg.
For those who focus on harvesting grass, machines with a belt drive and an engine with a power of more than 7 hp have been invented. With.
For transportation of goods it is recommended to use:
- up to 300 kg - light class units;
- 300 - 500 - middle class;
- 500 - 1000 kg - heavy class.
We also recommend reading an interesting article about cultivating a vegetable garden with a walk-behind tractor.
Engine
Most buyers of walk-behind tractors opt for a gasoline engine. It is valued for its relatively low cost, reliability and ease of maintenance.
The diesel engine has good traction capacity with low fuel consumption.
To process large undeveloped areas, it is better to buy a powerful unit. In this case, plowing with a heavy diesel walk-behind tractor is advisable.
Walk-behind tractor with plow and lugs
Transmission
When deciding which type of transmission to give preference to, it is important to know the features of each:
- the belt drive has a simple design and easy maintenance, but is limited in load;
- a gear transmission is more complex and expensive, but copes with significantly greater forces.
If the main type of work that you plan to perform is plowing the garden with a walk-behind tractor and transporting goods, you should opt for the first option. In cases where the unit will work with attachments, a gear drive is better suited.
Also, read a useful article about the gearbox of walk-behind tractors, it discusses in detail all the varieties with their advantages and disadvantages.
What affects the cost of plowing plots?
When you need to plow the land with a walk-behind tractor or cultivator, you want to know what the cost can be. Managers guide you by prices without seeing your site. The final payment is made by our specialists on site. They can go to the region to assess the property in advance, if required.
Several factors influence the cost:
- the purpose of plowing is for planting, for a lawn, before winter, etc.
- area and geometry of the site;
- soil composition – black soil, sand, clay;
- additional wishes of the customer.
How to plow the ground with a walk-behind tractor
Working with the device on site may vary depending on the tasks assigned. You need to know where to start, how to assemble the device correctly, what equipment to install and what efforts to apply.
Installing wheels
Plowing the land with a walk-behind tractor begins with assembling the device. In order for it to be assembled correctly, you must first attach the wheels, and only then install the plow. For optimal stability, we recommend that the wheels of the machine have a diameter of 50 mm or more, and their width is at least 20 cm. If these proportions are not met, it will not be possible to plow the soil efficiently, since the necessary immersion will not be ensured. Each of the two indicators indicated above is based on clear engineering calculations. For example, if the wheel width is insufficient, the entire device will roll in both directions when moving straight. If the diameter is incorrectly selected and the wheel is too small, the distance between the soil and the gearbox will be insufficient, which will lead to poor-quality plowing.
When choosing such an important attribute for a walk-behind tractor as a wheel, it is important to remember the rim. It is best if it is solid. If there are lug ribs, earth will get into them, dry out and prevent normal rotation.
Adjusting the plowing depth
Before plowing the plow, it is necessary to set its depth correctly. Different types of settings apply to different devices. So, for example, for plows with the PTK-9-35 index, the setting is as follows.
- Under both left wheels, transport and pneumatic, special liners are placed, whose height is slightly less than the required depth by 2-4 cm.
- Using the screw mechanism of the support wheel and the thrust screw of the left pneumatic, the body is lowered so that the support plane rests on the platform. The right support wheel remains on the plane of the body.
- To pass the first furrow, the right wheel of the support is raised using the adjusting screw to a height that is equal to V3 from the depth set for plowing.
- On the subsequent furrow, the right wheel is lowered to the level of the supporting plane of the body. During operation, the immersion depth of the plow is adjusted using the stop screw of the left pneumatics.
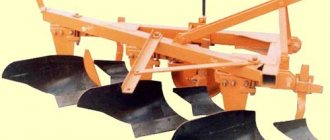
Plow PTK-9-35
Semi-mounted plow (index PLP-6-35). Plowing the site using this type of equipment is possible after setting it up. The plow frame is leveled using the screw mechanism of the support wheel, having previously placed a lining under the metal wheel. Often, the right-hand slanting mechanism for mounting the walk-behind tractor itself is involved in the alignment process. Each body must touch the platform with both the toe of the ploughshare and the heel of the field boards. In this case, the adjustable upper link is shortened to the limit.
Plow PLP-6-35
Mounted plow. Tilling the soil with a walk-behind tractor with a mounted plow requires careful debugging. The setup principle is generally similar to the previous point. The length of the top link at the attachment of the walk-behind tractor itself and its braces changes, then the frame is installed, but here it is worth remembering that this must be done strictly parallel to the site. The liner is placed under the wheel, which serves as a reference point, whose height corresponds to the required immersion depth with an error of up to 3 cm. During the first pass, the right brace of the walk-behind tractor suspension is reduced so that its first body is plowed to half the depth that was originally set. During the second pass, the distortion of the frame on the right brace is eliminated; this manipulation is performed in a transverse-vertical arrangement of the equipment.
In general, the process on tractors of different models and walk-behind tractors will not differ much from that presented above. Significant changes in settings are available for power regulators installed on heavy agricultural machinery. Here the wheel, which serves as a fulcrum for the plow, is lifted up or completely removed. To activate the regulator, the hatch under the seat is folded back, the lock is rotated, inserting the shank into the corresponding groove. In this case, you need to rotate to the left. Each distributor handle is placed in the neutral position, and the GSV handle remains in the locked position. The handle responsible for the regulator moves forward. The longer the regulator handle moves forward, the greater the depth of the plowed surface. When the required depth of immersion of the plow is found, the position is fixed with the handle of the power regulator of the handwheel-limiter.
To check the quality of plowing, special control is carried out. A furrow meter is used for this.
Adjusting the angle of attack
Plowing a garden using a walk-behind tractor is impossible without precise preliminary adjustment of the equipment. The angle of attack, or, more simply, the inclination of the field board, is the inclination that demonstrates the level of the plowing plane relative to a flat surface. This angle is adjusted using a conventional handle with a screw mechanism. To make the adjustment, you must complete the following steps in the correct order.
- Place the machine itself with the plow on the special stands mentioned above.
- Unscrew the adjuster handle as far as possible so that the field board remains completely pressed to the surface (even small gaps are not allowed).
- Then you need to start twisting the handle in the opposite direction until the back side is about 3 cm above the surface.
To make sure that the settings are correct, you need to proceed to plowing; at this stage it will be easy to determine whether the walk-behind tractor moves easily or rests heavily on the ground. If the angle of attack is large enough, the plow will begin to act as an anchor, thereby extinguishing the potential of the walk-behind tractor transmitted from the internal combustion engine, and accordingly, the efficiency will sharply decrease. This will lead to slipping and difficulty moving in the forward direction. If the angle of attack is insufficient, the required layer of soil simply will not be removed.
For high-quality plowing, it is necessary to make an even and clear straight line from one edge of the site to the other. All subsequent lines and the accuracy of the work performed as a whole will depend on this. To simplify the task, you can level the area with pegs and rope, at the same time clearly marking the boundaries and setting guidelines for plowing.
One wheel of the device must be placed in the furrow, the plow is oriented so as to remain perpendicular to the ground. The easiest way to achieve this is with a square. If it is inconvenient to make adjustments directly on the soil surface, you can place a stand that will correspond to the depth of the furrow. Once you have completed the setup process, you can move on to the second and third furrows.
We install the plow according to the track width
Even if the angle of attack has already been set, there is no need to rush to plow with a motorized cultivator. For competent and productive operation, the plow needs to stand on the soil surface not only with the heel, but also with the toe. This fact is easy to confirm even visually: if the stand is positioned vertically, it means that the setting has been carried out correctly. Heeling the plow will result in unnecessary pushing to the surface. When standing on its toes, the equipment will go deep into the soil.
At the moment of plowing, the load on the plow is not at all symmetrical, as it might initially seem. During operation, the walk-behind tractor will constantly open to the right. Usually the most difficult step is plowing the first furrow. For such needs, a stretched cord or a drawn line is used, which serves as a guide. The first furrow should be shallow - about 12 cm. Further work will be easier, because the right wheel of the walk-behind tractor will already go along the furrow.
It happens that the hitch beam is quite long. In this case, it is best to plow using a fulcrum, such as a wheel. It will help create the required depth of the plow. Typically, such a device can roll on both sides, both left and right.
Advice! It is much more convenient to work with a walk-behind tractor if you move both handles to the left - this will help you easily move along the unplowed side.
Recommendations for plowing various areas of land
Plowing virgin soil or any large piece of land where agricultural work has recently been carried out is not an easy task. Experts first of all recommend focusing on the shape of the existing site.
- A rectangular area is best plowed in a circle;
- Square plots are best plowed in a zigzag pattern.
In both cases, it will be more convenient to form a bed along the entire perimeter, placing them parallel to each other. In the future, this can significantly simplify the work of digging and planting.
It is not uncommon for the soil to be too hard. This problem cannot be solved in one go. It is best to plow in stages, first with heavy equipment (a walk-behind tractor with a rear adapter works great). With each subsequent treatment the soil becomes softer.
Advice! It is best to plow the soil when it is saturated with moisture. This leads to another recommendation: it is advisable to plow after precipitation or after the next watering.
Soil layers lend themselves well to processing using a walk-behind mill. To carry out such manipulations, you should drive over the same place several times, immersing the equipment more and more into the soil.
Many users wonder how many acres can be processed with a walk-behind tractor? Experts and experienced farmers say that using a walk-behind tractor, you can easily cultivate a plot of up to 10 acres. However, with perseverance and hard work, some cultivate entire hectares of land.
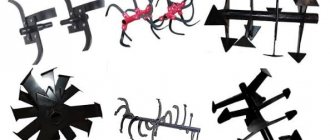
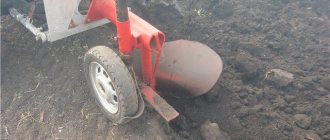
Installation of ground hooks
Ground hooks are special wheels on a walk-behind tractor for plowing. Their diameter is usually 50 cm, width - 18 cm. If you take a smaller size, the equipment will “swing” to the sides and it will not be possible to make an even furrow. You need to place the walk-behind tractor itself on a flat surface, remove the main wheels and install in their place the hooks prepared with the axles. Only after this they proceed to installing the plow.
Hanging and adjusting the plow
Various types of couplings are used for fastening. First of all, the plow itself and the couplings are connected. It is fastened on one side, the play on the horizontal plane should be about 5-6 degrees. It's important to remember a few things. If you fasten on both sides (with pins) or do not set the backlash, then the connection turns out to be too rigid, and this is a typical mistake.
The plow is then attached to the equipment's coupling device. The nuts should not be tightened tightly - adjustments still need to be made. It is better to perform this action with an assistant. The walk-behind tractor is installed on stands of about 25 cm (they can be made from scrap materials).
The ground hooks are fixed, the walk-behind tractor must stand level and not overweight, this is necessary for high-quality plowing. The plow bed is positioned so that the heel is parallel to the surface of the ground; adjustment is made using bolts. After the stands are removed, the plow blade is lowered to soil level, its rear part should be approximately 2.5 cm higher.
Starting a walk-behind tractor
Many owners have no idea how to properly start the engine. Most don't even touch the instructions. However, you can make mistakes that will lead to breakdown of the entire device, and repairs are often expensive.
First check the oil and fuel levels. Two-stroke engines should be filled with gasoline diluted with oil; the required proportions are given in the description of the device. Gasoline is used grades A-92 and A-95. For diesel engines fueled with diesel fuel, you should take into account the temperature outside, and base your choice of fuel on this.
Before the launch itself, the clutch, reverse, gas, and steering wheel are checked. The choke lever is set to the “Start” position, about 5 movements are carried out with the starter. After the ignition is turned on, the engine starts, the choke is switched to “Work”. Next, they begin to cultivate the land with a walk-behind tractor.
How to plow with a walk-behind tractor correctly
The process is not difficult to understand. First, the first control pass is carried out at low speed. In this case, the device is tilted to the left. Afterwards the technique is tilted to the right and a second approach is made. The result is checked - the depth and quality of plowing. If necessary, adjustments are made.
When working, the right lug should not go beyond the furrow line; it is better to move it in the middle. When properly configured, the equipment operates smoothly, without jumps or sudden movements.
Methods of tillage
You can plow with a walk-behind tractor in several ways:
- dump;
- waddle;
- before winter.
In the first method of digging an area with a walk-behind tractor, the movement begins from the center, at the edge the walk-behind tractor is turned around, a grouser is installed in the furrow, and then moved back. As a result, a ridge forms in the middle of the field. Plowing with a walk-behind tractor saturates the soil with moisture, trapping snow in the furrows in winter.
In the second case, work is carried out from the right edge. At the end of the row they move to the opposite edge and plow in the opposite direction. In this case, dump ridges are formed along the boundaries of the field. The method is used when applying fertilizers.
Smooth autumn plowing of the garden with a walk-behind tractor is carried out for the purpose of disinfecting and loosening the soil, as well as in the spring before planting.
Plowing schemes
Features of virgin soil plowing
How to plow virgin soil correctly? For high-quality processing you will need:
- Motoblock unit weighing at least 100 kg. If it is lighter, the plow simply will not budge.
- A rotary plow, which includes a cutter, a gearbox for connecting to a walk-behind tractor, and transport wheels.
- It would not be superfluous to use special weighting in the form of ballast.
The work of plowing virgin soil must be carried out in stages, each time going deeper and deeper. In addition, soil moisture will make it easier to work with.
Good to know! The direction of plowing needs to be changed every year, since the soil layer is constantly shifting.
Models of walk-behind tractors such as Neva, MTZ, Khoper, and Centaur are in great demand among gardeners. In addition to plowing, they also provide for other agricultural work.
Potatoes are often hilled with walk-behind tractors, that is, a hiller is used instead of a plow. It penetrates into the ground to a shallower depth, thereby differing from the first.
It is also used for harvesting. For this, a special canopy is used that raises the ground. Then it is poured through the grate, as if through a sieve, and only the root vegetables remain on the surface.
Types of plows used
Large farms, as well as enterprises engaged in agricultural activities, have many different attachments, and among other things, as a rule, several types of plows. They differ primarily in design: ploughshares, rotary, disk, as well as combined and chisel (which do not have moldboards and are designed for plowing without turning over layers of soil).
As for the rest, plowshare plows are the most widely used since ancient times, and are based on a ploughshare; in rotary plows, the working body is a rotating drum with blades or paddles. The name of the disc plow speaks for itself, as does the combined rotary-share plow. Each of the above agricultural implements for reverse plowing of land comes in different models, which are divided into semi-mounted, mounted and trailed according to the type of connection.
According to their purpose, plows are divided into a larger number of types: cultivated ploughshare, semi-screw and screw (simple and with angle), cut-out plows, plows with subsoiler and for rhombic plowing. All of the above equipment is based on a ploughshare, the shape of which depends on the required method of wrapping the topsoil, as well as often additional devices for various types of plowing.
So, for example, the usual cultivated plowshare body is a classic type, the design of which is only a stand, a moldboard and a lower share. The half-screw is complemented by a field board located behind the working surface of the ploughshare, as well as an extension feather at the rear of the blade. The screw plow is equipped with a disc blade; this tool is located in front of the plowshare body and is intended for preliminary cutting of the soil.
The screw with an angle is supplemented by the device indicated in the name of the plow, located in the upper part of the blade, a chisel on the front edge of the ploughshare, and a vertical knife of the “shark fin” type installed above it. The plow for rhombic plowing of the soil has a vertical share in the front part of the blade. Also, a plowing tool is often supplemented with a subsoiler on a separate stand, in the lower part of which a cone-shaped loosening paw is horizontally attached to a bracket.
The cut-out plow is equipped with two shares, lower and upper, between them there is a shield installed as a continuation of the blade, the front edge of which serves to cut the soil. The ploughshare knives themselves have several forms. The most common is the trapezoidal type; the chisel-shaped type, the toothed type and the ploughshare equipped with a retractable chisel are also widely used.
Leveling the area using a walk-behind tractor and cultivator
This type of equipment is suitable not only for agricultural needs. A cultivator or walk-behind tractor can be used for landscaping work. You can level your dacha plot with improvised means, a shovel and a rake, as well as with the help of utility equipment, but if the area is hilly or replete with stumps and a developed root system, heavier equipment may be required.
Leveling the area with a cultivator is only possible if there are minor unevennesses that can be eliminated without resorting to additional technical means (a tractor with a bucket, etc.). The walk-behind tractor is capable of diving a little deeper, but on average, the diving area reaches 15-17 cm. Further leveling of the area occurs with the help of a rake. The loosened soil should be evenly distributed throughout the area.
If the soil on the site is too hard, rocky, or if there are stumps that have not been uprooted, etc., it would be better to resort to the services of a tractor. It would be better to dig up solid objects, such as a large stone buried a considerable distance into the soil, or an overgrown rosehip bush deeply rooted in the area, using a regular bayonet shovel. Only after removing parts that interfere with loosening and removing large debris can you begin to work using a walk-behind tractor.
It is important to remember that operating a walk-behind tractor and cultivator on hilly terrain and other uneven terrain is associated with an increased risk.
Which method to choose for plowing: manual or mechanical?
Many inexperienced gardeners ask this question. There are many methods and devices. answering the question of when to plow the land, the question arose of “what” to plow. Of course, many will say that you need to dig with a plow. We mainly use three types: shovel, walk-behind tractor and tractor. Each has its own advantages and disadvantages.
A shovel is cheap and cheerful. But you definitely won’t damage the fertile layer. But more often than not, this method will not give much results. You can plow with a shovel if you have a very small garden.
If you have at least 5 acres, then a walk-behind tractor is ideal. They can plow quite deep - up to 25 cm. This will saturate the soil well with oxygen and remove a lot of weeds. They can also plow up all the passages of rodents. Then they will not harm you the next time you land.
But if you have large gardens, then in any case you need a tractor. It is desirable that a person not only knows how, but also knows how to plow the land correctly. The properties of the soil determine which type of tractor is best to use. Some heavy tractors may simply not reach deep into the ground. They may sink into the ground and not really plow.
In this article you will find useful tips on when is the best time to plow the land and in what way.
Plowing of the land in large areas is carried out in spring and autumn
Before embarking on such an important event, it is necessary to understand its essence in detail. There is a widespread belief that plowing helps reduce the number of pests and weeds on the site
Also, agricultural workers prefer to plow the land in order to fertilize it.
The above opinions are certainly true, but they are far from the only ones. Among the key reasons for plowing a plot of land are:
- excessive soil compaction or erosion;
- presence of pests and weeds;
- salinization
The last reason is the most common. If you do not plow the soil periodically, salt will accumulate inside the soil. This is especially familiar to residents of regions with high humidity. Excessive salinity negatively affects crop yields.
Additionally, you should know that the loosening process leads to the saturation of the soil with oxygen. This process is important primarily for beneficial microorganisms. They have a direct impact on soil fertility indicators.
Spring plowing
In the spring, the garden is also plowed. During this period, soil reservation is carried out. This work takes place immediately after the top layer of soil has dried sufficiently. For plowing large gardens, it is better to use a tractor cutter. At the same time, it is not at all necessary to plant it deeply. In this case, the soil is loosened safely, because all its beneficial bacteria remain absolutely unharmed.
Regardless of the time of year, you should definitely know how to plow the land correctly and what secrets this process has. There are both manual and mechanical methods of plowing the garden. For small areas it is not necessary to call a tractor. In this case, a walk-behind tractor will be sufficient. The appropriate technology allows for fairly deep plowing (up to 25 cm).
A tractor is necessary for large vegetable gardens. At the same time, the person who will manage it must have professionalism and appropriate experience. When choosing the type of tractor, it is necessary to take into account the properties of the soil itself. Sometimes the heaviest equipment simply cannot penetrate deep into the ground. Such tractors even sometimes sink in the soil, which is why plowing is not done properly.
Is it possible to plow the land in the rain? Is it better to plow the garden before or after the rains?
3
Solution
It's better to plow the garden. If you have a choice, in the fall it is better BEFORE the rains, although this option is more tiring for a person. But in the spring, ideally immediately after rain, then the soil inside will become more moist, which is important for the planting and growth of any plants. Although there is one more point - earthworms, which improve the structure and composition of the soil, are really damaged after rain, as they crawl to the surface. Thus, to decide when is the best time to plow, you need to be guided by specific conditions and goals.
replied 2015-08-28T16:04:03.000000+03:00 4 years, 2 months ago
Littlebduents
41
2 more answers
Of course, before the rains, I only managed to dig up part of the garden. Today it rained quite heavily, where it has been dug up, the soil looks nice and tidy, it doesn’t spread into the mud, unlike last year. Now it will be very difficult to dig, the ground is wet and heavy. I'll dig when it dries out a little. You can even dig in the snow, especially so that there are no pests in the ground.
replied 2015-08-28T16:51:33.000000+03:00 4 years, 2 months ago
Bogged
157
The soil has optimal moisture, they say its ripeness, then it loosens best and energy costs are less. In spring, the soil is at first very moist, the layer turns over well, it is easy to plow, but it does not loosen at all, it remains united, then it becomes ripe, then, as it dries, it is already difficult to plow or dig, as it becomes too hard. There is very little time to plow on time, it is not without reason that they say that in the spring one day feeds the year. This problem will not occur if watering is possible. There may be a very dry spring or fallow plowing in the summer, or a dry autumn, you can water the field before plowing and then huge lumps will not form. When the soil is very damp, there is nothing left to do but wait for fine days.
Features of autumn and spring plowing
As strange as it may sound for a city dweller, the main plowing of the soil is carried out not in the spring, but in the fall. It is called “chill” and is intended to prepare for the winter-spring season. Deep autumn cultivation destroys harmful larvae overwintering in the soil, the earth is abundantly saturated with moisture and oxygen. Timely work significantly increases soil fertility and ensures high yields, while simultaneously reducing the damage to crops by numerous diseases.
Spring deep plowing can have the opposite effect. The combination of humidity and warm air promotes the proliferation of bacteria, fungi and other parasitic organisms in freshly dug soil. Seeds that fall into such soil will either die or grow sickly and weak.
In spring, it is preferable to harrow the top layers of soil. Thanks to the grinding of the surface, all the moisture accumulated during the autumn-winter period will be preserved in the lower layers, and the earth will also be replenished with the necessary supply of oxygen.
It is advisable to introduce manure and straw into the cultivated lands in early spring, which has been resting for at least six months. Such organic components improve the quality, increase the looseness, aerobic properties and fertility of the soil. Beginning farmers should remember that fresh, unburned manure will do more harm than good - this fertilizer can only be applied during autumn plowing.
Common problems and their solutions
Remember that plows are structurally different from each other. The general adjustment process is similar, but the elements by which the adjustment occurs may differ. Before starting connection and setup, read the instructions that came with the device.
The same applies to the walk-behind tractor. Check the instructions to determine whether the wheels need to be replaced with lugs, and what diameter they should be. It is recommended to install weights on light and medium-class walk-behind tractors so that the unit sinks under the weight of the machine. If the plow is configured correctly, but the machine still slips, then the unit is too large for the walk-behind tractor of your power. This problem can be solved by installing weights.
When choosing a device, focus on the power of the walk-behind tractor. The heavier the machine, the larger the diameter of the plow you can install. Heavy diesel walk-behind tractors are equipped with two-body devices that increase the productivity of site processing.
The design of the plow is simple and understandable - the main thing is to pay attention to the unit itself and think sensibly when connecting it. Remember that the unit must be looked after in the same way as a walk-behind tractor. Clean your unit after plowing, try not to plow rocky soils and perform timely maintenance on your assistant.
When to dig potatoes
A certain amount of time must pass from the moment of planting to the moment of harvesting. And this time depends on several factors: the selected variety, time of planting, weather conditions. It is difficult to say the exact exact time.
There is some dependence on the harvest: if the potatoes were planted at the end of April, then they need to be dug up before the beginning of August. However, as statistics say, the favorable time for planting is the month of May and you need to dig up potatoes in early September. Although on average the harvest begins in mid-August.
The time it takes to dig up a vegetable directly depends on the variety. Early varieties are dug up 4-6 weeks earlier than late ones.
So, when digging up potatoes, you should know for what purpose the vegetable will be used. If you need young potatoes immediately for cooking, then you need to dig them up at the end of July.
If young potatoes are needed for cooking, then they need to be dug up at the end of July
If the root crop must be stored all winter, then early harvesting is not recommended. The peel should become rougher, otherwise the potatoes will quickly deteriorate and rot.
External signs of potato ripening
Potatoes are plants that are grown in large quantities relative to other crops.
It is important not to miss the harvest time and dig up the root crop on time. It is important to be able to understand by external signs that a vegetable is ripe
The main signs of potato ripening include:
- the bushes dry out, wither and turn yellow;
- the peel of dug up potatoes becomes coarser, becomes thicker and is difficult to peel off (unlike young potatoes);
- the tubers have accumulated enough starch to survive the winter for a long time. This is easy to find out; you need to drop iodine onto the pulp. If the flesh has turned lilac, then the potatoes are ready for storage;
- When harvested, the tubers are easily torn from the stems and roots.
Dry and yellowed tops are a sign of ripened potato tubers
Why harvest on time?
If you start digging up the plant ahead of time, the skins of the tubers are collected too well and can only be stored for a few months.
In order for the tubers to be preserved for a long time, the peel must harden. It is also impossible to keep vegetables in the ground for the following reasons:
- potatoes are damaged by harmful insects or diseases;
- tubers dry out and lose weight;
- fruits rot from wet soil;
- the vegetable is frozen due to the sudden onset of cold weather.
Timeliness and quality of plowing land with a tractor
Timely plowing will help retain moisture in the soil. When working, the soil should not be smeared onto the plow and fall off in large pieces, which is possible with high humidity. Or spray and break in low humidity. When cultivating wide layers, loosening is incomplete when the plow takes a layer that exceeds its normal work. In turn, if you are late and allow the soil to dry out, this will greatly affect future yields. That is why choosing the optimal time for plowing is one of the most important tasks for a landowner.
Our company has extensive experience in carrying out field work (we have cultivated over 10,000 hectares of land), and we will be happy to tell you the required time not only for plowing, but also for any other type of land cultivation.
Attachments and adapters
Thanks to the ability to install attachments, the functionality of the walk-behind tractor is significantly expanded:
- harrows will help to cultivate virgin soil, disk the soil with a walk-behind tractor, level it and loosen it;
- single- or double-row hillers are used for processing potatoes, forming furrows and laying seed material;
- rototillers allow you to plow, mill, cultivate the soil while simultaneously applying fertilizers, destroy large layers, and also level the surface of the field.
In addition to the above-mentioned attachments, flat cutters and mowers, rakes and sprayers, brushes and snow blowers, as well as other devices are used.
Attachments
An adapter for a walk-behind tractor—a trolley with a seat, brakes, coupling mechanisms and other structural elements—will help to significantly ease the farmer’s work.
Plowing and cultivating the land with a walk-behind tractor with an adapter is not the only function of the unit. He will be able to transport cargo, remove garbage and snow, and perform other work.
Walk-behind tractor with adapter
Safety precautions
The safety rules recommended for compliance when using a motor cultivator are not complicated.
You should adhere to the following rules:
- Operation may only begin after full reading of the instructions supplied with the device;
- It is prohibited for children to use the device, as well as persons who do not have experience in handling the device;
- during plowing, it is important to eliminate the proximity of any animals and other people;
- work should be carried out in closed clothing with long sleeves and closed shoes without dangling elements or in special equipment; It is better to choose high shoes, for example, boots or ankle boots, the toe of which is covered with a metal plate; We must not forget about gloves, mainly in the case of cultivating difficult soils, as well as safety glasses;
- During operation, it is necessary to keep your hands and feet away from rotating elements, and also maintain balance in relation to the forward and reverse handles; they cannot be raised at the same time, since one must always remain lowered;
- Vibrations occurring during operation signal the presence of breakdowns; in this case, the engine is stopped, cooled and the problems are eliminated if possible; most often the problem is a weakened fastening, which is easy to normalize;
- If you have a model with reverse gear, it is important to adhere to one simple rule: before changing direction, you should wait until the cutters come to a complete stop.
You can learn more about how to properly plow with a motor cultivator in the following video.
Handling the cultivator during operation
When operating the cultivator, be sure to keep your limbs away from moving parts of the cultivator. It is better to work in closed shoes: high boots, and even better – boots. Save flip-flops or flip-flops for other purposes, as they increase the risk of injury. It is advisable to wear glasses and gloves when plowing the soil.
After switching on, there is no need to push the cultivator; it is simply pointed in the desired direction. When the unit stops in the ground, rock it slightly from one side to the other, with your little help it will continue to move. To avoid trampling the newly tilled soil, turn the handle and walk next to the plowed strip.
When working with a cultivator on wet soil, large clods are obtained. It is then difficult to loosen the soil, and the soil sticks to the cutters. When the soil is very dry, the depth of cultivation is sharply reduced. In this case, the strip is first passed at a shallow depth, repeating its passage to the required depth. Therefore, it is best to work with moderately moist soil. The low speed of movement of the cultivator at high speeds of the cutter allows for more thorough cultivation of the soil.
When the ground is soft, an anchor attachment is best for loosening the soil. With a cultivator it is more convenient to move in rows or zigzags.
Some tips on how to properly handle the cultivator
If there are a lot of small pebbles in the area, work at lower speeds. The walk-behind tractor will serve for a long time with regular maintenance. Changing the oil, cleaning the unit, sharpening the cutters is the key to the “health” of your cultivator. You can't skimp on oil. When pouring inappropriate oil during operation, a solid sediment is formed, which clogs the unit components. As a result, the cultivator may fail. And then the cost of repairing it will significantly exceed the savings that you managed to achieve on changing the oil. This also applies to gasoline.
Important: Filling with fuel is only possible when the engine is stopped and cooled down. After refueling, check the fuel tank for leaks.
All adjustments should also be carried out with the engine turned off. If you feel vibration during operation, this is a signal that a problem has begun. It is worth stopping the engine, finding the cause (most likely the parts are loose) and eliminating it. Row spacing in the garden is not always ideal. In order not to damage the plants, you can reduce the cultivation strip by removing the external cutters. Powerful motor cultivators can move not only forward, but also backward. If it is necessary to change the direction of movement, pause until the cutters stop. The cultivator should move smoothly and evenly. If it buries itself in the ground, then it is necessary to adjust the position of the wheels or swap the cutters. After using the unit, wipe all metal parts with a cloth. If necessary, rinse the cutters and then wipe them dry. Safety precautions when working with a cultivator
To avoid accidents:
- Do not trust children to operate the cultivator.
- Do not allow people to work who are not familiar with the rules for handling it.
- Make sure that there are no other people or animals near the operating unit.
- Maintain a safe distance from rotating elements.
- Use special strong clothing, shoes and gloves. Laces, ribbons, clothing hems - nothing should dangle when moving.
How to choose a plow for a walk-behind tractor
When choosing a plow, pay attention to the technical characteristics of your walk-behind tractor. For processing small areas, a single-body plowshare unit is suitable, and if you are the owner of a heavy diesel walk-behind tractor, then you can connect a double-body device, which will speed up the process of cultivating the land twice as much as a single-body unit.
Single-body mounted plow SCOUT PL-130
The SCOUT PL-130 single-body plow is connected to a single-point attachment to mini-tractors and walk-behind tractors with a power of 10 hp or more. With.
The unit is equipped with an enlarged steel ploughshare, and the design itself is made reliably - you can forget about sharpening the ploughshare. To regulate the plowing depth on uneven terrain, a limit wheel is installed. The plow is designed for processing heavy, loamy soils and virgin soil.
When working with the floating mode of the hydraulic distributor, the device must be weighted.
Single-body mounted plow SCOUT PL-130 HYD with scoring disc
The SCOUT PL-130 HYD single-furrow plow is equipped with a scoring disc for more efficient work on turf soil. The unit is connected to mini-tractors and walk-behind tractors with a single-point attachment mechanism. The working part is made of reliable steel.
The angle of attack of the plowshare is adjusted using turnbuckles. The limit wheel regulates the plowing depth. The trimming disc is designed to trim plant roots during plowing, which increases the productivity and quality of plowing.
To plow heavy soils and virgin lands, you need to install weights on the equipment: 80 kg in the front and 60 kg in the rear.
Double-furrow mounted plow SCOUT PL-225
The double-furrow plow SCOUT PL-130 is the only two-furrow device that is connected to a walk-behind tractor. The unit is secured using a single-point mechanism. But for work you need a walk-behind tractor or a mini-tractor with a power of 15 hp or more. With. The base of the plow is a triangular frame with turnbuckles that adjusts the horizontal and vertical position. The plowshare body is adjusted using a stand. The plowing depth is controlled by a limit wheel.
Sources
- https://MoyMotoblok.ru/rabota/vspashka-zemli-motoblokom-plugom-i-frezami/
- https://tokar.guru/stanki-i-oborudovanie/motobloki/kak-pravilno-pahat-zemlyu-podgotovka-motobloka-i-ogoroda-dlya-vspashki.html
- https://sdelai-lestnicu.ru/stroi-tehnika/kak-pravilno-pahat-plugom-na-motobloke-kak-otregulirovat-glubinu-vspaski-zemli-nastrojka-motobloka-dla-pahoty-plugom
- https://stroy-podskazka.ru/motobloki/pravila-vspashki/
- https://zapchasti-isuzu.ru/marki-specavto/kak-pahat-ogorod-na-traktore.html
- https://remont-dmb.ru/service/vspashka-zemli-motoblokom/
- https://tehnika.expert/dlya-sada/prochaya-sadovaya-texnika/kak-pravilno-vspahat-zemlyu-motoblokom.html
- https://mzoc.ru/selskohozyajstvennaya/kak-pahat-motoblokom-s-plugom.html
- https://kamuflyzh.ru/tehnologii/kak-pahat.html
- https://vospari23.ru/kak-pravilno-pahat-ogorod-motoblokom-s-plugom/
- https://avtovishki-v-arendu.ru/spetstehnika/vspashka-ogoroda-motokul-tivatorom-pravil-naya-tehnologiya-i-sovety-ekspertov.html
[collapse]