Huggies Diapers Elite Soft 8-14 kg (size 4) 66 pcs
1099 ₽ More details
Huggies Diapers Elite Soft 5-9 kg (size 3) 80 pcs
1099 ₽ More details
Thermo mugs KAMILLE
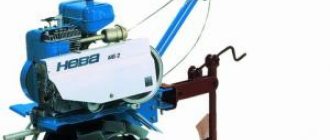
Motoblocks have gained particular popularity over the past decade. They really provide significant assistance to a person on a personal plot. Walk-behind tractors are capable of a lot - plowing a fairly large area of land in a short time, planting and quickly harvesting crops, moving heavy loads, taking on the functions of a snowblower and much more.
Walk-behind tractors are a mechanism that sooner or later begins to malfunction. The simple design of the unit allows you to find and fix the breakdown yourself.
Main types of malfunction of walk-behind tractors:
- engine breakdown;
- ignition system failure;
- uneven functioning of the battery;
- carburetor contamination;
- fuel supply problems.
This device has a specific list of possible malfunctions.
The task of the ignition system is to generate the spark necessary to ignite the fuel in the internal combustion chamber. Failures in the system can be eliminated quickly and easily if you strictly adhere to a certain action plan, otherwise you can simply harm the proper operation of the walk-behind tractor.
Ignition of an agro walk-behind tractor, conversion to a coil
The proposed scheme is intended for the repair or modernization of the MB-23 ignition of the Agros walk-behind tractor.
This design can also be used to work with motors of scooters, boat motors, etc. This circuit differs from the previously published ones by the increased spark duration.
In the standard MB-23 ignition, as well as in published homemade switches, the spark duration is 280 -300 μs and, accordingly, the spark energy is not high.
This drawback, inherent in all capacitor ignition systems with one oscillation period in the coil, leads to unstable operation of a cold engine, incomplete combustion of the rich mixture during warm-up, and difficulty starting a hot engine.
To eliminate this drawback, the development of G. Karasev [1] was taken as a basis, which made it possible to develop a walk-behind tractor ignition switch with a multi-period oscillatory discharge mode of a storage capacitor, using almost all the energy stored in it.
At the same time, the duration of the spark increased by 3-4 times and reaches 1.4-1.5 ms.
Current in the MB-23 spark plug circuit.
Current in the modernized ignition circuit.
Electronic switch circuit.
The switch was assembled on a breadboard; I did not print it.
I used a Zhiguli B-117A as a coil, but you can use any other one, including your own.
- G. Karasev. Stabilized electronic ignition unit. Radio No. 9 – 1988
If you find the designs useful, you can support the author to continue developments in the field of amateur radio.
Source
Modernization of the ignition switch of the Agro walk-behind tractor
The proposed scheme is intended for repairing or upgrading the ignition of the Agros walk-behind tractor. This design can also be used to work with motors of scooters, boat motors, etc.
This circuit differs from the previously published ones by increasing the voltage on the charging capacitor by 2 times and increasing the spark duration above 1.2 ms.
Electronic switch circuit.
The switch was assembled on a breadboard; I did not print it.
I used a Zhiguli B-117A as a coil, but you can use any other one, including your own.
After installing this ignition, the spark when cranking the engine with a manual starter became quite rich, even with a not very strong jerk there are no spark misses. This is due to the fact that even at low starting speeds the charging capacitor has time to charge to a voltage sufficient to form a good spark. A stronger, more consistent spark makes the engine easier to start.
Does it start well in minus?
Honestly, there haven’t been any cons yet, but I hope it will start normally. So far I've only tried it at -5 - it started normally. Although this is not an indicator, the minus was small and short-lived; in reality, the walk-behind tractor probably did not cool down to this temperature. But in any case, the spark cannot be compared with the one that was on the standard unit. On the standard one, at first I even thought that there was no spark, then I found it with difficulty, but here there is a thick and bright spark on the spark plug. It won't get any worse. That’s why I left the idea of email for now. starter, I want to see, maybe it won’t be needed if it starts well.
alldn, we will try to collect and test
If you tried it, then this one differs in only three details. You can make a small scarf with these parts, connect it to that switch and see the difference.
Please tell me, the coil for the capacitor and classic (transistor) ignition systems are fundamentally different, you claim that there is no difference. Which is correct?
nospin , FUNDAMENTALLY they are the same. Transformer with two windings. And the number of turns probably differs. Although, as I said, both will work. In the old Soviet times, we did the ignition with a blocking generator and a storage capacitor, installed a regular coil and everything worked without problems. In this ignition, the next version of which I published, the voltage on the capacitor and, accordingly, on the coil reaches 400 volts when operating at medium speeds, and the coil tolerates this easily and without problems.
Here is an oscillogram of the voltage across the coil. The vertical division value is 100 volts.
If you are interested, do it and don’t hesitate. This is the final version of the switch. There are thoughts for the future, but this is in terms of adjusting the OZ, in terms of power and duration of the spark there is nowhere to go further.
alldn wrote: nospin, FUNDAMENTALLY they are the same. Transformer with two windings. And the number of turns probably differs. Although, as I said, both will work. In the old Soviet times, we did the ignition with a blocking generator and a storage capacitor, installed a regular coil and everything worked without problems. In this ignition, the next version of which I published, the voltage on the capacitor and, accordingly, on the coil reaches 400 volts when operating at medium speeds, and the coil tolerates this easily and without problems.
Here is an oscillogram of the voltage across the coil. The vertical division value is 100 volts.
If you are interested, do it and don’t hesitate. This is the final version of the switch. There are thoughts for the future, but this is in terms of adjusting the OZ, in terms of power and duration of the spark there is nowhere to go further.
alldn,
Well done!
Source
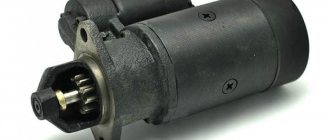
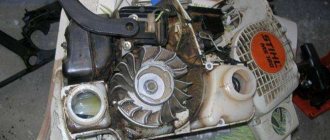
How to remove a bearing from a generator without a puller
In general, after washing the engine, the generator bearings began to make noise, my patience lasted for a week. I read the information on replacement on the internet and found out that there are 5 types of bearings: 201, 202 and 301, 302, 303, 2 types of front and 3 types of rear, or vice versa, I don’t remember exactly.
I went to Ladya and decided to buy 202 and 302, they cost me 105 rubles, I was more worried that they wouldn’t fit. Here they are: I came to my friends’ service and started filming. I unscrewed the upper tension pin of the generator, removed the belt, unscrewed the bolt on the generator, removed the terminals from it, began to unscrew the lower bolt of the generator, but it did not come out, it rested on the side member, we unscrewed the generator mount from the block with 3 bolts of 15. In the end, here he is the hero of the occasion .
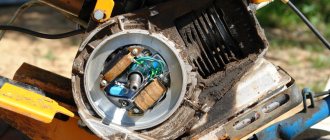
Remove the relay regulator (brushes) by unscrewing 2 bolts. We remove the plastic cover from the generator, we see the diode bridge. It is secured with 4 bolts. This is a very important point. 3 bolts to which the terminals from the winding are attached, they have a textolite washer (we found out through trial and error about this later), which prevents the winding from shorting to ground. Unscrew the 4 bolts and remove the diode bridge.
Next, insert a screwdriver between the blades and the generator housing and very carefully unscrew the pulley mounting nut. We unscrew the 4 bolts that connect the 2 parts of the body to each other, after spraying everything with water. I personally managed to unscrew only one bolt with a regular screwdriver.
The rest were unscrewed with an impact screwdriver. We put 2 marks on both parts of the case so as not to confuse it later, unscrew the 4 bolts, now we put screwdrivers on both sides between the 2 parts of the case and try to open it. The back part is removed from the plastic sleeve; it is easier to get the bearing out.
We removed the back part, put the front part of the generator with the armature between 2 bricks, screw the nut onto the end, and hit it from above in order to remove the armature from the bearing. In the end it should turn out like this. We take the front part more and more tightly, put it on something hard, take the head at 30 or 32, put it on the bearing and start pounding as hard as we can
Source
Ignition device on the Agro walk-behind tractor
Auto mechanic, specializes in agricultural equipment
Motoblocks have gained particular popularity over the past decade. They really provide significant assistance to a person on a personal plot. Walk-behind tractors are capable of a lot - plowing a fairly large area of land in a short time, planting and quickly harvesting crops, moving heavy loads, taking on the functions of a snowblower and much more.
Walk-behind tractors are a mechanism that sooner or later begins to malfunction. The simple design of the unit allows you to find and fix the breakdown yourself.
Main types of malfunction of walk-behind tractors:
- engine breakdown;
- ignition system failure;
- uneven functioning of the battery;
- carburetor contamination;
- fuel supply problems.
This device has a specific list of possible malfunctions.
The task of the ignition system is to generate the spark necessary to ignite the fuel in the internal combustion chamber. Failures in the system can be eliminated quickly and easily if you strictly adhere to a certain action plan, otherwise you can simply harm the proper operation of the walk-behind tractor.
Agro walk-behind tractor does not start - do-it-yourself repair
Regardless of whether the Agro or a domestic analogue, it, like any other mechanism, may require repairs over time. The device itself is used for cultivating the land, digging up root crops such as parsley, radishes, celery, carrots, etc. It also helps when raking, mowing grass, when transporting fertilizers or small cargo, when watering, for clearing snow, etc.
The use of a walk-behind tractor makes it easier to work hard with a shovel or other agricultural implement. The device also saves the farmer’s time. The reasons for the breakdown of this unit can be different: from simple to quite difficult to repair. For example, poor engine starting, damage to mechanisms and components (stopping the rotation of the power take-off shaft or clogging of the gas tank cap hole), etc.
Adjusting the ignition system
If the system is configured correctly, then a malfunction may not occur. However, such a violation does occur and it is necessary to be able to eliminate it and configure the system. Walk-behind tractors intended for large-scale agricultural work are subject to increased loads, and untimely or poor-quality ignition installation can lead to equipment breakdown. So how to adjust the ignition on an Agro walk-behind tractor?
Before performing work, carefully study the circuit diagram of the device. The ignition system produces a spark at certain intervals and piston positions. The upper part of the magneto is responsible for its distribution, the lower part interrupts the spark formation process. This is why the system is regulated.
In this video you will learn about the ignition unit:
To set the ignition on the walk-behind tractor, follow these steps:
- The operation of the engine flywheel is checked.
- The contacts located inside the magneto are opened.
- The distance between the hammer and the anvil inside the system is measured.
- The engine flywheel is turned to compress the piston.
- After the flywheel is in the upper position, continue turning further until it clicks. This signal means that the clutch inside the assembly has activated.
- Turn the flywheel back and align the mark on the body with the second mark on the flywheel.
- After carrying out the above operations, begin to adjust the distance between the breaker and the cam. The normal distance should be between 0.25 and 0.35 millimeters.
- The last step in making the adjustment is to secure the built-in cam with a screw located on the top of the assembly.
Detailed setup of the walk-behind tractor's ignition system can be viewed in the video provided on our website.
Important! Correct adjustment of the system will make the engine start more calm and smooth. Due to this, the pistons and other mechanisms of the power unit of the Agro walk-behind tractor will not wear out quickly.
This is not the only way; there are other adjustment methods:
- With the help of a spark.
- By ear with the engine running.
- Using a strobe light.
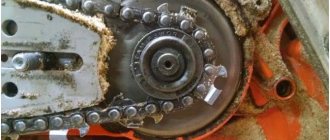
What if the gearbox chain fails?
Such a breakdown will be indicated by stopping the rotation of the power take-off shaft of the walk-behind tractor, and the gearbox itself will simply jam. It is possible that the chain itself has burst, then it just needs to be replaced and the PTO will resume its operation. Also, very often owners of walk-behind tractors have problems with adjusting attachments. For example, adjusting a plow on a walk-behind tractor involves the following actions:
- We secure the hitch with 1 kingpin, where the play in the horizontal position should correspond to 5° - 6°.
- We adjust the plowing depth. The norm would be somewhere deep into the ground by 5 - 7 cm.
- Adjusting the angle of attack. Place the walk-behind tractor with the plow on a flat surface. We unscrew the adjusting screw so that the plow touches the ground. And unscrew the screw back until the back of the canopy rises 2.5 cm from the ground.
These are the main points of plow adjustment that need to be made when installing it. Of course, this kind of breakdown of the Agro walk-behind tractor, such as turning on the power take-off shaft or adjusting the clutch, can be eliminated with your own hands without much difficulty. Also, if the Agro walk-behind tractor malfunctions, you should contact its instruction manual, where all problems with such equipment should be described in more detail. If you still understand, for example, that you need to disassemble the imported engine of your unit, that you are not sure that you will do it correctly, then it is still better to turn to specialists. Still, service centers can do detailed diagnostics and determine where the problem is with 100% accuracy. So, when in doubt, it is better to turn to professionals.
Source
Breakdowns and ways to fix them
We consider several reasons why the Agro walk-behind tractor may not work:
- the candle does not produce a spark;
- the ignition coil (magneto) has failed;
- wiring problem.
Checking the spark plug is easy; just unscrew it and inspect it carefully. If there is carbon deposits on the walls, this means that the part has been filled with fuel. Carbon deposits are removed by exposing it to the ignited burner of a gas oven. It is not enough to just clean the spark plugs; you need to check the entire fuel supply system for leaks.
To understand whether the magneto is working, a cap with a connected wire is put on top of the spark plug, and the lower part of the ignition element is brought to the body. Turn the flywheel. If a spark is not visible, the problem must be looked for in the coil. But that's not all. It is imperative to pay attention to the state of the gap between the central electrode and the side electrode. Take a simple blade and insert it into this gap. If the blade fits securely and tightly, then everything is in order. Otherwise, you should lightly hit the central electrode, after which it will move.
Advice. Buy candles with a short heat dissipation path. In practice, it has been proven that such candles do not overheat and last much longer.
Another elementary cause of system malfunction is poor contact of high-voltage wires. They need to be removed and thoroughly cleaned or replaced with new ones. In vehicles with an electronic ignition system, the wire will be automatically blocked by a command from a special safety device.
To ensure that the ignition system does not cause problems, you must follow the following tips, which will help not only extend the life of the mechanism, but also save the car owner money:
- do not operate the walk-behind tractor in unfavorable weather conditions (wet weather, frost, high humidity);
- If you notice the smell of burning plastic, you should immediately turn off the engine until the reasons are determined;
- Spark plugs should be changed at least once every three months;
- for efficient operation of the walk-behind tractor, it is necessary to use only high-quality spare parts and fuels and lubricants;
- unsuitable engine oil can lead to flooding of spark plugs;
- conduct a constant inspection of the entire system, right down to the wires.
We recommend reading:
Assembly and disassembly instructions, repair tips
I just finished overhauling the Ant engine and decided to write a short report on installing a magneto. Of course, the engine had to be half charged with spare parts made by no one. I suspect that the counterfeit goods with which I had to tinker for the last two days are being produced in some garage in Rostov-on-Don, or that the local workers are secretly making this nonsense at the factory. In any case, according to my information, traders bring this disgusting stuff from Rostov.
The engine to which I have devoted the last two days has already been converted to a magneto. Plus, there was another “Ant” in my yard, also converted by someone to use a magneto, but the store spacer to which the magneto is attached was “pinned” from it at one time... I had to buy a new spacer and the owner at the same time bought a coupling . I don’t know why he bought it - I didn’t ask him for it. The old one was in good condition. Well, since I bought it, we’ll install it.
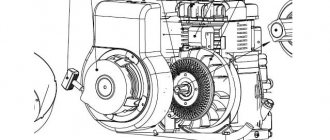
Walk-behind tractor ignition device
The ignition system is one of the most important components of both branded and homemade walk-behind tractors. Its main function is to generate a spark, which is needed for ignition and gradual combustion of fuel in the chrome-plated cylinder of the internal combustion engine.
The simplicity of the factory design of the unit allows you to perform your own repair of the ignition of a walk-behind tractor, which, most often, involves setting a gap between its elements. However, to do this correctly, you need to study the design of the unit.
The ignition device of any household agricultural unit includes a coil, which is initially connected to the electrical power supply of the system, as well as a magneto and spark plugs. When starting the power unit of the walk-behind tractor, voltage is supplied, as a result of which a pronounced spark is formed between the magnetic “shoe” and the standard spark plug. It is necessary for instant ignition of the fuel, which at this moment is in the combustion chamber of the engine. The photo will tell you more about the structure of the ignition system of the walk-behind tractor used.
The electronic ignition system of a walk-behind tractor is also often equipped with breakers that are triggered automatically when any unit malfunction occurs. This leads to an emergency shutdown of electrical power in the network.
How to set the ignition on a walk-behind tractor?
The following signs will indicate the need for urgent adjustment of the gap in the ignition system:
- the need to frequently pull the starter cord to no avail;
- delayed reaction of the walk-behind tractor engine to manipulations with the starter;
- complete lack of starting the internal combustion engine of the agricultural unit.
Each of these malfunctions indicates that the operator must install the ignition of the walk-behind tractor used on the farm. The correct procedure for this can be found in the operating instructions for the existing equipment. However, the operator does not always have the manual at hand. In this case, the gap between the built-in ignition module and the flywheel can be set in the following sequence:
- First, the operator must close the spark plug with a special square;
- Then its body will need to be pressed against the head of the standard cylinder of the internal combustion engine;
- Next, the spark plug must be turned in the direction opposite to the hole provided in the end of the chrome-plated cylinder;
- After this, you need to carefully turn the crankshaft of the internal combustion engine of the walk-behind tractor - to do this, just pull the trigger cord;
- As a result of these actions, a bright blue spark should jump between the built-in electrodes. If this does not happen, then it is necessary to check the distance between the magneto and the starter of the walk-behind tractor - it should be from 0.1 to 0.15 mm. If these requirements do not meet these requirements, the gap between the elements will need to be adjusted.
Many experienced users adjust the ignition of a walk-behind tractor by ear. Both contact and non-contact magnetos are suitable for this. To configure the system yourself, you must:
- Start the engine and slightly loosen the standard distributor;
- Slowly turn the breaker in each of the possible directions;
- Achieve maximum speed of the factory engine and quickly secure the structure;
- Listen and find the moment at which a spark instantly appears;
- Turn the breaker until there is a clear clicking sound;
- Fix the standard distributor fasteners.
In some cases, a strobe light will help to correctly adjust the existing gap.
To configure you need:
- Warm up the power unit of the walk-behind tractor;
- Connect the device to the electrical power supply network of the agricultural unit;
- Install the sound sensor on a high-voltage wire connected to one of the cylinders of the standard internal combustion engine;
- Carefully remove the vacuum tube and plug it with any available means;
- See where the light from the strobe will be directed - it should “look” towards the standard pulley;
- Start the engine and leave it idling;
- Scroll the distributor;
- Once the marks on the built-in pulley line up with the mark located on the cover of the device being used, turn the factory breaker nut all the way.
Each of these methods is suitable for adjustment on both gasoline and diesel walk-behind tractors. The main thing in the process of self-tuning is not to remove the coil and other elements of the ignition system - this can lead to disruption of the operation of the entire unit.
How to check the ignition coil on a walk-behind tractor?
Most often, this important element of the ignition of a walk-behind tractor is checked using a known working test sample. If during testing it turned out that after installing the sample everything began to work as it should, then the standard ignition coil of the walk-behind tractor is faulty.
However, not everyone has a test sample at hand. If it is not there, then you need to try to check the built-in coil in other ways. Before this, you need to eliminate any damage that may occur in the start button and high-voltage wiring. In addition, the user must carefully study the electrical diagrams, which indicate the location of the ignition system elements.
Further verification methods include:
- measuring the resistance of the built-in ignition coil. It is worth noting that it is not always used by users of agricultural machinery. First, the operator must know the exact parameters of the resistance created by the standard coil. Secondly, in addition to the inductor coil, the design of the ignition system contains semiconductor components required to generate the required electrical impulse. Problems with all these elements can only be identified when they are heated. To properly check the ignition coil, you will need to disconnect the cap and the standard armored wire from it. Knowing the exact resistance parameters of the built-in element, the operator will be able to understand which part of the system is faulty;
- checking the spark being created using a special device - it must be connected to the point where the electrical circuit is broken between the high-voltage wires of the standard coil and the spark plug;
- testing the coil using a spark plug built into the design - to do this, you need to unscrew the built-in spark plug and carefully place its body against the cylinder. Then you need to pull the starter handle and pay attention to the spark that forms between the factory contacts of the spark plug. It should be noted that this method of checking an existing coil is approximate - in this case the spark plug is not under load, which is why there is no compression in the internal combustion engine cylinder. As a result, the standard engine flywheel will rotate faster.
Each of these methods provides approximate information about the condition of the ignition coil. It must be remembered that you can find the exact cause of a part malfunction using specialized testers, which are available only in specialized workshops.
Magneto for walk-behind tractor - testing at home
The magneto on a walk-behind tractor is a structurally complex element that is in constant contact with high-voltage wiring and interacts with electricity. Due to operation of the walk-behind tractor in wet weather, accidental impacts and failures in the electrical power supply, this part gradually fails. Checking it for serviceability is quite simple, but the operator will have to act at his own peril and risk, since the only way to test the part in the field will be very dangerous for the entire ignition system.
To check the magneto of a walk-behind tractor, you will need:
- Carefully remove the cap from the candle screwed into its standard place and insert a small nail in its place. The latter must be clean, without signs of corrosion;
- The nail must be installed at a distance of 7 mm from the cylinder wall of the standard cylinder of the power unit of the walk-behind tractor;
- Start the engine of the agricultural unit;
- Check if a spark appears when starting the engine. It should be painted bright blue and clearly visible. If this is not the case, then the magneto has failed.
If the magneto breaks, it will need to be replaced. You can do this yourself by removing the faulty part and installing a new part.
What to do if there is no spark on the walk-behind tractor?
If after the tests it turns out that the spark has disappeared, then the cause of this breakdown must be sought in the main elements of the ignition system of the agricultural unit.
To do this you will need:
- inspect the spark plug - it needs to be unscrewed using a special key;
- the spark plug may be completely dry - this indicates that fuel is not entering the engine cylinder, that is, the fuel pipes are clogged or the carburetor is malfunctioning;
- in some cases, the part turns out to be wet from gasoline and motor oil. The reasons for this are an excess of lubricant contained in the fuel, or its leakage from the engine oil sump directly into the cylinder. In this case, the operator must remove the spark plug and dry it thoroughly. After this, you need to dry the cylinder, intensively pull the starter cable several times on the engine with the spark plug turned out;
- Most often, due to the lack of proper and timely maintenance of agricultural machinery, a thick continuous layer of soot and dried resinous deposits forms on the spark plug of a walk-behind tractor. To restore the candle, you need to carefully heat it with a lighter and wash off the remaining resin with clean gasoline. After this, the part will need to be dried and screwed into place. If this does not help, then the spark plug needs to be replaced.
It is important to be extremely careful when removing, cleaning, and reinstalling the spark plug. Any careless movement can damage the electrodes of the part, causing it to no longer generate a spark.
Other common engine starting problems
What to do if the walk-behind tractor engine operates intermittently and does not develop the required power? There may be several reasons for this behavior:
- Air filter clogged.
Air does not enter the carburetor, which means the fuel does not burn well - the filter will have to be cleaned or replaced.
Residues of fuel, as well as the products of its combustion, form a thick coating on the internal walls of the muffler, which must be removed.
- Carburetor clogged.
In this case, the assembly will have to be removed, disassembled and all its components properly cleaned. After this, the carburetor must be assembled and adjusted correctly.
- Wear of the cylinder-piston group.
Temperature and high loads take their toll, and even the strongest metal wears out and deforms over time. Such parts should be replaced immediately, otherwise you may pay for it with irreparable damage to the engine itself.
- Broken ratchet housing or ratchet
The presence of this problem is indicated by the absence of crankshaft movement when starting the engine. To replace the clutch housing and ratchet, you will have to completely disassemble the starting unit.
- Loosening the screws securing the starter housing to the engine housing.
If the starter cord does not return to its original position, the starter needs to be adjusted. To do this, the screws are loosened, and the position of the knot is set by hand so as to ensure normal return of the cord.
- Broken starter spring.
A fairly common reason for the starter cord not returning is the failure of the starter spring - it will have to be replaced.
Competent maintenance of its main units and components significantly increases the service life of any equipment. Efficiency of replacement of worn-out spare parts is also of great importance. Therefore, if the slightest failures or malfunctions occur, they should be addressed immediately - in the end, this will prevent much more serious and expensive problems.
Description
Agro walk-behind tractors are produced in Ufa at the Ufa Engine Production Association. This enterprise is a prominent representative of aircraft engine manufacturers in Russia.
The development of the Agro walk-behind tractor first began in 1996, and by 1998 it had already been put into mass production. Further, it has found wide application in farm lands and garden plots.
A special feature of Agro walk-behind tractors is that the engines are not purchased from abroad, but are produced directly at the factory. Thanks to this, the price of the device can be significantly reduced. At the same time, the build quality remains at a high level.
Initially, the production of Agro series walk-behind tractors was carried out at the Ufa Engine Plant. The model was released under the Agros brand, but was soon renamed.
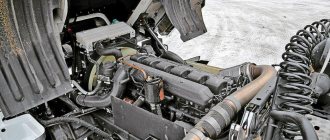
The UMZ-341 engine is installed on Agro walk-behind tractors. This is a single-cylinder, four-stroke device with an output of 8 hp. It successfully competes with imported models. There are simply no analogues to it among Russian manufacturers.
Recently, Lifan engines have become especially popular. They are an identical copy of the famous HONDA GX-220 model. At the same time, the price for the Lifan motor is significantly lower, which allows you to leave the price at the same level.
Engine UMZ-341 Engine Lifan-170F
Thanks to little mechanization, the designers managed to achieve great reliability and enviable power, while maintaining simplicity in the control process.
With the help of greater weight and higher traction force, the device produces maximum mechanization of manual labor.
- Carry out cultivation;
- Plow;
- Hill up potatoes;
- Carry out harrowing;
- Remove snow;
- Mow weeds;
- Transport goods over distances.
Which engine is better to put on a cascade walk-behind tractor?
It is necessary to take into account the fact that the domestically produced engines that were produced for this walk-behind tractor no longer exist. So you will need to choose among the imported assortment. But it’s almost impossible to find a part that meets all the parameters.
The following engines are most often installed on the Cascade:
- DM 68 is a good quality engine, which is recommended as one of the best options for installation on such equipment. Its main advantage is a reinforced transmission and high-quality assembly. Technical characteristics: power - 6 hp;
- fuel tank: 3.3 l;
- processing depth – 26 cm;
- processing width – 45/60/95 cm;
- number of gears: 2 forward, 2 reverse.
- reinforced transmission;
When purchasing an engine, pay attention to its build quality. It must meet all modern requirements, this will ensure the unit a long service life and operational efficiency
Specifications
| Name | Meaning |
| Overall dimensions, with the steering wheel positioned on the same axis with the steering rod, mm length width height |
| Weight, kg structural operational maximum | 150 ± 3 160 |
| Number of gears in transmission forward backward | 4 2 |
| Maximum ford depth, m | 0,3 |
| Limit values of the ambient temperature at which the operation of the walk-behind tractor is ensured | from -20 °С to +40ºС |
| Engine | |
| engine's type | Four-stroke, carburetor forced air cooling |
| Model | UMZ-341 |
| Rated power, kW (hp) | 5.88(8) at 3600 min-1 |
| Fuel | Automotive gasoline A-76 GOST 2084-77 or Normal-80 GOST R51105-97 |
| Transmission | |
| Clutch | Friction, conical "dry" type, permanently closed with manual control |
| main gear | Pair of bevel gears with circular teeth |
| Differential | Gear, bevel with 2 satellites with forced locking |
| Final drives | Single-stage spur gears |