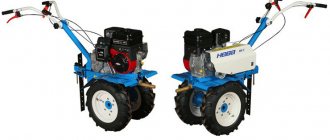
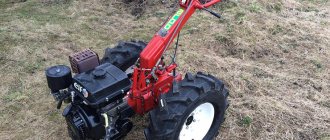
Motoblocks today are perhaps one of the most popular agricultural machinery, which has found its application both in farming and in summer cottages. These units will efficiently process any soil in a fairly short time without much difficulty. Everyone knows that any technology tends to fail. This also applies to walk-behind tractors. Now we will analyze several cases of breakdowns of the Cascade walk-behind tractor and give short instructions for eliminating them.
Repair of the walk-behind tractor ignition system (weak spark)
Many households have walk-behind tractors and walk-behind cultivators, which greatly facilitate work in the garden.
So I have such a unit. It was purchased back in the 90s and all this time it served me faithfully; it was, as they say, capable of everything. And I, in turn, tried not to offend him. So we lived with him in perfect harmony. But lately the walk-behind tractor has suddenly become more difficult to start. It took a lot of effort to revive the engine. I began to figure out what was the matter. Suspicion fell on the ignition system - the spark was very weak.
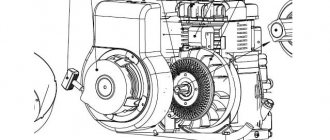
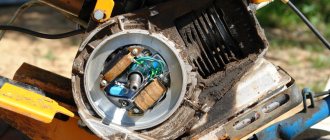
After surfing the Internet, I read a lot of advice and settled on one. So, the cause of a weak spark may be aging of the magnets attached to the engine flywheel. When they rotate, the magnetic field crosses the turns of the coils attached to the body, which leads to the appearance of an electric current.
EVERYTHING YOU NEED FOR THIS ARTICLE IS HERE >>>
Having learned about the price of a new flywheel, which needed to be replaced, I decided to remake the ignition system of the walk-behind tractor and make a battery-powered one from the factory transformer ignition system.
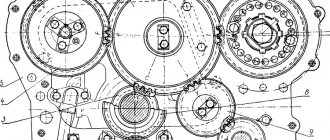
I visited a car dismantling shop and bought an ignition coil from a VAZ 2101-2107 for 300 rubles, took 10 batteries (element 33) from the store, and at home I found 2 m of PGVA wire with a cross-section of 1.5 mm. I grouped the batteries and wrapped them with electrical tape. I soldered them together in series, i.e. I got 15 volts on the output wires. I connected the negative wire to the body of the walk-behind tractor, having previously cleaned the contact point, and assembled the electrical circuit (see figure)
If there is no suitable switch, then you can do without it. You just need to connect the wires while the walk-behind tractor is running.
Then he pumped up the gas, according to the instructions, wound the starting rope around the flywheel drum, pulled - and the walk-behind tractor started up like a young one. This was last fall, and I still managed to plow the entire potato plot with a plow. In winter I put my iron friend in a barn. Spring has come. He pulled out the walk-behind tractor, checked the oil in the crankcase, filled it with gasoline, connected the wires - and the engine started working. With his help I planted potatoes. That is, the batteries overwintered well.
Other works
Sometimes on Cascade walk-behind tractors the reverse belts need to be replaced. Usually they resort to it if it is impossible to adjust the tension due to severe wear or complete rupture. Important: only those belts that are adapted for a specific model are suitable for replacement. If you supply the wrong components, they will quickly become worn out. Before replacing, turn off the engine and place it in zero gear.
Remove the insulating casing. Worn belts are removed, and if they are stretched to the limit, they are cut off. After removing the outer pulley, pull the belt onto the remaining pulley inside. Return the part to its place. Carefully check that the belt is not twisted. Put the casing back.
Very often it is necessary to disassemble the trigger mechanism in order to get rid of its malfunctions. Problematic springs do not need to be replaced. Sometimes they simply anneal the tip of the part with torches. Then the desired contour is reproduced with a file. Then the attachment of the spring and drum assembly returns to normal. It is wound onto the drum, the free edge is placed in the slot on the fan housing and the starter drum is centered.
Bend the “antennae”, cock the drum counterclockwise, and release the fully cocked spring. Align the holes of the fan and drum. Insert the starting cord with the handle, tie a knot on the drum; The tension of the released drum is held with the handle. The starting cord is changed in the same way. Important: all this work is easier to do together.
If the gear shift knob is broken, remove the rotating head from it, knocking out the pin with a hammer. After unscrewing the screw, remove the bushing and fixing spring. Then remove the remaining parts that interfere with the repair. Only problematic parts of the gearbox are replaced without disassembling the entire device. Do the same when you need to remove the ratchet.
If the shaft has fallen out, then only devices with the appropriate length, diameter, number of teeth and sprockets are purchased for replacement. When the speed controller sticks (or, conversely, is unstable), you need to turn the screw that sets the amount of mixture. As a result, the drop in speed will no longer be sharp, forcing the governor to open the throttle. To reduce the risk of breakdowns, you need to take care of proper maintenance of the walk-behind tractor. Maintenance (MOT) must be carried out every 3 months.
To learn how to repair the decompressor of the Cascade walk-behind tractor, see the following video.
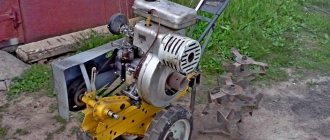
A few more words about the use of a walk-behind tractor.
When planting potatoes, one trouble was discovered. During this process, you must first make holes, throw humus, superphosphate and ash into them, mix everything, and then put in the tubers. But after all the preparatory procedures, the ground turns into a trampled area, along which a herd of elephants seems to have passed. So I used the following method:
- I loosen the soil with a walk-behind tractor (one pass),
- I make holes in the loose soil, fill them with fertilizers, mix and throw in the potatoes,
- I start the walk-behind tractor and loosen the soil along the holes,
- I repeat the process with holes, fertilizers, potatoes.
The process, of course, is not fast, but after planting is completed there is not a single trace on the field, and when the time for hilling approaches, you don’t feel sorry for the time spent planting.
The walk-behind tractor withstood starts and stops during manipulations with the holes, that is, it confirmed the functionality of the modernized ignition system. I hope that my advice will help other fans of tinkering with technology to restore their iron horses.
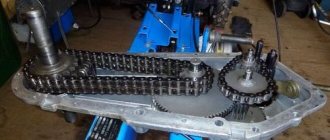
Working with a gearbox (reducer)
Sometimes there is a need to repair the speed switch. Oil seals are changed immediately when faults are detected. First, the cutters located on the shaft are removed. Clean them from all contaminants. Remove the cover by unscrewing the bolts. Install a replacement oil seal and, if necessary, treat the connector with a portion of sealant.
Walk-behind tractor ignition device
The ignition system is one of the most important components of both branded and homemade walk-behind tractors. Its main function is to generate a spark, which is needed for ignition and gradual combustion of fuel in the chrome-plated cylinder of the internal combustion engine.
The simplicity of the factory design of the unit allows you to perform your own repair of the ignition of a walk-behind tractor, which, most often, involves setting a gap between its elements. However, to do this correctly, you need to study the design of the unit.
The ignition device of any household agricultural unit includes a coil, which is initially connected to the electrical power supply of the system, as well as a magneto and spark plugs. When starting the power unit of the walk-behind tractor, voltage is supplied, as a result of which a pronounced spark is formed between the magnetic “shoe” and the standard spark plug. It is necessary for instant ignition of the fuel, which at this moment is in the combustion chamber of the engine. The photo will tell you more about the structure of the ignition system of the walk-behind tractor used.
The electronic ignition system of a walk-behind tractor is also often equipped with breakers that are triggered automatically when any unit malfunction occurs. This leads to an emergency shutdown of electrical power in the network.
How to check the ignition coil on a walk-behind tractor?
Most often, this important element of the ignition of a walk-behind tractor is checked using a known working test sample. If during testing it turned out that after installing the sample everything began to work as it should, then the standard ignition coil of the walk-behind tractor is faulty.
However, not everyone has a test sample at hand. If it is not there, then you need to try to check the built-in coil in other ways. Before this, you need to eliminate any damage that may occur in the start button and high-voltage wiring. In addition, the user must carefully study the electrical diagrams, which indicate the location of the ignition system elements.
Further verification methods include:
- measuring the resistance of the built-in ignition coil. It is worth noting that it is not always used by users of agricultural machinery. First, the operator must know the exact parameters of the resistance created by the standard coil. Secondly, in addition to the inductor coil, the design of the ignition system contains semiconductor components required to generate the required electrical impulse. Problems with all these elements can only be identified when they are heated. To properly check the ignition coil, you will need to disconnect the cap and the standard armored wire from it. Knowing the exact resistance parameters of the built-in element, the operator will be able to understand which part of the system is faulty;
- checking the spark being created using a special device - it must be connected to the point where the electrical circuit is broken between the high-voltage wires of the standard coil and the spark plug;
- testing the coil using a spark plug built into the design - to do this, you need to unscrew the built-in spark plug and carefully place its body against the cylinder. Then you need to pull the starter handle and pay attention to the spark that forms between the factory contacts of the spark plug. It should be noted that this method of checking an existing coil is approximate - in this case the spark plug is not under load, which is why there is no compression in the internal combustion engine cylinder. As a result, the standard engine flywheel will rotate faster.
Each of these methods provides approximate information about the condition of the ignition coil. It must be remembered that you can find the exact cause of a part malfunction using specialized testers, which are available only in specialized workshops.
Reverse belt
While on modern walk-behind tractors the reverse gear is switched off using a gearbox, which is directly connected to the engine, on the “Luch” a belt is used to transmit torque .
In fact, it is one of those parts that distinguishes the Luch walk-behind tractor from modern technology.
The reverse belt is subject to increased wear, and therefore an experienced beam owner always keeps several belts in reserve at once - sometimes they can be difficult to purchase, despite the fact that this walk-behind tractor is quite common.
Its marking is Z(0)- 1400 and it is easier to order it through an online store where there is a pre-order service.
In order not to find yourself in a situation where a malfunction has occurred and you cannot use your Luch walk-behind tractor, it is better to keep belts in the amount of at least two of each type. Such thriftiness will help you quickly replace them, even on the field, during work.
In general, a good way to keep all equipment in working order is to have spare consumables for all components. This is especially important if such consumables tend to break down quickly.
Magneto for walk-behind tractor - testing at home
The magneto on a walk-behind tractor is a structurally complex element that is in constant contact with high-voltage wiring and interacts with electricity. Due to operation of the walk-behind tractor in wet weather, accidental impacts and failures in the electrical power supply, this part gradually fails. Checking it for serviceability is quite simple, but the operator will have to act at his own peril and risk, since the only way to test the part in the field will be very dangerous for the entire ignition system.
To check the magneto of a walk-behind tractor, you will need:
- Carefully remove the cap from the candle screwed into its standard place and insert a small nail in its place. The latter must be clean, without signs of corrosion;
- The nail must be installed at a distance of 7 mm from the cylinder wall of the standard cylinder of the power unit of the walk-behind tractor;
- Start the engine of the agricultural unit;
- Check if a spark appears when starting the engine. It should be painted bright blue and clearly visible. If this is not the case, then the magneto has failed.
If the magneto breaks, it will need to be replaced. You can do this yourself by removing the faulty part and installing a new part.
The unit does not work or is unstable
It’s logical to start analyzing possible breakdowns with the following situation: the “Cascade” walk-behind tractor starts up and immediately stalls. Or it stopped starting altogether. The most likely reasons are:
- excess gasoline (this is indicated by the humidity of the candle);
- in models with an electric starter, the problem often lies in the battery being discharged;
- the total engine power is insufficient;
- There was a problem with the muffler.
The solution to each of these problems is quite simple. So, if a lot of gasoline is poured into the gas tank, be sure to dry the cylinder. After this, start the walk-behind tractor using a manual starter. Important: before this, the candle must be unscrewed and also dried. If the manual starter works but the electric starter does not, then the battery needs to be charged or replaced.
If the engine does not have enough power to operate normally, it must be repaired. To reduce the likelihood of such a breakdown, you must use only impeccable quality gasoline. Sometimes the carburetor filter becomes clogged due to poor fuel. You can clean it, but it’s better - we repeat again - to perceive such an event correctly and stop saving on fuel.
Sometimes adjustment of the KMB-5 carburetor is required. Such devices are installed on lightweight walk-behind tractors. But this does not diminish the importance of their work. After repairing a failed carburetor, only suitable grades of gasoline should be used to flush individual parts. Attempts to remove contaminants using a solvent will result in deformation of the rubber parts and washers.
You need to assemble the device as carefully as possible. Then bending and damage to parts will be avoided. The smallest parts of carburetors are cleaned with a thin wire or steel needle. Be sure to check after assembly whether the connection between the float chamber and the main body is tight. You should also evaluate whether there are any problems with the air filters or whether there are fuel leaks.
The actual adjustment of the carburetors is carried out either in the spring, when the walk-behind tractor is rolled out for the first time after the “winter vacation,” or in the fall, when the device has already been working for a very long time. But sometimes this procedure is resorted to at other times, trying to eliminate the shortcomings that have arisen. The typical sequence of steps is:
- warming up the engine in 5 minutes;
- tightening the adjusting bolts of the smallest and largest gas to the limit;
- unscrewing them one and a half turns;
- setting the transmission levers to the smallest stroke;
- setting low speeds using the throttle;
- unscrewing (slightly) the throttle screw to set the idle speed - with the engine running continuously;
- stopping the engine;
- assessment of the quality of adjustment by a new start.
To eliminate errors in the process of setting up the carburetor, you must check each step with the operating instructions. When the work is done normally, there will be no extraneous noise in the motor. Moreover, failures in any of the operating modes will be excluded. Then you will need to observe the sounds that the walk-behind tractor makes. If they differ from the norm, a new adjustment is needed.
Useful videos
Different branded walk-behind tractors produced by well-known brands differ from each other in the design of the built-in ignition system. To know how to properly adjust this important element, we offer videos that contain the correct procedure for setting up the ignition system on the most common models of walk-behind tractors.
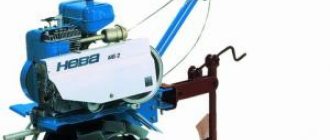
For Neva brand walk-behind tractors:
For Agro brand models:
For agricultural implements produced by the Ural brand;
For Mole walk-behind tractors:
For Bison models:
For Salyut brand walk-behind tractors:
For Honda agricultural implements:
For the model range produced by Cascade:
For MTZ brand walk-behind tractors:
Why does the Cascade walk-behind tractor have no spark?
Auto mechanic, specializes in agricultural equipment
If there is no spark, then the entire electronic ignition circuit of the Cascade walk-behind tractor should be checked. The walk-behind tractor itself is one of those equipment options that require ignition adjustment. Why there is no spark on the walk-behind tractor may depend on various factors. For this reason, you will need to configure the entire ignition system step by step.
How to set the ignition
Before you set the ignition on the walk-behind tractor, you will need to check the serviceability of all other systems. There are various options among motor-cultivators, but the ignition adjustment on the walk-behind tractor itself is carried out according to a standard plan.
You can adjust the system on the Cascade walk-behind tractor in stages:
- the operation of the flywheel is checked in the period before contact opening, which occurs in the internal part of the magneto;
- the distance between the parts, which are called an anvil and hammer, is measured;
- the flywheel rotates until piston compression;
- at the top point the flywheel rotates again until the overrunning clutch engages. Triggering will be indicated by a one-time knock, similar to a click;
- the flywheel rotates counterclockwise until two marks come together. One of them is located on the body;
- the distance between the contact parts is adjusted. The minimum for the Cascade is regulated as a gap of 0.25 mm, and the maximum is 0.35 mm;
- the built-in cam is secured with a special screw located above.
In this video you will learn how to adjust the ignition system: The video can show you how to carry out the adjustment process. It needs to be watched in advance, especially if there is no relevant experience in handling this equipment.
Important! Adjustment and tuning are necessary for proper operation, as well as the absence of accelerated wear of various elements of equipment, including the piston group. This is due to faster and smoother startup.
Timely adjustment reduces the likelihood of the need for further repair of the walk-behind tractor's ignition system.
Important points to consider:
- The walk-behind tractor ignition system is one of the main components in the mechanism;
- the setup is easy to carry out due to the simple design of the equipment, but you must follow the entire established procedure, since otherwise breakdowns are possible;
- without experience and knowledge, adjustment should be carried out by a specialist;
- Different models have their own characteristics, which are always specified in the operating instructions. This point may apply to different gap sizes in the model range;
- if the adjustment is not made in a timely manner, this may damage adjacent mechanisms and components;
- for an independent setup process, a complete study of the design diagrams of each specific walk-behind tractor is required, in particular, the various engine options, which can be either gasoline or diesel;
- the correct ignition process corresponds to a simple action - the magneto cover distributes the spark, and the lower part of this device interrupts it.
Important! The adjustment process is carried out only when the equipment, as well as all components and systems, are in full working order.
According to the regulations, the ignition must be set in several cases:
- after troubleshooting the ignition system;
- at the beginning of the season;
- during a scheduled technical inspection;
- after any repair work;
- after the end of the season;
- after a long period of inactivity;
- during break-in.
It is worth considering that when setting the ignition, the equipment must also be run in. This allows you to fix many problems at once. All systems can be adjusted in various ways, but the standard option is the simplest.
Description
Motoblocks "Cascade" have proven themselves as reliable farmer's assistants. These are productive, durable machines capable of working with a full range of mounted implements, performing the functions of a cultivator, plowing machine, mower, snow blower and many others.
In order for the walk-behind tractor to work without failures for many years, you must follow the instructions during its operation.
Timely maintenance of the walk-behind tractor is also important. For the Cascade, the maintenance schedule is the same as for any other household walk-behind tractor:
- scheduled maintenance: once a season, at the end of seasonal work and before it begins (at the beginning and end of spring, at the beginning and end of summer, etc.);
- regular mini-inspection - every day upon completion of work and turning off the walk-behind tractor, as well as an external inspection in order to identify damage, chipped paint, etc.;
- winter storage - is allocated to a separate maintenance category, since it involves draining all fuels and lubricants and storing the walk-behind tractor in a room with a positive temperature; upon completion of the winter “preservation” the unit is refilled with fuel and lubricants;
- annual engine prevention (detecting faults, eliminating them, maximizing the service life of the motor and other key components of the unit).
Next, we will look at the basic rules and requirements for fuels and lubricants, the process of starting and running in the Cascade walk-behind tractor, as well as the most common malfunctions of these devices.
No spark: how to fix the problem
For ignition to occur, all elements in the ignition system must be in good working order. The most common problem is the lack of spark. Among the various options, there are two most common - carbon deposits have formed, or the spark plug is not working properly.
There may be several reasons why there is no spark.
The first step is to unscrew the candle. After this, you need to inspect it, including the side and central electrodes. If there is carbon deposits, then, in addition to cleaning, it is necessary to check the entire fuel system of the walk-behind tractor. Another common mistake is using the wrong fuel and oil, which leads to carbon deposits and flooding of the spark plug.
Among the fuels for gasoline engines, both 92 and 80 gasoline can be used. The main point is to use high-quality and suitable oil.
A number of walk-behind tractors are not demanding on oils, but for all-season work it is worth using seasonal oil. For example, for summer we recommend mineral type 4TD STANDARD SAE 30, and for winter - 4TD ULTRA SAE 5W-30.
Checking the ignition coil
For any unit, before checking the ignition coil, you need to check the spark plug and system wires. The coil is checked according to the standard principle as the magneto, that is, a working spark plug is used, and it will be necessary to check for the appearance of a spark.
There are several signs that the coil is not functioning fully or is faulty:
- the spark is weak or completely absent;
- there is a smell of melted plastic in the place where the mechanism is located;
- When trying to start the vehicle, a cracking sound is heard.
Important! To fully inspect the coil, it is necessary to completely dismantle it.
Don't forget to check the ignition coil
Dismantling work is carried out carefully and in stages. First you need to unscrew the mounting bolts and remove the cover. After this, the high-voltage wire is disconnected. The coil is pryed up and carefully pulled out. The main point of the inspection is to look for black melted spots. They will indicate that the current did not flow to the spark plug. Most often, this problem occurs with contactless ignition options. All this leads to increased voltage on the coil and melting.
The main problem with no current reaching the spark plug is the presence of bad contacts on the high-voltage wire.
All repair work consists of stripping the wires. The best option would be to replace them completely.
Important! If there is an electronic ignition option, then in the event of a malfunction the wire will turn off automatically due to the presence of a special type of fuse. Other options require manual shutdown.
If the coil is good, then the next option is to check the magneto.
Valve adjustment
This procedure is carried out only on a cooled engine. Metal expanded from heating will not allow it to be completed correctly and accurately. You will have to wait approximately 3 or 4 hours. It is recommended to first blow off the motor with a jet of compressed air, and ideally, wash it. Having disconnected the wires from the spark plugs, unscrew the bolts from the resonator. The resonator itself will have to be removed, while acting as carefully as possible so that the mount remains in place.
Disconnect the PCV valve and power steering bolt. Using pliers, dismantle the ventilation duct of the block head. Unscrew the bolts securing the cover of this head. Wipe everything thoroughly to prevent contamination. Remove the timing cover.
Turn the wheels to the left until they stop. Remove the nut from the crankshaft and turn the shaft strictly counterclockwise. Now you can inspect the valves and measure the gaps between them with feeler gauges. To adjust, loosen the locknut and turn the screw, ensuring that the feeler gauge slides into the gap with little force. After tightening the locknut, the gap must be assessed again to ensure that it does not change during the tightening process.
Magneto check
If there is a problem with the ignition system, a standard magneto performance test is used. The first step will be a visual inspection. Next, the spark plug is cleaned and checked for stable operation, that is, serviceability. A cap is put on one end of the spark plug, and the second is brought to the body of the magneto. After this, the motor flywheel is started by hand.
No spark means the mechanism is faulty. It is worth considering that if there is any problem with the magneto, it will have to be completely replaced. This is mandatory, since this approach prevents wear and tear on other elements of the unit.
Important! All options for checking the system are similar for most types of walk-behind tractors, including the model range of Cascade, Neva, Salyut, Ural and other options.
Before installing the ignition system and running it in, it will be necessary to completely eliminate all problems, as well as replace non-functioning parts. In order to avoid most ignition problems, you will need to follow several rules:
- promptly check and replace damaged or non-functioning elements;
- do not use the equipment in the rain or during sudden temperature changes;
- during intensive use, allow the equipment to cool down;
- use protective plates that will protect the mechanisms from moisture;
- use only high-quality oils and fuel;
- Carry out regular inspection and maintenance.
All these rules will help to avoid most problems with the ignition system.
If there is no spark in the Cascade, then a series of checks of the entire system will be required. You need to start with a candle, since its serviceability is the basis for further actions. After a complete check and replacement of all necessary elements, a run-in is carried out in conjunction with setting the ignition according to a standard plan, similar to most walk-behind tractors.
Operating and Maintenance Instructions
Cascade walk-behind tractors are presented in a wide range of different modifications. Thanks to this, they are used on agricultural plots of various sizes. With proper use, Cascade walk-behind tractors can last for a long period of time. However, you need to know how to properly maintain and repair these machines.
If you purchased a Cascade walk-behind tractor, you should read the operating instructions before starting operation.
When purchasing this machine from the factory, it must be included as standard; if you purchased it second-hand, then ask the old owner to provide an instruction manual for the Cascade walk-behind tractor. However, this is a little book that sometimes tends to get lost. Now you can find an electronic version of the instructions on the Internet.
Here are a few facts that anyone who owns this equipment should definitely know.
Oil and fuel
Every owner should know what oil and fuel his Cascade walk-behind tractor works with.
Regardless of what kind of engine you have (Russian-made or Chinese Lifan), you must use only high-quality clean fuel AI-92 or AI-95. Do not use old or dirty gasoline. It can clog the fuel system.
Fuel is taken from the gas tank not from the bottom of the tank, but a little higher. This prevents dirt and dust from entering further into the carburetor, but it simply settles to the bottom.
Changing the oil in the engine of the Cascade walk-behind tractor:
According to the instructions for use, it is recommended to use Soviet oils in accordance with GOST. However, the time of the USSR has already passed, and now you can find higher quality imported motor oils with improved characteristics. In summer, you can use 15W-40 series, and in winter, semi-synthetic 10W-40.
The oil should be changed every 20 hours of operation of the Cascade walk-behind tractor.
The situation is similar with the transmission. The manufacturing plant recommends using Soviet TAP-15v or TAD-17i. However, 75W-90 or 80W-90 can be used instead.
To change the transmission oil, tilt the walk-behind tractor back and pull out the plug. Before doing this, place the container for drainage. Excavation causes great harm to the soil, so you should not pour it there.
Control levers are lubricated with Litol or Solidol.
First launch and run-in
The successful use of the walk-behind tractor in the future depends on the correct start of use. And an important stage is running-in.
These are the first hours of operation of the new device. In this way, the parts rub against each other and fit neatly into the grooves, so it is not allowed to heavily load the device at this time. The highest load should be half the maximum power. Otherwise, parts may fail before full operation begins.
If you are the first owner of a Cascade walk-behind tractor, then fill the crankcase with oil! It is not included in the factory configuration. And if you forget to fill it, there will be excessive friction, and the parts will fail again.
Since Cascade walk-behind tractors are representatives of a professional family, when purchasing it the owner expects it to work for a long time and help in carrying out agricultural work, and do not forget about running it in before starting.
Major breakdowns
Cascade walk-behind tractors have gained immense popularity due to the large number of compatible attachments and easy maintainability. You can easily configure and repair almost all parts of the equipment.
The most common reason for parts failure is their natural wear and tear. In order for the walk-behind tractor to serve for a long time, it is necessary to carry out tuning and regular scheduled technical inspections.
The main malfunctions include:
- Problems with spark plugs (contact came loose, gap changed, oxidized)
- Lack of oil (you need to check its level before each trip);
- The gasket on the cylinder is worn out;
- Dirt and debris have entered the fuel system (so gasoline does not flow into the carburetor);
- The tension of the chain or belt on the pulley has changed (as a result, the torque changes).
Let's take a closer look at the main breakdowns and ways to repair them.
- The transmission gets very hot during operation
The main reasons for this behavior are worn bearings, friction, lack of gear oil or its poor quality. The first thing you should try is to replace the transmission oil with new one. If this does not help, then disassemble the transmission and look at the condition of the bearings. Most likely, one of them has failed.
- The walk-behind tractor does not work smoothly
If the engine is running stably, but the Cascade is slipping or breaking out, look at the condition of the tread on the wheels. Most likely it has worn off. It is not allowed to work on tires that are too worn. If the treads are fine, the reason may be different tire pressures. And because of this, the walk-behind tractor will constantly move in one direction and behave incorrectly.
- Walk-behind tractor Cascade vibrates during operation
This nuance occurs when the attachment is connected incorrectly or is not fully secured. Before starting operation, you should always check the bolted connections and the reliability of their fixation.
- The engine is difficult to start
There may be several problems here:
- Initially, carry out a visual inspection for damage;
- If everything is fine, check if there is gasoline in the gas tank (there should be more than half of it and of good quality);
- If the walk-behind tractor is on an inclined plane, then place it on a flat surface;
- Check the entire fuel system and whether there is fuel supply throughout the entire line;
- Inspect the ignition system to see if there is a spark;
- Check the carburetor and try adjusting the fuel mixture.