The ignition unit is the main mechanism present in the walk-behind tractor. It creates the spark necessary for the initial ignition of the fuel.
Author of the article
Petr Mikhailovich
I know everything about walk-behind tractors and tractors.
Motoblocks of new generations have been improved and are equipped with a simple design of the ignition unit, which allows the owner of the equipment to do debugging and repairs independently. In this case, it is worth considering the procedure to avoid major breakdowns.
Let's look at how to set up the ignition on a walk-behind tractor.
How to set the ignition on a walk-behind tractor
Let's look at how to adjust the ignition of a walk-behind tractor. The ignition system of the walk-behind tractor is quite simple. Before installing the ignition, it is important to make sure that this design produces a spark, which in turn will ignite the fuel liquid located in the internal combustion chamber.
In order not to turn to specialists for trifles and save your money, you need to understand how the ignition and ignition coil settings are adjusted. Let's look at how to set the ignition on the MB 1 and MB 2 walk-behind tractor.
You can set the ignition using a spark. It is necessary to turn the crankshaft so that the marks of the pulley and the gas mechanism coincide. The slider distributing the gas flows should point to the high-voltage wire of the cylinder.
You need to slightly unscrew the nut that changes the position of the mechanical structure that determines the moments of the high-voltage pulse.
Then you need to remove the high-voltage wire from the system cover. He is at its center. Then place the contacts at a distance of 5 mm from the cultivator.
After this, turn on the ignition.
Next, you need to turn the mechanical structure, which determines the ignition timing, clockwise to the 200 mark. Carefully turn the above-mentioned structure in the other direction.
All this must be done with extreme caution; the mechanical structure should not change its position in relation to the walk-behind tractor.
A spark occurs between the central high-voltage wire and the ground of the cultivator. After this, you need to quickly tighten the breaker nut to prevent ignition.
You can set the ignition by sound. If the owner has fairly good hearing, then this method of checking and adjusting the ignition is quite suitable. In other words, this is a non-contact test of candles.
The non-contact method involves the following procedure:
- First you need to start the engine.
- Then you need to loosen the distributor a little.
- Rotate the breaker body slowly on both sides.
- The mechanical structure, which determines the moment of spark formation, must be strengthened in the state of greatest power and the greatest number of revolutions.
- Next, listen carefully. When turning the intermittent system, clicks should be heard.
- After all the steps taken, you need to tighten the distributor nut.
The strobe method works like this:
- First you need to warm up the engine.
- After this, attach the strobe light to the walk-behind tractor.
- A sensor that responds to sound must be connected to the high-voltage wire of the cylinder.
- Remove the vacuum hose and plug it.
- The strobe light will emit a light that should be aimed at the pulley.
- Start the unit engine again and leave it idling.
- Turn the distributor.
- Fasten as soon as the pulley mark points to the mark marked on the cover of the walk-behind tractor.
- Tighten the breaker nut.
The above describes how to check the ignition coil. When installing the system, it is advisable to use the instructions, especially for owners who are encountering this for the first time.
Adjusting the reel is not a difficult task.
Motoblocks Salyut 5: a series of noteworthy models
The above-discussed device options are distinguished by their originality and the highest level of popularity. Representatives of the Salyut 5 series are somewhat inferior to them in terms of prevalence, but not at all in functionality. Before considering the specifics of each object, you should familiarize yourself with the general advantages of all representatives of the group.
- Multifunctionality;
- Significant width of the cutting elements of the cutters;
- Compactness and relative lightness;
- Adjustable steering wheel;
- Solid rubberized wheels;
- Ability to control the transmission and gearbox via the steering wheel;
- Reduced vibration levels through handles;
- The presence of 2 belts that increase the power of the unit;
- Equipped with a free pulley.
Long-term operation of machines by satisfied owners is clear evidence that these positive qualities correspond to reality.
Ignition coil repair and troubleshooting
There are situations when the cultivator does not start. This may be a problem with the coil system. For example, it is observed:
- There is a problem with the coil itself.
- There is a fault in the spark plug located in the coil.
- In the wiring.
- In the tip of a candle.
- To check the spark plug, you need to pull it out and inspect it. If there is carbon deposits on the electrodes, they can be heated with gas.
To check the magneto (coil), put a tip on the spark plug and bring the lower part to the coil. When the flywheel rotates, a spark should form. If this does not happen, then there is a malfunction in the ignition coil for the walk-behind tractor.
Setting up and checking the ignition for the Neva walk-behind tractor
There are several factors on which the ignition setting will depend:
- the specific model of the unit and the presence of SZ modifications;
- what kind of spark plugs are used;
- then at what time you will adjust the system - the primary adjustment is carried out during the first run-in, the secondary adjustment is carried out during subsequent work.
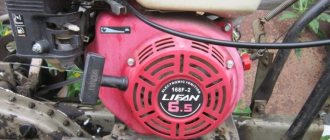
The video shows how easy it is to adjust the ignition of a walk-behind tractor with a LIFAN 168F engine in “field” conditions. The method is also applicable to cultivators with Russian engines
To correctly and quickly check the coil of Neva walk-behind tractors, you need to:
- Fold the A4 sheet 4 times.
- Loosen the module mounting bolts.
- Place the paper under the pillow.
- Press it down and hold it until the bolts are tightened.
- Turn the flywheel and check for spark.
There is also a second method, similar to the previous method of setting the ignition on a motor-cultivator engine, only a small piece of cardboard cut from a cigarette pack acts as a probe.
How to set the ignition on a cultivator
If the starter cable of the Neva cultivator is pulled frequently, over time the engine begins to start late. In this case:
- Place the square on the candle;
- Press the housing against the cylinder head and turn the ignition element away from the holes;
- Turn the crankshaft and tighten the cable several times;
- A spark should appear when tensioning; if there is none, the required gap between the flywheel and magneto should be adjusted.
Adjusting and tuning the magneto is quite simple. Most often, the cause of a malfunction of a walk-behind tractor coil is a spark plug. Therefore, every owner of a motor cultivator should have a set of spare spark plugs in his tool case.
The most popular spark plugs from well-known manufacturers are Bosch and Subaru.
Checking the spark plugs is done like this. In order to check the serviceability of the coil spark plugs of the MB and MB 1 walk-behind tractor, you need to follow the following instructions:
- Turn out the candle. Wipe the electrodes.
- If there is carbon deposits, clean it.
- Set the distance between the electrodes.
- Place a tip with a high-voltage wire on the spark plug.
- Press against the cylinder body. The electrodes should point in one direction under the spark plug.
- Rotate the crankshaft and observe the formation of a spark. If it is not there, then the fault is in the spark plug.
Step-by-step instructions for different models
Lifan 6.5
Adjusting the valves on a walk-behind tractor involves setting the correct gap under the valves.
The sequence of actions will be as follows:
- Remove the casing to get to the flywheel.
- Remove the valve cover. Below it there are two valves - inlet and outlet.
- To check the intake valve clearance, you will need a 0.15 mm feeler gauge, and for the exhaust valve, a 0.2 mm feeler gauge. When adjusted correctly, the dipstick should pass under the valve quite freely.
- To adjust, loosen the fastening nuts using a wrench. We insert the dipstick between the valve and the piston so that it does not slip, but is held tightly enough in this position. We tighten the nut.
- Replace the valve cover and flywheel housing.
Valve of Lifan 6.5 walk-behind tractor
Adjustment of devices Neva mb 2, Zirka 105
The process of adjusting the valves on the Neva MB 2 walk-behind tractor and a similar Zirka 105 walk-behind tractor:
- Let the engine run
and then cool a little. - We remove the casing.
- We remove the valve cover and get to the flywheels that are under it.
- Unscrew the locknut.
- The blade
that we insert into the gap should
pass very freely between the piston and the valve
. - Screw the entire system back.
How to properly adjust the valve of a Zip walk-behind tractor
What is the procedure for adjusting the valves on the popular zip walk-behind tractor:
- Open the flywheel.
- Unscrew the valve cover clockwise.
- We check the gap with a feeler gauge exactly as described above.
- Use a wrench to turn the nuts and loosen them a little.
- We close the system and conduct testing.
How to set up on an Agro walk-behind tractor
The valves on the Agro walk-behind tractor are adjusted as follows:
- We warm up the engine
, and then give it some time to cool down. - Remove the oil bath of the air filter.
- Next, you need to unscrew the flywheel housing, which is secured with 6 bolts.
- The marks on the flywheel are
0 (top dead center), 5, 10 and 20 (fuel injection). We compare the dead center of the flywheel with a mark located on the cylinder so that they are opposite each other. - Next, remove the valve cover.
- Below it are two valves. Loosen the locknut, then insert a razor blade under the valve. The blade must pass freely between the piston and the valve.
- Having achieved this, tighten the nut back
. Then we return the valve cover and flywheel housing to their place.
So, if necessary, you can use an identical scheme.
Cascade
Adjusting valves on the Cascade walk-behind tractor
- Remove the casing from the flywheel.
- Remove the valve cover.
- Turn the flywheel until the intake valve is pressed. Accordingly, the exhaust valve will be depressed.
- Next you need to achieve the correct clearance for each of the valves. According to the instructions, for the inlet this parameter is 0.15 mm, and for the exhaust - 0.20 mm.
- Using a feeler gauge, check the existing gap between the valve and the piston.
If the dipstick slips a lot, or it does not pass between them at all, then we will need adjustment. If there is no probe, then you can use a razor blade, the thickness of which is 0.1 mm. - To adjust, loosen the fastening nut, and then insert the feeler gauge into the space under the valve. Its optimal position would be a fairly tight movement between the piston and the valve, without slipping.
- If everything works out, tighten the nuts back
, and then put the valve cover and casing back in place.
The operating scheme is arranged in an identical way, so you can use one algorithm of actions, exactly the same as for adjusting the valves on the popular Centaur walk-behind tractor.
Repair and adjustment of ignition of the dm1k engine
The ignition system of a four-stroke engine of domestic production DM1K is electronic non-contact with magneto. The MB-2K model with a power of 6.5 hp and 7.5 hp is equipped with this engine.
If the ignition does not work, follow these steps:
- If, when checking for a spark, the spark plug turns out to be faulty, it should be replaced with a new one;
- check the candle holder and the wire going to it;
- check the serviceability of the ignition button and the integrity of the wiring;
- if all of the above is done, but the system does not work, then it is likely that the ignition itself is faulty and needs to be replaced.
Features of ignition adjustment on walk-behind tractors Cascade and LIFAN
The engines on the LIFAN and Cascade walk-behind tractors are equipped with an electronic ignition system that provides the spark plugs with a constant spark, so all the tips on how to adjust the system boil down to the following:
- Do not skimp on candles, give preference to Japanese manufacturers (for example, models BP6ES and BPR6ES(NGK)).
- Every 100 hours of engine operation, perform maintenance on the spark arrester and clean the filter from carbon deposits.
- Monitor the idle speed, it should be within 1700 (±150) rpm. Its deviation indicates a motor malfunction.
Do you adjust the SZ on the walk-behind tractor yourself or contact service centers?
Features of SKAT-1200A
- supplying the load with a constant stabilized voltage according to clause 2 of the table in the presence of voltage in the electrical network;
- optimal charge of the battery (hereinafter referred to as battery) in the presence of mains voltage ("MAIN" mode);
- automatic transition to backup power from the built-in battery (“RESERVE” mode) when the electrical network is disconnected;
- backup power supply of the load with constant voltage according to clause 2 of the table;
- protection against reverse polarity of battery terminals (self-restoring fuse);
- maintaining operability in the event of a break or short circuit in the battery circuit (if there is supply voltage);
- automatic protection (output shutdown for 1 minute) against short circuit or increase in output current above the maximum value (see table, clause 4);
- automatic restoration of operability (nominal parameters) after eliminating the causes of an increase in the output current above the maximum value or short circuit;
- light indication ("NETWORK" indicator) of the presence of mains voltage ("MAIN" mode);
- light indication ("Battery" indicator) of the presence (within normal limits) of a serviceable and charged battery;
- light indication ("OUTPUT" indicator) of the presence of output voltage ("OUTPUT" indicator);
- light alarm (battery indicator blinks once per second) indicating the imminent shutdown of the output voltage due to battery discharge;
- light signaling (short-term switching on of the battery indicator once every 4 seconds) about turning off the output voltage in the “RESERVE” mode due to the battery being discharged;
- battery protection in case of short circuit in the load;
- battery protection from deep discharge;
- automatic generation and transmission to external circuits of an information signal in the open collector (“OK”) format: about the absence of network voltage “TRANSFER TO RESERVE”;
- “cold start” function: restoring the source’s functionality when connecting a working and charged battery in the absence of mains voltage;
- time of technical readiness for work is no more than 20 seconds. after connecting to a mains voltage source or battery;
- maintaining operability both during and after exposure to elevated and/or reduced ambient temperatures, increased relative humidity and increased sinusoidal vibration.
Walk-behind tractor ignition system: how to set the ignition yourself
The ignition system of a walk-behind tractor is an important element of an agricultural unit.
Its task is to form a spark to ignite the fuel. Periodically, it is necessary to repair the ignition of the walk-behind tractor due to incorrect operation or wear of the main parts of the unit. The breakdown must be repaired as quickly as possible to prevent wear and tear on other spare parts and systems.
Magneto for walk-behind tractor - testing at home
The magnet on a walking tractor is a structurally complex element that is in constant contact with high-voltage wiring and interacts with electricity. Due to the operation of the walk-behind tractor in wet weather, accidental impacts and power outages, this part gradually fails. It is quite easy to check that it is working correctly, but the operator will have to act at his own risk, because the only way to check the part in the field will be very dangerous for the entire ignition system.
How to set the ignition on a walk-behind tractor?
Adjusting the ignition may be necessary if you have to repeatedly pull the starter cable or the engine does not start immediately, but after a delay.
You need to do the following:
- Place a square on the spark plug. The body is securely pressed against the cylinder head, the element rotates in the other direction from the hole on the cylinder head;
- The crankshaft turns. You need to tighten the starter cable a couple of times. When the cable is pulled, a blue spark should be visible that jumps between the electrodes;
- If there is no spark, check the gap from the flywheel magnetic shoe to the starter. The optimal distance is 0.1 millimeters.
So, installing the ignition will not take more than half an hour. If you perform simple manipulations correctly and in a timely manner, you can prevent wear of other parts and systems of the walk-behind tractor under high loads.
No spark: how to fix the problem
For ignition to occur, all elements in the ignition system must be in good working order. The most common problem is the lack of spark. Among the various options, there are two most common - carbon deposits have formed, or the spark plug is not working properly.
There may be several reasons why there is no spark.
The first step is to unscrew the candle. After this, you need to inspect it, including the side and central electrodes. If there is carbon deposits, then, in addition to cleaning, it is necessary to check the entire fuel system of the walk-behind tractor. Another common mistake is using the wrong fuel and oil, which leads to carbon deposits and flooding of the spark plug.
Among the fuels for gasoline engines, both 92 and 80 gasoline can be used. The main point is to use high-quality and suitable oil.
A number of walk-behind tractors are not demanding on oils, but for all-season work it is worth using seasonal oil. For example, for summer we recommend mineral type 4TD STANDARD SAE 30, and for winter - 4TD ULTRA SAE 5W-30.
Important! When carbon deposits occur, the entire fuel system is checked for leaks and damage to the structure of the fuel hoses.
A spark plug for a walk-behind tractor should also be in the category of high quality and recommended for this model. Information on the most suitable options can be found in the operating instructions.
Step-by-step action if there is no spark:
- unscrew and clean;
- for complete cleaning, heating is used, after which all carbon deposits from dried fuel are scraped off;
- the tip is put on the upper section of the candle;
- the spark plug is brought to the motor body, taking into account the distance to the electrode of 1 mm;
- the second hand is required to start the engine.
If a spark does not appear, then you will need to adjust the distance between the side and central electrodes. The thin blade should fit tightly between them. If you need to move the electrode, you will need to gently tap the back side until mixed. After this, the spark plug is also checked.
Important! Spark plugs must be changed regularly, especially for starts after inactivity or at a high level of operation. The standard spark plug change is every three months.
If the spark plug is serviceable, then the lack of a spark may be due to the ignition coil on the walk-behind tractor, the magneto, or faulty wiring.
It must be taken into account that it is the spark plug that is initially checked, after which the remaining mechanisms and elements of the system are inspected and adjusted. Also, for any checks of the functionality of the walk-behind tractor or setting the ignition, only stably working and serviceable spark plugs are used.
What to do if there is no spark on the walk-behind tractor?
The causes of ignition system malfunctions in most cases are related to spark plugs. Often the spark plug becomes oversaturated from too much engine oil. Once on the part, it prevents a spark from occurring.
When the spark disappears, you need to act as follows:
- The spark plug is unscrewed with a special key. The element is turned and carefully removed; the sealing ring must also be unscrewed;
- If the spark plug is dry, this indicates that fuel is not supplied to the engine cylinder;
- If the spark plug is too wet, this indicates too much engine oil. The spark plug is wiped and the cylinder is dried. For this purpose, the starter cable is tensioned;
- If there is hard carbon deposits on the spark plugs, you can use gasoline and coarse sandpaper to clean it.
Such manipulations can be performed on a diesel walk-behind tractor and on gasoline models. It is important to carry out all actions as carefully as possible without damaging the part.
Probable Cause
| Type of malfunction | Probable Cause |
| 1. Rotors (cutters) rotate unevenly or slowly | 1. Significant soil sticking to the cutters or large objects falling into them. 2. V-belt slippage |
| 2. When the engine is running and the clutch is engaged, the rotors (cutters) do not rotate | 1. Broken clutch cable. 2. The V-belt has jumped off the pulley. 3. Breakage of V-belts. |
Magneto for walk-behind tractor
The principle of operation of a magneto on a walk-behind tractor is similar to an ignition coil - it is responsible for the appearance of a spark.
You can check the magneto of a walk-behind tractor as follows:
- The cap is removed from the top of the candle and a nail is inserted. All manipulations must be performed as carefully as possible so that after rechecking the spark plug can be re-installed in place;
- The nail is located seven millimeters from the cylinder of the unit;
- The spark plug is returned to its standard position and the walk-behind tractor engine is started;
- A spark should form during the start. At the same time, it will be strong, with a blue tint. If the spark is different, this indicates that the problem has not been resolved.
When checking the magneto, it is important to follow these rules:
- The spark plug does not come out completely. This can cause a loss of compression, causing the flywheel to rotate much faster;
- This method is ineffective if an electronic ignition system is installed. Problems may also arise with key components of the system;
- The distance between the nail in the spark plug cap and the cylinder varies and depends on the specific design of the unit.
A few more words about the use of a walk-behind tractor.
When planting potatoes, one trouble was discovered. During this process, you must first make holes, throw humus, superphosphate and ash into them, mix everything, and then put in the tubers. But after all the preparatory procedures, the ground turns into a trampled area, along which a herd of elephants seems to have passed. So I used the following method:
- I loosen the soil with a walk-behind tractor (one pass),
- I make holes in the loose soil, fill them with fertilizers, mix and throw in the potatoes,
- I start the walk-behind tractor and loosen the soil along the holes,
- I repeat the process with holes, fertilizers, potatoes.
The process, of course, is not fast, but after planting is completed there is not a single trace on the field, and when the time for hilling approaches, you don’t feel sorry for the time spent planting.
The walk-behind tractor withstood starts and stops during manipulations with the holes, that is, it confirmed the functionality of the modernized ignition system. I hope that my advice will help other fans of tinkering with technology to restore their iron horses.
How to check the ignition coil on a walk-behind tractor?
The ignition coil of a walk-behind tractor produces a spark that ignites the fuel. The presented diagram allows you to familiarize yourself with the principle of its formation. Ignition can be non-contact (first photo) or contact (second photo) depending on the principle of operation.
Initially, the coil is inspected. It may have cracks, dents and other mechanical damage. If the coil design is intact, you need to look for another cause of the malfunction.
The following problems may occur:
- Coil resistance data is measured. In this case, you need to have an idea of the key parameters under which this resistance occurs;
- a spark detection device is used. The cost of such a device is quite high;
- spark plug is used. It is turned inside out and applied to the cylinder. Next, pull the starter cable and watch for a spark.
The listed methods should be used if it is impossible to seek qualified help. During operation, it is important to ensure that you do not get an electric shock.
It is quite possible to carry out repairs yourself, following simple tips. To make the job easier, you can watch the video instructions.
For walk-behind tractors of brands such as Neva, Ural, Agro, Zubr, Salyut, Krot, Kaskad, MTZ and Honda, the setup steps are completely identical.
How to set the ignition on a walk-behind tractor - execution algorithm
From time to time, the walk-behind tractor needs to adjust the ignition system. Untimely adjustment of this unit will lead to accelerated wear of other, no less important mechanisms of the agricultural machine. In order to be able to independently adjust the ignition system on a diesel walk-behind tractor and its gasoline counterpart, you need to study the design diagrams of this unit.
A properly configured walk-behind tractor ignition system is capable of creating a spark in the right place and at the right moment. In this case, the magneto cover is responsible for distributing the resulting spark, and its lower part is responsible for interrupting the spark. In order for the ignition system to work exactly according to this principle, it must be adjusted.
The ignition installation is performed in the following order:
- First, you need to check the operation of the flywheel in the engine until the contacts located inside the magneto open;
- After this, it is necessary to measure the distance between the “anvil” and “hammer” built into the ignition system;
- Next, you will need to turn the flywheel until the piston is compressed;
- As soon as the flywheel reaches the highest point, it needs to be turned again. As a result of this, a one-time knock will be heard, indicating the operation of the overrunning clutch included in the design;
- After this, the flywheel will need to be turned counterclockwise so that the second mark on it aligns with the mark located on the body;
- The next step is to adjust the distance between the breaker contact and the adjacent cam. The minimum gap between the parts for proper operation of the ignition system will be 0.25 mm, and the maximum will be 0.35 mm;
- At the end, it remains to secure the built-in cam with a special screw, which is located on top. The video will show you how to properly set up the ignition system on a walk-behind tractor.
The performed ignition adjustment will speed up the start of the walk-behind tractor engine and make it smoother, which will lead to slower wear of the piston group and other important elements of the engine of an agricultural machine.
Useful videos
Different branded walk-behind tractors produced by well-known brands differ from each other in the design of the built-in ignition system. To know how to correctly adjust this important element, we offer videos that contain the correct procedure for setting up the ignition system on the most common models of walk-behind tractors.
For walk-behind tractors of the Neva brand:
For models of the Agro brand: For agricultural units produced by the Ural brand; For Mole walk-behind tractors: For Zubr models: For Salyut brand walk-behind tractors: For Honda agricultural implements: For the model range produced by the Cascade company: For MTZ brand walk-behind tractors:
No spark on walk-behind tractor - reasons and solution
No spark
This is one of the typical malfunctions of the ignition system of a walk-behind tractor. The most common reasons for this are the formation of carbon deposits on the spark plug or its breakdown. In this case, you should unscrew the spark plug and carefully inspect its side and central electrodes. If the spark plug is covered with soot formed as a result of flooding the part with the fuel mixture, then cleaning the spark plug alone will not be enough - you will need to check the pipes of the fuel system of the walk-behind tractor for leaks. Examples of cases of a spark plug heavily contaminated with fuel are clearly visible in the photo.
If the spark is lost, then in any case you will need to thoroughly clean the spark plug. To do this, it is best to heat it over a gas burner, and then scrape off the dried fuel from the surface. After cleaning the part, put a tip on its upper part and bring it to the motor block motor housing. The spark plug must be held so that its electrode is approximately 1 millimeter from the engine body. At the same time, try to start the walk-behind tractor engine with your second hand.
If the spark plug is fully operational, a spark will form in its lower part, which will jump out and hit the motor housing. If this does not happen, then you need to inspect the distance between the side and central electrodes. A blade should be placed between them, and if it fits tightly between the two electrodes, then the gap has optimal dimensions. If the blade is loose, you will need to tap the back of the central electrode with any hard object. As a result of this, it will move, after which you need to try to start the walk-behind tractor engine again.
Self-check of the magneto for a walk-behind tractor
Another important element of the walk-behind tractor ignition system is the magneto. If a unit malfunctions, it can also be carefully inspected for operability. Checking the magneto of a walk-behind tractor is quite simple. To do this, you need to clean the spark plug from the carbon deposits that have accumulated on its surface and make sure that it is in good working order. Then a cap with a working drive is put on the spark plug. Next, the lower part of the spark plug must be brought to the magneto housing, and begin to rotate the flywheel located in the motor with your fingers.
If a spark does not appear in the magneto on the walk-behind tractor, it means that the element has failed. In this case, it will be necessary to replace the magneto of the ignition system of the walk-behind tractor in order to prevent wear and tear on other mechanisms of the unit.
How to check the ignition coil on a walk-behind tractor?
The ignition coil should be checked and, if necessary, repaired according to the same principle as the magneto of a walk-behind tractor.
Signs that the ignition coil of a walk-behind tractor has failed are indicated by the following factors:
- weak spark or its complete absence;
- presence of a smell of melted plastic in the area where the ignition coil is installed;
- the appearance of a cracking sound when trying to start the walk-behind tractor.
In any of these cases, you will need to carefully inspect the ignition coil of the walk-behind tractor. To do this, it is best to completely dismantle it. To do this, first unscrew the mounting bolts and remove the top cover of the ignition system housing. Then you will need to disconnect the high-voltage wire and, carefully prying the coil, remove it from the housing. After this, you need to carefully inspect the part for signs of melting - if black spots are visible on the coil, then, most likely, the current it creates did not reach the spark plug, as a result of which the ignition coil itself succumbed to voltage. Farmers whose walk-behind tractors have contactless ignition are especially often faced with this problem.
The reason that the current did not reach the spark plug was poor contacts on the high-voltage wire. In this case, repairing the walk-behind tractor ignition comes down to stripping the wires or completely replacing them. In walk-behind tractors where an electronic ignition system is installed, in the event of a breakdown, the wire is automatically turned off due to the presence of a special fuse. In agricultural machines with other types of ignition systems, it is necessary to disconnect the wire manually if it breaks.
Prevention of breakdowns of the walk-behind tractor ignition system
In order to avoid the need to repair the ignition system of a walk-behind tractor, you need to follow a number of simple rules. Compliance with them will extend the life of the unit and save time and money for the equipment owner.
Experts advise:
- exclude the use of the walk-behind tractor in wet weather, during the onset of frost, as well as under conditions of sudden changes in temperature and humidity;
- do not try to start the unit if there is a smell of melted plastic;
- if necessary, install plates on the walk-behind tractor that will protect the parts of the ignition system from moisture getting on them;
- change the spark plug at least once every 3 months. In case of intensive use of the walk-behind tractor, the frequency of replacement of the part can be increased;
- use high-quality motor oil - using the wrong composition will lead to constant flooding of the spark plug with the fuel mixture;
- regularly inspect the parts of the ignition system to eliminate the slightest possibility of operating the walk-behind tractor with broken wires or other damage;
- try not to subject a walk-behind tractor with a hot engine to heavy loads - this will lead to accelerated wear of important components of the unit, including its ignition system.
What problems might arise?
The main problem is the lack of spark . Most likely, the reason is in the spark plug - either carbon deposits have formed on it, or it is faulty. Unscrew it and carefully inspect the electrodes. If there is carbon deposits caused by filling with gasoline, in addition to cleaning the spark plug, it is necessary to check the fuel supply system; there may be leaks there. If there is no spark, you need to clean the spark plug from carbon deposits. A good solution would be to heat it over a switched-on gas burner and scrape off any frozen streaks of the fuel mixture from its surface.
After cleaning the spark plug, test its serviceability. To do this, put a cap on top of the part and, holding it in one hand, bring it closer to the motor block motor housing at a distance of about 1 mm. With your free hand, try to start the engine.
If the spark plug is in good working order, a long-awaited spark will form at its lower end and fly to the engine housing.
Otherwise, check the gap between the electrodes. Try to insert a razor blade there, and if the electrodes clamp it tightly, the distance is optimal. If the blade feels loose, the position of the electrodes needs to be adjusted. To do this, lightly tap the back of the central element with a screwdriver. When the electrodes are in the optimal position, try starting the engine again. If a spark does not appear, test the magneto for serviceability.
To check the serviceability of the magneto, after testing the spark plug, place a tip with a drive in good condition on the spark plug. Bring the lower end of the spark plug closer to the magnetic shoe body and begin to turn the motor flywheel. If there is no spark, there is a malfunction and the part requires replacement.
Other possible problems with the ignition system:
- weakness or lack of spark;
- feeling of an unpleasant smell of burnt plastic in the part of the mechanism where the ignition coil is located;
- crackling sound when starting the engine.
All these troubles require inspection of the coil. The best way out is to completely dismantle it and inspect it.
To do this, unscrew the fastening bolts and remove the upper part of the ignition system casing. Then disconnect the power cord, pry up the coil element and pull it out. Carefully inspect the appearance of the part - the presence of black spots indicates that the current did not flow to the spark plug, but melted the coil winding. This situation is especially relevant for walk-behind tractors with contactless ignition.
The reason for this malfunction is poor quality contacts on the high voltage cable. The wires need to be cleaned or completely replaced . Devices with an electronic ignition system are equipped with an automatic fuse that cuts off the power in the event of a malfunction. If your car has any other ignition system, you will have to disconnect the cable yourself. If there is a spark when you turn it on, check the spark plug tip; most likely it is dirty.
For information on how to adjust the ignition on a walk-behind tractor, see below.
All rights reserved, 14+
The use of any materials without our prior written consent is prohibited.
Walk-behind tractor ignition system
The ignition system is one of the most important components of the walk-behind tractor mechanism; its purpose is to create a spark, which is necessary for fuel combustion. The simplicity of the design of this system allows users to successfully try to repair or adjust it themselves.
Typically, the ignition system consists of a coil connected to the power supply, a spark plug and a magneto. When voltage is applied between the spark plug and the magnetic shoe, a spark is formed, which ignites the fuel in the combustion chamber of the engine.
Electronic systems are also equipped with automatic circuit breakers that cut off the power supply in the event of any malfunction.
How to set and adjust?
If your walk-behind tractor has trouble starting, you need to pull the starter cord for a long time, or the engine reacts with a delay, most often you just need to install the ignition correctly. The procedure is described in the operating manual of the device. But what if you don’t have it at hand, and you don’t remember where you put this useful brochure ?
Correcting the ignition on a walk-behind tractor often comes down to just adjusting the gap between the flywheel and the ignition module.
Follow these guidelines:
Close the spark plug with a square, press its body against the cylinder head, turning this element of the ignition system in the direction opposite to the hole in the end of the cylinder. Turn the crankshaft. You can do this by pulling the starter cord. As a result, a bluish spark should jump between the electrodes. If you do not get a spark, check the gap between the stater and the flywheel magneto. This figure should be 0.1 - 0.15 mm. If the gap does not correspond to the specified value, it must be adjusted.
You can try to install the ignition by ear, especially if you have a rather thin one. This method is also called non-contact. To do this, start the engine and slightly loosen the distributor. Slowly turn the breaker on both sides. At maximum power and speed, secure the structure that determines the moment of spark formation and listen. You should hear a clicking sound when you turn the breaker. After this, tighten the distributor mount.
You can use a strobe light to adjust the ignition.
Warm up the motor, connect the strobe light to the power circuit of the walk-behind tractor. Place the sound sensor on the high voltage wire from one of the engine cylinders. Dismantle the vacuum tube and plug it. The direction of the light emitted by the strobe must be towards the pulley. Idle the engine and turn the distributor. Once you have ensured that the direction of the pulley mark coincides with the mark on the device cover, secure it. Tighten the breaker nut.
Promotional offers based on your interests:
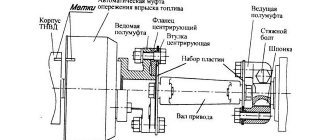
Diagram of such an ignition system for the Rioni-2 walk-behind tractor. The circuit is based on a left-hand flanged single-disk magneto type M25B, which combines a low-voltage alternating current generator and a step-up autotransformer designed to convert low-voltage current into high-voltage current.
On the fixed armature core, which has two pole pieces, two windings are wound: primary and secondary. The primary winding is connected at one end to ground, and at the other to the fixed contact of the breaker. The movable contact of the breaker is located on one arm of the breaker lever.
The contacts of the breaker are opened by pressing the cam on the heel of the second arm of the lever.
The secondary winding has a significantly larger number of turns than the primary. At one end it is connected to ground through the primary winding, and at the other - through the tip - to the central contact of the spark plug. A capacitor is installed parallel to the breaker contacts, which reduces sparking when the contacts open and increases the voltage in the secondary winding, which helps improve the discharge between the spark plug contacts.
A rotor, a permanent magnet, rotates between the magneto tip poles. When rotating, the magnet creates in the armature a magnetic field of variable value and direction, which, crossing the conductors of the primary winding, induces a low-voltage alternating current in its circuit, changing its direction twice per revolution of the magneto rotor.
This current reaches its maximum value when the poles of the permanent magnet are rotated 90° relative to the armature shoes. At the same time, there is a sharp change in direction to the opposite direction of the magnetic flux penetrating the turns of the primary winding. At this moment, the cam 13 of the breaker opens the contacts and, consequently, the circuit of the primary winding.
The breaker contacts are opened at the moment of time corresponding to the supply of a spark to the spark plug, and the high voltage current passes through the circuit: secondary winding, spark plug tip, washer, central electrode of the spark plug, air gap between the central and side electrodes, spark plug body, engine mass, secondary winding .
If a spark is formed at the moment the breaker contacts open, then with a further increase in the gap between the contacts, most of the current flows to capacitor 18. As a result of current absorption, the capacitor is charged, and the sparking at the contacts weakens.
When a certain voltage value is reached on the capacitor plates, a discharge current is formed in the direction opposite to the current in the primary winding.
The magnetic fluxes generated by these currents will be opposite in direction, which will lead to rapid demagnetization of the transformer core, and the combination of processes of rapid demagnetization and magnetization contributes to an additional increase in e. d.s. on the secondary winding.
The central electrode of the spark plug is connected to the tip. To avoid a short circuit to the spark plug body, the central electrode is embedded in an insulator, which must withstand electrical voltage up to 20-22 kV. In the spark plug body, the insulator is fixed with copper gaskets.
A switch is installed on the magneto, which is used to stop the engine. When its contacts are closed, a circuit is created that excludes the breaker contacts from operation, and a high voltage current will not be induced in the secondary winding. The safety spark gap prevents breakdown of the secondary winding of the autotransformer with a high voltage current exceeding the permissible value, which can occur as a result of disconnecting the high voltage wire from the tip of the spark plug.
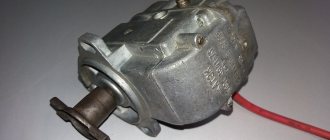
The M-137 magneto is equipped with an MS-151 starting accelerator. The magneto body is made of zinc alloy and the pole pieces are cast inside it. The tips are connected by a plate rod. An autotransformer is wound on the rod - an inductor with two windings.
An ignition switch is mounted on the housing cover, and a starting accelerator stop is screwed into the housing from the side of the mounting flange. Inside the housing there is a rotor on two rolling bearings, consisting of a magneto roller and a package of metal lamellas pressed onto the magnet. This unit is filled with zinc alloy.
The rear shank of the magneto roller is made conical to accommodate the starting accelerator. In the front wall of the magneto housing there is a magneto roller support assembly, and in the cavity of the magneto breaker cover the breaker mechanism itself is assembled. The starting accelerator allows you to provide a fairly intense spark when the engine crankshaft rotates slowly. When starting, the accelerator also provides a retardation of the ignition timing, which makes starting the engine easier.
Rice. 3.37. M-137 magneto diagram
When installing the ignition system on the engine, the ignition timing is set. To do this, remove the flywheel housing. The piston is placed in position c. m.t., which is determined by the valves: both must be closed. After this, the marks on the flywheel and on the rear wall of its casing are aligned.
In this case, the ignition timing angle is equal to 33° of crankshaft rotation. The breaker cover is removed from the magneto and the gap is checked with a feeler gauge, which should be 0.25-0.35 mm. If the gap does not correspond to this value, then the screw securing the breaker contact stand is loosened and the required gap is set by turning the eccentric.
After this, the rack mounting screw is tightened.
Rice. 3.38. Schematic diagram of the ignition system of the MK-1 motor cultivator
Having checked the gap, the magneto roller is placed in a position in which the contacts will be broken (the marks on the breaker and the panel coincide). The magneto is installed in the housing so that the protrusions of the starting accelerator fit into the corresponding grooves of the intermediate coupling.
Correctness - the installation is controlled by the reaction of the magneto roller to the rotation of the screw securing the small gear. When turning the screw to the left, the roller should not turn. If the screw is turned back, the roller will rotate, but the accelerator spring will return it to its original position.
During routine monitoring of the ignition timing, the flywheel housing is removed and the crankshaft is rotated along the way until the accelerator is activated. Then, turning the crankshaft, look for the contact opening position. If the marks on the flywheel and its casing do not coincide, then they must be combined, and the magneto body should be turned in the eyes in the required direction until the contacts open.
Unlike those considered, the basis of the ignition systems of the MB-1 walk-behind tractor and the MK-1 walk-behind cultivator is a non-contact electronic magneto. It is insensitive to spark plug contamination. The absence of contacts significantly increases the reliability of the ignition system and virtually eliminates the need for its maintenance.
At a certain position of the magneto rotor, the storage capacitor is discharged through the control electrode of the thyristor and the accumulated energy is transferred from it to the primary winding of the ignition coil. At the same time, a high-voltage pulse is induced in its secondary winding, which supplies an electric discharge through the wire through the noise-suppressing tip to the spark plug electrodes. In Fig. 3.38 spark plug A17B is indicated by a number, and the interference suppression tip is indicated by a number.
To stop the cultivator engine, just press the button.
In contrast to what was described, the SMK-1 stator of the non-contact electronic magneto motor of the MB-1 walk-behind tractor is located outside the fan-flywheel and the permanent magnet attached to it passes under the stator shoe with a gap of 0.1-0.15 mm. The magneto also includes a PMK-1 converter, and the ignition system includes an A17B (or A11-I) spark plug and an “engine stop” button.
The electrical equipment system of Mepol-Terra walk-behind tractors uses a Bosch-type magdino as an energy source, located on the upper toe of the engine crankshaft. To power light signaling devices, a lighting induction coil is installed in the Magdino.
The ignition coil and lighting coil are located on the Magdino stator and are rotated 180° relative to each other. The primary and secondary windings of the ignition system are placed on a metal core ending in pole pieces. The lighting winding is designed similarly.
At the moment when the two permanent magnets of the flywheel are located above the pole pieces of the ignition coil, the other two permanent magnets are located above the pole pieces of the lighting winding. As the magneto rotates, permanent magnets bypass these windings, inducing low-voltage alternating current in the primary winding of the ignition coil and the lighting winding.
The spark plug is supplied with voltage from the ignition coil.
The engine uses a 14-5R spark plug, and the ignition switch is located on the control rod to ensure safety during operation. It should be noted that recently similar safety systems have found application on other walk-behind tractors from foreign companies, and on the Kubota-T720 walk-behind tractor, when the ignition is turned off, the fuel supply is also automatically interrupted.
Prevention and Troubleshooting
To prevent malfunctions in the ignition system, try to follow simple recommendations :
- do not work on a walk-behind tractor if the weather outside is bad - rain, dampness, frost, or sudden changes in humidity and temperature conditions are expected;
- if you smell an unpleasant smell of burnt plastic, do not turn on the unit;
- ensure protection of important components of the mechanism from water penetration;
- replace spark plugs approximately once every 90 days; if you actively use the device, this period can and should be shortened;
- the oil used for the engine must be of high quality and suitable for the given model brand, otherwise the spark plug will be constantly filled with fuel;
- Carry out regular inspections of the ignition system and gears to prevent the use of the unit with broken cables or other faults;
- when the motor heats up, try to reduce the load on the device, this way you will protect the mechanism from accelerated wear;
- When you do not use the walk-behind tractor in winter, place it in a dry and fairly warm room under lock and key to prevent the device from overcooling.
Elimination method
| Type of malfunction | Elimination method |
| 1. Rotors (cutters) rotate unevenly or slowly | 1. Stop the engine and clean the cutters. 2. Adjust the tension of the V-belt drive: - with the clutch cable - by moving the engine along the frame |
| 2. When the engine is running and the clutch is engaged, the rotors (cutters) do not rotate | 1. Replace the clutch cable. 2. Install the belts on the pulleys and adjust the tension of the V-belt drive. 3. Replace V-belts. |
2.2.6 Safety precautions when working with a walk-behind tractor
- Fill with fuel, check for the presence of oil in the engine crankcase and gearbox, and top up oil only when the engine is not running.
- Strictly follow general fire safety rules when working with flammable liquids.
- Start the engine only with the clutch disengaged.
- Operation of the walk-behind tractor with the covers removed is not allowed.
- In the event of a sudden spontaneous increase in engine speed, immediately move the throttle lever to the “Idle” position, and then stop the engine by pressing the “Stop” button.
- Do not leave a running walk-behind tractor unattended.
- The person working on the walk-behind tractor and those around him must be at a safe distance (at least 1 m) from the mounted implements.
- When working in enclosed spaces (greenhouses), periodically stop the engine and ventilate the room.
- To limit the impact of noise and vibration on a walk-behind tractor, it is recommended to take breaks of 15...30 minutes. every 1.5...2 hours of operation.
ATTENTION! In order to limit exposure to vibration and noise, the duration of work with the walk-behind tractor should not exceed 5 hours during an eight-hour working day. Working without hearing protection (headphones, earplugs) is prohibited. When carrying out lifting operations, lift the box with the packed walk-behind tractor or the assembled walk-behind tractor according to the scheme for slinging the walk-behind tractor during lifting operations (Fig. 8).