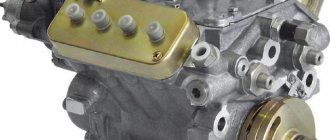
One of the main advantages of the 142nd model of the Swedish brand Husqvarna is the competent selection of its components and the high quality of the original assembly. The basis of the garden tool consists of a 2-stroke gasoline engine, the chrome-plated cylinder of which has a volume of 30 cm3. Starting a standard internal combustion engine is done by pulling the recoil starter cable. A proprietary Japanese Walbro brand carburetor with forged jets and an improved fuel injection system is responsible for preparing and enriching the fuel mixture with air in the internal combustion engine configuration. The manufacturer equipped the engine with a fuel and oil tank with a volume of 370 and 190 ml, respectively.
The Husqvarna 142 chainsaw is equipped with a durable clutch, which is responsible for the continuous connection of the engine with the saw set. All spare parts of the mechanism are made of durable steel, resistant to high temperatures and corrosion.
For instant ignition of fuel in the internal combustion engine cylinder of Husqvarna garden tools, a proprietary capacitor ignition system is used, which includes a Champion RCJ7Y spark plug. The distance between the flywheel and magneto electrodes in the operating state of the ignition system is 0.5 mm.
For sawing wood, the Husqvarna 142 chainsaw is equipped with a high-quality saw set made of wear-resistant alloy. It consists of a 38 cm long tire, as well as a chain with a pitch of 0.325". An oil pump operating in fully automatic mode is responsible for the continuous lubrication of the saw set. To allow chain adjustment without the use of hand tools, Husqvarna has provided easy access to the tensioner sprocket. The built-in inertia brake is responsible for the safe operation of the model, which is activated whenever the chain hits a wire, nail or any other solid object.
The Husqvarna 142 chainsaw stands out for its good balance and ergonomics. All switches and buttons necessary for operation are located at the rear of the instrument body. This simplifies the operation of the chainsaw in very limited space.
How to determine the advance angle of the built-in ignition?
The design features of the built-in ignition coil ensure a match between the optimal factory position of the moving piston and the discharge of the spark plug. During operation of 4-stroke power units, the spark must jump before the piston returns to its uppermost position. This is due to the fact that such engines take longer to burn fuel. In their factory design, the speed of operation of internal combustion engine parts is equal to the speed of planned ignition of the filled fuel. In this regard, the piston has time to travel a certain path from the moment the created spark instantly jumps to the place where the spark plug is located, to the period during which the burning gases are guaranteed to create extremely high pressures.
During mass assembly of engines under standard factory conditions, manufacturers do not perform ignition adjustments. Instead, marks are left on the rotating elements, which must be aligned during installation.
Setting the ignition on the trimmer. How to Set the Ignition on a Petrol Mower
Gasoline trimmers use both two-stroke internal combustion engines (ICE) and four-stroke ones. But the ignition system there is no different from each other, so the repair and setup of this set of accounting programs for fuel ignition will be identical for different types of internal combustion engines.
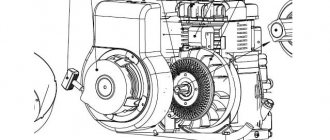
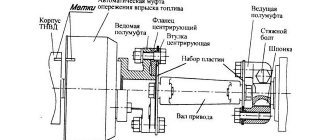
The ignition system of a two-stroke internal combustion engine consists of 2 parts: a flywheel and a coil (magneto). The picture below shows how they look.
There is an impeller on the flywheel that acts as a fan to cool the motor. Also on one side of the flywheel there are permanent magnets, shown with an arrow in the figure.
When the flywheel rotates, an electric current is generated in the coil, which serves to produce a spark at the spark plug. A spark appears when the magnets are directly under the magneto.
From time to time, when the engine does not start, it will be necessary to adjust the ignition. Naturally, you first need to check the serviceability of the spark plug and the high-voltage cable with a cap.
Regulating the ignition on a two-stroke engine is necessary to ensure timely ignition of the fuel in the combustion chamber of the engine. Below is a diagram, from which you can understand the principle of operation of the internal combustion engine.
A spark in the spark plug should appear at the moment the fuel is compressed by the piston, when it most likely does not reach top dead center (TDC). When the piston passes TDC, the fuel mixture ignites, under the influence of which the piston moves downward under the influence of explosion energy.
If for any reason (mostly this occurs due to the displacement of the flywheel on the shaft relative to its original position) ignition of the fuel occurs before the piston passes TDC, then it returns back, and the crankshaft rotates in the opposite direction. This movement may damage the starter assembly, break the starter cord, etc. Then early ignition of the fuel occurs.
You will also prefer late ignition on the trimmer: the piston, after compressing the fuel that has not ignited, goes down, and in this case a spark appears. Then the engine either will not start, or will significantly lose power and will have trouble picking up speed.
But such problems with early or late ignition on two-stroke internal combustion engines occur quite occasionally, because the flywheel with magnets is already installed in the correct position, which is completely synchronized with the movement of the piston. In addition, the flywheel is secured to the shaft with a key and nut. Therefore, incorrect installation of the part is excluded.
For the most part, ignition adjustment consists of setting the correct gap between the magneto and the flywheel.
The magneto is the main part in the engine ignition system and is a coil with primary and secondary windings located around a core. Often, due to a malfunction of the magneto, the spark at the spark plug disappears and the fuel does not ignite. To check the coil, you will need to use a tester and perform the following steps.
- On the tester, having switched to resistance measurement mode, you need to set it to 200 Ohms. This method will test the primary winding.
- Connect one electrode of the tester to the ground of the coil, and the second to the contact coming out of the magneto. Normally, the resistance will be from 0.4 to 2.7 ohms.
- To check the secondary winding, it will be necessary to set the device switch to 20 com. Next, one probe of the device is inserted into the spark plug cap, and the second one is connected to ground. Normally, the resistance properties should be in the range of 4-6 kohms and above (depending on the model).
If the circuit is open, the device will show infinity, and if it is closed, it will show 0 (zero).
First way
You can check the performance of the magneto using a tester. To do this you need to perform the following sequence of actions.
- Set up the tester correctly: use the resistance measurement function and set it to 200 Ohms to take measurements of the primary winding.
- Point the first electrode of the measuring device to the magneto ground, and the second to the output contact. If the primary winding is working properly, the characteristics should be from 0.4 to 2 ohms.
- Set the tester switch to 20 Kohm to diagnose the secondary winding. Then point the 1st probe into the spark plug cap, and the 2nd one to ground. If everything is in order, the characteristics will vary from 4 to 6 Kohm, depending on the trimmer model, be it Patriot 547, Husquarna 128 r, or another brand of equipment. If the circuit is broken, the tester display will show infinity. And if there is a short circuit, zero will appear on the screen.
How to check a chainsaw magneto
The magneto, spool, module is the ignition coil. It may have absolutely nothing to do with tool failures, and the reason may be hidden only in a gap or something else. But in some cases it is precisely this that becomes a factor in the violation.
To check the woman itself, you should, as in the case described above, use the method of excluding components from the chain. Or in other words:
- visually assess the condition of the bobbin body for cracks and other visible defects;
- check the cleanliness of current communications of various components and elements;
- diagnose the insulation and serviceability of armored wiring, reliability of fastenings, absence of rust, etc.;
- visually assess the condition of the spark device cap;
- checking the serviceability of the spark plug;
- diagnostics of the circuit breaker, which is especially important for Chinese-made chainsaws.
Again, as in the case described above, certain items are excluded from this chain, thereby identifying the cause of the problem.
The woman herself is examined in this way.
- The resistance of the magneto is measured. However, this option is not always applicable, since you first need to know the resistance parameters. In addition, to form the required explosive pulse, it is necessary to separate the indicators of various semiconductor elements. A sign of a problem, as a rule, is the ringing of the circuit through the explosive wire and the negative wire. It should show either an “open circuit” or high resistance.
- The check can be done this way - use a device that checks for the presence of a spark. It is installed in the open circuit between the BB wire and the spark plugs. The disadvantage of this method is that the device is very expensive and is mostly used in serious repair services.
- The “old-fashioned” method of testing, which will allow you to save on an expensive device. Use at your own risk when there are no other options. The method of checking is to remove the cap from the candle and insert a nail into it. The candle is reinserted. The nail should be located at a distance of 6-7 mm from the cylinder. The chainsaw starts. The spark is examined: it should be bright blue, if not, then this is a sign of a problem with the woman.
The “old-fashioned” method of checking a woman has many disadvantages. First of all, this concerns electrical components in the system, which can easily deteriorate. The distance between the cylinder and the nail may vary depending on different models of the tool.
As for setting up the magneto, it comes down to examining the groove on the flywheel. The OZ of most current saw models does not need to be adjusted. But its exposure can only be determined by the angle between the mark after the groove on the flywheel and the magnets installed, again, on the flywheel.
Correctly and accurately setting the gap between the magneto and the flywheel is what is most important.
You should know that the head on chainsaw systems is installed in the fan fuselage near the flywheel. The coil, in contact with the magnetic field of the flywheel, produces energy for the spark.
Replacing the coil itself will be much more difficult, since the installation location is too inconvenient. The installation of the new reel should be carried out so that the base of the reel is at a distance of 1-1.5 mm above the flywheel magnets.
In some cases, it is recommended to also check the crankshaft bearing for play.
Adjusting the chainsaw carburetor
The quality and performance of your chainsaw depends on many factors, but today we will talk about carburetor malfunctions. A lot depends on the operation of this node, including your good mood. You picked up the chainsaw, but it didn’t start, or it started and started sneezing and shooting, while completely losing power. Your day is ruined, and in your head there are thoughts about what is the reason, where to look for a repairman and how much the repair will cost.
Chainsaw spare parts
However, you shouldn’t despair in advance; most carburetor malfunctions can be corrected with your own hands, or adjustments can be made in a neighbor’s garage.
Chainsaw Gap Between Coil And Flywheel
Chainsaw gap between the coil and the flywheel
Spare parts for chainsaws and trimmers with delivery by Russian Post in almost all regions cash on delivery. SDEK, PEK, Business stripes on prepayment
- Spare parts for chainsaws
- Cylinder-piston groups of chainsaws
- Chainsaw carburetors
- Starters for chainsaws
- Chainsaw ignition coils
- Chainsaw chain brake covers
- Chain tensioners
- Chainsaw clutch
- Oil pumps
- Chainsaw crankshafts
- Chainsaw flywheels
- Chainsaw bearings
- Oil seals are not gaskets for chainsaws
- Chainsaw springs
- The remaining components are not chainsaw parts
- Chainsaw tank plugs (caps)
- Chainsaw mufflers
- Spare parts for trimmers
- Cylinder-piston groups of trimmers
- Carburetors for trimmers (gasoline trimmers)
- Starters for trimmers (gasoline trimmers)
- Ignition coils for trimmers (gasoline trimmers)
- Clutch of trimmers (gasoline trimmers)
- Trimmer flywheels (gasoline trimmers)
- Trimmer gearboxes (gasoline trimmers)
- Crankshafts of trimmers (gasoline trimmers)
- Bar elements not handles
- Oil seals are not trimmer gaskets
- Mufflers for trimmers (gasoline trimmers)
Selection by models
- Chainsaws
- Spare parts for Chinese chainsaws 45, 50 two cubic cm
- Spare parts for Chinese chainsaws 30 eight cc
- Spare parts for Chinese chainsaws 20 5 cc
- Spare parts for Chinese Shtil 660
- Spare parts for Partner 350, 351, 352, 371
- Spare parts for Partner 340S, 350S, 360S
- Spare parts for Husqvarna 137, 142
- Spare parts for Husqvarna 230, 235, 236, 240
- Spare parts for Husqvarna 365, 372
- Spare parts for Shtil 180
- Spare parts for Shtil 210, 230, 250
- Spare parts for Shtil 290
- Spare parts for Shtil 361
- Trimmers
- Spare parts for Chinese trimmer 33, 43, 50 two cubic cm
- Spare parts for Chinese trimmer 20 6 cc
- Spare parts for Husqvarna 125, 128
- Spare parts for Favorit T283, T284
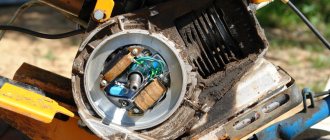
Ignition coil (magneto). Checking serviceability and setting the gap.
We often encounter situations where tool users come with a faulty ignition. Often, although they turn out to be faulty, often the ignition coil has nothing to do with the breakdown of the tool. The steps to check the serviceability of the ignition coil are described below.
Initial checks of the ignition system.
In advance, without performing a high-quality installation of how to test the ignition module, check the serviceability of the following parts of the circuit:
- candles are not a switch
- condition of the spark plug cap: must be tightly attached to the spark plug, the high-voltage wire is aggressively fixed, does not fly out of the cap or coil, the material of the cap does not contain cracks
- the high-voltage wire is not damaged along its entire length, the contacts of the wires are tight and there are no signs of corrosion
- visually assess the absence of cracks and visible flaws on the reel body
- remove contamination of conductive parts and components
- change the gas station if you can: you will like the gas bad
The meaning of these actions lies in the fact that in order to exclude from the list of possible defects what remains for our client to do are the circuit elements, not counting the coil. If our client remains ok, we move on.
Why do you need a good spark? A little physics of the process.
The quality of the spark determines its ability to ignite a properly formed air-fuel mixture within operating conditions. The initial ignition of the mixture is carried out in a spark (also called a breakdown cord from an electronic current pulse generated by the ignition coil). Here, there is actually an instantaneous heating of the molecules of gasoline and oxygen, for which reason they enter into a chemical combustion reaction. Then, like oil, it spreads completely over the volume of the consistency at a usual speed of 30-40 m/s, forming a combustion front of a certain shape. The method of existence of a spark without ignition occurs in 1-2ms.
Why do you need a good spark?
HOW TO SET THE IGNITION COIL CLEARANCE, chainsaw Partner, McCulloch, Jonsered, the magneto clearance
The video talks about the ease of adjusting the gap
magneto using the wall of a plastic bottle. Repair.
Air gap of ignition module MS261 0.10-0.20 mm
STIHL
Briggs Stratton
The quality of the spark determines its ability to ignite a properly formed air-fuel mixture under operating conditions. A weak spark under conditions of high pressure and temperature in the combustion chamber cannot do this. Ignition occurs later or does not occur at all. Uneven operation of the engine occurs, the engine does not gain speed, vibration and detonation occur, and a “kickback” effect may appear in the starter.
The insidiousness of such a breakdown is that diagnostics using the methods given below does not give one hundred percent confidence in the operability of the ignition coil. Such an implicit breakdown, when there seems to be a spark, but it is not quite correct, often misleads and forces you to attribute problems with the ignition coil to a carburetor malfunction. Typical action in such cases is to increase the fuel supply. It turns out that such a spark can ignite an enriched mixture, but not the right one. But the use of an enriched mixture leads to rapid wear of the cylinder-piston group and muffler. Therefore, in such controversial situations, check both the carburetor and the ignition coil once again.
How to understand that everything is done correctly
For this purpose, the design of the device provides 3 adjusting jets. The idle air adjustment screw (T) is located at the top of the carburetor. Below there is a pair of jets for adjusting the fuel supply at minimum (L) and maximum (H) speeds, left and right, respectively.
The procedure for adjusting the carburetor on a Husqvarna chainsaw is as follows:
- Warm up for 5 minutes.
- By turning screw L, we bring the engine to the highest speed in an unloaded state and return it back a quarter turn.
- Hold the gas button with one hand for 15 seconds. At this time, turn the jet H to the right until it stops and reaches maximum speed. Then we turn it back one and a half turns or until the “squealing” of the engine disappears.
- After releasing the gas, turn the idle speed screw (T) clockwise until the chain begins to move. After this, we rotate it in the opposite direction until the chain stops moving.
If this happens, you need to tighten the minimum and maximum speed jets all the way. Then turn them back one and a half turns and try to start the saw.
If cleaning and adjusting the carburetor does not correct the existing problem, you need to check the spark plug and adjust the engine. You should act in the following order:
- The spark plug is unscrewed and a visual inspection is carried out. If it is dry with a slight brown soot, it can be considered in good condition.
- If traces of gasoline are found on the spark plug, the carburetor should be re-adjusted. This happens because it supplies excess fuel to the internal combustion engine, flooding it.
- If the spark plug looks normal, check the operation of the electrical equipment. First of all, the cable that supplies current to the spark plug. Its end is brought a short distance to the radiator grille of the cylinder and the starter is turned with a cord. There should be a spark. If it is not there, the cable is checked with a tester and replaced if necessary.
- If the cable is in good condition, test the ignition coil. If the inspection does not reveal singed or broken wires, the coil is run through a tester, comparing the data with the accompanying documentation. If deviations are detected, the block must be replaced with a similar one.
What do you need to adjust the Husqvarna carburetor yourself?
To correctly adjust the carburetor of a chainsaw, you need to stock up on the appropriate tools in advance.
You will need the following list:
- The most common screwdriver used to unscrew or tighten the adjusting screws;
- A tachometer designed to count crankshaft revolutions. It is necessary when setting the idle speed, since it is quite problematic to determine the number of revolutions per minute by ear;
- Phillips screwdriver. It is needed to be able to unscrew the screw (T);
- A compressor with a special gun connected to it. A purge device will help get rid of excess debris and dirt, since the carburetor must always be clean.
When adjustment is necessary
The need to adjust the carburetor of a chainsaw rarely arises. More often there are problems with the supply of fuel, air or wear of parts. But sometimes adjustment is still required:
- a running engine stalls after a few seconds, or does not start - the reason for this is that the mixture is too rich;
- excessive exhaust, high speeds, increased consumption - in this case, on the contrary, the mixture is too lean, i.e. there is not enough air;
- the speed remains at the same level after the operator reduces or increases it - the cause may be a stuck needle valve.
Factors leading to such changes may include the following:
- Strong vibration damages the protective cover, and the adjusting jets are unscrewed, changing the setting. In this case, it is possible to adjust the carburetor on the chainsaw.
- Wear of piston system elements. Adjusting the carburetor in such a situation may provide temporary relief. Replacement of worn components is recommended.
- Poor quality fuel, a faulty filter, or long-term storage can cause blockages. In this situation, the carburetor must be removed, washed with a special liquid or clean gasoline, reassembled and adjusted again.
It is best to start adjusting the operation of the saw by checking the jets, fuel and air supply. After this, proceed to dismantling the carburetor, and then to checking the piston system.
Makita chainsaw carburetor repair. Adjusting the Makita chainsaw carburetor
Adjusting the carburetor of a Makita chainsaw affects the performance of the device and the quality of work
To correctly set up the working unit of the equipment, it is important to: understand the principle of its operation, have the necessary tools, take care of fasteners, as well as closely located elements responsible for the operation of the chainsaw
Features of setting up a Makita carburetor
The Makita chainsaw carburetor works on the same principle as carburetors produced by other manufacturers. This important part is responsible for mixing fuel with air. To ensure that there are no problems with the operation of the device, the Makita chainsaw is adjusted. This will help protect the equipment's motor.
By adjusting you can:
- eliminate the risk of the carburetor creating a “lean” mixture;
- minimize the risks of creating a supersaturated mixture, which negatively affects the operation of the engine, causing rapid wear.
If you need a new carburetor for a Makita chainsaw (you will set it up based on the standard instructions), choose one that is identical in structure to the original.
- The basis is a tube for air passage, which is connected to the damper (in the middle). The location of this part affects the amount of air that flows to the engine during operation.
- Diffuser. It is not difficult to identify it by carefully examining the components of the carburetor. This part looks like a narrow tube, the main function of which is to regulate the speed of air flow.
- A channel supplying fuel from the float chamber (connected to the nozzle).
- A separate design that stands out from the others is the float chamber, which looks like a standard reservoir for fuel liquids.
Screws for adjustment
Adjusting the Makita chainsaw carburetor is carried out with a set of adjusting screws, which are located in the body of this design:
- screw marked L – corrects low speed;
- a screw marked H, which is used to adjust high speeds;
- Screw T for adjusting carburetor idle speed.
Preparing for adjustment:
- The engine is left to warm up (run the chainsaw for 10 minutes).
- Checking the air filter and cleaning this part.
- Stop the chain by turning the screw marked T (turn until it stops).
Carry out the following settings:
- place the chainsaw on a flat surface;
- After removing the chain, set it aside.
To diagnose carburetor problems, use a tachometer.
Important! Experts advise listening to the sound the screws make when turning. A "squealing" sound may indicate that the mixture is oversaturated.
Algorithm of actions for configuration
The chainsaw carburetor is adjusted in two stages:
- basic stage (engine on);
- Stage two is to perform when the engine is warm.
Important ! Some setup steps need to be adjusted depending on the Makita chainsaw model. In order to do everything correctly, read the instructions
Standard algorithm of actions.
- Turn the screws for adjusting high and low speeds until they stop (turn clockwise).
- At the moment of meeting resistance, make one and a half turns back.
The screw marked T is moved clockwise. Release it only when the engine starts to run stably. Please note that the chain should not move at this stage.
What should I do if the engine turns off during tuning at idle? In this case, it is important to quickly turn the screw until it stops (turn clockwise). If the manipulation leads to movement of the chain, the adjusting screw is rotated slowly to its previous position
How to check if the carburetor is set correctly?
To do this, you need to speed up the chainsaw. Start the engine at maximum speed to objectively evaluate its performance. When you press the accelerator, the rotation speed should reach approximately 15 thousand revolutions per minute. This indicator indicates that the carburetor adjustment was successful.
If you cannot achieve this indicator at high speeds, and acceleration is slow, you need to adjust the carburetor again, working only with the screw marked L. Rotate it counterclockwise. In this case, you need to rotate the screw slowly so that the rotation does not exceed 1/8 of a full rotation.
If the opposite problem occurs and the maximum rotation rate needs to be reduced to 15 thousand, you need to rotate the screw marked with the letter H. Rotate it gradually, slowly in the direction opposite to the clockwise movement.
Reducing the speed indicator to the optimal value will reduce the risk of engine wear.
Maintenance and repair
The manufacturer recommends that you study the product operating instructions before starting work. This is where you need to start repairing the Husqvarna 142 chainsaw. In the book you can find the following information:
- Safe use of the tool, required protective equipment.
- Running in the device.
- Assembly and commissioning of equipment. This point is especially useful for beginners.
- Basic malfunctions and solutions.
- Information on maintenance, cleaning and proper use of the chainsaw.
- Description of saw sharpening, tools necessary for this.
The instructions will reduce the risk of injury and increase the service life of the device. Most breakdowns can be fixed with your own hands. The layout of the chainsaw elements will help with this, and you can purchase spare parts for this model in the store.
Does not start
Over time, the chainsaw may not work properly. Possible malfunction - the device starts and stalls or the chainsaw does not start. The reason may be hidden in different nodes:
- the fuel filter needs to be replaced due to contamination;
- fuel line rupture and gasoline leakage;
- faulty spark plugs or coil;
- control button failure;
- there is a strong air leak in the carburetor;
- sticking of rings;
- The carburetor is not adjusted correctly.
If it is necessary to replace parts, it is better to purchase original elements, otherwise this may affect the performance of the device.
How to adjust the carburetor
In some cases, it may be necessary to adjust the chainsaw carburetor. It is described in detail in the manual and must be carried out under the following conditions:
- clean air filter;
- chainsaw heated to operating temperature.
Steps for adjusting the carburetor on a chainsaw using screws:
- Prepare a tool - a special screwdriver for screws with non-standard slots.
- Remove dirt and dust from the device and its components.
- Turn screws H and L 1.5 turns, loosen screw T.
- Start and warm up the saw for 2-3 minutes.
- Use screw L to reach maximum idle speed, turn the screw 90° counterclockwise.
- Gradually increase idle speed by tightening screw T.
- Adjust the maximum engine speed with screw H. It is optimal to use an electronic tachometer for this.
Adjusting the carburetor of the Husqvarna chainsaw with your own hands was correct if the unit started without problems. You may need to additionally adjust the carburetor on your Husqvarna chainsaw if you start using a different fuel mixture or change the summer mode of the tool to winter.
Disassembly and assembly
To eliminate damage, you will need to disassemble the tool. It is important to remember the location of the parts for reassembly. A chainsaw diagram will help with this, in which all the components and elements are indicated. The device is disassembled:
- when checking spark plugs;
- when replacing shock absorbers;
- when repairing the starter;
- when replacing the carburetor.
Before you begin complex piston group repairs yourself, make sure you can handle the task. To do this, you will have to purchase precision instruments - a bore gauge and a micrometer.
Features of the Husqvarna chainsaw
Despite the fact that ideal chainsaws have not been created and it is unlikely that anyone will succeed, this Swedish company strives to improve the design and increase the power of its models. The entire line of Husqvarna saws is characterized by pleasant improvements that significantly facilitate the work of its owner.
General view of the husqvarna chainsaw
These positive options include:
- use of the fuel “suction” button (primer) for the convenience of starting the internal combustion engine;
- automatic carburetor adjustment by Auto Tune system;
- chain tension mechanism located on the side;
- environmentally friendly and powerful X-Torg engine;
- vibration reduction system;
- a mechanism for forced lubrication of the chain through a hole in the driven sprocket;
- centrifugal air purification Air Injection, allowing you to change the filter less frequently;
- universal key for maintenance and repair.
Reasons why a chainsaw stalls under load
This article from the construction site remstroisovet.ru will discuss the main reasons why a chainsaw may not start or stall under load.
The most common reasons of all are the following:
— Blockage in the chainsaw carburetor - if the chainsaw carburetor is severely clogged, then the engine simply does not have enough fuel, and it begins to stall under load. Consideration of this problem will be described below, but for now we move on.
— The chainsaw carburetor sucks in air. This is also one of the common reasons why a chainsaw engine lacks power. It’s all about the gasket, or more precisely, its tightness.
— Problems with the chainsaw’s clutch can also lead to it starting to stall. It is very easy to damage, or in other words “break” the chainsaw’s clutch, and repairs will cost a pretty penny.
— Poor quality fuel mixture often causes chainsaw breakdowns. This is especially true for those moments when the chainsaw has not been used for a long time and gasoline has been poured into it. The old fuel mixture should be drained and a new one should be added, strictly maintaining the correct proportions of two-stroke oil for lubrication.
What causes a chainsaw to lose power?
— The power of the chainsaw is not enough. This, as it may seem at first glance, trivial option for considering the problem cannot be discarded. But if you are sawing an old dry acacia tree or a thick wet log with a chainsaw, then the engine simply may not have enough power. This is especially true in cases where the chainsaw chain is too dull and requires immediate sharpening.
— Incorrect adjustment of the chainsaw carburetor. If you have already adjusted the carburetor of a chainsaw, you might have done something wrong, as a result of which the chainsaw began to stall under load. It is better to re-adjust the chainsaw carburetor and repeat it several times on a “hot” engine and always during operation, so to speak, under “load”.
— The chainsaw fuel filter is clogged. The next problem due to which the chainsaw will certainly stall under load is a severely clogged fuel filter. Remember how long ago you changed the fuel filter on your chainsaw and did you change it at all? If it hasn't been changed for a long time, then you shouldn't even get into the carburetor, because it won't help at all. First replace the old fuel filter, and then, if the problem does not go away on its own, adjust the carburetor on the chainsaw.
The same applies to the air filter; if this kind of problem occurs, it must be cleaned immediately. Now about the spark plug, if it is very dirty, it is also cleaned and adjusted if necessary. It is the incorrect gap between the electrode of the spark plug on a chainsaw that can lead to it starting to stall, and in general, to work extremely unstable.
What is the resource of candles
Spark plugs are consumables, i.e. They obviously have a shorter lifespan than a chainsaw. Technologically, it is believed that the service life of spark plugs for chainsaws is 100 hours. After this period, it is recommended to change it. In practice this period may be much longer or lower. Above under the following conditions:
- High-quality gasoline and oil are used at work;
- There was no critical engine overheating or spark plug overheating;
- Correctly set gap, normal electric arc (spark);
- Preventative measures were taken: the contact between the central and side electrodes was cleaned from scratch, and the dirt inside the spark plug was removed.
On the contrary, the service life of low-quality spark plugs, overheating, and contamination shorten the service life. An incorrect gap causes an arc that is too long or too short to accelerate the burning of the electrodes (electric welding effect).
Ignition
The main problem in this group of problems is the engine.
Ignition is one of the main parts that influences the trouble-free operation of the tool. Therefore, we will be the first to look specifically at this common rumor block.
Gone are the days when the ignition was controlled by a breaker with cams and moving contacts that supplied a spark to the spark plug.
It was not a very reliable system due to the huge number of parts that affected the operation of the motor. A chainsaw with no visible defects could simply not start. And we could follow the picture of the constant tugging of the winding cord. At this point in time, domestic manufacturers have switched to non-contact ignition accounting systems.
https://youtube.com/watch?v=t_AF84sByUE
How to set the ignition?
Now we will touch on an important topic. How to set the ignition
?
Vedeo ignition
.
They have fewer moving parts and no contacts that need to be reset periodically, which often fail. The coil used on a modern chainsaw will last until the end of your tool’s service life. The chainsaw has become much more reliable and easier to maintain.
What do we need to send?
In order to arrange delivery we need the following information:
- Last name, first name and patronymic of the recipient
- Main phone
- Spare phone (if available)
- Series, number and date of issue of a driver's license, passport or other identification document ( for TC PEK and Baikal Service
)
We understand some people's concerns—not everyone wants to give out so much information about themselves. Unfortunately, this data is required by the transport companies PEK and Baikal Service themselves.
.
Before handing over the goods to you at the point of delivery, they will compare the details of your document with those declared. If they do not match, then you will not be given the cargo, even if the full name is the same (because the full name of different people can be the same!).
There's absolutely nothing to be afraid of here
- This is standard practice for all transport companies.
Knowing 3 numbers from your passport or license, you can’t do
even if you want to.
The consignee (individual) must present an identification document, the details of which were declared by the consignor when handing over the cargo to the Forwarder.
Ignition of the chainsaw
A chainsaw, like any device powered by an internal combustion engine, has an ignition system. It is responsible for igniting the fuel-air mixture in the engine cylinder. This occurs through the application of an electrical discharge, which pierces the space between the spark plug electrodes.
Chainsaw trigger
It is clear that without igniting the fuel, not a single engine will start or operate. However, this is not the only problem: the quality of the chainsaw’s operation depends on how accurately the ignition is set. In other words, whether the fuel ignites on time or at the wrong time. Therefore, a chainsaw with lost settings needs repair. You can entrust the troubleshooting to an experienced mechanic, but you can repair the chainsaw ignition yourself.
Some Chinese chainsaws come with low-quality spark plugs - perhaps it makes sense to have several spark plugs in the kit. In our review, we will introduce you to the design and operating principle of the ignition system, its main problems and how to fix them.
Structural Components
All engines, be it a car or another instrument using an internal combustion engine, have similar operating principles.
No exception, there are such famous chainsaws that are used with pleasure by consumers such as Goodluck, Shtil or Husqvarna.
The drive in them is the familiar internal combustion engine, respectively the fuel tank, the engine and the working element that directly performs the work, as well as other attachments that help with control.
Sometimes during operation some problems may arise with this fairly reliable tool like a chainsaw.
All engines, be it a car or another internal combustion engine tool, have similar operating principles.
It is no exception that there are such outstanding chainsaws and are used with pleasure by such consumers as Goodluck, Calm or Husqvarna.
Drive into them. This is all familiar, respectively, the fuel tank, the engine and the working part, which does the work itself, as well as other articulated parts that help with control.
Sometimes, during operation, some problems may arise in this fairly reliable tool, such as a chainsaw.
Chainsaws Partner and Shtil, their adjustments.
In Shtil and Partner chainsaws, adjusting screws H and L set the proportion of air and gasoline in the mixture. When the screws are loosened, the mixture becomes richer and the speed increases. Screwing leads to a leaner mixture and, accordingly, a decrease in engine speed.
Setting the carburetor of the Partner chainsaw to idle speed is carried out using screw T (Shtil marks this adjustment with the letters LA). Basic tool adjustment is done at the factory during final testing. In most cases, the carburetor is adjusted to supply a slightly richer air-fuel mixture than the optimal calculated one. The settings set by the manufacturer must be saved during the first few hours of operation, during the break-in period. After this, finer adjustments can be made, although this is not necessary; the saw will work normally at the basic settings.
For fine adjustment of the carburetor, a tachometer is required, in addition, technical documentation will be needed in order to carry out work in strict accordance with the manufacturer's requirements. The best solution would be to entrust the fine tuning of fuel equipment to specialists.
If you still decide to adjust it yourself, you should start with screw L, then move on to jet H, after which you set the idle speed by rotating screw T (or LA - if it’s a Stihl saw).
By smoothly turning screw L in both directions, a position is sought at which the idle speed will be maximum. Once this point is found, you need to unscrew screw L 1/4 turn. If the chain continues to move while the engine is idling, screw T (LA) is slowly unscrewed until the chain stops.
After setting the maximum speed with screw H, the value of their frequency is checked using the tachometer. If the maximum rotation speed does not correspond to the values specified in the documentation, the adjustments are repeated. If at maximum speed the mixture is too rich, too much smoke comes from the muffler; if the mixture is lean, the saw makes a squealing sound and the engine heats up excessively. The adjustment ends with setting the idle speed - the position is considered correct if the engine runs exactly at minimum speed and the chain is stationary. The idle speed setting can be seen in the video below.
Possible faults
To get any tool working properly, you must first determine the exact cause of the failure. Let's look at the most common situations in which a chainsaw stalls.
Poor quality fuel
For trouble-free operation of the engine, the quality of the fuel used is important. To keep your saw running smoothly, it is important to use the correct fuel.
Fill the tank with gasoline with the octane rating recommended by the manufacturer.
The second important condition is choosing the right oil. When purchasing, you should give preference to products from brands that produce lubricants with special additives
The saw may stall if the proportions of gasoline and oil are not maintained during refueling. Due to lack of lubrication, the mechanisms jam and the tool stops working.
When mixing, you should use the proportions indicated in the instructions for the saw, and not the data on the oil packaging. The optimal ratio for most tool models is 25 ml of lubricant per 1 liter of gasoline.
For smooth operation of the saw, use AI-92 gasoline and two-stroke oil.
Filters are clogged
In this case, the saw runs idle, but when you press the gas it stalls. Most often this is caused by the use of low-quality gasoline. A clogged filter interferes with the flow of fuel to the engine, so the saw stops under load.
One of the important parts of the tool is the air filter. The performance of a chainsaw depends on its cleanliness and correct choice, which directly depends on the operating conditions of the tool:
- Cotton filter - installed on tools that are used with a saw in the warm season in dry air.
- The HD 2 filter is intended for use of the tool in winter or in dusty conditions (for example, during large-scale logging). Such parts are often equipped with professional tools.
Breather clogged
This small hole on the chainsaw tank is designed to allow air to enter. Depending on the model, it is located in the lid or in one of the walls. A clogged breather creates a vacuum inside the tank, which prevents fuel from entering the carburetor.
Fuel supply interrupted
A broken or damaged pipe is a possible reason why the saw stalls during operation. In this case, the tool starts up, since a small amount of fuel is present in the engine, but refuses to work further.
Storing the saw at sub-zero temperatures will cause the fuel tube to crack. The situation will be corrected only by replacing the part.
Problems with electrical components
Spark plugs are an important element of a chainsaw engine. The tool may stall if carbon deposits accumulate on their surface. Therefore, spark plugs need to be cleaned periodically and changed promptly.
Problems with the power supply can occur if the gap between the ignition coil and the magneto is damaged. This is caused by impacts when operating the saw in difficult conditions. For stable engine operation, the gap should not be more than 0.5 mm.
Expert opinion Dmitry Konstantinovich Levin
The lack of a spark may be due to a clogged fuel filter or depressurization of the tubes. If the spark plugs are wet, it means that during operation of the tool they are filled with gasoline or oil.
Carburetor not adjusted or clogged
Problems with the operation of this unit are indicated by the saw stopping at idle.
The carburetor malfunctions in the following cases:
- clogged jets, nozzles, channels or filters;
- wear of oil seals, cuffs, gaskets;
- incorrect adjustment.
Dirty muffler
The accumulation of carbon deposits in this part leads to loss of power of the tool. The muffler can become clogged if the wrong or low-quality oil is used. Adding too much lubricant to gasoline can also cause clogs.
Husqvarna saw disassembly algorithm
The process of disassembling a Husqvarna chainsaw is quite simple. In order to do everything correctly and not break parts of the housing or CPG, it is necessary to disassemble in the following order:
- Top cover.
- Chain and saw brake cover.
- Starter.
- Flywheel and clutch.
- Front handle.
- Carburetor.
- Oil pump.
- Engine.
Depending on the Husqvarna model, the disassembly procedure may vary slightly.
Important: before you start disassembling the chainsaw, you need to clean it. When working with a saw, a lot of chips and wood dust are generated, which during disassembly can get into the internal parts of the Husqvarna chainsaw
Removing the side cover and saw set
The side cover, or also called the saw chain brake cover, is held in place with two thirteen nuts.
After unscrewing the nuts, the cover is removed from the guide pins, after which you can remove the bar and chain from the chainsaw. Some models of Husqvarna saws have a special mechanism installed that allows you to dismantle the cover and saw set without the help of special tools.
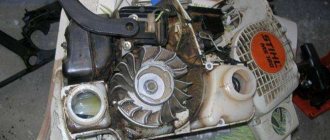
Starter
The starter is located on the right side of the Husqvarna and is held in place by several screws. By unscrewing them, you can easily remove the starter and thereby gain access to the flywheel and ignition coil.
Removing the flywheel and clutch
In order to unscrew the flywheel nut, you need to unscrew the spark plug and install a piston stopper in its place.
Once the piston stopper is installed in the cylinder, the flywheel nut can be loosened. After the nut is unscrewed, it is necessary to use a hammer and a drift made of soft material to apply one sharp blow, installing the drift on the flywheel mounting shaft. This is necessary to remove the flywheel from the shaft, since the design provides for the installation and tightening of this element with great force.
You can learn more about how to properly remove the flywheel from a Husqvarna chainsaw, as well as how to completely disassemble the saw by watching the video. The wizard explains the entire process step by step and demonstrates all the necessary tools:
In order to unscrew the clutch you will need a special key. If there is no key, then it can be made from an old twenty-two head, grinding it in a certain way using emery.
Do not try to unscrew the clutch with a hammer and chisel, as some craftsmen advise. Using these tools, you risk breaking the clutch housing and increasing repair costs. It can also damage the crankshaft bearings.
Removing the Husqvarna front handle is quite simple, as it is attached to the shock absorbers with screws.
Air filter and carburetor
To remove the carburetor, it is necessary to disconnect the fuel hose and damper rods from it; this can be done conveniently after the air filter is removed, which is installed immediately behind the carburetor and held in place with two 10mm nuts. After the air filter is removed, the fuel hose and the rods are disconnected, just pull the carburetor towards you and remove it from the studs.
Oil pump
On Husqvarna, the oil pump is installed on the right side of the chainsaw. It can only be removed after the clutch has been released. Removal does not require a special tool, because... The fastening screws are made for a regular Phillips screwdriver. After the screws are unscrewed, it is necessary to lift the pump and disconnect the oil hoses from it.