OgorodGuruCom
Tips and tricks for gardeners
Popular
What to do if the leaves of eggplant seedlings curl
Home › Vegetables › How to make a bazooka for planting garlic yourself
Planting garlic on an industrial scale is carried out using special mechanisms that cannot be used on home plots. However, manually planting beds is also not very convenient and requires some time. For ordinary gardeners, planting garlic using devices that you can easily build yourself is perfect.
Homemade seeder for walk-behind tractor - do-it-yourself options
Row seeder on a walk-behind tractor - a simple manufacturing method
Just before you start making a simple seeder for a walk-behind tractor, be sure to study the drawings. They will tell you the dimensions of the parts, the method of their fastening and the correct procedure for assembly.
- steel sheets, no more than 5 mm thick;
- 3 metal disks;
- steel pipe;
- wooden block;
- bicycle chain;
- 3 small wheels;
- bolts and screws;
- welding machine;
- hacksaw for metal;
- electric drill bits;
- multi-sheet plywood.
The manufacturing algorithm is as follows:
- To begin, weld the U-shaped frame of the seeder as shown in the diagram. To make it, take sheet iron, 52.5 cm long and 11.5 cm wide;
- At the top of the frame, install a seed hopper in the form of a box, which can be made from multi-layer plywood;
- Install a seeding device inside the bunker, which should be mounted on two plain bearings. The device itself should be shaped like a shaft and resemble a spool for winding thread. It can be made from a piece of wood and varnished;
- Then take a steel pipe that will serve as an axis and place 3 metal disks on it, which should be fixed at the same distance from each other;
- Drill 12 holes in the rim of one of the disks into which the seeds will fall. When the seeder starts working, this disk with holes made in it will fall into the bunker with planting material. The captured seeds will then fall into furrows placed directly in front of the seeder discs. To rotate the disk, put a bicycle chain on it, the other end of which is secured to the rotor of the walk-behind tractor engine;
- Next, at the rear of the seeder frame, weld a horizontal piece of steel sheet, which is necessary for embedding the seeds into the soil;
- After this, 3 wheels must be attached to the bottom of the structure. The front wheel can be taken from an old baby stroller, and the two rear wheels can be taken from a children's bicycle. The video will tell you more about making a simple row seeder.
A self-made seed drill is equally suitable for sowing garlic or corn seeds. In the process of moving the device along a previously plowed area, the seeder reel begins to rotate, which occurs due to the presence of a bicycle chain. The seeds that are in the hopper are scooped up by the cells of the coil, after which they are moved into the funnel of the seed tube, and from there into the ground.
Precision nest seeder for walk-behind tractor - a more complex assembly method
- 2 wheels for moving around the site;
- seed hopper;
- seeding roller;
- 2 bearings;
- handle with bracket;
- 2 brackets required for mounting the opener.
The manufacturing procedure is as follows:
- You can make a bunker from wooden boards, approximately 1.5 cm thick. For the bottom of the bunker, use several sheet steel bushes welded to each other. Connect the walls of the box lengthwise and crosswise with self-tapping screws, steel angles or tenons. Install 1.5 cm thick wooden pads at the bottom of the bunker walls. Use nails or screws to secure them. In the rear part of the seeder hopper, attach a bracket through which the device will be connected to the walk-behind tractor;
- To install the seeding roller in the walls and trims, make semicircular cutouts. Next, attach the fixing brackets to the overlays with screws. To ensure that when sowing the seeds fall exactly in the intended places, install several rubber plates in the inclined bottoms;
- The wheels of the seeder must have a diameter of at least 20 cm. To fasten them, use hubs 6 cm long. Make holes in the hubs, which should be the same size as the holes in the seeding roller;
- To make the opener, use sheet steel 1.5 mm thick. Next, attach the element using brackets. Make several holes on one of the brackets - they will be needed to adjust the depth at which the seeds will be sown. To adjust this setting, you will need to move the opener from one hole to another.
A seeder made in this way will help you quickly plant seeds of garlic, onions, corn and legumes. In this case, the seed will fall exactly into the pre-prepared holes.
How to make: step-by-step instructions and drawing
Manual
Inventory
- Drill.
- Knife.
- Scissors.
- Nail.
- Lighter.
- Matches.
Materials
- Plastic container or jar for seeds.
- Bolt.
- Plastic tube the height of the can.
- A metal tube with a diameter smaller than a plastic tube.
- Two washers.
- Screw.
- Tin can lid.
- Aluminum wire.
- Wooden handle.
- Hoe.
Procedure
- Drill the bottom of the plastic jar in the center and make a hole on the side for the seeds.
- The tin can lid will become the valve. Attach it to the jar with wire, leaving it free to open and close. There will be a plastic tube in the center of the jar and a metal tube inside it. This is a bearing. If you did everything correctly, the jar will rotate.
- Then insert the bolt into the metal pipe, tightening the nut between the two washers so that it rotates freely.
- Make two holes the size of a clove of garlic in the side of the plastic jar.
- Screw a wooden handle to the can, and just above it - a bent hoe.
Drawing of a manual garlic planter:
For self-propelled unit
Inventory
Welding machine.
Materials
- Channel "eight".
- Wheels.
- Steel sheets.
- Bolts.
- Nuts.
- Locknuts.
- Plywood.
- Drying oil.
- Rubber lining.
- Metal pipes.
- Spikes.
- Pins.
- Wheels or metal hub and bearings.
- Bicycle chain.
- Wooden boards.
- Pedals.
List of step-by-step production
- For the frame, weld two main elements and three cross members from a figure eight.
- Weld the arch with the fastening fork and two fastenings at the bottom on the sides.
- Attach supports for the seed tubes to the sides of the frame.
- Weld braces to strengthen the frames. Reinforce the arch with two rectangular plates and steel corners.
- Assemble the plywood to the size of the frame using metal corners.
- Cover the planter with drying oil and let dry.
- Place a liner inside the hopper to protect the garlic.
- Install the hopper on top of the frame using bolts and locknuts.
- Install and secure the conveyor.
- Screw the hopper to the frame.
- Screw the ripper holders with bolts.
- For the wheel axle, weld the axle tube to the frame and drill holes in it for the pins that hold the spikes. Weld the pins at the end of the job.
- Put on the wheels and attach to the axle.
- For the holders of the rippers, weld the metal corners into a square and weld them to the rod. Weld steel pipes at its ends
- Weld a steel groove cutter to the pipe.
- Connect the planter wheel and the walk-behind tractor wheel with a chain.
- Attach metal crossbars with boards to the frame - a seat and a place for legs.
On a walk-behind tractor
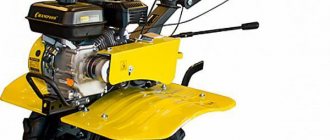
The walk-behind tractor has recently replaced several tools previously used on the farm for the farmer. This is a kind of mini tractor for Russian gardeners.
Using the device, you can dig and process potatoes, plow the ground, and use it as a means of transporting goods over rough terrain if you build a homemade trailer.
To build a garlic planter on a walk-behind tractor with your own hands you will need:
- The container for seeds is triangular in shape, so that it is convenient to pour through a wide channel, and the seeds come out from the opposite narrow end in a dosed manner.
- Wheel.
- Gears.
- Chain.
- Bolts and fastenings.
- Opener.
These elements need to be attached to the walk-behind tractor, according to a pre-prepared drawing.
Models
There are a variety of models of agricultural seeder for planting garlic. Let's look at the most common options for seeders for farmers.
To the walk-behind tractor
Garlic seeder for walk-behind tractor. Since machinery is actively used on the farm, walk-behind tractors have become one of the most popular types of transport, which, moreover, is ideal for working in the garden. As a walk-behind tractor, you can use the models Beam, Tarpan, Oka, Mole, Bison.
Therefore, if the soil on your site is not very convenient for transporting the seeder manually, or you simply want to save time, then it will be much more convenient to attach a device for sowing garlic to a walk-behind tractor. This is done thanks to special fasteners or adapters.
By clicking on the link here, you will get acquainted with the malfunctions and repairs of the Texas cultivator, which is very popular nowadays.
A household grain crusher is your reliable assistant in the household. With it you will quickly and efficiently grind various grain crops.
With a walk-behind tractor cart, you will transport a lot of different loads on your site and do a large amount of work.
As a rule, the seeder is set to a certain operating mode, after which the walk-behind tractor transports it along the entire planting line so that the bulbs get into the ground. This method is the fastest and most convenient, however, it requires fuel costs for the walk-behind tractor.
Manual
A manual seeder is simpler and requires manual adjustment and transportation. As a rule, such units are in demand among owners of small plots, as well as among those who want to use equipment in agriculture as economically as possible.
Of course, you will need more time to carry out the work than when using a walk-behind tractor.
https://youtube.com/watch?v=eAp17yTenSY
Four-row
The four-row seeder is also very common in agriculture. A distinctive characteristic of this unit is that this type of equipment allows for sowing as accurately as possible, in 4 rows. Thanks to this, you will not have problems with spot landing.
In addition, you can sow bulbs of various diameters. This technique is convenient, allows you to work in a wide variety of areas and do it really effectively.
If we talk about purchasing such equipment, you need to be aware of the cost. Depending on the type of device, prices vary. So, a seeder for a walk-behind tractor can cost you about 300 USD, manual equipment will most likely cost no more than 150 USD, and a four-row seeder can be purchased for 200 USD.
Used equipment can cost about 20% less than new ones.
The average technical characteristics of walk-behind seeder models can be described as follows. They can have 2 or 3 rows, which allows you to sow different sizes of seeds and do it quite quickly. The calibration of the teeth can vary from 10mm to 30mm.
The productivity of the equipment ranges from half a hectare to a hectare. The weight of such devices starts from 40 kg. As a rule, the row spacing and planting depth depend on the specific model of the unit. The bins hold approximately 10 kg.
Features of the garlic planter
Onions and garlic are among the crops that are particularly profitable for farmers. The reasons for this are simple: with a fairly high price on the market, these vegetables do not require much care, are easily stored for a long time and do not require the construction of special storage facilities. Products can be sold when their value is highest.
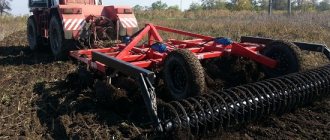
Special seeders can significantly speed up the process of planting garlic and onions. They are mounted on walk-behind tractors used for transporting planting material. Before planting, the soil must be prepared - it must be plowed, cultivated and leveled.
The planting material, in turn, must be calibrated - cloves no less than 15 and no more than 25 millimeters are planted. The power of the garlic planter depends entirely on the power of the walk-behind tractor itself.
In this video you will learn more about the garlic planter:
https://youtube.com/watch?v=WZ–kFCaqB0
A mechanism for planting garlic and onions is purchased due to a number of its advantages:
- he plants the seedlings to the required depth of 6-8 centimeters;
- allows you to plant from 0.3 to 1 hectare of area per hour;
- the distance between rows can be adjusted depending on the characteristics of the soil and crop;
- bins for each row can hold at least ten kilograms of planting material for each crop;
- The mechanism is very easy to set up and control.
The coverage of the treated area is determined by the traction force of the walk-behind tractor and the presence of the multi-row function.
The design of the device, as already noted, is simple and functional. Since its purpose is to make agricultural work as easy to carry out as possible, it is made in such a way that management is convenient and efficient. The main elements that make up the garlic planter mechanism:
- chain;
- gearbox;
- iron body with frame;
- seed container;
- star.
https://youtube.com/watch?v=L7A7quy54XA
Thanks to the presence of metal discs, the planter is able to distribute garlic or onion seedlings in an even layer. The number of wheels for moving the mechanism can vary from one to two. In the latter case, greater structural stability is achieved, and therefore most farmers prefer two-wheeled seeders.
The operating principle of a garlic planter is not much different from other seeders. At the first stage, she makes a furrow for the seedlings. Its depth ranges from 15 to 20 centimeters. At the same time, the mechanism grabs the seedling and immerses it in the ground. If the model is equipped with a container of water, then the first watering occurs immediately. The number of rows that the seeder can make at a time varies from one to five.
In order to avoid problems in the operation of the garlic planter, the owner should pay attention to several main signs of the quality of its work. Good mechanism:
- does not allow places that would be sown too sparsely or densely;
- makes even rows that are at the same distance in relation to each other;
- places the seedlings at a clearly defined, uniform depth.
Attention! If the device does not provide accuracy of fit, it is either broken or defective
Types of devices for planting garlic
There are different types of tools for planting garlic. Each of them has its own advantages and disadvantages.
Jagged markers
Such markers are very similar in appearance to ordinary rakes, but instead of metal teeth, they have wooden teeth in the shape of a triangle. The interval is determined depending on the distance at which the garlic is planned to be planted.
It is important to consider the planting depth - this will be the length of the tooth. Similar structures are made from wood or metal (at the discretion and capabilities of the summer resident):
Similar structures are made from wood or metal (at the discretion and capabilities of the summer resident):
- Take a chipboard and a metal corner.
- They make holes.
- On one side, the handle is secured with glue or welding (if it is metal).
- On the other side, teeth are attached at the required distance.
Using the device when sowing is quite simple. The structure is lowered into the ground by the handle and pressed. After which they are carefully taken out, even holes remain in the ground, located at an equal distance.
The serrated marker looks like a regular rakeSlat markers
Such a product will reduce the duration of disembarkation and make it easier. The basis of the tool is a board or plank. On one part there are slats with a triangular cross-section. A handle is attached to the top for convenient use of the device.
The application is quite simple - press the marker with your foot, the result is even holes with the same space between them.
Needle markers
Making such a device is very simple. The base is a board 30 cm wide. It has needle-shaped teeth in the form of a square, the parameters of which correspond to the requirements for planting garlic. Such tools are very convenient for sowing seeds and transplanting seedlings, so they can always be used in a summer cottage.
Gun for planting through film
The design allows you to plant garlic in a bed that is already covered with film or covering material. It looks like a large syringe with a plunger. Working with such a tool is quite simple:
- They stick the gun into the ground with the sharp end.
- Place garlic in the tube.
- Clamp the lever and lift.
That's all, the device allows you to spend less time on planting, avoid getting your hands dirty and plant the garlic immediately under the film or shelter.
The planting gun allows you to plant garlic directly under the film
Bazooka for planting garlic
This device is quite similar to the previous one. It is better to buy ready-made, but you can try to make it yourself. Thanks to the bazooka, the process of planting garlic becomes easier and faster.
When used, there is no need to bend down, and labor productivity increases. The device can be safely used with one hand, it is lightweight and quite easy to use.
In addition, you can find many mechanical products on sale that speed up the planting process several times. For example, a device on a walk-behind tractor greatly saves manpower and has virtually no negative aspects.
Do-it-yourself garlic cutter for walk-behind tractor
In order to make a garlic planter for a walk-behind tractor with your own hands, you will need:
- wooden boards (metal tools add extra weight to the unit, making the work of the walk-behind tractor heavier);
- brush wheel (driven by a chain drive);
- a shaft with a chain connected to the front wheels of the cultivator;
- metal layer
You need to build a box from the boards, which will later become a bunker. A wheel with seeds is installed at the back of the box. It can be adjusted to suit the crop size.
A metal plate is attached to the bottom frame of the garlic planter, which plows the soil under the rows. The plate digs trenches for planting garlic. This type of planter can be considered universal.
A homemade garlic seeder for a walk-behind tractor is quick and easy to assemble. But for assembly accuracy you need to use drawings and diagrams. They indicate the exact dimensions and diameters of the unit, and this will increase the accuracy of sowing.
Step-by-step instructions for creating a garlic planter for a walk-behind tractor with your own hands are presented in the video. Seeders for walk-behind tractors have occupied an honorable place among agricultural equipment for many years. With their help, row planting of garlic, wheat, corn, rye, lentils and other crops is carried out.
It is advisable to use a manual seeder in medium-sized or small areas. For a large plot of land, it is advisable to use a self-made seeder for a walk-behind tractor. Any of these devices optimizes the process of sowing crops and improves the uniformity of seedlings.
Depending on the plants being planted, there are several groups of seeders:
- Combined. They have special devices for applying fertilizers to the soil.
- Universal. For planting various crops.
- Special. Sowing of certain plants is carried out.
A seeder for a walk-behind tractor can be purchased in specialized stores or made independently, following the instructions in the photos and drawings. A homemade option will save money on the purchase of a factory unit.
Having studied the algorithm of actions according to the presented drawings, you can make sure that making a seeder yourself will not be difficult. The use of this agricultural device will save the gardener’s energy, increase labor productivity and improve the quality of sowing.
Should I buy or make my own?
Assembling a planting device with your own hands is not that difficult, even at home. But this is only advisable in a few cases:
The owner has all the necessary materials
It is important to take the drawing in advance, according to which the planter will be created, and check whether everything is available. Some parts (for example, a chain) can be taken from an old bicycle, others (mounts, containers) can be taken from a garage or workshop. Of course, you can buy a couple of things, but if you purchase all the components separately, it will be easier and cheaper to buy a ready-made device. The owner is more or less familiar with agricultural machinery
Otherwise, difficulties may arise, even if you have clear instructions and drawings in front of your eyes. You need to make the device “for yourself”. For example, make removable containers for different seeds or install containers for fertilizer and watering. In stores, seeders with advanced functions are always more expensive, and in this case the savings are significant.
Of course, you can buy a couple of things, but if you purchase all the components separately, it will be easier and cheaper to buy a ready-made device. The owner is more or less familiar with agricultural machinery. Otherwise, difficulties may arise, even if you have clear instructions and drawings in front of your eyes. You need to make the device “for yourself”. For example, make removable containers for different seeds or install containers for fertilizer and watering. In stores, seeders with advanced functions are always more expensive, and in this case the savings are significant.
If you don’t want to tinker with drawings and the device, collect spare parts, or don’t have enough time for all this, the best choice would be to buy a manual seeder in special stores.
Main types of planters
There are various models of this device on the modern market, but they all differ in the main principle of operation. They can be manual or attached to a walk-behind tractor, and can also sow a different number of rows: from 1 to 5 or more. It depends on the specific needs of the person and the amount of work required.
Manual
This is a simpler version of the device, easy to use, but requiring some physical effort on the part of a person. The seeder will need to be manually adjusted, transported to the site in the same way, and force must be exerted to move during the sowing process. It is a more budget option and does not require additional materials.
The garlic planter can be manual or made as an attachment for a tractor or walk-behind tractor.
The attachments on the walk-behind tractor are heavy and have devices for planting several rows at the same time. They cling through special fasteners and adapters to the rear of the machine. With different power capabilities of tractors, seeders are used that differ in weight and number of rows.
Each of the devices is quite good; the best models are selected solely from the individual preferences of the farmer.
In which stores and for how much can you buy it?
Device for planting potatoes
- The Tiu.ru marketplace offers hand planters starting from 10 thousand rubles. The cost of devices for a walk-behind tractor starts from 20 thousand, each additional row adds 10 thousand to the price. Six-row planters for tractors cost from 60 thousand rubles. The cost of delivery to Moscow and St. Petersburg depends on the seller. Free delivery and pickup are available.
- The agricultural equipment store Garden-shop sells planters for walk-behind tractors for 20-25 thousand rubles and more. Prices for tractor devices are set in the region of 40-50 thousand rubles. Delivery to Moscow and St. Petersburg costs 1 thousand rubles. If the address is outside the city, 40 rubles/km in the Moscow region and 35 rubles/km in the Leningrad region are added.
- The equipment store 100kwatt.ru sells planters for walk-behind tractors starting from 20 thousand rubles. You can buy a device for a tractor for 40 thousand or more. The cost of delivery also depends on the specific product and the place of acceptance.
- The Agrotrade store sells three-row garlic planters for 100 thousand rubles and four-row ones for 200 thousand rubles. Delivery is discussed with the store manager and depends on the weight, dimensions and city of the buyer.
How to choose?
There are several main signs by which you can determine whether the technique for planting garlic is suitable in a particular case.
- Principle of operation. The main principle of operation is the same for all seeders: garlic cloves or bulbs are picked up on a chain and planted in a furrow to a certain depth, after which they are covered with earth. The choice of power and row of device depends on the size of the plot and the scale of the farm.
The main types can be divided as follows:- For small gardens with loose soil: a hand planter.
For medium areas: garlic planter on a walk-behind tractor.
- For large farms: tractor seeder.
- Weight.
Manual garlic cutters weigh up to 10 kg. In this case, the principle “the lighter the better” works, since additional weight complicates manual labor. Garlic seeders on a walk-behind tractor weigh from 10 to 70 kg. It all depends on the model and the number of rows. Four-row planters can usually be mounted on both a walk-behind tractor and a tractor. Seeders for tractors are the most massive: from 70 to 100 kg or more. Here the choice of device should be made taking into account the power of the tractor. Models for mini tractors weigh less. - Price.
- Manual: the cheapest of all, but rarely sold in specialty stores. The average price is about 5000 rubles.
- For a walk-behind tractor: much more expensive. Prices vary from 20,000 to 40,000 rubles.
- For a tractor: the most expensive. The cheapest models cost a little more than 30,000 rubles, and the most expensive ones cost more than 100,000 rubles, sometimes the price reaches 200,000 rubles.
- Seeding type.
The type of sowing depends not on the type of garlic planter, but on the size of the bowls, planting depth and number of rows. For garlic bulbs, only seeders with small bowls are suitable, as they provide spot seeding - one bulb at a time. Large and medium bowls are suitable for cloves; in such models, several cloves are planted in one place. Suitable sowing depth for seeds: 6-8 cm, and for garlic cloves: 15-20. The sowing speed depends on the row row. Manual planters are almost always single-row, and the number of rows in walk-behind seeders varies from 1 to 4. For garlic bulbs, a four-row planter is suitable. It is considered one of the best, as it ensures more even sowing. And for the largest areas, it is effective to use 6-row planters (usually such models are only available for tractors), which will significantly save sowing time. - Manufacturer. Domestic and Ukrainian manufacturers are leading the market: Poltava, Yarilo, Zvezda, Premium, Bulat, etc. If desired, you can also find foreign brands. Prices rather depend not on the brand, but on the specific models and dimensions of the seeders.
Possible problems and warnings
When manufacturing each of the seeders, it is imperative to follow safety precautions. It is necessary to use personal protective equipment: protective gloves, boots, etc.
A planter for a walk-behind tractor is difficult to assemble without welding skills. In this case, it is better to buy it in a store. A walk-behind seeder weighs quite a lot, and during operation, seed and people make it even heavier. Therefore, the garlic planter may tip over. To prevent this from happening, you need to weld a counterweight. It is advisable to work together: one person will drive the walk-behind tractor, and the other will plant.
Garlic is a favorite ingredient in many dishes, so there is an increased demand for it. For its successful cultivation, we recommend that you look at the articles of our experts:
- When is the best time to sow spring crops?
- How to plant a winter variety in spring and autumn?
- What can you grow after this vegetable?
- Why do you need to adhere to planting deadlines?
- How to grow at home?
For small private farms, homemade models are the most suitable.
How do seeders work?
The chain drive system aggregates with the rear wheels of the equipment. The seed hopper holds the volume of crop for several rows or beds. On some models there is a separate container for each row. Often the seeds are mixed with some kind of fillers or fertilizers.
Vegetable seeders are equipped with special brushes that loosen the seeds. At the outlet of the container there is a disk that opens a hole for the culture to exit.
Seeders for walk-behind tractors are quite convenient in the sense that the speed mode for planting crops can be adjusted in advance. This is a big plus of the planter for motor cultivators and other units. Another advantage is that this tool can be installed on any type of walk-behind tractor.
For planters, there is a classification of sowing methods:
- privates;
- nesting;
- square-nested;
- dotted (accurate);
- scattered.
For different types of seeds, different models are used: vegetable, grain, universal. But for some cultures there is still an exception. These are sunflower seeds, corn and beans. The bunker system is most often used, but sometimes they resort to vacuum ones, which are used as mini-pneumatic planters.
A vacuum seeder is also a pneumatic seeder, a precision seeder, dotted. The vacuum seeder for the walk-behind tractor is SVTV 4-8. Its purpose is to sow vegetables and grains. Initially, the design is designed for 4 rows, but it can be converted into an eight-row one without radically changing the unit.
Pneumatic seeders are used to work with weighted walk-behind tractors. The set includes 4 removable drums that can sow 2 rows each. You can plant both small grains and large ones, such as corn. Sowing depth is up to 10 cm, row width is up to 70 cm.
A homemade garlic planter for a walk-behind tractor is used for planting bulbous species (garlic, tulip, onion). Farmers also use this seeder for vegetables. STV is an excellent garlic planter. SV-6, SVTV 4-8 - these models are vacuum. There is a special garlic planter specifically for garlic. The design includes small spoons that pick up the bulb and direct it directly into the furrow, which is prepared in advance.
But some models do not have plates with which the wheels dig into the soil and compact it. However, this attribute can be made with your own hands.
Sowing devices
The basis of any seeders is the principle of dosed dispersion of seed over a certain area. In the case of small and dusty seeds, sowing without subsequent thinning is impossible. To do this, special devices are used that help distribute the seeds in the soil in doses.
Manual household seeders
They are used over relatively large areas. They create even rows, apply the seeds in doses, and use them for planting carrots, beets, salad crops and nigella onions. The simplest single-row seeder is a two-wheeled structure with a seed hopper.
Operating principle of a manual seeder:
- the front wheel with spikes or blades creates a groove of the required depth;
- through an adjustable hole in the lower part of the hopper, a certain volume of seed is poured into the groove;
- The smooth rear wheel levels and lightly compacts the bed.
Improved manual seeders can have two or more rows, have adjustable groove depth and width, and additional containers for fertilizers.
Piston seed planter
It is a plastic cylindrical container into which seed material is poured. At the bottom of the device there is a cone-shaped adjustable hole through which the seeds are poured into the ground. At the top there is a spring piston. The principle of operation is to squeeze out a certain number of seeds into previously prepared grooves or holes. To prevent the seeds from scattering, the planter is kept at a height of about 5 cm.
Some gardeners prefer to use a medical syringe instead of a mini-planter, since the principle of operation is the same. Injection has its disadvantages:
- when shaking, large scattering of seeds is possible;
- it is impossible to press the piston with the same force, which leads to different amounts of squeezed out seeds and uneven germination.
Types and types of potato planters
Potato planters vary in size and type of tuber feeding.
To size
Small-sized ones are used for planting potatoes in a summer cottage or garden plot. The design provides a regulator for the depth and height of the earth ridge, which is formed when the soil is raised. Small-sized devices are suitable for walk-behind tractors. The hopper volume of such potato planters does not exceed 35 liters. The planting rate is 0.1-0.2 ha per hour.
For medium potato planters, the hopper volume reaches 45 liters, and the productivity is 0.25 hectares per hour. Such planters are installed on heavy walk-behind tractors and mini tractors.
Large ones are used for planting over large areas. Their bunker is correspondingly large and is loaded using a dump truck.
By type of seed supply
In a unit with a spoon system, potatoes are fed for planting using a structure of spoons attached to a belt.
The flat belt system consists of horizontally located belts between two main ones. This device produces a single-row planting.
The multi-belt system allows you to plant potatoes in two rows. Each row is served by several belts - up to 28 pcs.
Homemade potato planter.
Landing marker
The design resembles a wooden rake with large, non-triangular teeth. This type of device is the easiest to make. It is easier for them to distribute the garlic throughout the beds rather than using furrows. The marker does not ensure that the seeds fall into the ground, but it regulates the depth and distance between the holes, which can be easily controlled. These parameters will affect the yield and quality of the product.
Pros of planting with a marker:
- Same hole depth.
- Perfectly straight rows.
- You can plow the ground with such a seeder for faster work.
It is very easy to make it with your own hands; you only need a minimum amount of lumber and a cutting.
Seeders for equipment
In medium areas, a garlic seeder attached to a walk-behind tractor is required. The device has a similar structure, but it is driven by a walk-behind tractor. The camshaft controls the speed and pitch.
To install the planter on a walk-behind tractor, you will need special mounts and adapters. Instead of rubber wheels, loosening agents are installed. On large areas it is rational to use tractor planters. They have a similar principle of operation, but are larger in weight and size.
When planting in large areas, multi-row planters are used. This allows you to plant several rows at once, which speeds up the process and makes it more accurate. 2-4 row planters are mounted to the tractor and walk-behind tractor.
A walk-behind planter requires more fuel costs. It is also less maneuverable, and when moving there is a risk of damaging plants. It is used only in open areas with room to turn around.
Popular models
Planters make work easier
When planting crops, the following models of garlic planters are used:
- ChS-1. This is a single-row unit for small areas. It is used with a 5-6 hp walk-behind tractor. pp., has adjustable pitch and planting depth. Container for planting material - 10 l.
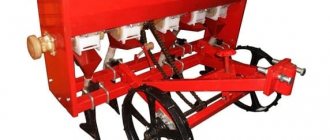
- ChS-2. Double-row planter with a width between furrows of 200-400 mm. Installed on walk-behind tractors or mini tractors. Sows 8-11 cloves per 1 m of soil. Up to 7 kg of seed is loaded into the container.
- SMK-3. Three-row unit. Installed on mini tractors and tractors. The advantage is the possibility of use with other crops.
- ProTek. Combined planter with the ability to change the number of rows from 1 to 4. Has an adjustable ejection hole from 3 to 15 mm. It is also possible to adjust the frequency of opening of the gutter.
- ChS-4. Four-row unit with adjustable pitch and planting depth. Works steadily on uneven ground.
- CHSN-4. Four-row mounted planter. Used with MTZ 80 tractors and similar in power. Sows 15 cloves per 1 m. Press wheels are installed.
Principle of operation
Garlic seeders are:
- manual;
- to the walk-behind tractor;
- to a tractor or mini tractor;
- multi-row;
- combined.
All varieties have a similar operating principle. The garlic planter consists of a frame to which a housing is installed, a container for seedlings, a gearbox and a chain with a sprocket.
Metal discs evenly distribute the bulbs in a row. To cut a furrow, a coulter is installed. The depth of soil cultivation when planting garlic is 16-18 cm.
The container with planting material is located in the upper part, from where it is captured by a special mechanism and placed in the furrow. Some garlic seeders have a reservoir for adding water or fertilizer along with the planting.
Using garlic seeders allows you to:
- plant the crop carefully at the same step;
- ensure the required sowing density;
- maintain processing depth.
Planter (seeder) for garlic
To make farming work easier, craftsmen are constantly inventing some kind of mechanisms. One of the most popular devices is a garlic planter. Using a simple device, the soil is prepared for planting onions and garlic.
Operating principle of the planter
A video of the operating principle of the planter can be viewed on the YouTube channel; in a few words we will try to explain its operating principle.
- a coulter that forms a furrow and, after planting, covers the cloves with soil;
- a container for storing in which prepared garlic cloves are placed;
- a seeder that distributes the cloves throughout the bed;
- wheel;
- shaft;
- chain;
- regulating brushes;
- handles.
All necessary parts are mounted on a metal frame.
The garlic planter can only operate on soft, loose soil. The device makes landing easier, making it faster. There are two models of planters.
Types of garlic planters
The manual type is very economical. It is transported by hand, suitable for beginner gardeners, and adjusted manually. The time spent on landing will take more than when using a walk-behind tractor, but fuel can be saved.
A garlic planter for a walk-behind tractor requires high fuel costs, but planting with it is convenient and, most importantly, fast. There are a large number of adapters, so the planter can be used for any model of walk-behind tractor.
The four-row planter is different in that garlic is planted in four rows at once. Precise landing is made possible by the precise placement of the tines into the furrows. The garlic and onion planter is very effective in different areas of work. The device can also be homemade.
Planting garlic using a planter (seeder)
A seeder is a universal device; it will help to accurately plant not only garlic, but also small potatoes, saffron, and onions. If crops are planted correctly, a rich harvest is guaranteed.
- Prepared garlic cloves or other seeds must be poured into a special container.
- Using a coulter, furrows are made for sowing garlic.
- The seeder sows seeds into loose soil.
- Sprinkle the planted material with loose soil.
It should be remembered that it is necessary to carefully prepare the garden, dig it up so that the soil becomes soft. If you try to run the device on an unprepared area, it may break.
The manual seeder is functional, easy to maintain, and environmentally friendly. It is perfect for a small summer cottage. For growing in larger areas, it is better to use a walk-behind tractor.
Making a device yourself
For production, you can use available materials that are available at each site. This is wire, pipe cuttings. The manufacturing method is simple, but you will have to use drawings. The seeder must perform certain functions:
- place the tines evenly into the soil;
- maintain the width and straight planting line between rows;
- achieve the required planting depth.
To produce the simplest agricultural seeder, a hole needs to be made in the center of the prepared container for the material. There is a small hole in the lid for garlic or onion sets. Use a tin can lid to make a small valve for the cut hole. You can use other available material.
Insert a small piece of plastic pipe into the central hole. Insert a metal pipe into this pipe. Place a bolt and nut in it and secure it on both sides with washers for free rotation. Screw a handle (wooden or plastic) to the seed container. Attach the opener to the handle. You can use a slightly bent hoe.
Some gardeners equip the planter with compaction wheels. They can be made from plastic wheels from a toy car. You can use a seeder from a tractor; it is driven by a bicycle chain. The seeding container can be made with a double bottom by inserting a movable metal plate into it. This will help to ensure uniform planting of the crop and control the sowing density of the area.
Benefits of using DIY devices
Homemade devices have certain advantages over purchased models. A summer resident can independently make a more complex or simpler design that will be convenient for him in any position. The advantages also include:
- Most replacement parts are easy to find around your house or shed and you don't even have to buy them, which can save you a significant amount of money.
- If you supplement the model with various objects, it is quite possible to make a universal device that can be used for other purposes or speed up the process.
- Home appliances are often suitable for planting not only garlic, but also other seeds.
Attention! The biggest advantage is still the low cost of the device; if desired, it can be made for free if all the materials are found at the dacha.
Mechanical seeders can also be made from scrap materials