How to remove the engine from a car in the garage without resorting to the help of a car service
In fact, this is not such a complicated procedure as it might seem at first glance. The main task is to select tools for removing the motor.
Important! The engine weighs several hundred kilograms. Falling it can not only cause property damage, but also lead to serious injuries. Before lifting the engine from the engine compartment, the following procedures must be carried out:
Before lifting the engine from the engine compartment, it is necessary to carry out the following procedures:
- Drain all technical fluids: oil, power steering fluid, brake fluid.
- Free the cooling system from antifreeze.
- Drain the gearbox (except when you remove the engine without removing the gearbox).
- Disconnect all hoses and pipes of the fuel, brake, lubrication and cooling systems.
- If possible, remove attachments: air conditioning compressor, generator, etc.
- Disconnect electrical cables, engine control unit, injector control cables, high-voltage ignition coil wires.
- Remove the connectors from all motor sensors. It is recommended to make a list (“based on” the maintenance and repair instructions), this will help you not to miss a hidden connector.
- In most cases, you will need to remove the hood cover.
If you plan to remove the engine without the transmission, you need to unscrew all the tightening bolts and make sure that after removal the gearbox will not fall under the car. That is, you need to take care of temporarily securing the unit.
How to use
The telescopic boom of the mechanism can be installed in several positions. The goose is maneuverable and can be controlled by 1 person. The equipment lifts quite heavy loads due to the installed jack; no additional accessories or devices for moving heavy loads are needed.
In order to raise the car engine, you need to open the hood and roll up the crane. It is installed so that the “legs” are placed under the machine, and the chain with the hook hangs over the engine.
The engine has eyes, cables are hooked onto them, and a chain with a hook is connected to them. Having installed the pry bar, pump the jack. He raises the boom, and the engine goes up with it.
After the repair of the machine is completed, the motor is lowered into place and the hook is removed. The crane is rolled away from the car. If necessary, it can be disassembled.
Removing an injection engine from a car without disassembling
To remove the injection engine from the car, you need a lifting device with a lifting capacity of at least 300 kg and slings (chain)
Installing an injection engine on a car
Installing the engine and all removed parts is performed in the reverse order
On these machines, VAZ 2101 to 2107, the principle of engine removal is the same. If you decide to remove the engine yourself at home, without any equipment, and don’t know how to do it correctly, then this article is for you.
The engine has to be removed to overhaul it, or to replace it with another engine.
You look at the engine and the first feeling is that it is difficult to remove the engine from the car, but in fact everything is very simple, two men can easily remove the engine themselves at home and also put it in place. I will give an example of removing an engine from a VAZ 2106, although this principle is suitable for VAZ2101 to 2107.
The engine can be removed entirely, but this is much more difficult, or you can remove it without the head, this is much easier. If you decide to repair the engine yourself, then the second option is preferable, since you have to disassemble the engine anyway and why drag out the extra weight. I will describe the removal of the engine with its partial disassembly, in the engine compartment of the car.
The reason for removing the engine was that the splines on the oil pump drive gears on this six were torn off, and the driver drove on without oil pressure, and the engine jammed.
Necessary materials
The tap is made from a profile 7 m long. It is best to use a material whose wall thickness is 7 mm. The mechanism must be durable, so you should choose a profile with a cross section of 80x80 mm.
To make a lifting device, you will also need several pipes. Suitable products are 700 mm, the cross-section of which ranges from 76 to 99 mm.
To build a crane you will need a jack, you can take it from a VAZ. It is best to use a device that is designed to lift loads weighing up to 5 tons. To construct the mechanism, 4 plates with a thickness of 8 mm are required.
To assemble a crane yourself, you need to have the following set of tools:
- drill;
- inverter for welding;
- spanners;
- Bulgarian
Assembling the mechanism is not complicated, so it can be easily done on your own. A gantry crane or any other device can be painted after assembly.
Removing the engine, VOLGA AVTOMOTIV-TOMIX
The engine is removed from the car upwards. To remove the engine, a lifting device with a lifting capacity of at least 300 kg is required. The car must be installed on a lift, inspection ditch or overpass. Before removing the engine, it is necessary to prepare a reliable stand on which the engine must stand steadily. It is easier to remove the engine if you remove the hood.
Before disconnecting hoses and electrical wires, we recommend that you mark them so as not to mix them up during assembly.
1. Disconnect the fuel supply and drain lines.
2. Remove the battery.
3. Remove the hood.
4. Remove the engine splash guard.
5. Drain the engine cooling system.
6. Drain the oil from the engine crankcase.
7. Remove the radiator of the cooling system with the electric fan and fan shroud.
8. Disconnect the wire terminals from the ignition coils. Remove the ignition coils.
9. Disconnect the phase sensor connector from the wiring harness.
10. Remove the screws and disconnect the wires from the oil pressure indicator 1 and emergency oil pressure 2 sensors. Loosen the clamp and remove hose 3 to the expansion tank from the thermostat fitting.
11. Disconnect the connectors from the engine temperature sensors 3, coolant temperature indicator 2, coolant overheat indicator 1.
12. Loosen the tightening of clamp 1 and remove hose 2 from the fitting to the check valve of the vacuum brake booster. Disconnect connector 3 from the throttle position sensor. Loosen the clamp and disconnect pipe 4 of the air supply from the throttle assembly. Move the pipe along with the mass air flow sensor to the side.
13. Unscrew the nut and remove the blue ground wire 2 from the stud at the front end of the receiver. Unscrew nut 1 and remove accelerator cable 3 from sector 4 of the air throttle valve drive.
DIY crane assembly technology
If you have certain skills, assembling the mechanism yourself will not be difficult. To do this, it is important to draw up a preliminary design drawing, choose materials wisely and strictly follow the assembly instructions.
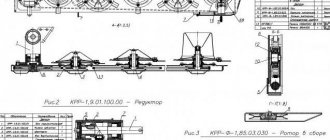
Schemes and drawings
Below are sample drawings of a hydraulic crane. You need to make accurate calculations yourself, based on the parameters of a particular garage.
Material selection
To build a garage lift yourself, it is recommended to first purchase all the required materials:
- 3 steel corners with parameters 7.5x7.5x0.8 centimeters.
- “Worm” gearbox, the minimum load capacity of which starts from 300 kilograms, and the additional indicator is 60 kilograms.
- A strong steel plate one centimeter thick. If you have an old metal cutting machine, you can take it from it; you won’t need outside help for this.
- About 10 matching bolts.
- 2 dense metal chains with a diameter of two to three centimeters. The crane is designed to work with very heavy materials - you should carefully monitor the quality of the metal.
- Hook.
- Steel cable with a diameter of 5 millimeters.
- 2 keys with different parameters in the shape of an asterisk.
Step-by-step construction instructions
The process of assembling and installing a homemade garage crane does not look complicated:
- steel corners must be installed on parallel walls;
- fasten the steel plate to them using M8 bolts;
- fix the “worm” gearbox on the plate;
- install a larger key on the drive shaft;
- drill a hole in a pre-designated place, insert a chain into it and close it into a ring;
- fix a smaller key on the output shaft of the gearbox;
- drill 2 more holes in the plate;
- pass the second chain through the holes, where one end is on a small key, and a hook is installed on the second.
Installing a faucet yourself has a number of important advantages. For example, the cost of a homemade mechanism is almost two times lower than a purchased one.
Causes
There are several most common reasons why a car owner has to remove the engine from his car.
| Cause | Peculiarities |
| Major renovation | In the event of a serious accident or as a result of wear of key engine elements, it will not be possible to restore its functionality without a removal procedure. Therefore, they resort to dismantling the engine |
| Replacement | It’s not uncommon for VAZ 2109 owners to think about replacing the standard factory engine with a more efficient, powerful power unit. This is a serious step, where dismantling is one of the initial stages |
| Finalization | If there is no opportunity or desire to change the engine, some simply modify the existing one. Tuning can be quite complex, involving the need to completely remove the engine from the engine compartment |
Regardless of the reasons, you need to remove the engine carefully, following a clear sequence of your actions. Decide in advance whether you will dismantle the engine together with the gearbox or without removing it.
Removal from gearbox
Follow the instructions clearly, be sure to watch the video tutorials. Plus, don't forget to check the condition of all engine mounts, since you'll probably be reassembling it again. All damaged elements will have to be replaced without fail.
- First, disconnect the battery to completely cut off the power to the car.
- Drain the oil from the engine crankcase. Here it is better for the engine to be warm. This will allow the oil to drain out faster.
- Drain the coolant from the cooling system. A cold motor is already required here. Be careful.
- To disconnect the exhaust systems, you will have to completely remove the engine crankcase protection and dismantle the exhaust pipe.
- Remove the air filter housing, and then disconnect all hoses from the engine, power wiring, sensors, damper rods, and brake system vacuum hoses.
- Unscrew the fastening nut of the ground wire, put on the stud and located on the clutch housing.
- Disconnect the cooling system pipes and turn off the thermostat.
- Disconnect the central high voltage from the ignition distributor. After this, you can release the clamp of the block with the supply wiring and remove the entire block.
- Disconnect the fuel supply hoses from the fuel pump. To do this, just loosen the fastening clamp.
- Unscrew the adjusting nuts to remove the drive cable from the clutch lever.
- Disconnect the power supply wires from the starter - one wire from the battery going to the solenoid relay and the wiring block.
- Switch off the generator in the same way.
- Deprive power by disconnecting the corresponding wires from the coolant temperature sensor and oil pressure sensor.
- Disconnect a pair of pipes from the radiator for the car interior. Loosen the clamps, which will allow you to remove the elements.
- We go directly under the car. Here it is better to have a pit or overpass available, otherwise it is inconvenient and unsafe to remove the engine while lying down.
- Unscrew the fastening nuts of the drive rod from the tip of the gearbox shift joint. The speedometer drive rod and the reverse sensor are also disconnected here. You need to disconnect the power wires.
- Disconnect both guy wires, right and left. Before this, you need to loosen the clamp of the tensioner fastening nut to the suspension arm on both sides. Next, unscrew the three bolts of the bracket to the car body. It is not necessary to remove them completely, but just move them to the side. This way they will not interfere with further processes.
- The next step is to disconnect the tie rods. To achieve the desired result, remove the cotter pin and unscrew the nut. Next, armed with a special puller, press the pin out of the swing arm.
- We perform the same actions with the ball joint, which will need to be similarly disconnected from the lever.
- Using a pry bar, pull out the upper tail of the front wheel drive and move it slightly to the side. Don't forget to insert a technological plug in place of this tail. A plug from an old grenade will suit you just fine, if you have one available.
- Now comes the stage of directly dismantling the power unit itself.
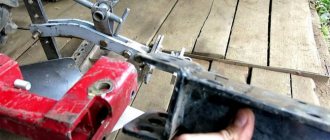
- Securely secure the motor by tying it by the eyelets using a strong rope or metal wire. Rym translated from Dutch “ring” means ring. That is, instead of a head, the eye bolt and eye nut end in a ring. And the eye bolt and eye nut are intended for gripping and moving machines, parts, as well as during installation, disassembly, loading, etc.
How to remove an engine from a car
At home, there is usually no professional lifting equipment, so you will have to rent it or make it yourself.
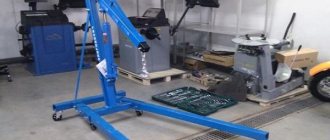
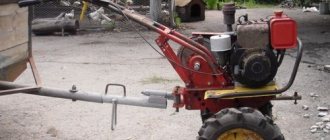
Do-it-yourself goose for removing the engine
This is a simple mechanism that resembles a gooseneck. It makes it possible to move the engine away from the engine compartment. It may have a rotating design that allows you to remove the engine without moving the machine.
The heavy internal combustion engine is simply transferred to a workbench located next to the car. In fact, it is a universal garage crane. The rack rests on long “legs” located under the engine compartment to prevent it from tipping over. A cable and a winch are used for lifting.
The gander is used both in garage conditions and in small services.
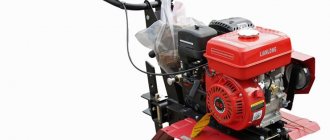
DIY engine removal lift
As a rule, this is a rolling crane, the lower part of which is placed under the front bumper. A smooth platform is required; on uneven ground, removing the engine using such a device is problematic. The lift operates using hydraulics or a tensioning mechanism like a winch. The device is simple: a stand with rolling supports, and a movable boom on which the motor is suspended. You can make a lift with your own hands from a channel or a square professional. pipes.
If there are strong wheels on supporting legs, you can quickly roll out the lift with the motor and move it to the repair area.
Design features and operating principle
The hydraulic valve is made of durable metal and has a stable design. The main principle of the mechanism structure: stable support with low dead weight. This helps you lift loads of up to three tons with ease, but a maximum of two meters above the ground.
Garage crane is used for:
- removing the engine;
- lifting beams, bridges;
- movement of dimensional units.
The crane contains a hydraulic drive and operates through a system of communicating vessels. The method allows you to make the rise smooth.
Stationary
The stationary crane is installed in large car repair shops and is securely attached to a monolithic foundation. The mechanism has a boom with a rotating system and is equipped with a manual drive. Allows you to work on only one vehicle at a time.
It is important to calculate the installation location in advance, since it will not be possible to dismantle the structure without loss.
An integral advantage of a stationary crane is its large lifting capacity. It is provided by a monolithic support, which creates rigidity of the system.
Portable
The hydraulic rolling crane has wheels on its base. The support is provided by the lower metal beams, which results in loss of load capacity readings. It is better to choose a faucet with a massive triangular support. By design they are divided:
- on cast solid supports with limited boom reach, but good load capacity;
- telescopic or folding - they have an increased boom reach, but reduce the load capacity by several times.
Important! Folding units need to strictly follow the instructions for lifting the permitted load. The arrow cannot withstand and, if the permitted standards are not observed, it breaks off.
Without removing the gearbox
In short, it is quite possible to remove the engine from your “nine” without removing the gearbox. To do this you will have to follow these steps:
- Place bricks or other reliable supports under the gearbox;
- Unscrew the left crab, move the stretcher aside;
- Remove the generator, crankshaft pulley, and camshaft gear from the engine;
- The pump, tensioner pin, distributor, and exhaust pipe are also dismantled;
- If a major overhaul is planned, then you can also remove the head;
- Then the engine mount is removed;
- The motor is moved from the box and lowered to the floor. To remove the engine, the front part is raised higher using a jack and the volume is removed;
- Or you can pull it out through the top using a winch.
In practice, all experts recommend dismantling the engine along with the gearbox. Especially if you plan to replace the engine or increase the power of the standard engine. In this situation, the box itself is often changed so that it can clearly interact with the new motor.
Gearbox from nine