Small agricultural machinery of domestic production is widely popular among Russian farmers and owners of household plots. Cascade walk-behind tractors have many adherents. Many owners of these units successfully carry out independent maintenance of their equipment. However, in order to ensure its smooth operation and long service life, it is important to know how to properly maintain this equipment. Today we will study such an important part of the Cascade walk-behind tractor as the gearbox.
Gearbox diagram
The mechanism system includes bushings and axles, which are connected by a special gasket and bolts. The parts of the structure are equipped with squares, sprockets and a spring, forming the basis of the device. Mechanism parts include:
- covers;
- pulleys;
- shift fork and shaft;
- bearings;
- control lever;
- input shaft bushings;
- shaft blocks;
- intermediate shaft gears;
- washers;
- gear oil seals;
- chain;
- stars;
- sprocket blocks;
- input shaft;
- clutch;
- clutch fork;
- brackets;
- springs;
- left and right axle shafts.
In this video we will look at repairing the gearbox of a Cascade walk-behind tractor:
Considering that the designs of the devices are quite simple, assembling the gearbox of the Cascade walk-behind tractor is usually not difficult.
Modifications with one lock
Making a reduction gearbox with your own hands is very simple. In this case, the pushers must be installed under the stops. The box for modification can be selected as a single-chamber type. Gears can be used with a clamp. Pressure disks are installed with a roller mechanism. The pressure disk is fixed in front of the pusher. To install the spring, use a hammer. The clutch is mounted under the disc. Ball bearings can be used in different sizes.
Read also: How a hydraulic press works
What are the types of walk-behind tractor gearboxes: types and purpose
One of the key differences between walk-behind tractors is their design. Unit gearboxes also vary in type. Currently used:
- Angular gearbox. This device connects the power plant and transmission. Due to its technical characteristics and availability, it is quite popular among farm owners. One of the attractive aspects of this type of gearbox is the ability to modify it, increasing productivity.
- Reduction gear. A mechanism of this type allows you to increase the load of the motor and reduce its speed. This type of gearbox is considered the most reliable and functional, since it is made of high-strength parts and is equipped with a high-quality cooling system. The main attractive feature of the device is its high performance in any load mode.
- Reverse gearbox. As the name suggests, this mechanism has a reverse function. It is mounted on the main shaft. The disadvantages of this type of device are low performance and low speed.
- Gear reducer. This type of gearbox is most common on heavy models of walk-behind tractors. It has a fairly simple design and is highly reliable, but is quite difficult to maintain.
- Worm gear. This mechanism is equipped with a special screw and a toothed worm wheel. All parts of this device are characterized by increased strength, making such gearboxes reliable and durable. A distinctive feature is the reduced angular speed and torque of the highest type. Design features provide the unit with such a gearbox with smooth operation and the ability to produce minimal noise.
Reviews of combined devices
Combined gearboxes that reduce speed are highly valued among professionals. If you believe the reviews, the models are well suited for asynchronous motors. It is more expedient to use pushers made of steel plates. Stops are used to install the discs. The coupling for modifications is fixed behind the shaft. If you believe the reviews of experts, the retainer can be cut from a regular plate. It should also be noted that it is more advisable to install the cover with a screw clamp.
What kind of oil to pour into the walk-behind tractor gearbox
Oil plays a vital role in the operation of equipment - the performance and service life of the unit depend on its correct use and regular replacement. It is important to take into account when using it that with constant increased loads of the device, one should expect its rapid wear. In addition, it is not recommended to install additional cutters yourself.
Increasing loads beyond those for which the device is designed leads to wear of the gearbox chains - the bushings are damaged, causing the chains to jump off during operation. If you apply strong lateral loads, this leads to premature wear of the support washer, which also leads to malfunction of the chain. Therefore, it is not recommended to work on an inclined surface or allow the machine to turn excessively sharply.
When using a Cascade walk-behind tractor, a complete oil change must be done every 50 hours of operation of the unit. When choosing fuel and engine oil, you must strictly adhere to the operating and repair instructions and use only those substances recommended by the manufacturer. In particular, for summer time it is optimal to use 15W-40 series oil, and in winter - 10W-40 or similar domestically produced oils. As for the transmission, it is allowed to use domestic oils TAP-15v and TAD-17i or imported oils of the 75W-90 and 80W-90 series.
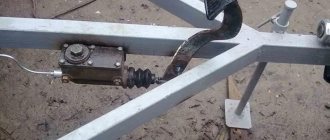
Features of operation
General device of the creeper
After the creeper has been installed on the walk-behind tractor, it is necessary to check its operation at least once every six months, periodically changing the oil in the bearings, lubricating the chains, pulley and sprockets. If the device is rarely used and is mainly stored, then it should be provided with anti-corrosion treatment and high-quality preservation using appropriate oil.
Before starting work, you need to make sure that the gearbox housing is closed, all elements are in good condition and securely fastened together. During work, only shoes with thick leather uppers should be used.
The speed reducer for a walk-behind tractor can only be wiped and lubricated when it is turned off and cooled down.
This device belongs to the category of sources of increased danger. Minors should not be allowed to work with him.
Related video: DIY creeper
Changing the oil in a walk-behind tractor
When using a walk-behind tractor, it is always important to remember to check the oil level and change it at the correct intervals. When changing the oil, follow these steps:
- The unit must be installed so that its wings are parallel to the surface on which it is located. The gearbox itself must be tilted.
- To make it more convenient to drain the old oil, you need to install the unit on an elevated platform. After this, you should unscrew the filler plug located in the upper part of the housing and the drain plug in the lower part of the unit (it is better to first place a container under it in an appropriate container to drain the old oil).
- After the old oil has been completely drained, close the drain plug and pour fresh oil through the hole in the filler plug.
Homemade mini tractors, all-terrain vehicles and cars
DIY cars, all-terrain vehicles, tractors and walk-behind tractors
Blueprints
We will also highlight drawings as a separate item. We recommend that you take a careful look at them before you begin. The instruction manual for any mini walk-behind tractor is suitable for this. The Gardenshop store has collected for you the necessary drawings for assembling a walk-behind tractor with your own hands.
READ Motoblock Kutaisi Super 610 Engine Replacement
Assembling a walk-behind tractor from a chainsaw
If you have an unnecessary saw lying around in the garage somewhere, then you can easily convert it into a motor cultivator. Here you can't do without understanding the drawings. A drawing for a walk-behind tractor made from a chainsaw is necessary primarily in order to be able to maintain the highest accuracy during installation.
Recommendation: It is better to use a powerful, compact and lightweight chainsaw with high performance to create a motor cultivator.
- Creating a frame. It needs to be made into a cubic shape with corners measuring 32 x 32 cm.
- Engine installation. It should be attached to the cross member of the frame.
- Install the fuel tank. It is installed under the cross member of the frame. It is best to use brackets to implement this point.
- Weld the bearings onto the supports.
- Creation of steering control. Weld the center of gravity, which is located above the wheelbase, to the wheel support. Any engine ignition switch will work.
The advantages are obvious: there are no serious requirements for lubrication and fuel, it works autonomously, and can be used in hard-to-reach places. In addition, such a homemade cultivator made from improvised materials is very compact and lightweight.
Assembling a walk-behind tractor from a car
Absolutely any car is suitable for this. What tools will you need?
- checkpoint
- Final drives
- Front suspension
- Steering rack
- Wheels
At the very beginning of the assembly, you need to weld a strong metal pipe up to 10 cm in size to create an axis. On both sides of the end of the pipe, you need to weld ball bearings to the body, then attach motorcycle wheels to them. You need to attach a gearbox from the same motorcycle to the pipe by welding brackets. After carrying out such a cycle of work, it is possible to install a full-fledged engine on the basis of the ZAZ gearbox. The last step will be to attach the unit control handles to the vertical holder.
Do-it-yourself disassembly and assembly of the gearbox
First of all, to disassemble the walk-behind tractor gearbox, you need to dismantle it (remove it from the main device). After this, do the following:
- unscrew the screws;
- remove the covers;
- disconnect the input shaft bushing;
- remove the control lever and fork;
- remove the input shaft with gear;
- remove the shaft from the sleeve;
- remove the chain from the shaft;
- remove the shaft block;
- remove the sprocket block;
- remove the intermediate shaft with gears;
- dismantle the axle shaft, clutch and other axle shaft.
The device is assembled in the reverse order of disassembly.
Stages of work to create this device
- Installation of drive sprockets on the input shaft. In this case, installation can be done by spot welding, flange or key connection;
- Assembly of driven shaft axles;
- Installation of the driven sprocket;
- The case can be picked up from disassembly and adjusted or made by yourself. At the same time, it is necessary to make technological holes in it for oil seals and bearing connections;
- Installation of closed type ball bearings. An excellent option would be cylindrical ones. Their installation is carried out by tension;
- The drive shaft is mounted on eccentric bearing supports with the ability to adjust the chain tension by at least 15 degrees;
- At the final stage, a lid with a sealing gasket is installed.
Having decided to do this, it is better to first assess your strengths, knowledge and skills in handling the tool, so as not to get into trouble by spending a decent amount of money, a lot of time and effort, and at the same time, without creating the necessary device, but if you are an existing or former mechanic, you can safely get down to business.
If you have any questions, leave them in the comments below the article. We or our visitors will be happy to answer them
DIY gearbox repair
Easy maintainability is one of the reasons why Cascade agricultural units have gained their popularity. When operating these walk-behind tractors, it is not difficult to independently adjust and repair almost any of its parts.
The most common cause of malfunction is wear of parts, which occurs naturally sooner or later. To increase the service life of the device, it is recommended to adjust it as needed during operation and carry out technical inspections at the required intervals.
Let's look at the most common breakdowns:
- problems with spark plugs (oxidation, contacts come off, the shape of the gap has changed);
- insufficient oil level;
- cylinder gasket wear;
- contamination of the fuel system (resulting in difficulty getting fuel into the carburetor);
- The chain or belt tension has weakened.
As a result of malfunctions in various parts of the device, several types of malfunctions are possible. Let's take a closer look at them:
- Excessive heating of the transmission during operation is a malfunction that is caused by bearing wear or oil problems (low level or poor quality). To avoid interruptions in operation due to oil, it should be replaced. If the malfunction remains, it is necessary to disassemble the transmission, inspect the bearings and replace those that have become unusable.
- Uneven running of the unit with stable engine operation is a problem usually associated with wear of the treads. It is important to consider here that you cannot work on worn out protectors. If everything is in order with the treads, there may be a problem of uneven pressure on each of the wheels.
- Vibration of a walk-behind tractor during operation is a malfunction that occurs if the equipment attached to the unit is poorly secured. To avoid this, before starting work you need to make sure that the bolt connections are made correctly and securely.
Another problem that sometimes occurs is difficulty starting the engine. There may be several reasons for this, and in order to determine which one is interfering with the correct operation of the unit, it is necessary to check it according to the following scheme:
- inspect the appearance of the device and make sure there is no damage;
- make sure that the fuel tank is more than half full and the quality of gasoline meets that required by the manufacturer;
- place the walk-behind tractor on a flat horizontal surface;
- make sure that the fuel supply system is working correctly;
- check the ignition system - make sure that a spark is being supplied;
- Check the operation of the carburetor and, if necessary, adjust the fuel mixture.
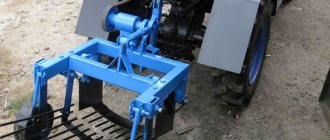
Additional accessories
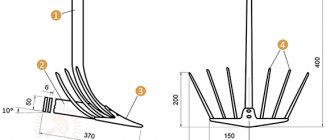
- Installation of a rake on a walk-behind tractor for collecting debris, leaves, and hay. Such a simple device will speed up autumn field work and allow you to clear large areas of debris in a matter of minutes. To make a rake you will need: several meters of reinforcement with a cross section of 8-12 mm and a strip of sheet metal. The reinforcement is cut into pieces 10 cm long and welded to the plate in several rows with an interval of 3-5 cm. To increase maneuverability, the rake can be equipped with roller wheels.
- A trailer and cart will help transport large loads. The cart can be made from scrap materials - channel and old car wheels, metal profiles and boards. The clutch is made standard for both tractors and cars.
- If desired, you can make a potato digger, hiller and harrows, which will not be inferior in quality to purchased ones.
Plows for walk-behind tractors
- The easiest to use is the single-hull one, also known as the Zykov plow.
- Reversible plow for walk-behind tractor: rotary or reversible. The upper part has a curved feather, which turns the soil over during plowing. A universal device that easily copes with plowing heavy soils. Quickly copes with the treatment of areas with clay and marshy soil.
- The rotary plow for a walk-behind tractor has a complex design. Depending on the number of ploughshares, there are two-body and three-body models. Active plowshares dump soil in one direction only, while passive plowshares level the beds and lift them. Tilling the soil with such a plow has a number of advantages: the soil is maximally saturated with oxygen; tire wear and fuel consumption are reduced; after processing there are no large clods of earth left.
- A rotary plow for a walk-behind tractor provides unlimited possibilities. During operation, the axis rotates, and with it the soil layers. It easily plows even very hard soil at a depth of about 30 centimeters. There are paddle, drum, shovel and auger plows. Devices of the first type are equipped with a rigid pusher and can consist of a spring plate or be combined. Units of the second type are equipped with a disk with blades that rotate during operation. A plow with a disc blade for a walk-behind tractor is suitable for work in early spring; it copes well with wet soil.
How to replace oil seals on a walk-behind tractor
Replacing the oil seal in the gearbox of a Cascade walk-behind tractor is a necessary measure if this part fails.
Faulty oil seals cause oil leakage, as a result of which moving parts run dry, quickly wear out and become inoperable. This is interesting: video repair of a Cascade walk-behind tractor.
This repair is carried out as follows:
- Remove the cutters and clean them of dirt.
- Unscrew the bolts holding the cover and remove it from the unit.
- Remove the faulty oil seal and replace it with a new one, pre-lubricated with oil. If necessary, treat the connector with sealant. If the oil seals are protected by a special part, in order to remove and replace them, the gearbox must be disassembled.
Models with front pushrods
Reduction gearboxes for walk-behind tractors with front-mounted pushers are capable of maintaining high speeds of an asynchronous engine. The holders of the modifications are installed with roller mechanisms. Many models fold with longitudinal stops. Before starting assembly, a chamber for ball bearings is prepared. They are fixed on the bottom of the block. The driven disk is machined to a small diameter. It should also be noted that it is important to securely fix the stops. A cover must be attached to the rear of the gearbox.
Replacing bearings
As mentioned above, replacement of bearings is necessary if they are worn out. Replacement is quite easy, but it is recommended to do it after completely disconnecting the part.
Tags: big, make, , power, box, first, conditions, attention, availability, position, task, soil, plow, care, available, brand, normal, summer residents, plus, processing, working, volume, specialists, dirt, long , move, indicators, costs, fastenings, question, purchase, consists of, spare parts, impossible, size, some, adjust, weight, frame, suitable, air, row, , GOST, day off, you can, choose, completely, condition, other
Reviews of one-stage modifications
Most experts speak positively about single-stage gearboxes. However, it is important to understand that high-quality models are assembled with adapter pushers. They use sharpened heads and do not rub against the discs. It is more expedient to install the gearbox shaft behind the partition. The gear is most often fixed in front of the rack.
It should also be noted that there are compact modifications with a small shaft. They have small pressure disks; the device is not able to maintain high engine speeds. The holders are installed in a cylindrical shape. Pressure plates are used with and without adapters. Rollers are used to reduce friction, and bearings are installed at the base of the shaft. It is important to pay special attention to the block during assembly. In order for the case to withstand heavy loads, it must be carefully soldered. At the end of the work, all that remains is to weld the lid.