As a fisherman, you have learned what it is like to carry a Russian ice auger to a fishing spot when it is -20 °C outside. As an owner, you have experienced the feelings of a man who dug 20 holes with a shovel while building a fence.
Domestic ice screws no longer attract you with their affordability and unproductiveness. You come to a store selling small mechanization equipment in order to buy imported products.
The numbers on the price tag are significant, but the amount of work on your site does not correspond to them. Buying an expensive tool for seasonal work is an irrational decision. And you once bought a chainsaw, but it turned out to be not so necessary.
This chainsaw can be turned into a presentable looking motor drill. Thanks to your ingenuity, you'll get two tools and save a lot of money.
How does a motor drill work and how does it work?
Motor drills differ in drives:
- gasoline;
- electrical;
- hydraulic.
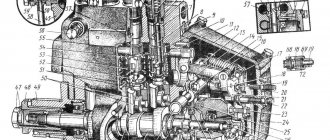
The motor drill consists of the following elements:
- drive (gasoline engine, electric motor, hydraulic drive);
- transmission (worm or cylindrical coaxial);
- drill (head, knives) connected to an auger;
- extension;
- frame.
The drive is necessary to create torque, causing the auger with the drill to rotate. Electric engines are quiet and operate without exhaust gases, but have less power and torque compared to gasoline engines and are limited in autonomy by the cord for supplying electricity.
Recently, electric drives powered by batteries have appeared. Gasoline and electric engines are high-speed and in order to transfer sufficient power to the auger drill, it is necessary to reduce the speed using the transmission. The transmission can be worm or cylindrical coaxial. During operation, you need to ensure that the transmission is filled with oil. Transmission ratio from 1:25 to 1:50.
The key part of a motorized drill is the drill connected to the auger. The drill is a small-diameter head, 7-10 cm long, which initially loosens and crushes the soil, which is then cut off by a cutter consisting of two symmetrical horizontal knives mounted on the first branch of the auger and equal in diameter. The loosened, cut and crushed soil falls onto an auger, which is a screw belt wound onto a shaft and serves to feed the crushed load upward from the hole.
The walls of the hole are the outer walls of the screw device. The diameter of the drill head is 30−50 mm, while the diameter of the auger ranges from 150 to 250 or more. The larger the diameter of the auger, the larger the diameter of the dug hole, but the greater the power and torque required from the drive. Augers are available in various lengths from 1-2 turns to 10 and a length of about 70 cm. If it is necessary to drill a hole more than 1 m, an extension is used.
The final stage of production
To make a high-quality hole drill with your own hands, you need to pay due attention to the process of making a knife. It should be at the end of the hole drill
Therefore, this part will take on the entire load from cutting the soil. In order for it to serve for a long time and be able to effectively perform its functions, spring steel is used for its manufacture. This material is durable, wear-resistant, and does not require frequent sharpening.
The dimensions of the knife must correspond to the dimensions of the auger. A rotating sandpaper is used to sharpen it, and a welding machine is used to connect it to the base.
Dimensions of drill knives
Types of motor drills
- lungs;
- heavy.
The former are more compact and cheaper. One operator is enough to control them. They are equipped with an engine with a power of up to 3 liters. With. The most common engines are 1.5 -2 liters. With. and a working volume of 33−40 cubic meters.
cm. Their work is limited to loose sandy soils, loam and black soil. The maximum depth of the hole is 1.5−2 m.
When working with heavy soils, clays, and rocky soils, heavy motor drills . They are equipped with engines with power starting from 3.5 liters. With. and they require two operators to operate them. Some heavy motor drills are mounted not on a frame, but on a trolley. Then one manager is enough.
Heavy motor drills can be equipped with a hydraulic drive, which is completed with:
- hydraulic pump providing hydraulic fluid pressure;
- hydraulic motor , providing low-speed rotation of the shaft and drill with auger;
- distribution system providing reverse by switching hydraulic fluid supply valves.
The hydraulic drive is an extremely reliable system, as it does not contain a large number of moving moving parts and provides sufficient power and torque to operate large diameter augers on heavy soils. However, such systems are very expensive for non-industrial use without constant work. Heavy motor drills with hydraulic drive can handle drilling to a depth of up to 5 m.
The presence of reverse and several gears are extremely useful properties for motor drills, as they allow you to avoid jamming of the drill with the auger and select the optimal operating mode.
Recent Entries
Chainsaw or electric saw - what to choose for the garden? 4 mistakes when growing tomatoes in pots that almost all housewives make Secrets of growing seedlings from the Japanese, who are very sensitive to the soil
Rules of use and care
To ensure that the tool you make or purchase serves for many years, adhere to the following recommendations:
- Before drilling, loosen the top layer of soil with a shovel.
- Sharpen the blades in a timely manner with a whetstone or sandpaper.
- After making your own drill, coat it with an anti-corrosion compound or paint it to prevent rust from forming.
- After use, thoroughly clean the working part from any remaining soil.
- Store the drill in a dry, ventilated area.
- Repair any damage promptly and restore cracked paintwork.
What garden auger do you use?
ScrewDisk
When used skillfully, a hand garden auger is an indispensable assistant in working on a country plot.
- Motorized drill for excavation work: what is it, what is it for, types, criteria for choosing the optimal one, review of the best models, their pros and cons, advice from owners
- How to choose the best planting cone for your garden: types, material, review of 7 popular models, their pros and cons
- How to choose the best garden rake: their types, design, important parameters, main varieties, selection criteria
- A miracle shovel for the garden - we dig the soil in the country without effort: the principle and rules of operation of a manual cultivator based on combined forks
The main idea is an earth drill
The motor auger is descended from its predecessor, the hand-held earth auger, which was claimed as an invention in the United States back in 1890 as a machine “for drilling holes for the installation of mailboxes.” Even then, the basic operating principle was laid down:
- a post drill that crushes the soil;
- an auger that feeds it upward from the hole.
An auger, a device well known to us from a mechanical meat grinder, is a screw rotating in a pipe close to its walls, pushing the mass entering the pipe along its axis.
A manual drilling rig consists of the drilling part itself (knives, drill), an auger mechanism for lifting soil, and handles for creating torque with muscle force. The motor drill replaced the muscular force with the torque created by the drive.
Rules of operation and care
In order for a homemade fishing drill to serve properly and remain a fisherman’s assistant for a long time, you must adhere to some rules:
- After each use, wipe the drill dry, even though it has a protective coating.
- Store the equipment in a specially designed case made of thick fabric with holes for ventilation.
- During seasonal storage, lubricate the knives with machine oil. If the drill is made of several parts, lubricate all joints.
- Clean knives that have ice or snow stuck to them with a brush. Do not knock the coating off the knives, as this can lead to their dulling.
- Immediately secure all loose parts.
- Paint over areas where scratches have appeared to prevent rust from appearing.
When drilling holes, do not allow uneven load distribution
You should drill very carefully, paying attention to the thickness of the ice. The speed of drilling holes depends on the quality and reliability of the screwdriver
The manufacture of this design requires special attention. After all, the holes will be drilled not by someone, but by the fisherman himself. The easier and faster the drill is to drill, the more enjoyable the fishing process itself will be. After all, it should be organized in such a way that you can relax and have fun, and not exhaust yourself with hard work.
Working on a motorized drill
In order to drill a hole, the operator, holding the control handles, sets the motor drill vertically to the point where the hole is supposed to be located and turns on the engine. The drill head goes deeper, the cutter begins to cut the soil and the motor drill sinks.
For best performance, it must be periodically jerked upward to release excess soil in the auger. The optimal depth of the resulting hole is limited by the height to which the operator can lift the device to remove it from the hole and is 1−1.5 m.
The disadvantage of using a motorized drill is that if the drill jams when it hits a stone, the motorized drill can make a sharp reverse rotation. The operator may be injured. Therefore, some motor drills (for example, from Hitachi) are equipped with a protective apron mounted on the frame of the motor drill and a special limiting lever that emergency shuts down the engine when it jams and begins to reverse rotation. Working with a motor drill requires the operator's careful attention to safety precautions and significant efforts to hold the motor drill.
Modifications
Before making your own, you need to consider various models of hand-held eartheners. Taking a suitable design as a basis, one should determine its characteristics: productivity, cutting force, ability to work with hard soil. Perhaps for individual use you will have to make a combined device that combines successful solutions from several models.
Basic diagrams of auger tools
The basis of the earth rotor is the screw part - the auger. It is made welded from thin-walled steel disks. The latter are cut from the center to the outer diameter and bent. As a rule, from 1 to 4 rings are taken to make a screw. The volume of soil that can be extracted in one pass depends on their quantity. However, with a larger number of rings, the drill is more difficult to rotate and remove from the ground. The soil is cut by the auger itself or additional blades. In the first case, the working edge quickly dulls on plant roots or stones. And the blades are made of durable steel and do not require periodic sharpening.
DIY motor drill
Prices for the most budget motorized drills start from 10,000 rubles. Having known skills in plumbing and repair work, you can build a motor drill from a chainsaw or a powerful electric drill.
If using a chainsaw you will need:
- a gearbox that reduces shaft rotation speed, which can be purchased separately;
- bushing for connecting the motor shaft to the gearbox shaft;
- a drill with an auger, which can also be purchased additionally.
Manufacturing a motorized drill based on a powerful (2 kW) hammer drill is even simpler, since the hammer drill has a built-in gearbox and a jamming safety system, and connection to the drill does not require additional devices.
The situation is similar with a drill, with the difference that an additional gearbox and adapter coupling are required. use a 30-50 mm drill with a length of 7-10 mm as drill head corresponds to the diameter of the base of the drill.
To make a screw, you need a reamer pattern, which can be found on the Internet, but twisting and welding a strip cut from a steel sheet is so labor-intensive that it is better to purchase a ready-made one.
The economics of the manufacturing process of power tools plays an important role. Before you dive into the manufacturing process, estimate the order of costs (gearbox, cutter, coupling, auger). Perhaps the price will be close to buying a budget option.
Recently, the MB-1 attachment , suitable for installation on chainsaws from Husqvarna, Stihl and some Chinese manufacturers, which allows you to attach a drill with an auger to the chainsaw and thus get two tools in one, a chainsaw and a motor drill.
When working with a homemade motor drill, you should remember that this is not a completely full-fledged tool and limit the hole drilling diameter to 150 mm.
Guide to assembling a homemade drilling rig
To assemble a drilling rig yourself, it is enough to have minimal experience working with a welding unit, an electric drill and an angle grinder.
Prepare the required equipment in advance. You will need:
- tool for creating external inch threads;
- Bulgarian;
- adjustable wrench;
- half-inch galvanized pipe, as well as a pipe of a similar size;
- plumbing cross.
Prepare everything you need and proceed to perform the work in accordance with the step-by-step guide.
First step
DIY drilling rig
Prepare lengths of pipe to make the main part of the drilling jig. The pipes will need to be fastened into a bracket and a cross. To do this, prepare a two-centimeter thread at the ends of the segments.
Weld pointed metal plates to the ends of several sections. They will serve as tips.
This installation involves drilling with a constant supply of water, thanks to which the actual construction of the deepening and soil removal will be easier.
DIY drilling rig
To supply water, connect a water supply or pump hose to any hole in the cross blank. Make the connection using a suitable adapter.
Second step
Proceed to connect the structural parts to the threaded connections. Connect a piece of workpiece with a fitted tip to the lower end of your working pipe. Make the connection using a squeegee.
Drilling itself will be carried out by deepening the pointed tip and rotating the working installation. Blanks with tips must have different lengths. You use the shortest jig first. Once the approximately meter deep hole is complete, replace the short tip with a slightly longer one.
DIY drilling rig
Third step
Assemble the base of the drilling structure from a square section profile. In this case, the base will be a rack with supporting components of the structure. The supports are connected to the main post by means of a transition pad using welding.
Attach the platform and motor to the square profile. Fix the profile itself to the rack so that it can move along the rack. The dimensions of the profile used should be slightly larger than the dimensions of the rack.
DIY drilling rig
When choosing an electric motor, be sure to pay attention to its power rating. To ensure optimal drilling conditions, a 0.5 horsepower motor will be sufficient
DIY drilling rigDIY drilling rigDIY drilling rigDIY drilling rig
Power regulation is carried out using a gearbox. A flange must be attached to the gearbox shaft. Attach another flange to the flange using bolts. There should be a rubber washer between these two flanges. Thanks to the rubber gasket, shock loads that appear when passing through different types of soil will be smoothed out.
Fourth step
Connect the water. The liquid must be continuously supplied to the main working tool through a drill. Without a properly organized water supply, the quality of equipment operation will decrease.
The problem mentioned above can be solved by installing a special device made from a steel pipe below the flanges. Prepare 2 holes in the pipe section with some shift in relation to each other.
Next, you need to make a groove on both ends of the pipe to accommodate ball bearings. You must also prepare an inch thread. At one end the pipe is connected to the flange, and at the other end the working elements will be installed.
In order to create additional moisture insulation for the created device, place it in a special polypropylene tee. Connect an adapter to the middle of this tee to connect the water supply hose.
Recommendations
If we compare a device assembled with our own hands and a purchased unit, the first option is considered more budget-friendly. For carrying out earthworks on a personal plot, a homemade unit will be quite sufficient, provided that there are no too hard soils.
When assembling a motor drill yourself, it is recommended to follow safety precautions and use only reliable and durable tools and materials. Experts also advise you to familiarize yourself with the structure of a motor drill, the design of simple mechanisms and the operating principle of the future tool.
Varieties
Each gearbox has its own peculiarity, due to which it is used in various fields. Most often they are classified according to the method of transmission of rotating mechanisms; the efficiency of the device depends on this. The main types of gearboxes include the following devices:
- on a hydraulic basis;
- based on a worm system;
- based on coaxial cylinders.
What can be said about the hydraulic gearbox system is that it is very wear-resistant and durable, unlike others. Inexperienced specialists believe that such devices are very expensive to maintain and complex. But this is not so: it is enough to change the oil and filters in the hydraulic system just once a year or season.
The second type of gearbox is special due to its conversion of engine torque into angular speeds using worm gears. The advantages of such a device are its silent operation and a high degree of smoothness of the tool during the drilling process.
But there are also disadvantages, one of them is the unreliable gears of the main gears, which are made of bronze.
Under heavy loads, it licks the threads, causing the device body to be more subject to wear.
The third type of mechanical devices is the most popular in industry. Helical gearboxes are inexpensive and have been used for a very long time. Their advantage is that when assembled they can work in any climatic conditions, they are very light, and can be easily assembled or dismantled.
In addition, gearboxes for gas drills come in straight and lateral types. It depends on the motor connection.
Rules of application
Typically, an electric earth drill is used to make holes for planting fruit trees or shrubs. But this device can also come in handy during construction work. It is great for creating holes where piles or other supporting elements will later be installed.
Manually creating holes in the ground is a labor-intensive task and is made more difficult by the presence of rocks and tree roots. However, using an electric drill can solve the problem easily and quickly. In a situation where it is necessary to drill holes in a hard-to-reach place, where it is not possible to place large equipment, such a device will significantly facilitate the process.
There are a variety of electric drills available in the market today. They differ in size from each other. They can even be used for work such as drilling a well or constructing a well. If you need a device to perform a wide range of tasks in the garden, then you can easily purchase it at any specialized store.
Budget electric drill.
As they say, laziness is the engine of progress. He began experiments on drilling through thick ice back in 2014. And it seems that I found the optimal solution to this, in the form of an attachment - a gearbox for a chainsaw, but something didn’t catch on; of course, it’s convenient for them to drive assholes, but that’s not what we go fishing for. https://www.youtube.com/watch?v=5mIlvYdKwvA And then just last season the original battery on the Dingasik “died” (it’s a winter “goat”, like a snowmobile), I stuck an adult 55 A/h battery in it .
Well, I think, since the stars have aligned, it’s time to switch the drill to electric traction. I bought a Toyota electric power steering at Drome for 2.5 rubles.
, a 22mm aluminum tube in Leroy, a rubberized cable with a cross section of 2.5mm, a 40 Amp car relay, a 30 A fuse, bicycle handles, crocodile clips on the terminals, and other little things.
First of all, I unscrewed all the unnecessary parts from the amplifier that could not be removed in a civilized way - I sawed them off with a grinder, only two wires should be left (thick power ones), the rest “in the furnace”. The button cannot be connected directly, they are usually designed for 2-5 amperes, and the motor “eats” 15-17, in general, sooner or later it will burn out. It is also advisable to install a fuse in the power branch; no one is insured against a short circuit, otherwise at least the battery will remain intact.
The button I have is not quite correct, it is a two-position on-off button, it is better to set it to “single-contact” like on a doorbell, pressed - there is power, released - no power, it’s safer.
Well, of course, it is advisable to solder all contacts. There is a lot of information on the Internet about how to connect a relay; I won’t describe it. I screwed the handle into the standard holes of the amplifier. I put spacers inside the tube on the bolts, without them, when tightening the nut, the handle flattens and it bursts.
The diameter of the output shaft was adjusted to the dimensions of the adapter.
The weight turned out to be 5 kg. Rotation can be provided either left or right, it all depends on how the terminals are connected to the battery. The rotation speed is about 140 rpm, which makes it quite comfortable to make holes in the ice.
I’ll also tell you a case of how NOT to do it. I started assembling the drill at the end of last season, screwed on the handle, installed the auger, threw the wires directly without buttons and relays and ran to the tests. The first hole was good, the second was a total “song”, and on the third the auger got caught on the lower edge of the ice..... In general, while I reached it and threw off the terminals, the handle broke off on the ice. It’s good that the drill itself didn’t drown. So don't repeat other people's mistakes. I wish you all a good bite and big catches in the coming season.
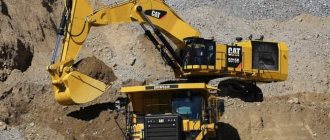
What is it needed for?
A motor drill (gasoline drill) greatly simplifies and speeds up the drilling of small wells: up to 1500 mm in depth and up to 200 mm in diameter.
The purpose of these wells can be very different:
- Recessing fence posts.
- Installation of a columnar foundation, lightning rod, flagpole or lighting pole.
- Strengthening the foundation.
- Preventing the collapse of pits or erosion of coastlines.
- Geological exploration work.
Comparative characteristics
For convenience, the most important parameters of different models have been grouped in a table.
| Model | Power, hp | Motor | Engine volume, cm3 | Weight, kg | Average price, rub |
| Champion AG252 | 2,2 | 2 stroke | 51,7 | 9.2 kg | 13000 |
| Patriot Garden PT AE50 | 2,2 | 2 stroke | 50 | 10 kg | 13500 |
| VULKAN GD620 | 3,2 | 2 stroke | 62 | 9.5 kg | 12000 |
| RedVerg RD-EA630B | 3 | 2 stroke | 63,3 | 12 kg | 17000 |
| Hitachi DA300E | 2,09 | 2 stroke | 50,2 | 17 kg | 43000 |
| ADA instruments Ground Drill 14 Reverse | 8 | 4 stroke | 172 | 30 kg | 50000 |
| Iron Mole Compact | 7 | 4 stroke | 212 | 45 kg | 78000 |
Main manufacturers
Many companies produce drilling equipment for use in garden plots. In countries such as Japan, Sweden and Italy, there are many companies producing electric drills . Among Russian consumers, the most popular devices are from the following companies:
- ECHO. This Japanese company produces a variety of products. The models are highly reliable and delight with their performance characteristics. Their feature is a fairly simple design. This eliminates frequent breakdowns and facilitates maintenance. The average price tag for devices from this manufacturer is 28,000 rubles.
- EFCO. The Italian manufacturer offers a variety of devices for drilling operations. A special feature of the devices is their increased strength; they can easily withstand heavy loads. The devices are great for frequent use. The brand's products are offered at an average price of 29,000 rubles.
- STIHL. The equipment of this company is well known on the Russian market. The domestic manufacturer offers a variety of devices. Its product line also includes electric drills. The models are practical and durable. They are also economical to use. The devices can be used to perform work of varying complexity and are equipped with a safe locking system. The average price for them in comparison with foreign analogues is much lower and amounts to 15,000 rubles.
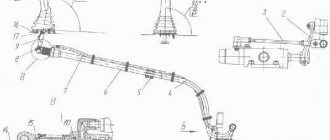
Vibrator from a hammer drill
To put the project into practice, you will need the following materials and tools:
- metal (steel) plate of the required dimensions, thickness from 50 to 70 mm;
- an iron rod or reinforcement (rectangular or round) of such length that it is possible to reach the bottom of the exposed formwork structure when pouring concrete;
- perforator;
- an old drill or a pick, a shovel, a chisel, even a crown;
- grinder with metal discs;
- welding machine with electrodes;
- ruler or tape measure;
- marker.
The minimum power of the hammer drill should be 1.5 kW - only such a tool will provide the required performance without overheating.
One side of the rod with a cross-section of 15-20 mm is processed so that it can be inserted into a punch chuck. A stainless steel plate is welded to the second side. For this you will need special electrodes.
It is better that the rod is also made of stainless steel. Concrete is an aggressive environment. Ordinary metal is highly susceptible to chemical attack and also wears out faster mechanically.
The sequence of manufacturing the tamping nozzle is as follows:
- Using a grinder, cut a rectangle of the required size from a steel sheet, and a piece of the required length from a round or rectangular rod;
- weld the plate to either end of the rod;
- cut off the drill seat with a small margin;
- weld it to the rod.
If you do not use an old drill, you will need to make a special adapter for the hammer drill chuck, or use machine tools to grind out a seat at the free end of the rod . The easiest way is to immediately use a drill of the required length. On the basis of a hammer drill, you can make more complex devices, for example, with a flexible shaft, which will additionally mix the working solution.
A homemade tamper for small-sized concrete (the simplest manufacturing option) is presented in the video.