SHARE ON SOCIAL NETWORKS
FacebookTwitterOkGoogle+PinterestVk
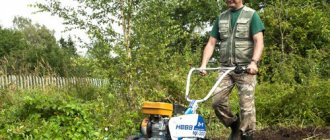
Carrying out gardening work such as loosening the soil or mowing the grass by hand can be quite tedious, especially if it is carried out over a large area. Using a unit such as the Neva walk-behind tractor and its attachments will not only make your work much easier, but will also make many processes much more efficient and faster. In addition, it can be easily improved and its functionality significantly expanded.
The Neva walk-behind tractor is one of the most popular and reliable units on the modern market.
Gasoline and diesel walk-behind tractors Neva: features, types and advantages
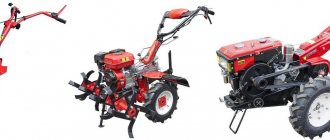
Under the Mototekhnika Neva trademark, a large number of walk-behind tractors are produced, differing in their performance characteristics. You can choose a model that will ideally suit your requirements. Let's look at popular models of walk-behind tractors.
Neva walk-behind tractors can significantly facilitate work on the ground
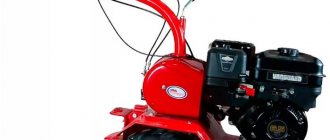
MB-Compact - used for processing small areas, characterized by compact dimensions and ease of operation. The MB-Compact engine power is 6.5 hp, and the design of the model allows you to install various attachments on it. The model operates on 2 forward and one reverse gears, which can be switched by simply turning the lever. The support wheel is not included in the basic kit, but you can easily install it yourself.
MB-1 - differs from the previous model in the increased number of gears, there are 3 of them. The unit is designed to work with medium-heavy soils and can be used as a vehicle, as well as for removing snow, leaves and various types of dirt. The engine power for the Neva MB-1 walk-behind tractor is 6.5 hp.
MB-2 – equipped with an engine from the Japanese company Honda with a power of 5.8 hp. The advantage of the Neva walk-behind tractor with a Honda engine is that the number of gears, which is three in the base model, can be doubled by simply rearranging the belt in the engine. You can also install various types of attachments for the Neva MB 2 walk-behind tractor, which will allow you to use it as harvesting equipment. Compared to other models, MB-2 wheels are characterized by an increased diameter, which increases cross-country ability.
The Neva MB-2 walk-behind tractor has high cross-country ability, so it is convenient to use in large areas
MB-23 is the most powerful model in the line, equipped with a 10 hp engine, which makes it an excellent choice for long and difficult work, including plowing unplowed soil. In addition, the model is highly maneuverable thanks to the wheel release function. This walk-behind tractor model can be converted into a vehicle, as well as attached to a trailer and used as a tractor.
MB-23SD – equipped with a 4.8 hp diesel engine from Subaru. It is characterized by a low arable speed, thanks to which it can effectively cultivate even frozen soil. Just like in other models, the Neva walk-behind tractor with a Subaru engine can be equipped with attachments.
Regardless of the model, all Neva walk-behind tractors are characterized by the following advantages:
- imported engines with high efficiency, allowing for efficient cultivation of the soil;
- the ability to install a variety of attachments and attachments to the Neva walk-behind tractor, significantly expanding its functionality;
- ease of operation and maintenance. To work with a walk-behind tractor, you do not need any special skills; you just need to read the instructions;
- a simple gear shift system, thanks to which you can set the optimal speed for certain types of work.
Motoblocks of the Neva series are widely used for planting potatoes
Helpful advice! When choosing a walk-behind tractor model, consider the density of the soil you will be working with, as well as the season. Based on these parameters, it is necessary to select engine power and other characteristics.
Snow removal equipment
There are three types of snow removal equipment:
- snow removal shed;
- blade shovel;
- brush.
The snow removal canopy is considered the most preferable, as it imitates the operation of road equipment. Equipment of the SMB-1 series is installed on the Neva. It covers up to 64 cm of surface at a time. The height of snow that such a canopy can handle should not exceed 25 cm.
The blade shovel is mainly used for removing accumulated snow. At a time it covers more than 100 cm of surface.
It is recommended to remove fresh snow using a rotary brush, which clears up to 880 cm in one pass.
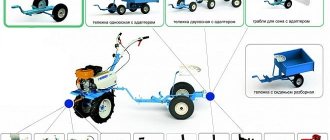
Attachment options for the Neva walk-behind tractor
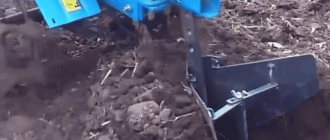
The basic functions for any version of the walk-behind tractor include preparing the soil for sowing and plowing it. Thanks to the various types of cutters installed on the unit, it is possible to loosen the soil to a depth of several centimeters, but cutters also have disadvantages. They can only handle regularly cultivated soil, but do not cope well with frozen or simply hard soil. In addition, cutters do not allow you to remove debris or snow or use the walk-behind tractor for other purposes. You can solve this problem if you buy attachments for the Neva walk-behind tractor. The following varieties are distinguished:
- A plow is a good option for additional equipment if you need to work with heavy soil. Weighing 7.8 kg, the P1 20/3 model is capable of plowing even very hard soil to a depth of 215 mm with a working width of 220 mm;
- Hiller is the second most popular equipment option for the Neva walk-behind tractor after the plow. A mounted hiller is used to add soil to the roots of plants. Different models of hillers are distinguished by the depth of entry into the soil and the width of the soil, as well as by weight;
Attachments for the Neva walk-behind tractor - hiller and plow
- A potato digger is a good choice if you're tired of having to fiddle with a shovel every time you harvest your potatoes. The KNM model is capable of entering the ground to a depth of 220 mm, while capturing 250 mm in width. This option will be very useful if you need to process a large area of a potato field as efficiently as possible, quickly and without much effort in terms of effort. Models of potato diggers are distinguished by weight, width of soil coverage and depth of penetration into the soil. Please note that to install this and other equipment described above on a walk-behind tractor, you will need special couplings, individual for each model;
- lugs - are installed as the wheels of a walk-behind tractor and are used to drive the unit deeper into the ground. They vary in diameter, width and weight, and can be used for hilling an area;
- cart or trailer - equipment designed to transform a walk-behind tractor into a transport vehicle. The dimensions of the trailer are selected depending on the engine power of the unit, and the maximum speed at which a walk-behind tractor with a trolley can move usually does not exceed 10 km/h;
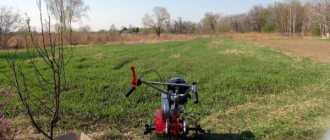
- mower – allows you to use a walk-behind tractor for mowing the lawn or cutting grass for animal feed. Different mower options differ in the maximum height of grass cut, operating speed and coverage width;
The potato digger and lugs can be selected according to size, weight and plowing depth
- potato planter - special equipment that is suitable for all types of walk-behind tractors and greatly facilitates the process of planting potatoes;
- reversible plow - characterized by a large soil coverage, due to which there are no missed areas when plowing. When installing this equipment option, it should be taken into account that it requires a counterweight. If the walk-behind tractor model weighs less than 100 kg, then it is recommended to install a weighting agent on it;
- rake - equipment for removing leaves and various debris from the site. You can buy such a spare part for the Neva MB 2 walk-behind tractor and other models or make it yourself, provided you have a welding machine;
- snow removal equipment - makes the Neva walk-behind tractor useful in the cold season. There are several options for snow blowers for the Neva walk-behind tractor, each of which performs its own functions.
Special equipment that facilitates excavation work - a reversible plow and a potato planter
Helpful advice! When purchasing any type of attachment for the Neva walk-behind tractor, make sure that it is suitable for the specific model of the unit, and also take care in advance of purchasing all the necessary fasteners and couplings.
Hay and lawn mowers
Depending on the terrain, the following types of mowers are installed on the walk-behind tractor:
1. Segmental.
The segment mower type KN 1.1 is a frame on which blades for cutting grass are mounted. The latter are made in the form of two plates, complemented by sharp teeth. The grass is mowed by applying vibrations from the drive to the knives. The operating principle of the equipment resembles the operation of scissors. At a time, a segment mower can cover an area 110 cm wide. The speed of the equipment is 4 km/h.
Due to the fact that the teeth are made of hard alloy, they are capable of cutting through rods up to 1 cm thick. To protect the user, the instrument belt is covered with a casing. Special slides prevent the mechanism from touching the ground.
2. Rotary.
The rotary mower is used more often. It also consists of a frame in the central part of which one or two cutting discs are fixed. A rotary mower allows you to remove even thick grass growing on the nerve surface.
There are 4 knives on the disk, secured with cotter pins. They come out only when the engine starts and return to their place after it stops. The disks themselves rotate towards each other. The rotary mower allows you to set the swath height. It can grasp no more than 80 cm at a time.
Regardless of the type of mounted mower, it is recommended that before starting work, clear the area of foreign objects (cans, branches, etc.) and regularly check the blades.
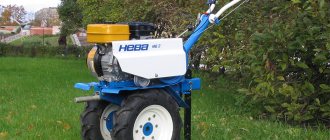
Snow blowers for the Neva walk-behind tractor: types and features
There are such options for snow blowers for the Neva MB 2 walk-behind tractor and other models, such as canopy, blade and brush. The canopy allows you to simulate the operation of a snow blower and remove even stale snow. The blade differs from it in that it allows you to remove a smaller layer of snow over a width of about 1 meter, while the canopy covers approximately 60 cm. The rotary brush is designed for removing freshly fallen snow that has not yet compacted. The only significant drawback of the rotary brush is its heavy weight, so be prepared to reduce the maneuverability of the unit when installing it.
The Neva walk-behind tractor, thanks to its attachments for snow removal, is effective even in winter
DIY snow removal attachments
The disadvantage of all options for winter attachments is the rather high cost of snow blowers for Neva walk-behind tractors. Not everyone can afford to buy such equipment, but this problem can be overcome if you have the necessary skills and tools.
The simplest version of a homemade snow blower for the Neva MB 2 walk-behind tractor and other models is a bulldozer-type blade. To create it, you will need a special adapter that is attached to the unit and a metal sheet with a pointed edge that will act as a snow blade. All parts of the structure are cut out of steel and connected to each other using rods and brackets.
The second, slightly more complex option is a rotary nozzle. It is made from a pipe into which snow is thrown, a box, a gearbox, a shaft and an auger. To make such a nozzle, you will need a welding machine, as well as detailed instructions, which can be found in large quantities on the Internet.
Attachments for snow removal can be made independently or purchased in specialized stores.
The third type of snow removal equipment for the Neva walk-behind tractor is a snow thrower that operates on the principle of a fan. This design is quite complex, so it is recommended to find instructions or a video to create it. Neva walk-behind tractors with a fan attachment are designed to work with soft, not yet compacted snow.
The most complex version of the snow removal attachment that you can make with your own hands is the auger-fan one. It works well on packed and icy snow and can cover a large area, but you will need specialized knowledge and tools to make it.
How to make a universal rake for a walk-behind tractor with your own hands
It seems that there is no equipment for a walk-behind tractor that is simpler in its design than a rake. All the better for those who want to make them themselves and not spend money.
Of course, provided that you have the materials for this and a welding machine. To make a homemade rake from a walk-behind tractor, you need to take a metal pipe and strong rods in the form of half rings.
A water pipe (if available) can easily be used for the pipe. We must make the rake teeth 700-800 mm high. It is necessary to fasten the rods along the entire length of the pipe with a welding machine.
The rake must be connected to the walk-behind tractor using an adapter. If you wish, you can get what is shown in the photo above. By the way, if you want to make such a rake, you can take the drawbar from the trailer if you don’t need it, and slightly rebuild what is behind the seat.
Neva walk-behind tractor with caterpillar drive
Although Neva walk-behind tractors are equipped with wheels as standard, you can buy a tracked attachment for your unit. Neva crawler walk-behind tractors differ from their wheeled counterparts in their increased maneuverability in rainy or snowy weather and allow the unit to be used at any time of the year. You can buy tracks for Neva walk-behind tractors, or you can make them yourself using improvised means.
Neva walk-behind tractors with a caterpillar drive have high maneuverability and can be used in adverse weather conditions
Making caterpillars with your own hands
If you don’t want to buy a caterpillar drive for Neva walk-behind tractors, but make it yourself, then for this you will need the following materials:
- the walk-behind tractor itself, equipped with an axle locking function and a 4-stroke engine;
- transport tape or a pair of large-diameter car tires for making tracks;
- a pair of extra wheels.
Related article:
Which walk-behind tractor is better: prices, reviews and characteristics of this type of equipment
Information about what types of units are available and how to choose the most suitable model. A brief overview of the characteristics of various walk-behind tractors.
The simplest version of tracks for the Neva walk-behind tractor, reviews of which indicate the high efficiency of the design, is a design made from a transport belt. To make it, you will need a tape with a thickness of at least 7 mm, as well as an additional wheel on each side of the unit. To make the tape track last longer, you can stitch it along the edge with thick fishing line.
Helpful advice! Additional wheels for a crawler walk-behind tractor can be taken from an old car. The main thing is that they exactly match the original wheels in diameter.
To make caterpillars with your own hands, it is better to use old car tires.
Also, a tracked unit from a Neva walk-behind tractor with an American or Japanese engine can be made using car tires. For this you will need tires with a large diameter and the correct tread pattern. It is best to choose tires from a tractor or large truck for this. The process of making tracks from tires is divided into the following stages:
- Cutting tracks for tracks in tires. To do this, you can use a special shoe knife, which must be moistened with a soap solution to facilitate the process of cutting rubber.
- Cutting off the side part from them. This can be done with a fine-toothed jigsaw.
- Removing excess parts from the inside of the tire.
The advantage of tracks made from car tires is their increased strength and reliability due to their solid structure. The disadvantage follows from the advantage and is that the length of such a track is strictly limited by the length of the tire.
In addition, tracks for walk-behind tractors can be made from belts or chains. In the first case, it is necessary to connect several belts with a wedge-shaped profile to each other. The connection is made using lugs and rivets. For the second option you will need two chains of the same size.
When installing tracks on a walk-behind tractor, use a water-cooled engine
Before making tracks for the Neva unit, you need to correctly calculate their parameters. If the caterpillar is too high, the walk-behind tractor may tip over when turning. In addition, when installing tracks, it is better to choose a water-cooled engine model, since this design puts a greater load on the engine and can lead to overheating.
Recommendations
The first and very important rule is to follow safety precautions. Select the size of wheels with lugs wisely. There is no need to chase the diameter, otherwise the linear speed will be excessively high. The ideal diameter is 460-500 millimeters. The dimensions of the plow depend on the weight of the tractor; this indicator must also be taken into account
For motorized equipment weighing approximately 100 kilograms, the largest plows are installed, with a grip of 23 centimeters. For units weighing up to 75 kilograms, plows with a grip of 18 centimeters are best suited. A plow with a grip of 13 centimeters is suitable for lighter units.
Here, too, from time to time they make a mistake - they purchase a relatively light unit and install a large plow on it. If you also try to use such a “duet” on rough ground, the effect will be completely predictable – “it doesn’t plow up.” But the point is not in the quality characteristics of the plow, but in its incorrect selection and/or adjustment. In general, the design of the unit is simple and understandable. But under any conditions, like any other equipment, it requires care, timely maintenance and replacement of consumables. Use only high quality spare parts recommended by the manufacturers.
To learn how to properly adjust a plow on a walk-behind tractor, watch the following video.
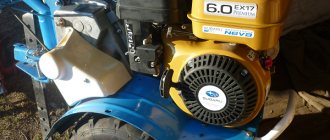
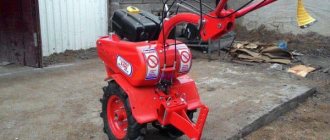
Features of the Neva MB-23S-9.0 walk-behind tractor with a 9 hp Subaru EX27 engine: video of use
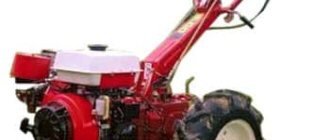
Among all engine options for walk-behind tractors Neva, Subaru 9 hp. is the heaviest and most powerful. A model with such an engine is perfect for solving a wide range of tasks and can be used regardless of the time of year.
A distinctive feature of the engine for the Neva Subaru walk-behind tractor with 9 horsepower is the ability to use any type of attachment. In addition, the MB-23 model is characterized by a reinforced gearbox design, on which an additional cutter can be installed on each side. This allows you to simultaneously cultivate a plot of land up to 170 cm wide.
There are also several other reasons for purchasing such a model. If you decide to buy a Neva Subaru EX27 walk-behind tractor, you will save significantly on fuel for the unit. A special balancing device effectively suppresses vibrations and reduces noise during operation. The model starts up equally easily both at above-zero temperatures and in cold weather.
Potato digger and potato planter
The principle of operation of a potato digger is to lift tubers from the ground and then sift them. This type of attachment is capable of extracting vegetables from only one row at a time.
For Neva walk-behind tractors, it is recommended to purchase vibration-type potato diggers KKM-1. They are a device whose design includes a ploughshare that cuts the ground and a grate. In an hour, KKM-1 is capable of covering no more than 0.2 hectares. The girth width of the equipment reaches 37 cm. The ploughshare is lowered into the ground to a depth of 20 cm.
Potato planters for Neva walk-behind tractors are recommended to be taken from the KSM-1 series. The design of the device includes a small container into which potatoes are poured for planting, and two disks that create a furrow. Potato planters are used on various types of walk-behind tractors.
Neva walk-behind tractors with 7.5 hp Subaru engine: reviews from owners and features of the units
Subaru engines with a power of 7.5 horsepower are installed on Neva MB 2 walk-behind tractors. The price of such a device is slightly higher than that of the standard MB-2 model, but the performance characteristics are also higher. The model is equipped with a four-stroke Japanese engine, which allows it to perform a wide range of work, as well as use the unit as a vehicle or transportation vehicle. The engine of the Neva Subaru 7.5 hp walk-behind tractor maintains stable speed at any air temperature, which makes it equally effective for use in winter and summer.
Neva 7.5 hp walk-behind tractors with a Subaru engine can be used for cutting grass, digging up potatoes, removing debris from the site, loosening the soil and many other purposes. Reviews from owners speak of the high power and maneuverability of the device, as well as ease of operation and management. And if you need to expand the functionality of the unit using attachments, then this can easily be done on your own.
Helpful advice! When using a Neva walk-behind tractor with a 7.5 hp Subaru engine, make sure that the weight of additional equipment does not outweigh the unit itself. If this does happen, use weights.
Subaru 7.5 hp engine is efficient to use at any time of the year
Walk-behind tractor gearbox
A gear-chain reducer is installed on the walk-behind tractor. It is housed in a durable aluminum housing. This gearbox allows you to:
- increase the power of the device by as much as one and a half times, and this allows you to reduce the time spent on processing particularly difficult areas;
- reach a speed of 1.8 km/h;
- increase speed up to 12.5 kilometers per hour;
- disable one of the axle shafts.
In general, the gearbox is very multifunctional and increases the range of capabilities several times. It is reliable and has a long service life. This contributes to a significant increase in traction force up to 180 kGS, and this in turn will have a positive impact on the performance of the walk-behind tractor.
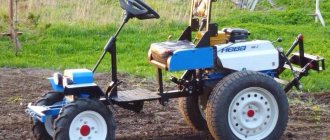
Homemade tractor from a Neva walk-behind tractor: reviews from owners and manufacturing instructions
The main disadvantage of any model of walk-behind tractor is that you need to walk to use it. When processing large areas, this quickly leads to fatigue. You can get rid of this problem if you make a mini version of the tractor from the Neva walk-behind tractor with your own hands. Videos of this process can be found in large quantities on the Internet, so there should be no problems with improving the design.
Of course, an additional module for seated control can be purchased. However, it is much more economical to do it yourself. The homemade design includes a conventional frame made of rolled metal with attached wheels and a seat. To make this design you will need the following components:
- Rolled metal for the frame - a metal corner, tee or half-tee, as well as a square or channel are suitable for these purposes.
- A pair of wheels with a solid axle or two axle axles.
- Welding machine and consumables for welding work.
- Bearings and fastenings.
- Sitting.
- Lubricants and paints and varnishes.
You can create a convenient mini-tractor based on any walk-behind tractor
In addition, the following tools will be useful to you:
- grinder or other tool for cutting metal;
- plumbing tools such as screwdrivers, hammer, chisel, wrenches or adjustable wrenches;
- dies and taps for marking cut metal products;
- electric drill and drill set;
- brushes and rollers for applying lubricants and paint.
When manufacturing a tractor from a walk-behind tractor, the kinematic diagram is first designed. It is designed to ensure that the resulting structure maintains balance and does not overload the walk-behind tractor. After this, the frame is made from rolled metal. At this stage it is very important to consider the location of the fork and bushing for turning the trailer. After this, you can begin manufacturing the body. The best material option for it is steel sheet.
After creating the frame and body, the driver's seat and attachments, if necessary, are attached to the resulting structure. Upon completion of the installation work, you can begin painting the finished mini-tractor.
The mini-tractor is convenient to use for harvesting large areas
Reviews from owners of home-made units indicate that you can create a mini-tractor based on any walk-behind tractor, and it will cost much less than buying it. Neva walk-behind tractors with a Subaru engine, for example, can be converted into a miniature tractor with minimal investment of money and time.
Helpful advice! Transforming the Neva walk-behind tractor into a mini-tractor will help you solve the problem of insufficient weight of the unit. The trailer and the driver weigh the block so much that the traction of its wheels with the ground is significantly improved. This, in turn, increases maneuverability and efficiency of land cultivation.
Plow diagram. Diagrams of different plows and their purposes
A standard plow is capable of plowing the ground to a depth of 18-35 cm. There is a smooth method of plowing with plowshare plows, but for better cutting and crushing of the layer, right-hand repellent bodies can be attached to the plow, forming a dump-type plowing.
Then, at the slightest deviation to the side from the given direction, the blade crushes the earth into small pieces. A standard plow (plow diagram) consists of a frame, a knife, a skimmer, a coupling mechanism with a tractor, and a body. The plow may have support wheels. There may be several of them, or one. Depends on the design of a particular plow. The body, in turn, is a combination of a ploughshare, a blade and a field wheel. You can see a diagram of a standard plow below:
So here is a complete diagram of the plow:
- - skimmer,
- - plow body,
- - frame,
- - plow knife,
- - support wheel,
- - support wheel adjustment screw,
- — tractor clutch mechanism.
Let us determine the principle of coupling a plow to a tractor. Based on this criterion, mounted, semi-mounted and trailed plows can be classified.
Plows based on the hitch principle
Mounted plows are characterized by the fact that the plow is attached to the tractor by attaching the plow's hinged mechanism to the same mechanism on the tractor.
Trailed plows are attached to the tractor through a trailed eyelet.
The automatic coupling of the plow with the tractor is formed due to the operation of the lock and frame. The lock is securely fastened, and the frame is fixed with a finger to the lower arms of the tractor canopy, and with a cheek to the upper link.
Attaching the plow to the tractor
During operation, both the frame and the lock are supported by a pawl, which is connected to the driver’s cabin through a cable. This way the tractor driver can release the clutch directly from the cab. The hitch includes two counter posts and a brace. They are connected to each other with one bolt.
The posts are attached to the brackets. The brackets are attached to the plow frame with bolts. Trailed plows are characterized by the presence of three wheels in their design.
1. Furrow wheel - front, placed closer to the front body at a distance of 3-4 cm from the wall of the furrow. In this case, the wheel should not interfere with soil rejection.
2. The field wheel is the second wheel, it follows the furrow wheel. The rear one is the very last one. Each wheel accounts for about 30% of the total plow weight. Semi-mounted plows have two wheels. This is a field wheel and a furrow wheel, which is located at the rear.
Plow attachment diagram
- - lock,
- - brace,
- - plow handle,
- - neck,
- - finger,
- - frame,
- - fastening pawl,
- - finger,
- - plow stand,
- - bolt,
- - plow brace,
- - bracket
Three-tier plow
So, let's talk about three-tier plows. They are the most popular among the people, since if desired, a three-tier plow can be easily adapted for two-tier plowing. When we want to leave the top layer of the soil we have processed on top, and mix the second and third layers together, we need to remove the rear body, install an extended blade on the front one, and place the middle body on the main beam behind the first body.
When the top layer of soil is littered, we transfer it to the bottom of the furrow: we put the front body with a cultural dump instead of the rear one, and we put the middle body in place of the outrigger beam. Below you can see a diagram of a three-furrow plow. For you, as an option, the diagram of the PTN 40 plow is shown below:
diagram of the plow PTN 40
- - front body,
- - main middle body,
- - rear body,
- - frame beam (main),
- - beam for harrows,
- - pendant,
- - support wheel,
- - outrigger beam,
- - cutting knife,
- - suspension pin
Diagram of a plow with a hydropneumatic fuse
Previously, we looked at standard plows for cultivating soft soil. The plow for cultivating rocky soil is equipped with a hydropneumatic safety device.
- - hydraulic cylinder,
- - oil line,
- - pressure gauge,
- - hydropneumatic accumulator,
- - gas chamber,
- - fuse piston,
- - valve, 8 - check valve,
- - plow frame,
- - plow support wheel,
- - plow body
This increased resistance to difficult-to-arable soils is explained by the active interaction of the plow's hydropneumatic accumulator with the tractor's hydraulic system.
When the plow hits a rock, the plow body rises, moving the cylinder plunger, and the cylinder, as it moves, pushes oil into the battery, supplying it with energy. Then the body returns to its normal state, and its beam rests against the frame again.
Important Combine harvester SK-6 Kolos: review, technical characteristics, owner reviews
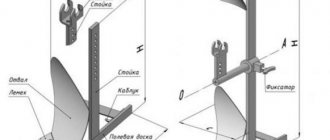
Horse plow diagram
Also, for light soils, the technical bells and whistles of a horse-drawn plow are suitable. You are shown a plow of the PV-23 brand. This is a hanging plow, which means it only has one insignificant support wheel. It practically does not rest on it, so the operator needs to support it with his hands.
- - cutting knife,
- - ploughshare,
- - dump,
- - field board,
- - handle
- - rowdy,
- - plowing depth regulator,
- - coverage width adjuster,
- - harness hook,
- - wheel and supporting stand of the plow.
How to install correctly?
First you need to put on the earring. It will be necessary to attach the working part to it. Attach it using cotter pins and bushings
Important: fasteners should be inserted into the second hole from the bottom. This allows you to adjust the depth of the cutters in an optimal way for complete cultivation of the land.
It happens that the standard depth (20 cm) is not enough. To set the opener to go deeper, it is lowered and attached to the shank through the upper holes. On the contrary, if it is necessary to process only the top layer of soil, before using the tool it is attached through the lower hole. Experts recommend initially organizing a test run of the walk-behind tractor. Only he will show whether everything was done correctly.
How to adjust correctly?
Plowing depth is the distance to which the plow plunges into the soil during operation. It must be adjusted as far as the bayonet of the shovel can reach. Otherwise, the following problems may occur.
- If the depth is insufficient, a considerable proportion of the roots of weeds will remain under the ground, which will require new efforts to eliminate them.
- If the depth is greater than required, the fertile soil layer will mix with what is located underneath it, and the vegetation will not have adequate nutrition. In this regard, you need to stick to the golden mean.
Attack angle
For someone who already has the practical skill of plowing soil with motorized equipment, there is no need to explain what and how to do at this stage. The following information is provided for informational purposes to those who are encountering this matter for the first time. The slope of the angle of attack, or, as it is also called, the slope of the angle of the field board, is a slope that shows the height of the plowing plane in relation to a flat plane. Adjustment is carried out using a screw knob.
The order of operations is as follows:
- place the unit with the plow on the supports mentioned earlier;
- turn the adjustment knob to the limit so that the field board rests completely on the ground, without gaps;
- start turning the handle in the opposite direction until the back of the board rises 2-3 cm above the ground.
If you make a miscalculation, the following unpleasant consequences will appear:
- with a large angle of the field board, the plow will become an anchor - the unit will begin to regularly slip and move forward with effort;
- at a small angle, the required layer of soil will not be removed.
- You can check whether everything is correct only at the plowing stage - the unit should not resist or move excessively freely.
Preparation for plowing
Before plowing, you need to perform a test plowing and find out the quality of the plow adjustment.
To do this you need:
- find out the features of the blade and the depth of the furrow;
- control the movement of the plow in the furrow;
- monitor the regular movement of the unit and the load on the plowman’s hands;
- set the load of the unit.
Test plowing of the site is performed as follows.
We place the unit on the edge of the cultivated plot of land. We set the first speed and carefully press the clutch handle. It is extremely important that the steering wheel of the unit is parallel to the plane of the ground, so that the unit does not dig into the ground, but also does not rise above the arable land being cut. When plowing, the worker does not need to press the steering wheel or push the motorcycle too diligently, since this agricultural machine itself will perfectly cope with its responsibilities without auxiliary efforts. After obtaining a test furrow, you must definitely measure the depth of plowing. To do this, you need to use a tape measure or an ordinary ruler
If the dimensions match those initially established, then you can begin the main work.
Plow for walk-behind tractor, how to work and how to choose
Good day dear readers, from this article you will learn:
- How to choose a suitable walk-behind tractor.
- How to prepare it for plowing
- How to hang additional equipment.
Recently, small farmers and owners of personal plots are increasingly buying hand-held equipment for their farms, which can replace a small tractor. If you are interested in this problem, then in one of our previous articles, we talked about how to choose the right walk-behind tractor. If you already have such a unit on your farm and you would like to expand its functionality, then this can be done using a plow. This way, you can plow the land without resorting to the help of more expensive equipment such as a tractor. If you have not tried to do such manipulations yet and want to learn more about this activity, then you can do this using our article and find out how to attach a plow to a walk-behind tractor.
How to choose a suitable walk-behind tractor:
First of all, you need to evaluate the scope of work for the unit, because there are three main types in terms of performance:
- Small or cultivator. A lightweight unit weighing only 40-50 kg, with a power of up to 5 horsepower. The territory that can be served does not exceed 10 acres.
- Average . A heavier unit weighing under a hundredweight. The power of such a machine reaches 21 horsepower. And it can process up to 30 acres
- Big. Such a unit will not joke; it has a power of up to 30 horsepower, and can process an area of up to 2 hectares. It would be advisable to attach a plow to such a walk-behind tractor.
Getting ready for plowing
The main thing you should do is prepare the plow and walk-behind tractor for plowing the land, don’t be alarmed, there’s nothing complicated about it, you just need to carefully read the material in our article and watch the videos, and everything will fall into place.
Installing the lug
First, install your walk-behind tractor on blocks or something similar. Attach a lug - this will significantly simplify your plowing task, and at the same time you will save your energy. As a rule, it is included in the kit, if it was not included, do not worry, you can buy it separately, it is not expensive.
After you have placed the unit on supports, remove the wheels and hubs from it. After that, you need to attach the hubs to the axle for lugs. They are longer than usual, which makes the device more stable.
The lug hubs must be installed on the axle and connected to the shaft drive. To do this, use special spiers, which are also included in the kit. Then we install the equipment.
How to attach a plow to a walk-behind tractor
How is this procedure carried out, what nuances do you need to know and follow? First, it must be tightly coupled to the unit. To do this, you need to mount these two parts into one solid piece.
To perform this procedure, you need to remove the adjuster screw from the hitch and install the plow. This stand will have 3 holes, they regulate the soil being processed, you can choose the position that you need. It is recommended to install the equipment on the middle mount, then it will be easier for you to adjust its position to suit your needs.
Once you have chosen the mounting position, begin adjusting it. Place the heels of the plow parallel to the ground. Set the steering wheel of the car to the center of the adjustment screw.
The first plowing is the most important
The first plowing is very important and must be approached very carefully. Plowing should be started from the middle of the first strip; besides, it is better for the stripes to be parallel. Start plowing at minimum speed. Focus all your attention on the attachment. It should be perpendicular to the ground. Otherwise, it needs to be calibrated again.
The plowing depth should be from 15-20 cm. If this is not the case, then change its position, move it from the middle position to the desired direction. Maintain the minimum operating speed until you have even furrows, after which the speed can be gradually increased.
Features of working with a plow for a walk-behind tractor
As you can see, modern technology greatly simplifies the life of a farmer; there is no longer any need to buy expensive equipment, or spend an incredible amount of effort and time to process your plot manually. There are special machines that solve this problem, the main thing is to choose the right one based on your needs, and of course, your budget. Let me finish our story here, we hope you found it interesting and you were able to learn a lot of new and useful things for yourself.