Simple devices at a construction site
Any construction site cannot do without effective and simple devices to facilitate labor and increase the speed and quality of the object being built. Today in this article I will talk about some of them, the simplest and most effective.
The easiest way to climb along guides, two ropes and fixed guides are enough for it.
This method is simple, but there are some tricks and difficulties; you need to pull at the same time and the guides must be securely fastened.
This is a very simple device, but it also makes the work easier, since the force is applied downwards, and this is always easier than simply pulling on the rope.
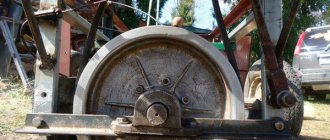
A lift in the form of a well crane perfectly reduces the time for lifting loads. The only negative is that. that lifting heavy loads using such a device is very difficult.
But lifting the load is much easier than without a counterweight.
Types of chain hoist fastenings.
With the help of chain hoists, you can make your work several times easier. It all depends on the method of securing it.
If you apply fastening number 1, then the force will be equal to the weight of the load being lifted;
2- two times less than in the first case;
3 – three times less;
4 – four times less than in the first case.
With the help of a chain hoist you can lift a load without making much effort.
The figure shows the types and methods of fastening simple lifts with pulley blocks. Lifting mechanisms are made rotating and simple non-rotating.
To facilitate lifting, an electric drive is installed and beam cranes are installed. Such mechanisms completely replace a truck crane.
This is, of course, only a small part of all the devices and you can’t tell about them all in one article. So, wait for the continuation.
The most interesting and useful devices for construction
When building any object, be it a house or something else that requires lifting heavy objects to a height, you need to go in two ways.
The first and easiest way is to hire people to lift heavy materials such as mortar, concrete or something similar.
Second, make a lifting mechanism capable of lifting heavy loads.
This device can replace at least three people and it is made of an aluminum ladder and an electric hoist.
Such a lift is capable of lifting three buckets of concrete and can be used alone. It’s not difficult to make a welded frame on bearings, and anyone with a little knowledge of electric welding can easily attach an electric hoist to the top of a ladder.
If you attach the electric hoist as shown in the photo to a well-reinforced beam, then you will get a very convenient device that can easily replace a crane.
This simple device will speed up your work on grinding grooves when building from round timber. Using the same principle, you can make other devices for carpentry work.
With the help of such a simple device, you can not only break walls with virtually no noise, but also press metal parts during installation and hold together floor boards during installation.
A very convenient device, especially in the manufacture of fencing and other work involving a large amount of work with bent wire and fittings.
I also have experience working with almost the same device when making fences, and I liked that the speed of work increases significantly.
Making such a device for cleaning walls from paint will not take much time; for this you need a welding machine, an old drill, and by welding a metal plate to the drill, you can increase the speed of cleaning the walls using a hammer drill.
Using an attachment that you can buy in a store today and a construction vacuum cleaner, you can remove paint from the wall with virtually no dust.
Step-by-step manufacturing instructions
- The frame installed in the opening is the main strength element of the gate. It bears the main load of the entire garage door system. The box is made from a 100*50 mm wooden beam or a thick metal corner. The width of the corner shelf should be 1.5 times wider than the sash thickness, that is, if the sash thickness is 40 mm, then we take the corner with shelves of at least 60 mm. The box parts are installed in the letter P, two on the sides of the opening, one on top. If we use wood, we fasten it with 100 mm self-tapping screws into pre-prepared wooden embeds. In the case of using a corner, we fasten it using anchor bolts, however, they are perfect for the first case.
- Let's start assembling the frame for the gate leaf. We cut the profile pipe to size according to your drawing. We lay out the frame elements on a flat horizontal surface and, after checking the right angles, use a square to grab the joints. Before fully welding the joints, it is necessary to check the length of the frame diagonals with a piece of cord or tape measure. If necessary, you can adjust the product and begin fully welding the joints. We weld gussets at the corners of the frame, as shown in the drawing, to enhance the rigidity of the structure.
Welding joints of frame elements
We clean the weld seams from burrs and the entire frame from rust with a grinder.
- We coat the frame with an anti-corrosion primer and paint it with alkyd enamel in 2 layers with intermediate drying.
- We weld brackets with rollers to the upper corners at the end.
- We place it on the frame and fasten the profile sheet with self-tapping screws with a drill and a rubber washer in increments of 15–20 cm. We attach the sash opening handle to M8-M10 bolts. This operation can be done at the end of installation work, which significantly reduces the physical stress on workers when checking the operation of mechanisms.
- We attach guides for the rollers to the ceiling. We check their parallelism and perpendicularity to the opening.
- We temporarily install the sash in the opening to mark the place where the lever-spring mechanism is attached. We remove the sash and attach the levers along the marks to its ends with self-tapping screws.
Checking the correct operation of the gate
Gate leaf installation
How and with what to insulate
Classic insulation materials used for these purposes are mineral wool and polystyrene foam boards. Foam plastic compares favorably with mineral board in that it does not shrink over time. We will insulate the sash with polystyrene foam 40 mm thick and density 20. First, we insert the foam without fastening into the sash to cut all the necessary trims to size. Sheets of foam plastic are glued to the profile sheet from the inside between the side members using “liquid nails”. Next, we fasten the inner plane of the sash with a sheet of galvanized sheet using self-tapping screws and a drill.
Insulation of gate leaves with polystyrene foam
Exploitation
For ease of use of garage doors, you can install an electric drive with a control unit operating from commands coming from the remote control to the existing opening system. When purchasing a drive, make sure that it is suitable for your type of gate.
In winter, rubber seals must be periodically lubricated with silicone grease to avoid freezing of the leaf and damage to the seal when opening the gate. Also, periodically pay attention to lubricating the lever system and support rollers.
Video: homemade folding garage doors
Video: lift-and-swivel design
The overhead garage door system is easy to implement on your own, so almost any car owner with welding and metal working skills can do it, the main thing is to be more careful with the installation of such critical elements as guides. From the start of work to the complete installation of the gate, you can handle it in 2 days if you invite friends or acquaintances to help.
Homemade lifting devices are an indispensable tool for a garage where major car repairs are planned. With the help of such an auxiliary device, you can easily remove the car engine, lift the edge of the body, or even the entire car.
Easy-to-make homemade lifting mechanisms make work several times easier and faster not only in the garage, but also near the house. They are indispensable for construction and repair, moving construction waste, and unloading heavy loads.
How to make useful mechanisms and tools for construction with your own hands
It doesn’t matter whether you’re building your dream home or renovating an old country house, you can’t do without reliable tools and construction equipment. Almost any device today can be bought in a store, but purchases are not always pleasing with quality and even less often with prices. Our forum members know how to reduce the burden on the family budget and offer recipes for proven mechanisms and tools for construction, made with their own hands.
Machine for making dowels
Another story. Machine tools and machine tools are a must-have in the arsenal of any self-builder. If you need to make dowels in industrial quantities for the construction of a wooden house, do not pass by the original machine.
I'm building a log house. I need dowels - 1000 pcs. The price of one dowel is 10 rubles. In total, it turns out that I need to spend 10,000 rubles. to the "pegs". Expensive! I decided to make a machine for making dowels. I looked at different designs on the Internet. That's it, that's not it. The cutter is stationary and the workpiece rotates. This is suitable for making thin rods, but I need dowels with a diameter of 2.5 cm. You can’t stick such a workpiece into a drill. So I made a machine with a rotating cutter. The cross-section of the workpiece for the dowel is 2.6x2.6 cm. If it is birch, then 2.5x2.5 or 2.4x2.4 cm is better. The dowels come out from under the machine with a smooth surface. The length of the dowel is not limited in any way. Made more than 1000 pieces. dowels, 30 cm long.
Note: The user tried 5 methods before settling on this method of making dowels. The rotating cutter option is the best. For production 500 pcs. dowels, taking into account cutting the wood with a circular saw into square blanks and sorting them, takes 10-12 hours.
Truck...from the old four
Bring sand, crushed stone, boards, transport a concrete mixer and an old refrigerator... The need to deliver materials and tools during construction arises constantly. FORUMHOUSE member g8o8r8
found a way to save on freight transportation: he converted his old four into a truck!
Read also: Rules for working with a megohmmeter in electrical installations
Budget auto tuning cost the craftsman 3.5 thousand rubles - this was the cost of materials: an iron square, corners, galvanized steel for the loading body. Loading body g8o8r8
made it high to protect it from rainwater: to close the gaps between it and the car body, metal canopies were welded around the perimeter.
The rear side of the body is lifted with a 12-volt electric winch. This is convenient when unloading bulk materials and loading boards, stones, furniture, etc. into the body.
g8o8r8 (FORUMHOUSE Member):
At our metal collection point, they give five thousand rubles for any car. This inspired the idea of using my decommissioned four-wheeler for household needs: bringing earth, peat, stones, sand to the dacha. And if you install a subframe, weld a blade, install chains, you’ll see that you’ll be able to throw snow in the winter.
Crane for building a house and lifting beams and logs
Before starting construction of the lift, it is necessary to sketch out drawings to calculate the amount of materials. A crane for DIY construction should be easy to move and disassemble for transportation. It should not only perform the functions of a lift, but also be as much as possible:
- light;
- durable;
- sustainable;
- collapsible.
To make it lighter, the crane frame is welded from a pipe. It can move on three or four wheels at the discretion of the designer. There must be a place for a counterweight on the back so that the crane does not lose balance and fall when lifting a load.
After making the platform on wheels, a beam is installed diagonally to the ground level and a stand under it in the form of a support welded from pipes. If desired, the height of the boom can be made retractable and with the ability to raise or lower it for ease of operation.
At the bottom of the boom, a winch (manual or electric) is installed on the body so that the cable can be easily removed from the upper roller of the boom and it serves to pull heavy logs and timber to the crane for easy lifting.
A hook is installed at the end of the cable. Additionally, a special device is made for gripping logs and beams in the form of the letter “P”. A rod is installed on top of the center of this device to engage it with a hook. A screw-shaped clamp is made on the side in the center, which will hold the building material.
When lifting a log or beam to the desired height, the crane on wheels easily rolls to the desired side, and the material is lowered into place for further installation and fastening. The lift structure must be on a flat, hard surface for easy movement.
Such lifting mechanisms help to carry out work efficiently and quickly with minimal physical exertion, which can be done by children.
Construction materials lift
Another useful homemade product that will make life at a construction site much easier is a building materials lift. For example, like the one from FORUMHOUSE member Ali-bastr
Having started pouring monolithic walls, the forum member got tired of manually lifting heavy buckets of concrete and made a simple but ingenious design.
The basis of the lift was a metal staircase. To securely fix the ladder on the wall, in a 15×15 Ali-bastre
I drilled holes and put a washer on the back side of the pipe, securing it with a cotter pin. The trolley on which building materials are placed moves up and down on bearings No. 304 using an electric winch. It is located almost parallel, at a slight angle to the stairs, due to which the movement occurs smoothly.
Ali-bastr (FORUMHOUSE member):
It’s not for nothing that they say: laziness is the engine of progress. My lift lifts six buckets of concrete easily!
Assembly instructions
It will take 2 days to assemble a simple or movable structure. The process of making a crane beam with your own hands:
- The main load that the crane will move falls on the stand. To securely fix the structure, you need to make a frame. To do this, legs for the tap are welded from metal corners. The corners are welded to the pipe at an angle of 45° on both sides of the pipe.
- To make spacers, 2 triangles are welded to each rack.
- For a mobile structure you will need rollers. They are welded to a horizontal base, positioned on both sides of each rack. To prevent the rollers from breaking and to withstand the weight, use products that are designed for metal containers. Furniture cannot be used.
- A pipe is installed at the top of the structure. It is designed to move the lifting mechanism.
- The roller for moving the cable is mounted on an I-beam. The I-beam is pre-welded at the central point of the pipe.
- To give the frame additional stability, a pipe with a square cross-section is welded to the beam element. It is placed on top of the beam so that it protrudes forward by 20 cm on both sides.
- The transverse pipe is inserted into a pipe with a square cross-section and through holes for fastenings are drilled on both sides. Bolts are used as fasteners. The homemade frame for a U-shaped crane is ready. The pipe in the form of a crossbar is securely fixed in the upper part of the product, and the entire structure is stably placed on spacers (legs).
- Mechanical lifting is designed to lift parts. It can be manual or automatic. A manual hoist consists of a winch and a cable. The worm winch is mounted on the side of the rack. The movement of the steel cable occurs through rollers.
- The structure can be equipped with a lifting mechanism, which is used in elevators. This mechanism has strong rollers.
- Connecting an electric lift drive will make repair work easier. An engine with a power of 300 to 500 W is suitable for installation. It is mounted on the base of the structure.
A crane beam equipped with an electric drive is used mainly for the reconstruction of old buildings and private wooden houses. To prevent the crane from malfunctioning, you must follow the operating rules.
Planer for aerated concrete
Aerated concrete is one of the most popular modern materials for the construction of stone houses. The large format of the blocks and the installation technology, which can be easily mastered, allow even novice builders to erect buildings quickly.
But despite all its advantages, aerated concrete has a significant disadvantage - the blocks do not match in size and the need to adjust them to each other. You can use a shop tool for these purposes. But our forum members suggest making a plane for aerated concrete with your own hands. For this you will need: a board 5 cm thick, 3 wood files, universal glue, a door handle.
worodew (FORUMHOUSE Member):
Cut the files in half. We cut grooves in the board to half the thickness of the blade, lubricate the grooves with glue and insert the files. Screw the handle on and you're done.
Drawing of overhead garage doors
When preparing a drawing to suit your opening dimensions, you should use ready-made solutions, slightly adjusting them to your dimensions. Here is an example of drawings for making gates:
Drawing of lifting gates
Drawing of the frame, dimensions must be set to match your gate dimensions.
Mobile foam cutting machine
And for those who insulate their house with polystyrene foam, another homemade product from the forum will come in handy - a machine for cutting polystyrene foam, which allows you to cut pieces of the required size simply and quickly, without bothering with a hacksaw and a ruler.
Our forum user Oleg Lvovich
To make a mobile machine, I used a 25x25 mm wooden strip 1.3 meters long, nichrome wire with a cross-section of 1 mm, a spring, two 20x4 mm steel strips, a 220/36V transformer and a 15-20 meter wire.
On FORUMHOUSE, a forum member shares a diagram of a homemade machine:
Unlike stationary cutting machines, this device can be freely moved around scaffolding and cut foam directly on site. At the same time, the sheet can be expanded not only in length, but also in thickness - for this, two profiles are additionally attached to the EPS with nails. According to a forum member, the cost of a mobile machine is 800-1000 rubles, and even with intensive use it will faithfully serve for several construction seasons in a row.
Other examples of machines for cutting foam plastic, including stationary ones, are in this topic.
Inexpensive mini lift
Practice shows that when building a private house, a real crane is not always needed. Often, a developer can get by with “little expense” and make a small lift based on an electrically driven hoist.
Gexx FORUMHOUSE Member
My design is simpler than the authors above, but it suits me quite well. I bought a hoist with a load capacity of 300 kg without a block and 600 kg with a block. Tests have shown that the device can lift a load weighing 250-270 kg, then the engine protection is triggered. During the construction season, I used it to lift about 40 pallets with building blocks, a 6-meter beam for the mauerlat, rafters, mortar for masonry and concrete for the reinforced belt.
The lift, again to save money, is made from used pipes, angles and channels.
All rust was cleaned off with a grinder, and the pipes were sprayed and then painted with paint with a rust reducer.
In order to be able to assemble the lift on the ceiling of the second floor, all components (where welding is not needed) are made dismountable - with bolted connections.
A hoist is installed on the stand using clamps.
In case of rain, a plastic bottle with the bottom cut off is placed on the control panel.
The telpher covers a canopy made of used roofing iron.
When lifting a pallet, two boards are placed under it, and the pallet is lowered onto them.
The entire structure is fixed to the floor with clamps.
Drawing with dimensions of the lift.
As a result, the user has a universal, self-manufacturing and budget “helper” that greatly simplifies the work of building a house.
These are topics that describe in detail how to make a lift for aerated concrete, and provide dozens of options for mini-cranes, from simple to the most complex designs.
Production of jib cranes of general industrial, fireproof and explosion-proof design. The lifting capacity of stationary electric and manual jib cranes is up to 5 tons, boom radius is up to 7 m (possibly more on special order). The lifting capacity of wall-mounted manual console cranes is up to 3.2 tons, boom radius is up to 7 m.
Creating a dimensional drawing of an electric cantilever crane is one of the most important stages of its production. Drawings allow us to take into account most of the nuances associated with the crane design, installation and further work already at the design stage. The drawing clearly demonstrates such parameters of the crane as the method of its installation, the maximum and minimum reach of the crane boom, its lifting capacity, the maximum lifting height of loads, the height of the device itself, its weight, all static loads on the structure, the dimensions of the fastenings and the angle of its rotation.
Next on the page is a drawing of a typical cantilever slewing crane. If you need to upgrade a slewing jib crane or install additional options on it, our company’s specialists can quickly provide you with dimensional drawings, taking into account all the improvements.
Comfortable grinder
Have you noticed that holding a small grinder by the top handle is convenient, but a large one is not? The big one always tries to escape from your hands when biting into metal. Having such a sad experience, some are generally afraid to use a large grinder. So that the grinder always remains in your hands, forum member chichic
designed a homemade handle for the instrument with a natural grip.
сhichic (FORUMHOUSE Member):
A powerful grinder can break out a cutting disc stuck in the metal, but it always remains in your hands. Proven by ten years of experience and cutting metal up to 14mm.
Crane Pioneer
The Pioneer type lift has excellent technical characteristics. It is light in weight and distinguished by maneuverability and mobility. The advantages of this device include the ability to quickly and easily assemble and disassemble.
To deliver the device to the construction site, it can be disassembled and folded into a simple gazelle. After work, it can also be easily disassembled and transported back. The crane can be installed anywhere: on the ground, in a pit, on a roof, on building floors.
This special equipment is produced by different companies in three main modifications of cranes, lifting capacity, and booms.
If necessary, you can make a Pioneer crane on your own, having with you the necessary consumables, tools, a well-drawn drawing and free time.
As for the scope of application of the Pioneer, it can be used to move various objects in any weather conditions. It is capable of delivering cargo to any floor or building structure. With its help you can deliver: tools, equipment, building materials and the like.
Quite often this device is used when installing roofs. With it you can quickly lift various loads, machines, metal structures, and materials.
Advantages of the Pioneer crane
The main advantages of the Pioneer crane include:
- ease of use - thanks to a simple and reliable design;
- the ability to assemble and disassemble the device within half an hour;
- mobility, allowing the unit to be used even at distant sites;
- low energy consumption.
Important: the Pioneer crane is capable of rotating the boom 360 degrees.
But this unit also has its drawbacks:
- it is capable of lifting a weight of no more than 1 ton;
- if you hang a flexible load on it, it is not always convenient and safe.
Do-it-yourself Pioneer crane
The Pioneer crane has a simple design. It consists of the following elements:
- Main support frame. It can be dismountable, bolted or standing on wheels. The second rotating frame is attached to it;
- Safety guy ropes, cargo ropes, electric drive;
- Swivel boom. It can be dismountable or bolted;
- End stop mechanism. It is located at the end of the boom;
- A limit switch located on the mechanism responsible for lifting the load.
So, if you have started construction on a personal plot, but there is no desire or financial opportunity to hire special equipment, try assembling a crane with your own hands. With it, you don't have to lift heavy loads yourself.
Attention: the Pioneer construction crane is a collapsible structure designed to lift loads. It can be used when digging a foundation pit for a house, installing a roof, or constructing walls at high altitudes.
The basis of the mechanism is a supporting running frame, which is installed either permanently or on a chassis. The part of the crane that rotates is installed on the frame. The boom can be rotated manually or electrically.
The load of this device is lifted using a winch, and stability is achieved thanks to a counterweight and turnbuckles (steel cable stays).
Materials and tools
To make the device, we will need the following materials, which can be found in the garage or in a specialized store:
- rectangular pipe;
- I-beam;
- telescopic unit for I-beam;
- small diameter cables;
- channel;
- electric motor;
- winch.
Tools you will need:
- keys;
- hammer;
- Screwdriver Set.
Design diagram
To make a Pioneer faucet with your own hands, you need to make a competent diagram. It should strictly indicate: materials of manufacture, dimensions of each individual element, methods of fastening parts.
When creating a diagram of a future design, it is worth carefully calculating everything. If you don’t quite understand this, it’s better to invite a specialist. Having a well-designed diagram in your hands, you can independently manufacture and assemble the device in the shortest possible time.
Assembly Features
As for the assembly of the product:
- The crane frame is assembled from a corner 63x63x5 mm.
- For a 5-meter boom, a pipe with a diameter of 5–8 cm is required.
- To strengthen the structure, you will need 2 corners, measuring 30x30x3 mm.
The carrying capacity of such a device will be 150 kg. If the ropes are strengthened, it will be possible to lift heavier loads.
Attention: making an electric faucet at home is quite difficult. It will be more expensive and take longer.
When choosing an I-beam, you should make sure that it fits freely into the pipe. It will be installed on sliding guides, resulting in a telescopic unit.
In order for a homemade crane to function well, you will need to equip it with small diameter cables. They are best purchased at a specialty store. To weld the supporting structure and the rotating frame, it is necessary to use a channel.
Thanks to it, the crane will be well fixed to the surface. For safe operation of the device, it is recommended to weld the platform into a rectangle.
To start the lifting process, you will need to purchase an electric motor and connect it to a winch from the UAZ.
Attention: if you want the electric motor to start electrically, invite a specialized technician. Despite the fact that this procedure is not particularly complicated, for safety reasons it is better to use the services of a professional.
That's the whole process of assembling a Pioneer crane with your own hands.
Specifications
The manufacture and assembly of the Pioneer construction crane has a lot of positive aspects. Installing it on a construction site will help you save on the number of construction workers. With it you can lift roofing materials, timber, working tools and equipment to the required height.
After assembling the homemade device, you can familiarize yourself with its technical characteristics:
- The load capacity of the device can vary between 0.5–1 ton. It all depends on the materials used during assembly.
- The height of the crane will be 4 meters.
- The platform can rotate 360 degrees.
In conclusion, it is worth noting that when starting construction on a personal plot, in order to save money, try to assemble special equipment with your own hands. Of course, you will spend your free time on such manipulations, but you can save a lot. Even large construction companies do not always buy special equipment. They usually resort to renting units.
DIY cyclone vacuum cleaner
Dust and small debris during construction or major repairs are a real problem, which is difficult and ineffective to combat with a broom and rag. To make the cleaning process easier without spending money on expensive equipment, FORUMHOUSE member zalman3000
I quickly assembled a cyclone for a vacuum cleaner from scrap materials.
Zalman3000 (FORUMHOUSE Member):
I needed: a 20 liter plastic barrel, a 45 degree 40 mm angle, a 90 degree 32 mm angle, an oil filter from Moskvich (it fits tightly at the 32nd angle).
The simple design is attached to the vacuum cleaner, and waste is collected directly into a capacious plastic container.
You can discuss the article and read other materials on country life on the FORUMHOUSE portal.
A homemade crane for dismantling an engine, a photo of making a dismountable crane, and a video of testing a homemade product.
One day the idea arose to build a crane for dismantling a car engine, since there is not much space in the garage, which means we need to make a collapsible one!
Read also: Wrench for licked bolts
To build the crane I needed the following materials:
- Profile pipe 80 x 80 mm (wall 3 mm) - 7 meters.
- Pipe 89 mm - two pieces 0.7 meters long.
- Pipe 76 mm - two pieces 0.9 meters long.
- Jack - 5 t (Soviet production).
- Metal plates 8 mm thick - 4 pcs.
- Hook from towing strap.
- Wheels 2 straight, 2 swivel + 2 swivel with brake.
- Studs M 14 - 1000 mm.
Next, I suggest looking at the drawings and the process of making the crane.
Crane drawings.
Tested my crane. I suspended a moped of 120 kg, then decided to climb onto the moped myself with another +120 kg - and again it seemed too little! But it is enough to dismantle the engine. I tried and lifted the Gazelle and took a video of the crane in action.
What is required for production
For the manufacture of the sash frame, rectangular profile pipes with dimensions of 40*20 and a wall thickness of 2 mm are most suitable. For transverse and longitudinal spars we also use profile pipes, but of smaller sizes - namely 20*20*2 mm, to reduce the weight of the structure. For sewing up the front and inner sides of the sash, a profile sheet is best suited, since it is already coated with an anti-corrosion compound from the factory. You can also use galvanized sheets.
For guides, it is ideal to use a channel up to 20 cm wide. The size of the channel shelf depends on the width of the rollers used in your particular case. The box to which the lever-spring mechanism is attached in the garage doorway can be made from a 100*50 mm wooden beam. For these purposes, you can also use a metal corner with a 50 mm shelf.
Support-sliding rollers and lever-spring rollers are purchased separately at a store specializing in sliding gates.
For thermal insulation of gates, for reasons of price and quality, it is advisable to use polystyrene foam with a thickness of 40 mm and a density of 15 to 25 kg/m 3.
Hook lifting height:
From the ground with a short boom, the lowest point is 90 cm, the top 170 cm.
With a long boom - the bottom point is 80 cm, the top is 180 cm.
Long boom and unscrewed jack rod - bottom 140 cm and top 225 cm.
Throughout the long history of its existence, man has more than once been faced with the task of lifting and moving heavy objects in space. For example, the familiar Egyptian pyramids consist of massive stone blocks that no one can lift. Therefore, one of the greatest achievements of mankind is the invention of the lifting crane, which made it possible to significantly simplify the task of moving heavy loads and speed up the construction of houses and other objects.
Installation of lifting mechanism
The main element of the crane is the lifting mechanism, which can be manual or automatic. The tefler consists of a cable and a winch installed on the side of the rack. The cable moves due to the rotation of the rollers. Additional fixation of the elements is not required; it is enough to secure the lift to the rack.
A self-made crane can be equipped with lifting equipment that is used in elevators. Such mechanisms are highly reliable and able to withstand massive objects.
To simplify repair work, it is possible to connect an electric drive to the lifting element. To automate the design, a motor with a power of 300-500 W is suitable. The electric drive is mounted to the base of the crane beam.
The design, equipped with an electric drive, is widely used in large-scale garage repairs and car disassembly for spare parts when a complex of work is required. According to the principle of operation, manual and automated cranes do not have significant differences.
Experienced car owners say that a crane beam is rarely needed in the garage, but if it is needed, there is nothing to replace it with. It is used for removing and installing the engine, and less often for moving other loads. Purchased mechanisms are expensive and take up a lot of space, so the best solution for a private craftsman is a do-it-yourself beam crane made from scrap materials.
In order to make a garage lift with your own hands, you will need:
- For racks - pipe with a cross-section of 100x100, length 2350 mm - 2 pcs.
- For the cross rod - a round pipe with a diameter of 100 mm and a length of 4150 mm.
- For supports – round pipe with a diameter of 110 mm and a length of 600 mm – 2 pcs.
- For bases and diagonal supports - corner 100x100 mm.
- M 16 bolts for attaching supports to rods.
- Wheels (for example, from a warehouse cart) – 4 pcs.
- Manual winch with a lifting capacity of up to 1 ton.
- Cable and rollers (for example, from an elevator door drive).
A beam crane is necessary for moving various loads
Crane beam device
The mechanism is a U-shaped structure (bridge) with a lifting mechanism. In large auto repair shops, both parts may be movable. The bridge moves on rails, the lift moves on a span beam. In garages, to save space, rails are not laid, and the bridge is equipped with wheels.
The crane beam device consists of supports, a span beam and a lifting mechanism. The supports are welded from metal pipes and channel bars. A manual or, less commonly, electric winch is used as a lifting mechanism.
Girder cranes are of the "floor operated" type, as opposed to those that are handled from a cab. To make the mechanic's work easier, the garage crane can be equipped with an electric winch
. This will increase manufacturing and maintenance costs, but if it is necessary to frequently dismantle engines and other heavy units, it will pay for itself. In rural areas where there are power outages, insufficient power or voltage surges, you should give preference to a manual winch. Especially if we are talking about a personal garage and not a private workshop.
Above we looked at what a beam crane consists of: supports, a span beam and a hoist. Manufacturing takes place in several stages:
- Weld the vertical supports in the shape of an inverted T with two diagonal supports.
- Weld the span pipe to form a U-shaped structure.
- Install the wheels.
- Weld a winch to one of the side supports.
- Install the lifting mechanism: fix the rollers, stretch the cable and hang the hook.
Ready-made drawings can be found online, but it’s easier to make it yourself by adjusting the product to the size of the garage.
Crane drawing
If for some reason this type of lift is not suitable, you can make a goose garage crane with your own hands - it will take even less time. The gooseneck crane has an L-shape, where the vertical stand is equipped with a jack rather than a winch. It is rolled under the car from the front and the engine is lifted by pumping a hydraulic jack. The boom moves upward and lifts the load.
Another interesting solution that will help save space is a suspended crane beam. Unlike the supporting structure described above, the span beam is attached to the ceiling by means of a rail (I-beam). This option requires sufficient ceiling height and strength of the building.
All devices must be tested with a load 20% greater than the maximum intended load.
Machine structure
The operating principle of a crane is based on the physics of simple mechanisms. The simplest version of the crane is a stick placed on a fulcrum in such a way that the free ends have different lengths. Now if you hang a load on a short lever, it will take less effort to lift it. The most common design is one that uses, in addition to levers, a system of blocks.
A do-it-yourself crane is an indisputable assistant in small-scale construction. When constructing a private house, the use of bulky industrial cranes is not required. The height of the houses rarely exceeds 2 floors, and the weight of the lifted load is 200 kilograms.
Crane diagram
Although there are many variations of lifting mechanisms, a classic crane consists of the following parts:
- An arrow with a block attached to its end. Depending on its length, the height to which the load can be lifted is determined.
- Platform. The boom and counterweight are attached to it. It is the main part of the crane and is subject to significant loads. Therefore, when manufacturing a platform, it is important to pay special attention to its strength.
- Counterweight. Serves for crane stability. Defines the maximum load weight that the crane can lift. Stackable counterweight options are available to provide maximum stability.
- A guy wire connecting the boom and the counterweight. Allows you to adjust the tilt of the boom and move the load in both vertical and horizontal planes.
- Winch with cable. It is the lifting mechanism itself. The power of the winch determines how much weight the crane can lift.
- Stand with a rotating mechanism. It is necessary to turn the crane to the sides.
- The support cross, which is the base of the crane. Sets the stability of the entire structure. When manufacturing it, you should also pay attention to its strength.
Types of homemade lifting mechanisms for the garage
For a one-car garage, car enthusiasts have come up with many different lifting devices. These are blocks, jacks, hoists, hoists and others.
The jack is the most popular device. Such small equipment must be kept in the trunk so that it is possible to lift the car when changing a wheel. Large jacks can be kept in the garage for serious work.
One unit suspended from a garage ceiling beam can halve the force required to lift a specific load. The combination of such mechanisms reduces the required force exponentially with the number of blocks involved. For example, using four blocks suspended from the garage ceiling, you can lift the entire car by the four corners.
The hoist is a structurally designed set of blocks. A hoist is a combination of a hoist and a trolley that moves along a ceiling beam above the machine. The telpher can be equipped with two electric motors: one is designed to move the trolley, the other is designed to rotate the drum with the cable. The result is a miniature crane.
Other designs are based on the principles of converting the horizontal movement of the rod into the vertical movement of the platform with the machine.
terms of Use
To operate lifting mechanisms safely, certain rules must be followed.
Homemade Pioneer crane
These rules apply to any lifting device:
- The load capacity must not be exceeded. A load that is too heavy may damage the device.
- The base must be stable. Homemade lifting devices should be located on a previously prepared hard horizontal surface.
- In bad weather conditions, you should also refrain from working with the crane. Strong winds will throw the crane off balance, and poor visibility may make it difficult to see people under the boom.
- Before operating a crane or lifting device, it is necessary to conduct an external inspection to identify any malfunctions. If malfunctions are detected, operation of the crane is prohibited.
- It should be remembered that when working with the lift, you should not make sudden movements. The load must be lifted smoothly. And most importantly, do not stand under any lifted load.
Construction[edit | edit code]
Construction in IndustrialCraft² is easiest using construction foam (), which serves as a source of foam concrete () - a strong and blast-resistant block that can also be painted and attached to the texture of any other block. If construction foam is compressed, then foam concrete becomes a very cheap building material, since when sprayed, one compressed foam produces 12 blocks of foam concrete.
Room lighting in IndustrialCraft² can be done not only with torches, but also with the help of an electric lamp, from which a floor, wall, table or ceiling lamp is formed (), depending on the placement. A lamp made from an electric lamp consumes electricity for lighting.
What characteristics should a garage lift have?
In garage conditions, two types of lifting mechanisms are used. The first type includes a lift that can lift the entire car, and the second type includes a goose-type lift that allows you to move loads around the garage.
Lifts of the first type are stationary devices and the main requirement for them is stability. The car weighs more than a ton and should not have the slightest chance of falling. In order to prevent any accidents, the garage lift must have a reliable stopper.
Homemade goose tap
The goose type lifts are most often used in auto repair shops. It is quite simple to make it from a profile pipe or channel. First, the base is welded on which the rotating mechanism needs to be installed. It is best to make an arrow with an adjustable reach. This will make it possible to move weights in any direction.
Read also: Drawing of a trailer hitch for a walk-behind tractor
What types of lifts are there?
Lifts come in various designs, differing in the method of lifting the car and the type of drive. For vehicle repairs, three types of drives are mainly used:
- chain mechanisms;
- screw;
- hydraulic systems.
The method of lifting the car plays an important role in the design; a garage lift can be a fork, scissor, or platform design. The most popular are fork screw units, the basis of which is a long threaded shaft made of tool steel. The parts of the unit are able to withstand the load of an average car; it is almost impossible to make the mechanism with your own hands, due to the complex design of the forks.
Types of lifts for car repairs
The easiest way to make a platform lift with your own hands is using a screw mechanism.
Parallel beams attached to the mechanism are capable of lifting a car weighing up to 3 tons.
How a simple block design works
The pulley system or pulley system has been known to mankind since ancient times. The classic system design consists of pulleys and cable. One pulley is called a block. Depending on the method of fastening, the pulley can be movable or fixed:
- Fixed block. It is attached to the support and plays the role of changing the direction of movement of the rope. Does not provide any gain in strength.
- Movable block. It is located on the side of the load and gives a gain in strength.
The principle of operation of a pulley block is similar to the principle of operation of a lever in the physics of simple mechanisms. The role of the lever in this case is played by the cable itself. In the case of a simple block of two pulleys, the movable pulley divides the rope into 2 parts and in order to lift the load the same distance, a rope twice as long will be required. The work of lifting the load is performed in the same volume. And the effort, due to the fact that the length of the rope has become twice as long, becomes half as much.
If there are more than 2 pulleys in the system, the gain in strength is approximately equal to the number of blocks. In the case of 3 blocks, the effort will be 3 times less, and 4 blocks will require only a quarter of the original effort.
Industrial development[edit | edit code]
Electrical engineeringedit | edit code
Once a sufficient amount of latex, red dust (), copper, iron and tin has been found, you can begin to manufacture a generator - the first source of electrical energy, as well as the first consumer of electricity - an electric furnace (), which works almost twice as fast as a conventional one. To create an electric furnace you will need copper and red dust, because you will definitely need an electrical circuit.
IndustrialCraft² recommends that mined ore be first crushed in a crusher and only then smelted. Thus, from one block of ore you get 2 ingots, instead of one. Therefore, the sooner the crusher is manufactured, the better. There is also an ore washing machine and a thermal centrifuge, which allows you to wash even more resources from crushed ore. Likewise, it is recommended not to melt latex in a furnace to make rubber, but to use an extractor, as it squeezes more rubber out of the latex. The crusher, ore washing machine and extractor are also consumers of electricity.
Miner's affairs | edit code
At the initial stage of development in this mod, when a lot of iron has been accumulated, it is worth stocking up on stone pickaxes and one iron one and going to the mine (cave or canyon). It is recommended to stay in it for an hour or two of real time, mining a pile of , various stones (stone, coal, lapis lazuli, obsidian, diamonds) and red dust, so that later, during any complex or not very difficult crafting, you do not have to run into the mine for new portions of useful resources.
Subsequently, a mining laser and a drilling rig (used for automatic extraction of resources) will be very useful in mining.
Agricultureedit | edit code
The agricultural complex can be effectively used for the player’s life thanks to perches (which simplify farming) and plant selection. For example, Ferrium yields a small pile of iron dust as a harvest, and Aurelia yields a gold nugget. A mug of coffee is extremely useful, as it gives the player more energy, making him move faster. A coffee mug () is crafted from coffee fruits.
Complex block system how to calculate power gain
If the system is designed in such a way that one simple pulley pulls another simple pulley, then this is already a complex system of blocks. To theoretically calculate the gain in strength, it is necessary to conditionally divide a complex chain hoist into simple ones and multiply the values of the gain from simple chain hoists.
For example, if the system consists of 4 blocks, and the first conditional simple pulley has a gain of 3. It pulls the second simple two-block pulley, also with a gain of 3. The total force that will need to be applied will be 9 times less. It is the 4-block complex chain hoist that is most often used by rescuers.
The simplest lifting and transport mechanisms for the construction of cottages and houses.
During the construction process, it is very often necessary to move all kinds of cargo, building materials, parts, etc. The most labor-intensive of these movements is vertical. For example, lifting bricks, buckets of mortar, blocks onto scaffolding or onto second floor floors. Such movements require large physical and time expenditures.
Of course, the simplest solution is to invite a crane to the construction site. But this is expensive and does not always solve the problem. So, you can’t lift a lot of bricks onto scaffolding, they simply won’t hold up. And if you lift it little by little - taking into account the cost of the crane and the speed of laying this brick - the brick wall will simply become golden.
The simplest of them is a block. Everyone knows what he looks like and I’m not even giving a photo of him, just diagrams. The meaning of the block is to change the direction of application of force. For example, for block 1 in the diagram (the simplest case, called a fixed block), in order to lift the load up, you need to pull the cable down. And this will make it possible to use the worker’s own weight to lift the load. For example, you can make several loops on a cable, then a worker, walking along them like a rope ladder, can easily lift up a load of 50-70 kilograms with almost no effort!
Block 2 (in the diagram, a movable block) has one end of the cable fixed motionless and already allows the force to be doubled, and a worker using such a block will already be able to lift a load of 100 kilograms. The disadvantage is that the cable also needs to be pulled up. But if you combine block 2 with block 1, the lifted load can reach double the weight of the worker, which can now be used again!
Such a combination of several blocks of type 1 and 2 is called a chain hoist. The chain hoist gives a gain in strength equal to the number of blocks. Those. to lift a load weighing 1000 kg, having a chain hoist with 6 movable and 6 fixed blocks, an effort of only 85 kg will be required!
A pulley block is a rather complex device, so they often use a block with two pulleys of different diameters or a block on a thick axle, which serves as a second block.
So block type 3 (in the diagram) gives a gain in strength equal to the ratio of the radii of the large and small blocks. The well-known gate in a well is constructed in approximately the same way. You remember that the log or pipe on which the chain or rope is wound is much smaller than the wheel (or the radius of the handle) with which the gate rotates. This allows even children to lift a full bucket of water from the well with ease.
Blocks and pulleys of all types are readily available. However, they have one significant drawback - they move loads only vertically. Therefore, the so-called crane - rocker arm should be recognized as a more valuable lifting and transport mechanism.
The crane represents nothing other than the famous lever of Archimedes. Although it was known much earlier than Archimedes, back in ancient Egypt. With the help of cranes, Egyptian workers pumped Nile water into canals and ditches.
The beauty of the crane is its simplicity, extreme cheapness and very high efficiency. I had to use it myself. It so happened that much more rubble was poured into the basement than required and it was necessary to lift the excess. How? Carrying buckets up the stairs? The work is extremely unproductive, hard and thankless. I had to urgently make a crane from discarded boards and poles. The easiest way turned out to be to hang the boom (yoke) of the crane on a strong cable (for transporting the car). Now lifting a bucket of crushed stone (more than 20 kg!) took 2-3 seconds! (it took longer to load).
The crane also uses the weight of the worker himself. In addition, counterweights can be used, which also makes lifting heavy objects easier.
But the most valuable quality is that it also moves the load horizontally! Within the range of your arrow, of course. Therefore, sometimes it makes sense to use a crane not only for lifting, but also to move cargo from place to place.
The crane is also useful if you need to lift the load to a sufficiently high height. In this case, the crane's arrow is hung quite high, and so that the worker below can operate it, a strong rope or small pole is tied to the butt. A stationary block with a long rope is installed at the end of the crane's arrow. This will allow 1 person to lift loads completely freely, for example, to the second floor. And this is instead of carrying them along stairs or walkways.
Such simple lifting and transport mechanisms can significantly speed up and facilitate rigging and construction work without any additional costs for their organization. Apply them on your construction and you will feel the difference!
Methods for attaching a rope to a lifting mechanism
When creating complex pulley blocks, there are often situations when a cable of the required length for attaching the moving block is not at hand.
Crane for gas blocks
Methods for attaching a cable using general-purpose rigging:
- Using a cord. Using a self-tightening knot, the cord is tied to the main cable. As the load is lifted, the grappling knot moves along the main rope, thereby allowing the height of the load to be increased.
- Using clamps. In the case of using a steel cable, it is not possible to use a cord, so it is necessary to use special clamps.
Design and operating diagram of folding garage doors
The lifting (panel) gate system is a fairly simple mechanical device. The main and load-bearing elements are the frame, guides and a lever-spring mechanism that moves the sash. The mechanism can be controlled either manually or using an electric drive controlled by a remote control (remote control). When opening the gate, levers are used that are attached to the bottom of the sash, and two guides for the movement of rollers, fixed at the top at the ends of the sash. Opening is carried out by lifting the lower part of the door by the handle and is done quite easily, since the stretched springs of the lever mechanism help in opening the gate.
Scheme of operation of the lifting mechanism
There are two types of lifting gate mechanisms:
- Lever-spring is a fairly simple and reliable mechanism that is popular among garage owners. Installation features: precise adjustment of tension springs and high quality and precision installation of roller guides.
- With counterweights - used mainly on gates with a large leaf weight. The cable is attached to the lower corners of the sash and passes through the block to a counterweight mounted on the other edge of the winch.
We create a simple lifting mechanism with our own hands
Construction of a crane is not a quick task and is justified if it is required frequently or the volume of work is large enough. In cases where the load needs to be lifted urgently or this is a one-time operation, you can use improvised means.
To create a simple lifting device you will need a cord and two blocks. One block and the end of the rope are fixed motionless on the support. This will be the highest point to which the load can be lifted. We attach the second block to the load using slings or a hook. We first pull the rope along the block attached to the load, then pass it through the upper block. The gain in power will be 2 times. Using your own weight, you can easily lift a load weighing 100 kilograms to the required height.
DIY mini crane
If you add the ability to move the upper block along a guide, for example along a rail, you can get a do-it-yourself jib crane. It is useful in garage conditions for moving heavy machine parts.
It should be remembered that when working with the lift, you should not make sudden movements. The load must be lifted smoothly. And most importantly, do not stand under any lifted load. The same rule applies to a crane - standing under the arrow is prohibited.
Hydraulic garage crane drive
There are several types of hydraulic drive:
- with hydraulic cylinders;
- with hydraulic cylinders and manual winches.
When the operator increases the pressure level in the cylindrical block, the oil fluid acts on the piston part, pushing out the telescopic rod, at which time the boom equipment rises.
Based on the nature of the movement of the output link of the hydraulic power unit, the following types of drives are distinguished:
- Rotational movement. The design of such a mechanism includes a hydraulic motor equipped with a driven link with unlimited rotational movement.
- Forward movement. In this case, a hydraulic cylinder is used with a reciprocating movement of a driven type link (piston rod, plunger).
- Rotary movement. The crane mechanism is equipped with a rotary hydraulic motor, the driven link of which makes a reciprocating movement at an angle of less than 270°.
- Adjustable. In this case, the speed of the output type link can be adjusted by changing the crankshaft speed of the power unit, which activates the high pressure pump.
- With a closed circuit of working fluid circulation. This means that the fuel is returned to the suction hydraulic line of the pump mechanism. This drive is lightweight and provides high rotor speeds without the risk of air getting into the system.
Materials and tools
The most important thing when making a crane is to use high-quality tools and materials. This will guarantee that the structure will be strong and safe.
The cable should have minimal stretch; this will give a greater gain in strength when using a pulley system. The fittings used for tying must be taken only from metal. Plastic fittings cannot withstand heavy loads and break at the wrong time. To fasten individual parts of a homemade crane, you should choose high-strength hardware products.
If a winch is intended to be used, its lifting capacity should not be less than 500 kilograms. The best choice would be winches that can lift a load weighing 1 ton or more.
In conclusion, I would like to once again remind you of the need to observe safety precautions when working with lifting mechanisms. Also, regardless of whether the crane is purchased or made by yourself, you should inspect it before starting work.
If you find an error, please select a piece of text and press Ctrl+Enter.
Advantages and disadvantages of a lifting structure
The lifting structure perfectly fulfills its function and has a number of undeniable advantages over other types of garage doors, but at the same time it is not without its disadvantages.
Advantages:
- No additional opening space required. The unused space under the ceiling is used.
- The one-piece design of the canvas provides reliable protection against penetration.
- Any external finishing and decoration can be used.
- The door leaf can be additionally insulated with expanded polystyrene.
- It is possible to supply equipment for automatic opening.
- Can be used in both single and double garages.
The disadvantages are primarily due to the design features of the lifting mechanism and the inability to do it any other way.
Flaws:
- Installation is only possible in rectangular openings.
- When damaged, a solid canvas must be replaced, as it does not involve partial repair.
- When the gate is open, the height of the opening decreases.
- The gate mechanism is designed for a certain load and this should be taken into account when insulating.
- Some difficulty in installation.
Lift for laying aerated concrete blocks
Abroad, during the construction of private houses, cranes and various lifts are often used. This way construction goes faster, which means the “box” is cheaper, because It is more profitable to use small-scale mechanization tools than to hire laborers. Our developer relies on himself and often builds a house “with one helmet.” Therefore, the urgent question is how not to physically overstrain yourself when laying a wall from aerated concrete blocks weighing 35-40 kg.
An interesting option is the unusual homemade “assistant” of the FORUMHOUSE user with the nickname Krestik. First, let's show what he took as a basis.
German mini crane with retractable central post
A special feature of the lift is the original folding “arm-boom”, with the help of which the crane, moving on wheels, can reach two opposite walls.
I am building a house myself and, in order to be able to lay aerated concrete blocks, I built a lift according to the above model. The crane was made completely collapsible, except for the base. I didn’t measure the maximum load on the hook, but it easily lifts me (weighing 95 kg).
Technical characteristics of the lift:
- width – 2200 mm;
- height – 4200 mm;
- boom radius – 4200 mm;
- load capacity of electric hoist – up to 800 kg;
- total weight of the crane with ballast is approximately 650 kg;
- lift weight without ballast – about 300 kg;
- The maximum lifting height of the masonry block is 3500 mm.
The working height of lifting blocks is adjustable in two ranges. The first is 1750 mm. The second is 3.5 m, for which the structure is raised, sliding upward along the supporting “legs” using a hydraulic jack lined with spacers made of GB blocks.
To make the lift, the user needed:
- swivel wheels;
- profile pipes for the mast, “legs” and boom with a section of 12x12 cm, 12x6 cm, wall 6 mm;
- pipe-jibs – 63x3 mm;
- powerful gate hinges;
- The boom rotating mechanism is made of ST45 steel and “205” bearings.
During operation, the design was modified. For example, the user laid the cable for the winch in a corrugated pipe and extended the cable for the control panel.
The design has a number of shortcomings that I would like to correct. For example, I’m thinking about making wireless control, replacing the gate hinges with bearings. Increase the number of “joints” in the boom at the same reach. Instead of a temporary counterweight - bags of sand concrete, pour concrete ballast.
An important nuance: in order for the lift to move around a construction site or, for example, on a concrete slab on the second floor, you need to keep the workplace clean, because GB fragments and debris interfere with the relocation of the tap.
The design of the unusual lift attracted the interest of portal users.
With such a lift, I think, as they do in Germany, you need to make masonry from blocks larger than standard ones. The length and height are 2-3 times greater than a regular GB. The crane has enough lifting capacity, and the laying speed will increase significantly.
According to Krestik, he heard that someone on the portal had already tried to order blocks of 1x0.4x0.6 m format from a gas silicate manufacturer. But it turned out that this was not profitable for the plant, because it is necessary to reconfigure the line for the production of GB, but for the sake of a small volume (for an ordinary private house) they will not do this.
I'm wondering: is the work on site easier when using a crane? What work can be done with it and what cannot?
There is no need to install scaffolding when laying GB walls. The lift can be assembled and disassembled. I poured the concrete lintels over the windows the old fashioned way, from buckets, because... The volume is small, and it’s easier to do it with one assistant.
The overall result: the mini-crane turned out to be successful, and with some modifications to its design, the lift can be put into small-scale production.
The simplest and most versatile crane that does not require movement
If you give our people support, they will move the earth! Perhaps this motto best applies to the action that the participant with the nickname MichaelJackson “creates” on the construction site. The user independently builds a house from aerated concrete. He decided to simplify his task and made a crane.
Although we have already talked about the many types of load lifters on a construction site (links to materials at the end of the article), this crane deserves a separate story. It does not need to be moved around the site, because the arrow reaches the farthest walls.
The crane is assembled from scrap metal. The arrow is welded from a corner. According to the user, this is not the best solution in terms of weight of the structure. But the corner was at hand.
The crane is designed to tilt and stands vertically both without a counterweight and with a counterweight of 200 kg.
Crane swivel assembly. The user scalded a large bearing with plates. The result is a “basket”. The “basket” is welded to the crane stand, and a round piece of wood is inserted into the bearing on top, which is welded to the boom.
The homemade product turned out to be so successful that the designer was bombarded with questions.
How much did the crane cost?
Crane weight 250 kg. Metal was purchased for 30 rubles. for 1 kg. 7,500 rubles were spent on hardware. + telpher for 3500 rub. In total, the crane cost 11,000 rubles. and two for work.
Does the hoist move around the crane?
Yes, the hoist moves along the entire boom. The boom rotates 360 degrees. It reaches everywhere, so there is no need to carry blocks. I took the aerated concrete with a grip, applied glue using a homemade device, and laid the block.
Show me how you made a carriage for applying glue and a gripper for blocks?
Homemade carriage for applying glue to aerated concrete blocks.
And this is an “upgrade” of a garden wheelbarrow for pouring concrete into an armored belt using a crane.
The crane boom can be made removable. To do this, you need to weld a 1.5 m long “arm” to the central column of the crane, because The hoist does not move closer than this distance - there is a limiter. The boom rotates in a circle using a cable. A 6 m long boom (a 1.5 m “arm” and a 4.5 m removable part) is enough to reach the walls of a house measuring 10x10 m. In total, the longest part of the crane is 4.5 m and can be transported by car, and the crane can be assembled on site.