Every summer resident and gardener knows how important it is to plant vegetables correctly. This process is labor-intensive, quite expensive in both time and money. After all, it is necessary not only to evenly distribute the planting seeds in the furrows, but also to further thin out the seedlings manually, forming crops. A special seeder will help to significantly simplify the work, which, even in manual mode, will be a real help in planting. The article will discuss the nuances of the operation of planting structures, the principle of manual assembly of the simplest mechanisms, the features of operation and the creation of manual machines for more accurate seeding.
Tool requirements
A completely working structure is made from available materials: various recyclable materials, tin cans, plastic bottles. It is advisable to use more complex structures made of metal sheets only for industrial-scale cultivation of vegetable crops.
A good example of the simplest design for planting is a carrot seeder.
Certain aspects apply to self-made mechanisms for planting vegetables.:
- The placement of seed into the soil must be in a certain quantity (per 1 linear meter) and to the required depth.
- Seeds should be distributed evenly, without gaps and without damage.
- The mechanism ensures straightness of planting rows and row spacing.
- After each laying, the grooves should be filled with loose soil.
Sowing small seeds is best done using mini-seeders. Such devices are suitable for growing carrots, onion sets, salad greens, that is, those crops that have rather small planting material.
Rules for planting carrots
The carrot seeder makes it possible to sow seeds in pre-prepared shallow grooves, at an even distance of 1.5 to 2.0 cm from each other. The recommended distance between the rows should be from 15 to 20 cm. For industrial planting, carrots are best planted in the form of double rows with a distance between them of up to 20 cm and a wide row spacing of 40 to 50 cm. It is recommended to place the rows perpendicular to the long side of the bed, for convenient subsequent plant care.
Features of application
The basic principle of operation of the simplest sowing mechanism is to limit the spilling of seeds out. An open box with a double good bottom is used for this procedure. A movable plate is inserted into the formed space.
Grains or seeds are poured into the bottom of the box (upper) with holes slightly larger than the size of the planting material; in the lower tier of the mechanism there are larger holes, they coincide with the top. When pushing in the middle intermediate plate, the holes in the bottoms do not communicate, which means the grains do not spill out. If the valve is moved, the sower will start working again. To avoid thickening of the crops, you should not pour a large number of seeds into the structure at once, rolling them over the mechanism.
Many vegetable growers equip the movable (middle) plate with a spring, which facilitates the operational process.
Using the landing mechanism is very simple. A furrow is marked in the garden bed. They place a homemade seeder on it and move the device forward. The tank begins to rotate - grain or seeds are poured out evenly. Then, using an improvised hoe, the plantings are covered with loose soil.
The seeds are fixed in the seeder using a transparent plastic tank. The entire structure can be easily converted for any vegetable crop; for example, in a radish seeder, the holes in the tank need to be made smaller than in a mechanism for planting corn. It is very easy to make improvised parts using simple materials. For economical and high-quality planting of different vegetable crops, it is necessary to make about 3-4 tanks with holes of different sizes for the seeder.
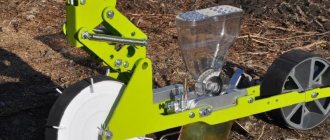
DIY making
By using a mechanism for planting small seeds, sowing can be accelerated 10 times. As an example of a simple hand-held device, consider a carrot seeder.
To make it you will need the following materials::
- Plastic or metal shaft. You can use a part from a thick-walled pipe.
- A wheel made from a tin can (a small bicycle wheel will do).
- A bunker made from a plastic bottle, container, or shampoo container.
- Retaining rings designed for the wheel.
- Foam rubber.
- Transport bracket (1 piece).
- Wooden handle.
- Screw “M 4” (from 4 to 8 pcs.).
- Restrictive rings/clamps (from 2 to 4 pcs.).
- Nut “M 4” (from 4 to 8 pcs.).
For high-quality assembly you will need tools: a screwdriver, drills with different diameters, scissors, a drill, a knife.
The process of manufacturing a simple manual seeder takes place in several stages:
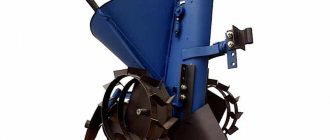
- The shaft is being prepared. In the middle of the plastic pipe, recesses of different diameters are drilled (for large and small seeds). The pipe is not drilled through.
- Wheels are made from tin cans. To ensure better grip, rubber rings are placed on the wheels in several rows. In the middle, using scissors, a hole is cut equal to the diameter of the shaft.
- A hopper is cut out of a plastic container. The lower part is cut off, holes are made on the opposite walls for the sowing shaft. The bottle is placed upside down.
- The hopper is placed on the shaft. Foam rubber is laid and glued to the bottle walls so that during further rotation the excess seeds are removed. That is, when the foam brush is turned, the shaft should produce small cells, each of which will contain one or two seeds.
- The transport bracket is attached to the shaft with wheels and secured with screws.
- The hopper is carefully attached through a metal plate to the bracket. When the shaft rotates, it should not move.
- A wooden handle is installed.
The simple design will significantly reduce labor costs . This is how you make a manual seeder with your own hands. The main disadvantage of this mechanism is the limited sowing (only in 1 row) and the sowing of only one vegetable crop due to the different size of the seeds. The problem can be solved by using several replacement cans with different holes.
Much more complicated is a self-made sowing device, with which you can work with seeds of different crops. The main working mechanism in the universal design is the sowing shaft, which is an aluminum tube with a diameter of 30 mm. Holes are drilled in three rows of different sizes. Each line is made for one crop.
How to sow seeds
If you plant flowering plants yourself as a source of pollen for your bees, you will need a seeder. It can significantly facilitate your economic activities in the territory of your apiary.
The fact is that an apiary is far from just a hive with bees. These honey insects must have a good source of food for themselves.
It’s good if a variety of flowering plants grow naturally around your site. Then you will not have to take additional measures to provide food for your charges.
Precision seeding mechanism
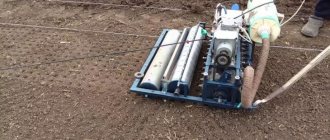
An important task of using seeding structures is to ensure uniform planting . To plant seeds in the ground at a strictly defined distance, manual precision seeding drills are used; these mechanisms are easy to make with your own hands, just like the simplest devices described above.
Design
The device consists of one or more containers with seeds, a frame on wheels, and a control handle. To independently manufacture such a unit, you will need a turning tool or a drill to drill metal sheets, the thickness of which is approximately 1 or 2 mm, and the diameter is about 5-8 mm.
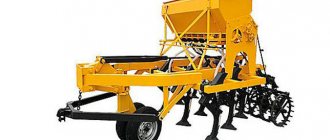
When planning a connection between a seeder and a walk-behind tractor, it is better to use rigid bolts that are more vibration-resistant instead of rivets . The front wheels are designed to form furrows in the beds, where the seeds fall from the hopper. Using the rear wheels, the resulting holes are filled with loose soil.
The basis of the precision seeding design consists of a rectangular metal frame. Containers are attached along the edges into which seeds are loaded. It is recommended to buy the blocks necessary for turning the shaft separately, since it is very difficult to make them yourself without special skills and tools. For example, containers that are used in conventional manual seeders or in conjunction with walk-behind tractors are perfect.
The precision seed drill is driven by reversible wheels, which also adjust the height of the head, designed to get the seeds into the ground . Each container must be secured separately. The wheels are connected on a springy and rigid base.
The sowing unit is a container in which the seeds are placed. When the seeder is dragged along the ground, a mechanical wheel with blades, also located in the container, is activated. At the end of the container there is a narrow slot where only one unit of planting material can be placed, so seeding is uniform and very economical. The size of the hole can be changed to accommodate seeds of different sizes.
Operating principle
When working with a manual precision seeder, first do the assembly, move the handle to the working position, and put the rear wheel on the axle. The marker can be adjusted if necessary. Depending on the crop being sown, a disc of a certain size is installed in the hopper. The depth of the chalk is adjusted to the size of the seeds.
This device forms the required depth of the holes. When the seeder is put into action, the front wheel of the structure begins to spin; with the help of a belt drive, the rotational movement is transmitted to the disk, which captures the seeds from the hopper.
Using a marker, smooth planting rows are formed. It is often recommended to carry out the first sowing along a certain contour for a more uniform distribution.
DIY making
The bunker container must be made of plastic. This makes it easier to visually control the number of seeds poured. Take the following components:
- A bolt that will be used as an axis on which the seed-filled container will rotate.
- A plastic pipe equal in length to the dimensions (depth) of the bunker. Steel pipe of the same length.
- Aluminum wire.
- Washers for fixing the pipe.
Assembly is a step-by-step process. Let's describe the algorithm :
- A through hole must be drilled in the center of the selected plastic jar. The cover is removed and an additional hole in the form of a rectangle (through) is made in the side wall. The hopper will be filled with seeds through it.
- We install a plastic pipe in the center of the jar to prevent the seed from spilling out. A steel pipe is installed into it, a bolt and nut are screwed in. The rotation mechanism is ready.
- On the side of the hopper, points are marked for holes at a distance of 30 mm. They are then pierced with a hot nail. The seeds should fit into the holes.
- They make a handle. A through hole is drilled in the wooden handle at the end. Using a bolt and nut, attach the handle to the seeder.
- To automate the process, a device is made from an iron sheet to fill planting holes with seeds.
- The workpiece is attached to the handle above the seed hopper.
The device is ready. Before starting sowing work, it is recommended to prepare the site and loosen the hardened soil.
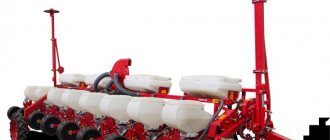
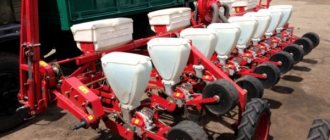
Range of modern seeders
If making a planting unit yourself causes difficulties, it is recommended to immediately purchase ready-made structures. The assortment on the market is quite large. The American model of precision seeding “1001 - B” is equipped with 6 replaceable discs. With such a seeder you can plant 28 types of vegetable crops. Using the adjusting screw, you can change the planting depth.
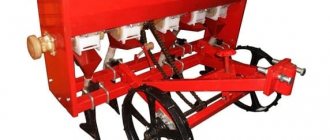
Newtechagro seeders are single-row types. Designed for sowing beets, carrots, onions, and cabbage . But such designs are expensive.
But there are also cheaper analogues - precision seeders "SOR - 1/1". They are also single-row, can be equipped with a bush or brush sowing unit, the row marker is 0.5 m. This is quite enough for an average garden.
Using a manual seeder can significantly reduce labor costs, increases the speed of the planting process, simplifies the technology, significantly improves the quality of crops, and hence excellent harvests in the future.
Al-ko us 45
The AL-KO US 45 model from a German manufacturer can be used throughout the year.
In summer, you can use it to plant various vegetable crops and sow lawn grass, and in winter, if you don’t have a Foreman, Patriot, Husqvarna, Champion, Huter or any other snow blower, you can sprinkle gravel and sand on an icy and snowy surface.
The cost of this manual seeder is about 3 thousand rubles.
In general, there are many different modifications on the market, so the farmer has plenty to choose from. In particular, he can choose a drum or disk unit, a belt or chain drive, as well as a standard or extended configuration of the device.
The unit pays for itself quite quickly - almost in one season.
This is explained by the fact that partial mechanization of the process makes it possible to carry out sowing work in an accelerated mode, which makes it possible to sow as much area as possible.