Every summer resident and gardener knows how important it is to plant vegetables correctly. This process is labor-intensive, quite expensive in both time and money. After all, it is necessary not only to evenly distribute the planting seeds in the furrows, but also to further thin out the seedlings manually, forming crops. A special seeder will help to significantly simplify the work, which, even in manual mode, will be a real help in planting. The article will discuss the nuances of the operation of planting structures, the principle of manual assembly of the simplest mechanisms, the features of operation and the creation of manual machines for more accurate seeding.
Tool requirements
A completely working structure is made from available materials: various recyclable materials, tin cans, plastic bottles. It is advisable to use more complex structures made of metal sheets only for industrial-scale cultivation of vegetable crops.
A good example of the simplest design for planting is a carrot seeder.
Certain aspects apply to self-made mechanisms for planting vegetables.:
- The placement of seed into the soil must be in a certain quantity (per 1 linear meter) and to the required depth.
- Seeds should be distributed evenly, without gaps and without damage.
- The mechanism ensures straightness of planting rows and row spacing.
- After each laying, the grooves should be filled with loose soil.
Sowing small seeds is best done using mini-seeders. Such devices are suitable for growing carrots, onion sets, salad greens, that is, those crops that have rather small planting material.
After upgrading the vacuum seeder, it will be able to apply liquid fertilizers
If a set of equipment for applying liquid fertilizers is installed on the seeder, then it is possible to apply starter fertilizers simultaneously with sowing. For this purpose, it carries out work on modernizing seeders, cultivators and disc harrows. After installing a spraying computer and a working fluid supply system on the soil-cultivating equipment, it will be able to simultaneously apply liquid fertilizers and plant protection products while performing routine tasks. The amount of fertilizer applied and the quality of the territory’s cultivation will be saved in the Agrosystem database.
Features of application
The basic principle of operation of the simplest sowing mechanism is to limit the spilling of seeds out. An open box with a double good bottom is used for this procedure. A movable plate is inserted into the formed space.
Grains or seeds are poured into the bottom of the box (upper) with holes slightly larger than the size of the planting material; in the lower tier of the mechanism there are larger holes, they coincide with the top. When pushing in the middle intermediate plate, the holes in the bottoms do not communicate, which means the grains do not spill out. If the valve is moved, the sower will start working again. To avoid thickening of the crops, you should not pour a large number of seeds into the structure at once, rolling them over the mechanism.
Many vegetable growers equip the movable (middle) plate with a spring, which facilitates the operational process.
Using the landing mechanism is very simple. A furrow is marked in the garden bed. They place a homemade seeder on it and move the device forward. The tank begins to rotate - grain or seeds are poured out evenly. Then, using an improvised hoe, the plantings are covered with loose soil.
The seeds are fixed in the seeder using a transparent plastic tank. The entire structure can be easily converted for any vegetable crop; for example, in a radish seeder, the holes in the tank need to be made smaller than in a mechanism for planting corn. It is very easy to make improvised parts using simple materials. For economical and high-quality planting of different vegetable crops, it is necessary to make about 3-4 tanks with holes of different sizes for the seeder.
Application
Furrows are made in the selected area.
The container is filled with prepared seeds. The seeder is installed with wheels in the furrows, which, turning, begin to move it, thereby carrying out sowing. The planting depth can be adjusted by controlling the immersion of the unit into the ground. The optimal level to adhere to is 2.5 - 3 mm below the soil level.
A vacuum seeder has a number of positive and negative characteristics. Advantages of using a vacuum seeder:
When working with a vacuum seeder, whether made with your own hands or purchased, it is important to adhere to some safety rules. So, if you need to transport the specified unit, it is worth removing the remaining seeds or fertilizers from the containers intended for this, which can also be placed on the site using a vacuum seeder.
All elements must be secured to prevent them from becoming loose. If the seeder is used in conjunction with a tractor, it is strictly prohibited to stand between these machines. It is impossible to carry out cleaning, repairs, adjustments, or add seeds and fertilizers when the seeder is in motion. Also, do not level, compact or mix the seeds in containers with your hands, even if the machine is not moving.
DIY making
By using a mechanism for planting small seeds, sowing can be accelerated 10 times. As an example of a simple hand-held device, consider a carrot seeder.
To make it you will need the following materials::
- Plastic or metal shaft. You can use a part from a thick-walled pipe.
- A wheel made from a tin can (a small bicycle wheel will do).
- A bunker made from a plastic bottle, container, or shampoo container.
- Retaining rings designed for the wheel.
- Foam rubber.
- Transport bracket (1 piece).
- Wooden handle.
- Screw “M 4” (from 4 to 8 pcs.).
- Restrictive rings/clamps (from 2 to 4 pcs.).
- Nut “M 4” (from 4 to 8 pcs.).
For high-quality assembly you will need tools: a screwdriver, drills with different diameters, scissors, a drill, a knife.
The process of manufacturing a simple manual seeder takes place in several stages:
- The shaft is being prepared. In the middle of the plastic pipe, recesses of different diameters are drilled (for large and small seeds). The pipe is not drilled through.
- Wheels are made from tin cans. To ensure better grip, rubber rings are placed on the wheels in several rows. In the middle, using scissors, a hole is cut equal to the diameter of the shaft.
- A hopper is cut out of a plastic container. The lower part is cut off, holes are made on the opposite walls for the sowing shaft. The bottle is placed upside down.
- The hopper is placed on the shaft. Foam rubber is laid and glued to the bottle walls so that during further rotation the excess seeds are removed. That is, when the foam brush is turned, the shaft should produce small cells, each of which will contain one or two seeds.
- The transport bracket is attached to the shaft with wheels and secured with screws.
- The hopper is carefully attached through a metal plate to the bracket. When the shaft rotates, it should not move.
- A wooden handle is installed.
The simple design will significantly reduce labor costs . This is how you make a manual seeder with your own hands. The main disadvantage of this mechanism is the limited sowing (only in 1 row) and the sowing of only one vegetable crop due to the different size of the seeds. The problem can be solved by using several replacement cans with different holes.
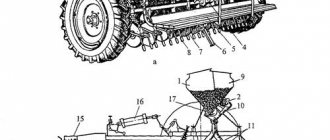
Much more complicated is a self-made sowing device, with which you can work with seeds of different crops. The main working mechanism in the universal design is the sowing shaft, which is an aluminum tube with a diameter of 30 mm. Holes are drilled in three rows of different sizes. Each line is made for one crop.
Description of the vacuum seeder
The device consists of a pneumatic sowing mechanism with a vacuum and pressure system with tubes. The pitch between the tips of these tubes is equal to the pitch between the centers of the wells.
The seed distribution system is pneumatic, which ensures the most uniform sowing of seeds even of different shapes and sizes.
The principle of operation is as follows: torque from the wheels is transmitted to a shaft in which there are special recesses - dispensers. The upper part of the shaft is in contact with the hopper where the seeds are located.
The surface of the shaft is pierced with holes whose diameter corresponds to the most common seed diameter. Thus, only one seed can enter the drum.
The exit holes are made under the shaft. Under the influence of gravity, the seeds fall into the ground through these outlets. The holes are located at a certain pitch. With the same step, the aggregator’s miniplow cuts through the soil.
Modern machines are capable of sowing seeds without tilling the soil or reducing it to a minimum. Almost all factory units differ only in the method of feeding seeds.
Precision seeding mechanism
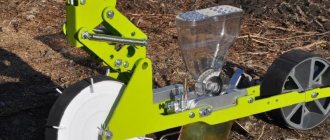
An important task of using seeding structures is to ensure uniform planting . To plant seeds in the ground at a strictly defined distance, manual precision seeding drills are used; these mechanisms are easy to make with your own hands, just like the simplest devices described above.
Design
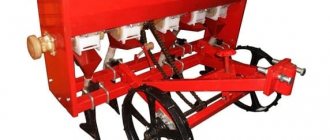
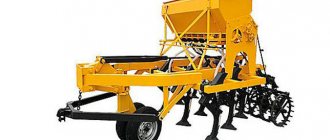
The device consists of one or more containers with seeds, a frame on wheels, and a control handle. To independently manufacture such a unit, you will need a turning tool or a drill to drill metal sheets, the thickness of which is approximately 1 or 2 mm, and the diameter is about 5-8 mm.
When planning a connection between a seeder and a walk-behind tractor, it is better to use rigid bolts that are more vibration-resistant instead of rivets . The front wheels are designed to form furrows in the beds, where the seeds fall from the hopper. Using the rear wheels, the resulting holes are filled with loose soil.
The basis of the precision seeding design consists of a rectangular metal frame. Containers are attached along the edges into which seeds are loaded. It is recommended to buy the blocks necessary for turning the shaft separately, since it is very difficult to make them yourself without special skills and tools. For example, containers that are used in conventional manual seeders or in conjunction with walk-behind tractors are perfect.
The precision seed drill is driven by reversible wheels, which also adjust the height of the head, designed to get the seeds into the ground . Each container must be secured separately. The wheels are connected on a springy and rigid base.
The sowing unit is a container in which the seeds are placed. When the seeder is dragged along the ground, a mechanical wheel with blades, also located in the container, is activated. At the end of the container there is a narrow slot where only one unit of planting material can be placed, so seeding is uniform and very economical. The size of the hole can be changed to accommodate seeds of different sizes.
Operating principle
When working with a manual precision seeder, first do the assembly, move the handle to the working position, and put the rear wheel on the axle. The marker can be adjusted if necessary. Depending on the crop being sown, a disc of a certain size is installed in the hopper. The depth of the chalk is adjusted to the size of the seeds.
This device forms the required depth of the holes. When the seeder is put into action, the front wheel of the structure begins to spin; with the help of a belt drive, the rotational movement is transmitted to the disk, which captures the seeds from the hopper.
Using a marker, smooth planting rows are formed. It is often recommended to carry out the first sowing along a certain contour for a more uniform distribution.
DIY making
The bunker container must be made of plastic. This makes it easier to visually control the number of seeds poured. Take the following components:
- A bolt that will be used as an axis on which the seed-filled container will rotate.
- A plastic pipe equal in length to the dimensions (depth) of the bunker. Steel pipe of the same length.
- Aluminum wire.
- Washers for fixing the pipe.
Assembly is a step-by-step process. Let's describe the algorithm :
- A through hole must be drilled in the center of the selected plastic jar. The cover is removed and an additional hole in the form of a rectangle (through) is made in the side wall. The hopper will be filled with seeds through it.
- We install a plastic pipe in the center of the jar to prevent the seed from spilling out. A steel pipe is installed into it, a bolt and nut are screwed in. The rotation mechanism is ready.
- On the side of the hopper, points are marked for holes at a distance of 30 mm. They are then pierced with a hot nail. The seeds should fit into the holes.
- They make a handle. A through hole is drilled in the wooden handle at the end. Using a bolt and nut, attach the handle to the seeder.
- To automate the process, a device is made from an iron sheet to fill planting holes with seeds.
- The workpiece is attached to the handle above the seed hopper.
The device is ready. Before starting sowing work, it is recommended to prepare the site and loosen the hardened soil.
Description of the vacuum seeder
The device consists of a pneumatic sowing mechanism with a vacuum and pressure system with tubes. The pitch between the tips of these tubes is equal to the pitch between the centers of the wells.
The seed distribution system is pneumatic, which ensures the most uniform sowing of seeds even of different shapes and sizes.
The principle of operation is as follows: torque from the wheels is transmitted to a shaft in which there are special recesses - dispensers. The upper part of the shaft is in contact with the hopper where the seeds are located.
The surface of the shaft is pierced with holes whose diameter corresponds to the most common seed diameter. Thus, only one seed can enter the drum.
The exit holes are made under the shaft. Under the influence of gravity, the seeds fall into the ground through these outlets. The holes are located at a certain pitch. With the same step, the aggregator’s miniplow cuts through the soil.
Modern machines are capable of sowing seeds without tilling the soil or reducing it to a minimum. Almost all factory units differ only in the method of feeding seeds.
Range of modern seeders
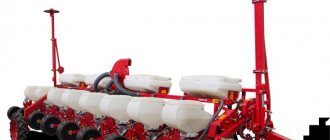
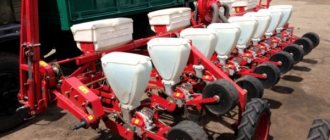
If making a planting unit yourself causes difficulties, it is recommended to immediately purchase ready-made structures. The assortment on the market is quite large. The American model of precision seeding “1001 - B” is equipped with 6 replaceable discs. With such a seeder you can plant 28 types of vegetable crops. Using the adjusting screw, you can change the planting depth.
Newtechagro seeders are single-row types. Designed for sowing beets, carrots, onions, and cabbage . But such designs are expensive.
But there are also cheaper analogues - precision seeders "SOR - 1/1". They are also single-row, can be equipped with a bush or brush sowing unit, the row marker is 0.5 m. This is quite enough for an average garden.
Using a manual seeder can significantly reduce labor costs, increases the speed of the planting process, simplifies the technology, significantly improves the quality of crops, and hence excellent harvests in the future.
Manual grain seeder on wheels
This option will be a middle link between a mini-seeder and a module for a walk-behind tractor. It has all the necessary elements:
The dimensions of such a device should not be too large - a manual grain seeder is controlled with your own hands, and it will be difficult to move a large and heavy device in loose soil.
You can use a welded container as a seed hopper, or you can use a regular bucket. The sowing mechanism is equipped with a reel with blades, with which it directs the seed to the lower hole. Through it, the seeds fall into the ground. The reel must be connected to the axis of the mechanism so that sowing is carried out only while moving. It is also necessary to provide for the possibility of changing the position of the reel and seed hopper - this is necessary to adjust the intensity of sowing.
How to make a seeder
You can make a seeder with your own hands. To do this, you need to stock up on the source material and the appropriate tools for processing it.
You can use high-quality steel profile as the starting material. From it you can make a product that will be reliable and will serve you for a long time.
The main design elements of such equipment include the following elements:
Each individual element of this design performs specific functions.
Such a device is usually well suited for use for a particular type of seed .
The elements of such a product are adapted for specific seed sizes. In addition, such a design has the ability to comply with the step with which it is best to place each of the flowering plants from each other.
The fact is that each crop has its own specific seeding rates. And if it is quite difficult for a person to observe them by eye, then with the help of such equipment this is actually done automatically.
Do-it-yourself seeding unit - Metals, equipment, instructions
A handmade seeder made by yourself will help make it easier and faster to plant seeds in your garden or summer cottage.
This does not require any special materials or special skills, since a do-it-yourself sowing unit, in most cases, is a simple device.
Benefits of using a manual seeder
Manual labor on the land is always hard work. But, using simple devices, such as homemade seeders, you can turn it into pleasure.
Using a hand-made precision seeding seeder created by yourself, you can achieve the following:
- the seeds will be evenly distributed on the beds, forming even rows;
- the depth of placement in the soil will be the same for all seeds, which will allow seedlings to appear at the same time;
- A homemade do-it-yourself precision seeder will allow you to create even row spacing and ensure an equal distance between future plants, and this will make caring for them easier in the future.
Options for homemade seeders
Everyone who is going to make a seeder with their own hands wants to reduce its cost as much as possible. Therefore, most often, craftsmen make those units that can be made from scrap materials.
For example, a do-it-yourself vacuum seeder is more of a myth than a reality, because its manufacture requires not only serious knowledge and skills, but also a large number of purchased spare parts.
General view of a homemade seeder
Therefore, we will not consider the process of manufacturing more complex seeders. We will talk about the simplest and most universal devices for sowing seeds.
The simplest manual seeder
Each craftsman decides for himself how to make a homemade seeder using available materials. But the principle of arranging working elements boils down to the following content:
- presence of a seed reservoir;
- use of a system for separating seeds from the total mass;
- installation of a device for covering seeds with soil after sowing.
An example of such a device would be a do-it-yourself carrot seeder, the manufacture of which will require the following materials:
- transparent plastic flat jar (diameter from 10 cm and wall height up to 5 cm);
- a bolt more than 7 cm long - it will serve as an axis;
- a piece of plastic pipe of arbitrary diameter and length equal to the depth of the can (this will be a sleeve);
- metal tube, slightly smaller than the inner diameter of the plastic pipe (for free rotation);
- washers (2 pieces) for fixing the can on the axis through the bushing;
- a long wooden handle (a shovel handle will do);
- a small sheet of thin metal in the form of a hoe (for raking the earth after sowing).
After all materials and tools are prepared, you can proceed to assembly:
Drawing of a manual seeder
- We measure the center of the plastic jar and drill a hole through. It is necessary to perform this operation with maximum accuracy, since rotation will occur thanks to this hole.
- We make another hole in the lid (can be triangular) to pour the seeds inside the jar.
- We close the triangular hole with a valve made of tin (tin can), which is secured with one screw and nut in one of the corners to allow movement.
- Insert a pre-prepared piece of plastic tube into the hole in the center of the jar. This bushing will prevent the seeds from spilling out and will add rigidity when attached to the handle.
- We insert a metal tube into the plastic sleeve through which a long fastening bolt passes.
- We fix the entire structure through the hole at the end of the wooden handle, having previously laid the washers, using a long screw and nut.
- We put a control mark on the can and, as it rolls, determine the distance that is obtained with one revolution while moving along the ground.
- Depending on the required distance between the sown seeds, we calculate the number of holes for the seeds to fall out when rolling along the bed. This can be from 3 to 5 cm along the side plane of the can.
- Having marked the required number of holes, we use a hot nail to make holes through which the seeds will fall out.
- We select the diameter of the holes for planting seeds according to their size. Holes that are too small will prevent the seed from falling out, while holes that are too large will cause more than the required amount to fall out.
If desired, you can attach a flat metal plate to the cutting, with which the sown seeds will be covered with soil immediately after sowing.
Usage
For example, such a device can be used as a garlic seeder.
In the area allocated for this crop, furrows are made using a hoe (as with conventional sowing). Then, a hand seeder is placed in the furrow and as it moves, the seeds are evenly distributed along the entire length of the future bed. While moving, the presence of a metal plate that covers the sown grains with soil will make it possible not to go through this area again.
What does a universal hand seeder consist of?
The disadvantages of such a device include the limited possibility of sowing (only one row) and sowing only one specific crop, since the seeds are not the same in size for different plants. To eliminate this problem, several replacement jars should be used, with different opening sizes for each crop.
In the same way, you can make a lawn seeder with your own hands. The only difference is that not one, but several (4 or 6) plastic cans are attached to the wooden handle in equal quantities on both sides. In this case, special sowing accuracy is not needed, but uniform distribution of lawn grass seeds will be ensured, covering a larger area.
Universal hand seeder and its creation
A more complex option for self-manufacturing a device for sowing seeds, which allows you to work with any seed crops.
The main working mechanism is the sowing shaft, which is an aluminum tube with a diameter of 30 mm (plus/minus 2 mm). Holes of different diameters should be drilled in it (according to the size of seeds of different crops) in three rows (each row for one crop).
The first row of 8 holes with a diameter of 4.5 mm is reserved for sowing such garden plants as parsley, carrots, sorrel, lettuce and others like them.
The second row with 16 holes with a diameter of 5.5 mm allows you to sow onions.
The third row, which consists of 5 holes with a diameter of 8.2 mm, is intended for sowing large seed crops (peas, beets, etc.).
In order to use one of the three rows during operation, the seeding shaft can be moved horizontally in relation to the loading hopper.
The seed hopper is made of sheet (preferably galvanized steel) 0.3-0.5 mm thick, in the form of a truncated inverted pyramid, the upper base of which is 80x70 mm and the height is 40 mm.
The lower part of the hopper has an opening for passing seed material to the sowing shaft.
There is also a brush located there that regulates the sowing density when moving it vertically relative to the sowing shaft.
Sowing with a manual seeder
To control the filling of the hopper, it is closed with a transparent lid made of plastic or plexiglass. The lid is also necessary to ensure that the seeds do not spill out when moving when the hopper is completely filled or are not blown away by the wind.
The frame of the universal seeder, on which the bunker is attached, is made of 2.5 mm sheet steel with dimensions of 78x85 mm. The sides of the frame should be 90 mm, and the front and back 40 mm (seed hopper length). At the bottom of the frame, on the sides, holes are prepared for the bearings on which the sowing shaft will be supported, with a diameter of 28.05 mm.
A 0.8 m thick stainless steel coulter, which has a length of 90 mm, is attached to the frame. It must be bent in the center so that the seeds slide down freely along the resulting trench, occupying a precisely defined place in the bed.
Wheels are attached to the seeding shaft, on the outer sides of the frame, which will transmit rotational motion to it. It is better to use ready-made wheels (made of nylon).
Application of a universal seeder
In the selected area, furrows are made in the soil along its entire length. Having set up the seeder, moving the brush to the position for one of the three rows, the hopper is filled with seed material.
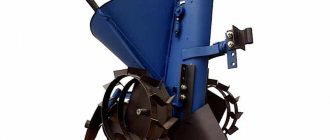
Lawn seeder - what is it?
This is a device for uniform sowing of seeds and application of fertilizers. The precision seeder, manual precision seeder and garlic seeder work on the same principle. The choice of seeder depends on the area to be sown, the topography of the area for planting grass and financial capabilities.
Lawn seeder
Manual
The simplest device consists of a container for seeds, which is mounted on a frame, with a metering shaft located under it. The handle that drives the spreader is connected to the disk. Miniature hand-held seeders are designed for small areas or seed sowing. The mechanism is operated manually.
Manual
This is the most convenient option on difficult terrain, where a mechanical seeder may not be able to pass.
The disadvantages of a manual seeder include the need to select seeds of the same size, clogging the shaft with several seeds at the same time, and manual adjustment of the dispenser.
For more information about the operation of a manual seeder, watch the video:
Mechanical
For smooth, large lawns, a mechanical seeder was invented. It is a trolley on which, just like a manual one, a seed hopper , but of a larger volume. It consists of a wheelbase, a hopper made of durable plastic and a dispenser adapted for seeds of different sizes.