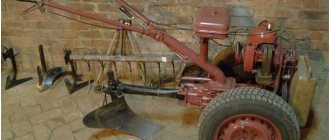
How to make a walk-behind tractor from a chainsaw with your own hands?
To create such a homemade unit, it is recommended to use special drawings.
You can draw these diagrams yourself if you have some knowledge and an idea about the walk-behind tractor, or choose one of the proposed options. A homemade walk-behind tractor from a chainsaw is created in several stages, and it is important to follow all the nuances indicated in the diagram
- Making the frame. To do this, use a thick-walled pipe, from which you should create a cube with corners of 32x32mm.
- Installing the motor on the upper frame corners of the frame, which are transverse. You also need to attach the fuel tank using brackets (the tank must be placed below the engine).
- The frame on the front part is equipped with vertical posts, which serve as intermediate shaft supports.
- Special supports are attached to the longitudinal corners, which will then allow the installation of running shaft bearings.
- A metal weight is installed on the front element of the frame, which will ensure the stability of the walk-behind tractor.
- Handles for control are constructed from small metal pipes.
- The walk-behind tractor is equipped with old small wheels, and can also be made from metal plates.
As a result, you can get a good walk-behind tractor, whose center of gravity is located above the wheel support surface.
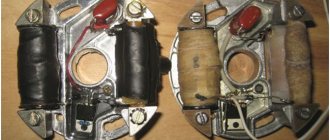
The structure of the Druzhba chainsaw - a detailed description of the design
The design of the famous Soviet chainsaw is based on a powerful 2-stroke single-cylinder MP-1 engine with an air cooling system, which has an increased service life and good endurance. The engine is lubricated using oil, which is diluted in gasoline to prepare the fuel mixture. The air supplied to the carburetor is cleaned using a foam air filter. A reliable and durable starter is responsible for starting the engine.
The saw accessories are connected to the motor using flange connections, which are fixed with a clamp attached to the handles of the chainsaw. Thanks to this unusual arrangement, the operator is able to rotate the bar and saw chain at any angle required for work. In addition, this method of connecting saw accessories and a motor makes it possible to use the latter in cases where there is a need to make various home-made household units.
The preparation of the fuel mixture in the design of the Druzhba 4 chainsaw is handled by a carburetor consisting of two chambers. Electronic ignition and a spark plug are responsible for producing the spark necessary to ignite the fuel. The chainsaw has a standard muffler, the function of which is to reduce the noise level when working with the tool.
To transmit and convert the torque of the motor, a gearbox is provided in the design of the Druzhba chainsaw. It is highly reliable and rarely requires repairs, even when operating the chainsaw in difficult conditions.
Where do you need to start?
If you have a very small plot, it is not justified for you to buy an expensive walk-behind tractor. In addition, such equipment requires careful maintenance, the purchase of additional lubricants, fuel and parts. If you have a chainsaw, you can easily upgrade it.
The chainsaw has compact dimensions, light weight, but at the same time quite high power. That is why it can act as a universal drive to create a walk-behind tractor for cultivating the land.
The entire stage of converting a chainsaw into a walk-behind tractor takes place in several stages:
- creating a drawing. Without this, you will not be able to make truly high-quality equipment. On the diagram you should indicate all the parts, their attachment points, and clearly calculate the dimensions;
- frame manufacturing. It should be made of a cube with angles of 32 by 32 millimeters;
- the motor is mounted on the transverse upper frame corners, and the fuel tank is mounted slightly lower using brackets;
- in front there are also vertical posts needed for intermediate shaft supports. To mount the bearings, you need to install special supports at the longitudinal corners.
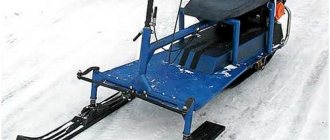
Principle, device diagram, theory, how everything should work out
All work begins with a plan and drawings, which can then be relied upon. Diagrams and drawings will be required in order to take into account all the components and their location, the relationship between each other and the operation of the mechanism as a whole. Pay close attention to the location of each unit, as if you make a mistake, the snowmobile simply will not move.
Work plan:
- First, the chainsaw motor is attached to the made frame.
- Skis are installed in the steering part of the snow scooter, which are the main element of movement.
- Then the steering is installed.
- To set the mechanism in motion, it is necessary to install tracks at the rear.
- Connect the track disk and the chainsaw motor sprocket.
- Finally, the driver’s seat is installed, which is mounted on a specially equipped place.
To equip the steering on a snowmobile, borrow the handlebars from a moped or bicycle. The main task will be to properly secure the steering wheel so that when you turn, the skis also turn.
Step-by-step instructions for making a walk-behind tractor from “Friendship”
The manufacturing process depends on the chosen design option and drawing. Step-by-step analysis of one of the modifications:
- Two bases (spars) are made from a steel pipe or profile with a diameter of at least 20 mm. The bend is made so that the ends are bent upward.
- On the long part, a steering wheel is welded, either welded at random or taken from a motorcycle. The bases are connected and reinforced by cross members. Also, platforms for the battery and gas tank are welded or screwed to the bend of the base.
- To mount the engine, a structure in the form of a slide is made from pipes or profiles. The motor is attached to it, and then to the base.
- Next, the RU-32 collar flange from the VAZ car is installed. Thanks to it, the shaft transmitting forces from the motor will be fixed. It is also recommended to use a VAZ gearbox shaft as a shaft. To fix the shaft in the flange, bearings with a diameter of 30 mm are used.
- The transmission link is made from sprockets from any old car or moped. One is mounted on the gearbox shaft, the other on the shaft on which the cutters or wheels are located. A chain from an old motorcycle is connected to each other.
- Next, all parts are installed and connected.
- You can also make wheels and cutters yourself, using old wheels from a car or agricultural machinery as a base. The resulting parts are mounted on a steel pipe or circle of the required diameter.
You also need to consider an effective forced-type cooling system. Several options are offered. The simplest option is to install a fan. More complex designs offer the use of water cooling.
What needs to be provided?
Before making, you need to pay attention to the following things:
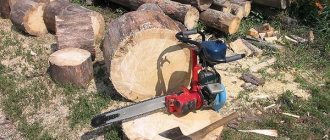
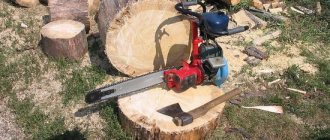
- The diameter of the logs being cut, if there are large diameters, then you need a more powerful saw, a longer bar with chain;
- Loading heavy logs for sawing, for this it is necessary to provide some kind of mechanism, or they can be rolled up either by additional jacks or, ideally, by a loader;
- The log must be fixed so that it does not play during sawing and the boards are even;
- The chainsaw guide and sled should not play, so they need to be strengthened;
- The more powerful the saw, the easier production will be. Therefore, when purchasing a saw, you need to take the most powerful one;
- Using electricity as an energy source allows you to save a lot;
- Do not forget that the chain must be for longitudinal sawing, this will significantly increase the speed of the process. Experts recommend using a 3*8 chain.
- It is advisable to buy a carbide chain. This is what he is doing today. Conventional circuits fail quite quickly;
- The length of the logs to be cut must take into account the maximum and minimum. So that the longest ones fit in, and the shortest ones don’t fall between the guides;
- Calculate in such a way that the saw does not vibrate or play on the guides during operation;
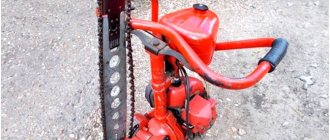
- The power of the saw, in some cases you want it to be both more powerful and more economical. In this case, folk craftsmen do the following. Instead of a chainsaw, an electric motor is installed, and the tire is left for sawing, see photo below;
- The height of the sawmill. It is necessary to provide in such a way that the back does not hurt to bend over and the logs do not need to be lifted high. If the wood is not heavy, it is better to make it higher. If the forest is heavy, you can go lower.
- Sawing of wood can be carried out either by the upper part of the tire or by the lower part. When sawing with the lower part, sawdust flies towards the chainsaw and clogs it. The upper part throws out sawdust from the chainsaw, this allows you to increase both the service life of the saw and the downtime during sawing;
- During the sawing process, the chain very often stretches on the saw and needs tensioning. Therefore, when installing the saw, it is necessary to provide access to the chain tension and secure the saw with access to the mechanism;
- When sawing, it is better to fix the position of the chainsaw handle, this simplifies the process;
- The cable, clothesline or lace should not drag, since the sawing process should be uniform over time.
Application of cultivators
Since cultivating even a small plot of land requires a lot of effort, summer residents are thinking about making a motorized hoe. These workers come to the idea of making a homemade walk-behind tractor with their own hands because factory-made walk-behind cultivators are expensive.
Homemade walk-behind tractors are used to carry out the following procedures:
- plowing;
- hilling,
- mowing,
- application of fertilizers.
Also, a do-it-yourself motorized plow will help with snow removal and weeding, and if you add a trailer, you can use it to transport cargo weighing up to 200 kg. A light walk-behind tractor usually includes only a cutter and a weeder. On a medium-weight product you can find a milling cutter, a plow, a mower and a hiller. Heavy products are reliable, have high maneuverability and non-removable wheels. With this design of the walk-behind tractor, it is possible to use the following equipment:
- cutter;
- plow;
- harrow;
- rake;
- mower;
- semitrailer;
- snow blower.
Summarize
Making equipment with your own hands from old equipment is quite an exciting activity. It's nice to give a second life to devices that have served their time. After practicing on Druzhba or Ural, you can begin to remake newer models from foreign companies. In any case, it will cost much less than purchasing specialized factory-made equipment. At the same time, the home master will receive a bonus and satisfaction from the work done.
Husqvarna saws are considered one of the best today, along with the Stihl brand.
We hope that today's article was useful to our dear reader. We will be glad if you share your experience in making various homemade products in the discussions below - this may help novice home craftsmen. There you can ask questions if they arose while reading. The Seti.guru editorial team will be happy to answer them. Write, share, ask. And finally, following the established good tradition, we suggest watching a short but very informative video on the topic of alterations to chainsaws.
Pros and cons of homemade design
Having analyzed the results of this homemade product, based on reviews from owners and videos of operation, the conclusion suggests itself that the design is effective. With a competent approach to business, a walk-behind tractor with an engine from Druzhba is not much inferior in its characteristics to its factory counterparts.
The main advantage of homemade products, of course, is saving money. You can find the necessary parts and materials by simply rummaging around in your garage or shed, or you can purchase them for a small amount of money.
Also among the advantages of a homemade unit are:
- sufficient power of the resulting device – up to 4 hp;
- compactness, small dimensions of the walk-behind tractor;
- light weight, maneuverability, mobility;
- economical fuel consumption;
- the Druzhba engine is not whimsical in terms of the choice of fuels and lubricants;
- The walk-behind tractor is capable of performing various operations.
The engine used in chainsaws, especially in the Soviet “Druzhby” chainsaws, is durable and capable of withstanding long-term loads.
The main disadvantage of a homemade walk-behind tractor from a Druzhba chainsaw is that with any design you won’t be able to get a real walk-behind tractor. The power of the walk-behind tractor is enough to cultivate areas with good soil. There are also restrictions on operations. It will most likely not be possible to use the entire arsenal of attachments on a factory walk-behind tractor.
Types of sawmills
The most widespread today are the following three types of devices for sawing logs with a chainsaw with your own hands, which differ in their design:
- Tire.
- Tape.
- Disc sawmill.
https://youtube.com/watch?v=XR_TrDiAqQU
Disk installations
The relatively simple design of disc installations makes them easy for most homeowners. Due to their ease of assembly and versatility, these types of woodworking machines are most widespread and are found everywhere. The basis of this design will be a circular saw, which is mounted on the spindle of an electric motor. Additionally, a strong base is made, above or below which a shaft with a saw and an electric motor are fixed.
A durable and reliable frame for a disk unit can be made of metal or wooden parts that are welded or fastened together with nails and screws. The work table can be made of sheet metal; you just need to ensure the ideal geometry of the structure, which allows you to guarantee the highest possible quality of wood cutting.
The use of disc saws allows you to make slats of various sizes, produce timber, veneer, and cut boards to the required length and width. Thanks to the high rotation speed of the saw, it is possible to ensure that logs are cut with smooth, high-quality edges and cuts.
Band sawmill
Belt-type installations combine simplicity of design and excellent performance. Accordingly, they are popular not only in everyday life, but are also widely used in sawmills and enterprises that produce lumber. The advantages of this type of equipment include its high productivity, as well as the ability to cut large logs weighing more than 300 kilograms.
To make a band sawmill you will need the following:
- Pulleys.
- Channel.
- Metal corners.
- Pipes with different diameters and sizes.
- Metal structures for the production of sleepers.
The production of such a sawmill begins with the construction of a frame, which has the shape of the letter P and is made of a corner or channel with dimensions of 50 by 100 millimeters. The standard dimensions of the frame are a length of 8 meters and a height of at least 15 centimeters. To increase the strength of the base, the channels are additionally tightened with pipes and angles, which will allow the base to withstand the maximum possible load.
Next, they begin to build the mobile cart. For this, a steel plate is used, the thickness of which is 40 millimeters. An electric motor will be responsible for driving the trolley, the power of which should be 10-12 kW.
A saw is attached to the trolley with a chain drive, which is fixed to the electric motor shaft through a pulley. A handle-steering wheel is welded to the side of the movable cart, which will be responsible for moving the mobile structure along a fixed base.
https://youtube.com/watch?v=MVx1lq1COng
Tire sawmills
Tire sawmills or logosols differ in their design from other similar devices. Using this manual technique, you can longitudinally saw logs, producing high-quality slats and veneer. Thanks to its compact dimensions, logosol can be installed both outdoors and inside a small workshop or wooden shed. At such a sawmill it will be possible not only to cut logs, but also to produce small-sized workpieces with a non-standard shape.
Having a high-quality sawmill diagram in hand and choosing the correct length of the chainsaw blade, you can independently create a machine that will provide high-quality sawing of logs. It will be possible to decide how to make a sawmill with your own hands, saving on the purchase of components for equipment.
Procedure
Once a suitable drawing (component layout diagram) has been selected, the necessary tools have been found and the Druzhba saw has been dismantled, you can begin assembly. You should start with the frame, since all the elements of the motor unit will be attached to it. The process is completed by assembling the chassis, as well as additional blocks: if desired, headlights, gearbox and clutch, if the drawing is more complex and requires them. For the first time, it is best to choose a simpler drawing.
Frame assembly
The first stage involves the following actions:
- bend the pipe so that it takes the shape of 2 spars with edges pointing upward;
- the steering wheel is welded at the back (the easiest way is to weld two handles, but if available, you can use a ready-made steering wheel from a motorcycle);
- It is recommended to strengthen the structure with cross members from the same pipe;
- We cut out a “shelf” from a metal sheet for the battery, which we weld to the rear bends of the side members.
It turns out to be a vague resemblance to a sleigh. For heavier structures with more powerful power units, the frame can be made in the shape of a cube or similar to a tractor for 4-wheeled homemade products.
Assembly of the motor block
The most difficult stage is assembling the components. Before you begin, you need to mark on the frame the places to which the parts will be attached. The principle is as follows:
- a motor with a gearbox is mounted on top of the crossbars;
- a fuel tank is installed under the engine (a separate support should be welded under it), the battery is mounted on a special platform;
- To prevent exhaust gases from entering the control unit, you can make an exhaust pipe from a 7 cm metal tube with a diameter of up to 25 cm.
This is the basic version without a gearbox, which can be installed upon request. The drawings will help you understand the assembly in more detail. By and large, the details of “Friendship” are simply rearranged. The hitch is connected to the output shaft of the chainsaw.
Chassis assembly
There are at least two options: you can use a ready-made axle shaft from a car, or you can make a homemade walk-behind tractor driven by physical force (the “chassis” of an old cart or wheelbarrow will come in handy, which will significantly reduce the weight and dimensions, because a car axle shaft will require the use of tires). In the first case, you will have to organize the drive from the motor to the axle shaft, which is not easy, so welding the “running” wheelbarrow to the frame is a more understandable option.
It is not difficult to figure out how to make a walk-behind tractor from a chainsaw if you understand the general operating principle of both units. In addition to “Friendship”, “Ural” and “Taiga” saws are also suitable for the walk-behind tractor. When deciding to experiment, you should understand that the homemade product will have limited functionality and low power, allowing you to process a maximum of 20 acres.
If you find an error, please select a piece of text and press Ctrl+Enter.
The walk-behind tractor is an effective assistant in the processes of cultivating the land, as well as further caring for the garden and garden. The easiest way to obtain this device is, of course, to purchase it. However, there is an option for making it using a chainsaw engine, in particular from the Soviet “Druzhba”. Its powerful engine, simple design and overall unpretentiousness make it well suited for this role.
Winch
The mechanism is designed for horizontal movement or lifting loads to a height. Does not depend on the availability of electricity, can be used outdoors, on hiking trips.
A prerequisite for this is that the engine power of a do-it-yourself chainsaw winch should not be less than 2.5 kW.
An important element of the device is the drum - it can be made independently or used from a hand winch. In addition, you will need:
- gearbox to reduce the speed of the chain saw;
- metal pipes or rolled profiles, levers, cam clamps, clamps.
The procedure for making a winch:
- A rigid frame is made from pipes. Welding is used.
- Attach the chainsaw motor to it. The gearbox is connected to it with clamps, and the drum is connected to the output shaft of the latter.
- Install a lever equipped with cam clamps connected to the drum shaft. This control element allows you to control the work process: when you move the lever in one direction, the drum rotates, and in the other, it stops.
- An anchor is made with which the winch will be secured in the soil or cling to any stationary object. Use pointed corners that are welded or hinged to the frame.
- A cable is wound onto a drum, the free end of which is equipped with a hook. It is used to capture and attach to a load that needs to be moved.
The device exists in 2 versions. Do-it-yourself chainsaw drills are made for the ground or for drilling ice. In the first case, the device facilitates the construction of deep holes for poles, fence supports, and other structures. In the second, he helps fishermen drill holes in winter. They differ in the drill used.
The design of a gas drill involves combining a finished drill and a chainsaw engine into one unit. To make a motor drill from a chainsaw, the latter must have a high-power motor - at least 2 liters. With. In addition, you will need:
- Gearbox. This is an important element of the device. It is necessary to reduce the speed of the saw motor, because when the drill rotates quickly, the engine power may not be enough, and it is difficult to work under such conditions.
- Bulgarian.
- Metal pipe.
- Drill.
- Welding machine.
Drill assembly sequence:
- Two rectangular frames are made from a metal pipe. The size of one is 45x35 cm, the second is 10x10 cm.
- The frames are connected to each other, placed parallel to one another at a distance of 30 cm. This is done with identical pieces of metal pipe, welding adjacent corners of the frames with them.
- Inside the resulting truncated pyramid, a gearbox is attached to the smaller frame.
- According to the drill assembly diagram, a motor is installed on top, connecting it to the gearbox with a short shaft (pre-made). The handle that regulates the fuel supply is placed on the upper large frame. It also houses an emergency engine shutdown system.
- Connect a drill using a piece of pipe to the output shaft of the gearbox. The parts are connected with dowels or studs.