To increase potato yields, it is necessary to hill the plant several times a season. Hilling consists of adding earth to a grown potato bush, and as a result, an earthen mound is gradually formed around it.
Due to the fact that potatoes grow in soft soil in beds, their number and the size of the tubers increase. The loss of moisture from the bush is also reduced; during hilling, the roots of weeds are cut off, and the area is clean.
Hilling is usually carried out two to three times per season. The first time - when the height of the plants is no more than 10 cm. The second time - 3-4 weeks after the first time. The last time was after the flowering of the potato bush. If the potato stems are very elongated, then hilling is carried out more times.
When the area is small, you can add soil using a hoe. But if you need to hill up a lot of bushes, then doing it manually is quite difficult.
For this purpose, special mechanisms called hillers are used.
Hilling potatoes with a walk-behind tractor
Disc hiller
The most popular type of equipment among users. It has become widespread for its simplicity of design and operation, does not require much effort during operation, and is convenient to set up and repair.
It also has two subspecies:
- without the possibility of adjustment - designed for light walk-behind tractors with low power. The working width is usually about 30 cm;
- with interchangeable working width - a universal type, since the width can increase up to 70 cm. With its help, you can hill up any crops - from beans to potatoes.
Peculiarities
Cultivators are agricultural equipment designed for cultivating soil. As independent mechanisms, they can run on gasoline, electricity or manual traction. They are divided into two main types: fallow, which prepares the land for sowing, and row crops, which process the planted plants. Hiller cultivators belong to the second type. They loosen the soil, evenly sprinkling (hilling up) the plants, at the same time cutting and grinding weeds, saturating the soil with oxygen.
Cultivators-hillers can be additional equipment to heavier equipment, for example, a tractor. Hillers are used to care for different types of plants, but they are most applicable on potato plantations, since working with tubers is especially labor-intensive.
How to install a hiller on a walk-behind tractor?
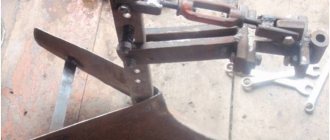
Installing and setting up a potato hiller for a walk-behind tractor is not a very complicated procedure. It is attached to the hitch using bolts and washers. When working with a simple hiller, you need to adjust its operating angle and depth of immersion into the ground. The plowing depth of the hiller is less than that of a plow, so for adjustment you do not need to place the walk-behind tractor on a hill. Simply adjust the hiller stand vertically. The required angle of attack is determined by how deep the hiller enters the ground in the working position. This depth should be about 15 cm.
If during the work you notice that the hiller is digging deep into the ground, tilt the stand forward. Otherwise, if the hiller does not deepen enough, the stand, on the contrary, is tilted back.
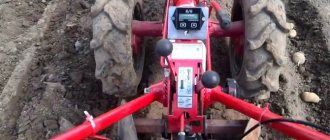
Setting up and installing a disc hiller is a little more complicated. First you need to set the distance between the lower points of the hiller disks. It will be 40-70 cm, depending on the upcoming work. Next, the angle of inclination of the disks relative to the horizontal axis is set.
The settings of both disks must be identical, otherwise the walk-behind tractor may skid to the side.
Processing a potato bed
Now let's look at how to hill potatoes using a walk-behind tractor. Before you start hilling potatoes, you must correctly install the mechanism on the bed.
Weeding potatoes with a walk-behind tractor
Unlike the lister device, for the disk device the processed potato bed must be between the disks.
Advice! The cultivator must be driven carefully along the rows so as not to damage the potato plants. The discs will automatically loosen, pick up and shovel the soil into ridges.
After the first row has been processed, the walk-behind tractor or cultivator is deployed and reinstalled so that the bush is located between the discs. With the help of a disk hiller, you can process potato beds in the forward and reverse directions using the reverse motion of the walk-behind tractor.
To increase the power of the walk-behind tractor when hilling on heavy soils, an additional creeper is installed on it. In this case, the increase in power occurs due to a decrease in the speed of movement of the mechanism and an increase in torque. Fix it on the body of the walk-behind tractor. This device will be especially in demand if an air-cooled walk-behind tractor is used.
The use of a hiller for processing potatoes significantly reduces human labor and time costs. A properly selected hiller configured for specific tasks will allow you to quickly hill up a potato plot of any size.
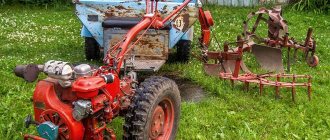
Do-it-yourself hiller for walk-behind tractor
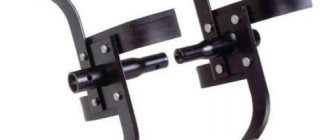
Making a homemade hiller for a walk-behind tractor is not that difficult. It will consist of such basic components as 2 disks, 2 racks, 2 screw adjustment tarlaps, and a T-shaped rod for fastening the structure.
Before starting work, prepare the necessary preparations:
- metal sheets for making disks (or ready-made disks);
- square metal profile for making a rod;
- parts for making tarlap adjustment.
The photo below shows exactly how the vertical axes of the hiller will be adjusted using the tarlep. The letter “B” denotes the adjustment screws, the letter “C” denotes the racks:
If you have the necessary preparations, the manufacture of the hiller should be carried out according to the drawings given below. Remember to adhere to the specified dimensions to obtain a quality product.
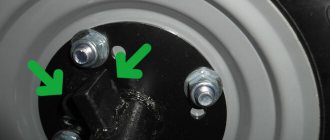
The hiller will be attached to the walk-behind tractor by a bracket, the leash, in turn, is attached to the bracket with bolts with a stopper.
We also suggest that you watch the video, which describes the intricacies of making a homemade hiller for a walk-behind tractor:
Such a hiller will be compatible with such models of walk-behind tractors as Neva MB-1, MB-2, Agro, MTZ, etc.
Why is hilling necessary?
As you know, during the growing process, potatoes must be periodically hilled.
But many people don’t know why this is needed and what it does for potatoes. So, why do potatoes need to be hilled:
1. Loosening the soil ensures air flow to the roots, due to which they grow.
2. Due to the fact that air enters the soil, tubers quickly form.
3. In addition, hilling increases the yield by up to 20-30%.
It is worth noting: in regions with a cool climate and high humidity, it is advisable to periodically carry out the specified agrotechnical technique. Due to this, excess water is removed from the ground, it warms up and is saturated with oxygen. But in the southern and southeastern regions, the moisture level is low, and this leads to irrigation problems. Sometimes hilling in these areas, on the contrary, harms the plants.
We recommend remembering the basic rules for hilling:
1. Loosening must be done on time. Typically, potatoes are loosened at least twice throughout the entire season. The first hilling should be done when the plant grows 5-10 cm out of the ground. The second loosening is done when the height of the stems reaches 14-20 cm. It is advisable that the bushes still have unopened flower buds.
2. Loosening should be carried out in cloudy weather, in the morning or evening. It is best to do this after rain, watering or after morning dew.
3. Do not hill up the soil in extreme heat. Because leaves and stems that are exposed to the open sun may burn and the plant will die.
You might be interested in an article on how to make a screw log splitter yourself.
Read a useful article on how to sharpen a chainsaw chain at home here.
We suggest reading an article on how to make a grain crusher with your own hands.
Of course, hilling should always be carried out using special equipment. Some people use choppers, hoes and rakes, but working with them is quite difficult and takes a long time. Therefore, it is best to use a manual hiller. Moreover, you can make it with your own hands.
Owner reviews
Ilya, 31 years old:
I don’t have an Oka walk-behind tractor, but a mini-tractor! I bought a front Forza 2 years ago and moved on to high-speed work. My 1.5 hectares of potatoes are processed quickly and efficiently. Savings in human resources, time and fuel. I felt the difference in the first week. The attachment is fully equipped. The technology is excellent.
Peter, 52 years old:
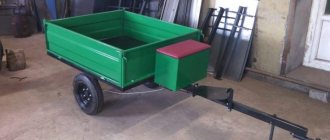
Hello. My old lady Oka is already 8 years old. Still works fine. Over the years, I have collected all the attachments I have and tested them under different loads. What can I say: in the spring I only mill the soil, in the fall I pull with a plow, I pull a 300 kg trailer, I take a disk hiller, I have a simple, inexpensive potato digger. There is other equipment, everything is simple, without bells and whistles - everything works great. In winter I also use it, plant it on a tracked attachment and complete it with a blade - that’s it! The car, of course, is periodically repaired, parts are freely available, belts too.
Where to find hedgehogs for potatoes
You can buy hedgehogs. They are often sold together with a walk-behind tractor and are included in the set of necessary accessories. If they are not available, talk to the seller and place an additional order. Or find someone who will make a design especially for you. But the easiest way is to make such equipment for processing potatoes yourself.
Hedgehog for handmade
If you carefully examine the design, you will see that making it with your own hands is not so difficult.
There are spikes attached to the rings. They are needed to get the job done. Two cones are attached to one handle. They need to be connected not parallel to each other, but at a slight angle so that elevations are formed in the garden bed.
How to make such a device with your own hands? It is not necessary to make exactly a cone. You can use a hollow tube with a diameter of 14 mm as a basis. Long metal teeth are welded to it - 5 pieces at a distance of 4 cm, measuring 60 x 8 mm. The device is mounted on a special frame and then screwed to a wooden handle. The hedgehog is ready for tillage. It is rolled back and forth across the garden bed. This requires physical strength. Before you make this device yourself, ask your friends to borrow it. It may be difficult for you to do the work, test yourself first.
Handmade hedgehogs have a fairly simple design
Hedgehog for walk-behind tractor
If you need a hedgehog for a walk-behind tractor, then you should think about buying it in a special store. But if you want to use homemade ones, carefully consider the design drawing.
Making a hedgehog:
- Find 3 metal disks of different sizes. Proportions: 240, 170, 100 mm or 300, 200, 100 mm. It's better if you use rings instead of discs. Then the whole structure will be much lighter. Another advantage of this lightweight option is that it is much gentler on the soil and plants.
- Take a pipe (25 mm in diameter). Collect disks on it. Start with the largest, end with the smallest. The distance between them is no more than 18 cm.
- Weld the spikes. A metal rod is suitable for them. One hedgehog will need about 40 spikes. The length of each is 10-14 cm. 5 spikes are attached to the small disk, 10 to the larger one, and 15 to the third. The part is attached to the axle itself.
- Inside is the largest disk, then the middle one and the smallest one. They are attached using bushings and jumpers to the frame at an angle of 45 degrees.
- You also need to add guide wheels. They are needed to reduce the load on the towbar. There should be two of them. First, a bracket is made from a metal strip 7 cm wide and 4 mm thick. Drill holes there and strengthen the wheels.
Do I need to hill up potatoes?
Potato roots, like other cultivated plants, need oxygen and moisture for good development and growth of fruits. Hilling provides air access to the soil, loose soil allows water to pass through better, and sprinkled stems form additional tuberous roots. Another advantage is the destruction of the surface root system of weeds during the hilling process.
Before you begin, you need to take into account the climatic features of your area. Potatoes do not tolerate drought and high temperatures, but cold and excess moisture can lead to the death of the plant.
The culture develops best at +25 degrees Celsius. In growing conditions in northern regions with a cool and humid climate, hilling will only be beneficial. An additional layer of soil will raise the temperature of the root system, and increasing the area of land around the bush (forming high slopes) will increase evaporation, reducing soil moisture.
In the southern regions, hilling can only harm potatoes, since an increase in surface soil temperature can reduce yields. In this case, it is necessary to carry out only surface aeration for oxygen access and to fight weeds.
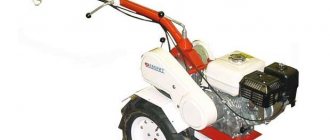
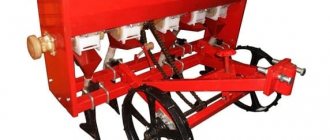
Description
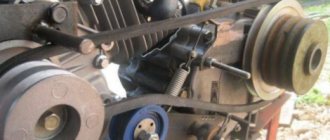
Today, small-scale mechanization tools have become widespread. For agricultural work, a disc hiller for a walk-behind tractor is most often used. Externally, it looks like a frame on two wheels with disks attached to it. The device allows you to cultivate the soil both before sowing and after harvesting.
During the period of seedling growth, this device is used to treat the row spaces with plants. Disc hillers are suitable for garden equipment with two forward gears. The unit is combined with both a walk-behind tractor and a cultivator. There are also manual versions of this garden tool.
The difficulty with a disc hiller is the need to set the gap of the required size. Between the lower base of the disks it is equal to the row spacing. At the same time, the track width of the motorcycle wheels must correspond to the same distance. To create furrows, the discs are installed at an angle relative to the vertical. Disc hillers cope with:
- elimination of weeds;
- by arranging a ridge of soil that protects the tubers from sunlight (it is known that due to the proximity of the vegetable to the surface, its development is inhibited);
- improving soil air exchange, which eliminates moisture evaporation.