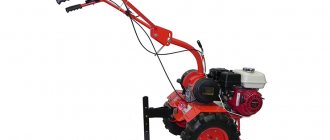
Planting and growing potatoes in our country has long become a very popular activity. Therefore, every owner of his own garden often thinks about how to make his work easier and plow, dig and prepare the soil for planting potatoes as quickly and efficiently as possible. Purchasing a walk-behind tractor is a complete solution to these problems. This very valuable unit allows you to effectively plow and cultivate land plots of varying length and degree of soil complexity.
It is not surprising that every happy owner of such a device expresses a desire to use additional attachments in the future in order to significantly expand the capabilities of his assistant. Of course, you can purchase such equipment at specialized retail outlets, but you will have to spend a certain amount of money. Therefore, many people try to make a hiller themselves. In this case, it is not at all necessary to make an exact copy of the factory equipment. The main thing is to take into account the operating principle and general features of the product during manufacturing.
Types of hillers for walk-behind tractors
Conventionally, the hiller for a walk-behind tractor, according to its design and operating principle, can be divided into several main types:
- disk type;
- lister;
- propeller (active).
Listerny
A device of this type has the simplest design solution. Such hillers have a strictly fixed working width and resemble butterfly wings in appearance.
The design of this device consists of two branched, attached and fixed sheets of iron. When working, the hiller must lift the soil from a flat surface to the top, while overcoming the resistance of the soil and creating the necessary ridge. The end of the pointed device should descend below the soil surface to a predetermined depth. It loosens the soil and lifts it, and guide planes serve to direct the soil to the base of the plant, which creates the collapse of the soil on both sides.
Since the wings in such a hiller are fixed motionless, when working with it you have to adjust the row spacing to the size of the device, and not vice versa. Therefore, given that the optimal width between rows when planting potatoes is considered to be 60 cm, the working width of a factory hiller of 25-30 cm is considered not very convenient when growing potatoes. Structural modifications for the hiller concern the size of the wings and the angle of their installation to reduce soil resistance and change the working width and height of the furrow ridge.
Variable width attachment
This device is the most convenient because it has an adjustment mechanism that provides convenient and quick changes in the position of the wings. It is thanks to this design solution that the hiller can be easily adjusted to suit different sizes of beds. One unpleasant drawback of such a mechanism is related to the fact that during the loosening process, the wings push the earth in different directions, but not a very large amount of it falls back into the furrow. But, despite this inconvenience, this model of hiller is more popular among many farmers.
Disk
From the very name of the device you can understand that it uses discs, the thin rims of which go to the required depth with little soil resistance. For high-quality and easy work, this design requires precise adjustment of the take-off angle and the vertical tilt angle of the disks. The distance between the working disks is set on the frame according to the required size of the row being processed.
This type of tool has a number of advantages:
- Pairs perfectly with a walk-behind tractor. When using such a tool in a low gear on a walk-behind tractor, its power increases. Therefore, the efficiency of digging soil increases significantly, and also has a beneficial effect on the working cycle of the tool.
- Very convenient to use. Loosening and digging up the soil does not require much physical effort. A correctly configured device does not require additional support from behind, but moves along the ground as if on its own.
- Versatility of use. This tool is convenient to use for loosening the soil both during the planting of potatoes and during the growing season of the plant.
Propeller
This type of hiller is also called active, because the principle of its operation involves both the rotational movement of the working elements and their translational movement. The use of such equipment is only possible on walk-behind tractors with two forward gears and a power take-off shaft. In appearance, the design resembles a home fan.
The use of such equipment is much more effective than other models, but due to the complexity of manufacturing and the high cost of components, they are used much less often.
The entire technological process of operation of the propeller elements is carried out in one turn of the active disk. First of all, the soil is dug up and the weeds are cleared, and then the beds themselves are loosened.
At maximum power, this device can be used not only for hilling soil, but also for transferring soil to another place.
Planting techniques with a hiller and a potato planter - what are the differences?
In order for planting potatoes with a walk-behind tractor to be as successful as possible, you need to choose a method that would be ideal for your site. Whatever option you choose, remember that for good potato germination, the distance between the seeds in the row should be at least 20-30 cm, and the planting depth should be 10-15 cm. If you use a regular hiller, you need to fix it on a walk-behind tractor, and then move the blades and increase the grip of the wings. This will allow you to maintain the most comfortable space between the rows.
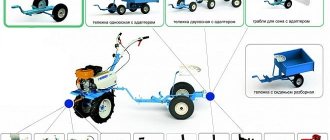
Walk-behind tractor for planting potatoes
As for the rest of the preparatory aspects, they will depend on the model you are using. For example, when using a Neva walk-behind tractor for planting, do not forget to remove the wings and main support from it. But for the Salute walk-behind tractor, you don’t need to do this. It is enough to simply attach the lug wheels, maintaining the optimal track width of 60 cm. When the furrows are prepared, we place potato tubers in them at the same distance from each other. The ideal “ruler” for this will be your standard step, which will allow you to plant the potatoes as accurately as possible.
Next, we put rubber wheels on the walk-behind tractor, leaving the original track width and the maximum gap between the wings, and fill the rows with potatoes with soil. We do this with all the rows, reach the edge and turn in the opposite direction. If the planting areas are large enough, planting the planting material manually will be quite labor-intensive. In such cases, it is preferable to use a mounted potato planter. Thanks to a special design consisting of a furrower, a conveyor, a potato tuber distributor and a high-quality disc hiller, you will be able to plant and cover potatoes with fresh soil in just one pass.
Making your own hiller
Of course, making a hiller cannot be called a simple task. This will require the ability to carry out welding and plumbing work. But this will allow you to save quite a decent amount and make a device that is more user-friendly.
To carry out the work you may need the following tools:
- Arc welding machine.
- Electric drill with a set of reliable drill bits of different diameters.
- Grinder and several attachments and discs included.
- Electric emery.
- A gas burner designed to heat metal during hardening.
- Workbench with a vice.
- Various files.
- Consumable fastening material (bolts, nuts, rivets).
Read also: How to become an electrician without education
Making a lister-type hiller
To make such a device, it is necessary to cut two identical parts from a sheet of steel 2 mm thick. Then you need to bend these plates so that the bending radii coincide. After this, these surfaces are welded and the seams are processed to obtain a perfectly flat plane. The quality of stripping significantly affects the ease of operation of the device and the absence of soil clogging of bad joints.
Particular attention should be paid to the strength of the hiller stand, since it bears the main load during operation of the device.
By making two such devices and connecting them in a unique way, we get a device for double-row tillage.
If you make such a device with an adjustable wing system, based on a hinge joint and installing movable rods at the end of the device that regulate the angle of inclination of the structure, you will get an adjustable two-row hiller.
Disc hiller for walk-behind tractor
The manufacture of a disk device can be done using available material, which will significantly reduce its cost.
The main stages of manufacturing a disk device:
- We cut out two round discs from a 2 mm thick steel sheet and sharpen their edges to reduce resistance when cutting into the soil.
- Using a hammer, we bend the elements: one side should be concave, the other should be convex. This disk shape better rake up the soil and sprinkle it on the plants.
- We use special fastening bolts and welding to connect the racks, tarlap and T-shaped leash.
- We connect the wheels of the disk device with adapters.
- The distance between the disks is made equal to the size of the row spacing.
- The vertical rotation angle of the disks is ensured by a tarlap.
- Then the entire device is attached through a leash to the walk-behind tractor bracket using bolts and locking elements.
Tips for using equipment
After assembling the equipment yourself, it is necessary to carry out trial work with it on site. Its high-quality work depends on many factors: soil conditions, weather conditions, correct adjustment and sharpening of working elements and many other indicators.
All settings of a self-made device are carried out experimentally. To do this, it is advisable to first walk along a regular area of soil and adjust the optimal value of the angles and depth of penetration of the working surfaces of the hiller into the soil.
And equally important is determining the optimal operating speed of the unit. A correctly chosen pace of work has a positive effect on the quality of hilling, because at high speed the device will mainly scatter the soil in different directions, while worsening the process of furrow formation.
In our country, potatoes are considered the “second bread”, so with the beginning of the new spring season, many summer residents strive to plant this useful product on their plot. However, the process of obtaining a good harvest depends largely not only on planting, but also on further care (weeding, hilling) for this root crop.
Handling potatoes by hand is considered labor-intensive and time-consuming work. Therefore, the use of a walk-behind tractor with special mounted equipment is becoming increasingly popular among gardeners.
You can make attachments that are in no way inferior to industrial analogues yourself, with the help of minor material investments.
Potatoes are the main dish in all regions of the Russian Federation, which requires mass cultivation of the root crop. Potatoes need regular care, for which hillers are used in industrial production. However, for small and medium-sized farms there is also a solution that replaces manual labor - potato hillers attached to a walk-behind tractor allow you to quickly process large areas of land.
Assembly and configuration
Assembly (installation of the nozzle) and adjustment of the hiller for cultivating beds for potatoes or other crops is carried out after a detailed study of the instructions included with the nozzle itself, as well as with the walk-behind tractor. Fixation methods are listed here. Do not proceed with settings until you have read the instruction manual.
The attachments are fixed on the hitch and wheels, and only then are they connected to the main unit. The walk-behind tractor should be placed on a flat surface. Next, the hiller is lowered and connected to the unit by a hitch.
To work with potatoes as efficiently as possible, it is important to follow the rules for regulating the working width, immersion (depth), and angle of attack. The equipment must be lower than the lug support. And the immersion should be less than when using a manual plow.
Advice! Before the main work on hilling or plowing potatoes, it is recommended to test a lister, propeller or disk hiller on virgin soil - a flat, uncultivated area.
Lister version
The hiller for lister-type potatoes has a simple design, which guarantees the reliability and durability of the device. The lister manual hiller does not have the ability to calibrate the working width - the blades are adjusted at the factory during manufacture. Typically, the soil gripping width is 30-35 cm, which is enough for hilling bushes planted either with a shovel or with a walk-behind tractor. The advantages of the lister hiller are:
- Safety – blades pointing straight forward prevent accidental injury when hilling;
- Repairability - thanks to the simple design and the use of metal sheets as a blade, the device can be easily repaired with improvised means. You can straighten bent blades right on the spot;
- Versatility - the design allows you to hill up by hand or using a walk-behind tractor;
- Availability - a lister hiller is cheap and, if desired, can be easily assembled from scratch, requiring a minimum of components.
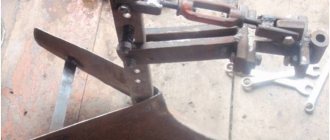
Description of design
The design of the lister version consists of a power frame, which includes a bracket for fixing the device to a mechanical handle or walk-behind tractor, as well as a cutting tool. The simplicity of the device allows you to make a homemade potato hiller, which will require 2-3 meters of pipe with a diameter of 2 inches for the frame and metal sheets used as grips.
When welding a homemade hiller, it would be appropriate to make a mechanical limiter in the form of a perpendicularly located bar relative to the gripping disks - this will prevent the product from burying deep into the ground, leading to overload of the walk-behind tractor. During cooking of the device, it is desirable to reduce the distance between the discs of the product to 25 cm, which will increase the accuracy of hilling and uniform plowing.
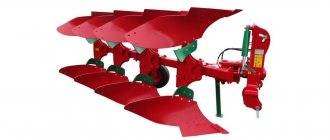
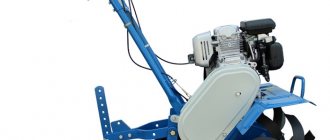
Disk model
A disc-shaped potato hiller is a convenient tool for farmers. This is due to ease of operation and greater accuracy of hilling. The disc hiller is characterized by high efficiency and efficiency - disc cutting blades lined up in a row increase the power of the device when plowing both with a walk-behind tractor and in manual mode. Using a potato hiller allows you to quickly cultivate a large area of land at high speed - a manual hiller forms even rows of beds without damaging root crops. Among the advantages of this technique are:
- Efficiency - the design provides for the installation of several discs for hilling several rows;
- Economical – processing several rows reduces the fuel consumption of motor vehicles;
- Processing quality – the ability to adjust the grip allows you to adjust the depth and width of the hilling of each plowing row.
Read also: Ax handle length
You can make a disk hiller for a walk-behind tractor with your own hands in a couple of days: you will need 5-6 m of 1.5-inch pipe for the frame, as well as ready-made blades or screw cutters. Hiller discs can be made independently from a single sheet of steel or several circular saws, but the procedure will require a gas cutter and a powerful welding machine.
Advantages and features of different types of hillers
A potato hiller is an indispensable equipment necessary for proper potato care and increasing crop yields. To use the device effectively, you need to choose a hiller. The following types are distinguished:
- Lister version - characterized by a monolithic design that does not allow adjusting the width or depth of hilling beds. The hiller is easy to use, easy to maintain and compatible with walk-behind tractors;
- Disc hiller - features a row of disc blades, which increases the speed of hilling and also allows you to plow problem areas of land. The disk-type design is suitable for manual operation or on low-power walk-behind tractors;
- The variable grip width option is an advanced type of lister design that allows the grip of the cutting blades to be adjusted. The model allows you to increase the accuracy of processing beds planted by hand or under a walk-behind tractor. The disadvantage of the device is the low service life of the grip calibration mechanism, which requires regular cleaning of dirt and treatment with anti-corrosion compounds;
- A single-row model for a walk-behind tractor is usually an attachment for a specific walk-behind tractor, sold both separately and as a complete set with the equipment. The device allows you to hill only 1 row per trip, but is easy to maintain and durable. The single-row option is suitable for low-power models, as it does not load the walk-behind tractor even when buried deep in the ground;
- Propeller type - a solution for a walk-behind tractor with a gear selector. Models with one speed cannot cope with embossed blades, which increases the risk of engine overheating or locking of the walk-behind tractor's crankshaft. The design of the blades is similar to a disk blade, but has a curved cutting edge, due to which it performs two actions at once: first it plows the soil, and then pulls out weed rhizomes.
Advantages and disadvantages
The cost of a hiller depends on the complexity of the design and the power of the device - models that allow plowing several rows can reach the cost of a walk-behind tractor on the secondary market. Due to the high cost of attachments, it is easier to make a manual potato hiller with your own hands. All work can be done by one person and requires a minimum of investment. A do-it-yourself hiller can be made in 4-5 hours of free time and does not require specialized equipment other than an angle grinder and a welding machine.
Manufacturers and prices
Do-it-yourself home horizontal bar drawings, diagrams, photos
Let's find out at what price we can buy potato hillers today: let's look at several of the most interesting manufacturers.
Champion C304
This is a hiller from a Chinese manufacturer. This device is a two-row type. The hiller loosens the soil and rolls it to the roots of the potatoes, which significantly improves the quality of work.
From Champion C304
This model is capable of both preparing beds for planting and hilling already planted potatoes. The device is made of high quality steel, which significantly extends its service life. Price - 2200 rub.
Scout
The disc hiller is also made in China. Made from hardened steel for highly efficient performance. Forms neat, even ridges that greatly simplify further potato cultivation. Cost - 3280 rubles.
From Scout
Aurora
This hiller is designed to work on a motorized cultivator. In addition to processing potato beds, it can also be used for other garden work: loosening the soil, improving the soil, hilling other plants (planted in rows). This model is multifunctional, and at the same time it performs each function quite efficiently. Price — 1260 rub.
Intraskol
This unit is already made in Russia. The Interskol company produces several types of hillers: high-quality and not too expensive. The average cost of a device of this brand is 1200 rubles.
From Interskol
We looked at the features of hillers for processing potatoes. As you can see, these devices are very useful and can significantly speed up and simplify potato cultivation. If you want a ready-made device, purchase it only from a trusted manufacturer, but if you wish and have the proper skill, you can make the device yourself.
How to make a potato hiller with your own hands
A manual hiller allows you to plow the soil without the use of machinery. Allows you to process small areas. To make a homemade hiller you will need:
- Discs or sheets of metal as blades – 2 pcs;
- Cam type mechanism – 2 pcs;
- Fixing brackets – 2 pcs;
- Metal stands – 2 pcs;
- Bridge beam;
- The handle is a rower.
Important to remember! A disk hiller differs from a lister hiller not only in the cutting tool, but also in the design of the frame. During manufacturing, it is necessary to set the cutting width of the blades in a practical way. For disks, the width should be approximately 25 cm, for lister - about 30 cm. This is explained by the nature of the cutting of the blades. The discs plow the soil along a straight path, and the metal sheets are hilled at an angle.
Manufacturing
Making a homemade hiller for a walk-behind tractor is quite simple. First you need to assemble the cutting element. Then weld and attach the frame. The diameter of the cutting discs should be between 370-770 mm. For lister blades, sheet metal measuring 25 x 40 cm is used. The thickness of the blades is selected depending on the power of the walk-behind tractor. For manual plowing or hilling, 2 mm steel is sufficient. With an increase in the number of hillers, the thickness of the metal is increased by 2 mm. This will prevent the blades from deforming under load.
Metal bushings are welded between the finished discs or blades. They will ensure fixation of the cutting edge during hilling. The width of the grip depends on the length of the bushings.
After welding the blades, we move on to making the frame. The length of the structure should not exceed 120 cm. Otherwise, the steering handle will vibrate during operation. The frame for the hiller is made taking into account the attachment to the walk-behind tractor. The lower part is a reinforced structure that secures the tool. When making hand tools, instead of mounting them under the walk-behind tractor, a guide rod is welded.
Motoblocks have long been popular among representatives of the agricultural sector. The versatility, compactness and high level of performance of such equipment are increasing every year, because special attachments contribute to this.
There are many types of attachments on the market at the moment, but one of the most popular is the hiller.
CULTIVATOR-WEDDERER
And the front part of the frame will serve as a kind of beacon. More precisely, a support wheel oriented towards the middle of the row spacing, since the cultivator itself, cutting into the surface layer of soil, becomes simply invisible in the resulting crumble. There was, however, an attempt to make the cultivator paw more noticeable by additionally installing vertical ends. But this idea soon had to be abandoned - too many “small things” clung to such an elaborate “chopper”.
The option, sketches of which are shown in the figure, is designed for inter-row cultivation of potatoes with a planting width of 0.5 m. Those who are accustomed to other seeding rates will have to make appropriate adjustments. It is easier to take a ready-made cultivator paw (for example, from decommissioned agricultural machinery).
But you can do it yourself, especially since the main dimensions are indicated in the sketch. In the upper part of the paw there is a bushing with a “mouse tooth” type corrugation (for details on its implementation, see No. 1 of the magazine for 1993) at the ends - for fastening in the corrugated cheeks of the rotary bracket and subsequent tightening with an M14 bolt and nut. As a result, it becomes possible to easily, quickly and widely change the angle of installation of the cultivator.
It is also better to borrow a weeder-clump breaker from agricultural machinery. Installed in the rear part of a homemade frame, it, together with the cultivator (on a swivel bracket!) forms a kind of hinge, the axle shafts of which are two M6 steel bolts with nuts and washers.
And to fish out worn-out and half-ground weeds from the conglomerate formed in the working area, a heavy multi-link chain, freely hung on end hooks, is used. The stems and roots of weeds, pulled to the surface by a rake, wither and die in dry, sunny weather.
The U-shaped rotary handle used in the weeder cultivator is practically no different from the analogue already discussed earlier. Another thing is the spring introduced into this design (wound from 1.5 mm steel wire) with a chain lock and hook. Such a seemingly simple device has a special role: to serve as both an indicator and a regulator of the load that the cultivator-weeder experiences during operation.
It also performs the function of pressing the working bodies to the soil surface, depending on the condition of the latter. The load naturally increases when working in heavy damp and turfy areas. The soil sticks to all structural elements and is driven into the weeder's drum.
Periodically shaking the unit helps. To make it faster and more efficient, I recommend welding small thrust washers to the cross member of the weeder’s frame (not shown in Fig. 2). One has only to pull the handle up and the hind ends of the paws will rest against them. Well, the jerk will cause a shock to the structure itself, as a result of which all the adhesion will immediately fly off and the equipment will be ready for work again.
And further. Make a long poker-type hook from 6mm wire rod. Hang this tool on your hand while weeding so that, as necessary, you can quickly clear the frame or, say, the same star weeder from tangled roots and other things. Let’s assume we’ve sorted out the mechanization of weeding. Next up is the hilling of potato plantations. Any gardener knows firsthand, but from his own hard-won experience, how difficult this work is. And, as a rule, it takes a lot of time to complete it.
You will get exhausted even if you take a hiller plow as your assistant, the advantages of which are outlined in the previous issue of the magazine. In particular, the use of the considered plow can improve the situation if you install it instead of a cultivator paw. But there is another, radical solution: to acquire more specialized equipment.
Why do you need a hiller for a walk-behind tractor?
This element is used for planting and caring for vegetables. It works quite simply: after installing the add-on and starting the walk-behind tractor, the part tows the machine across the treated area with planted seeds, thereby sprinkling the future vegetation with the necessary layer of moist and slightly loose soil. Such an operation is of considerable importance, because it allows you to protect the seeds from negative atmospheric influences, increase the level of oxygen saturation, and stimulate growth.
Experts note that hilling with a walk-behind tractor also helps rid the soil of excess moisture to avoid rotting. After treatment, the sun’s rays penetrate the soil much better, and some harmful insects end up on the surface, where birds “remove” them. Some weeds are also destroyed, so basic treatment can be safely considered a partial replacement for the use of herbicides. It is important to note that hillers are most often used for processing potato plantings.
Read also: Connecting a diode strip to a power supply
How this tool works and works
The equipment is used together with cutters that are installed on the gearbox shaft. During the forward movements of the walk-behind tractor, the hiller goes deep into the ground and forms a furrow with a depression of a certain depth. The dimensions of the base of the depression allow the gardener to move along the ground without disturbing the furrow.
At the same time, the hiller moves the soil from the depression to the top, thereby forming “ridges” with a fixed location.
In addition to forming furrows for planting crops, the hiller is needed to:
- loosen the soil between the rows and at the same time sprinkle the plants;
- weed the finished beds and get rid of weeds.
Most often it is used to plant potatoes, carrots, turnips or beets.
Which hiller is best for a walk-behind tractor?
Modern manufacturers of agricultural machinery are trying to meet the ever-increasing demands of users, so each brand produces specialized hillers that are fully adapted to the specifics of a particular manufacturer’s walk-behind tractor. For example, for the Neva, MB 2, MB 1 and Agro units, you can purchase the following types of additional assistants:
Hillers for potatoes for walk-behind tractors, having a clearly marked working width
Such an object is considered one of the simplest and has another name - lister. It is used for processing narrow row spacing, the width of which does not exceed 30 cm. As for the design features, the hitch consists of several wings fixed relative to each other. This option is suitable for low-power walk-behind tractors (about 3.5 hp). A thin stand provides additional protection for the device from overloads. The negative aspects of such a development include the impossibility of working with wet soil, since the soil simply sticks to the wings, preventing the equipment from performing its task;
Hiller with variable working width
The main advantage of this type of tool is the ability to adjust the processing width. With its help it will be possible to process rows of completely different sizes. Suitable for more powerful machines, because it consumes more energy. Often such devices have the form of double-row hillers, which allow the necessary operations to be performed with even greater efficiency. For adequate operation, it is necessary to place the lugs of the walk-behind tractor on extensions;
Disc hiller
It is considered the most convenient, since it can be used to properly prepare furrows for planting seeds. A feature of the part is the placement of the dump disks at a certain angle. The productivity of use is much higher than that of the previously discussed models;
Dutch type hiller
A specific feature of the development of such a plan is the rotation of the wings in several planes. It seems that the lower edge of the wings follows the contour of the crest. This approach allows you to perform care more productively with minimal energy expenditure. Financial inclusion is also a significant plus;
Active plan propeller hiller (rotary)
The technical device allows you to perform the hilling procedure efficiently, throwing soil directly to the roots of the plants. An important point: you can work with such a device in the second forward gear of the walk-behind tractor, which not every car can boast of. An increased gear will allow the hiller to rotate at a speed of 160-180 turns per minute, due to which the soil is “thrown” from the rows to the rows themselves.
How to install a hiller on a walk-behind tractor?
Since recently agronomists are increasingly using a two-row hiller, we should consider the specifics of installing a hitch of this particular type. Often, fixation occurs through the use of special couplings SV-2 and SV-1/1. A prerequisite for proper installation is the presence of lugs, the diameter of which should not be less than 600 mm. Otherwise, it will be impossible to avoid squeezing the potato tops by the reducer.
It is important to direct the hiller correctly, because you can get the desired result only if it is oriented parallel to the ground surface. This can be done simply by just adjusting a few bolts on the bracket. During the process, special attention should be paid to selecting the width of the furrow and the depth of immersion in the ground, because after processing the ridges should be at the same level. This depth is adjusted in several ways:
- The master should be guided by the height of the mounting holes;
- The presence of a screw adjustment (for adjustable objects) will allow you to change the angle between the nozzle frame and the unit itself while turning the handle.
To adjust the width of the furrows, you should use the frame fastening brackets (move them or spread them apart). You can also follow the directions described in the following videos:
Working with a hiller
You can watch the hiller's work in the video. In fact, it is simple and easy to operate, you just need to get used to it and get used to it. If you managed to assemble and adjust everything correctly, then high-quality hilling is ensured and the product will work properly.
First you need to mark out future beds for potatoes, for example, simply outlining the territory, observing the width of the rows. This is followed by making furrows in the direction of the ridges, followed by laying planting material in them, for example, potatoes. Then the leading active elements are placed between the rows. As the unit moves, the soil fills the beds, that is, hilling occurs.
If you notice that something went wrong, you need to cancel or add pressure, if necessary, review the settings of the disk or other device. If the stand goes too deep into the ground, it tilts back from the bottom position, raising the toe. If you need to make the depth greater, then the toe moves forward and down. And in order to avoid damage to the potatoes, it is important to set the width between individual rows as accurately as possible.
We create a hiller for a walk-behind tractor with our own hands
It is quite logical that owners of walk-behind tractors want to expand the range of tasks performed by the machine with the help of a hiller. But some people do not express any particular desire to spend money on this, trying to create homemade devices. Oddly enough, but they do it very well!
It is worth noting that you cannot do without basic plumbing equipment.
For further manipulations you need:
- Welding machine (arc);
- Electric sharpener;
- Gas-burner;
- Vise;
- Bulgarian. It is desirable that the device be of medium power and have a set of roughing and cutting discs;
- Drill and drill bits;
- Files;
- Mechanic's workbench.
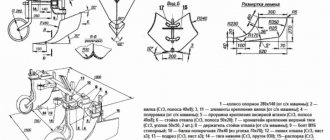
Hiller with fixed and adjustable angle (lister)
We have already mentioned this type earlier, and now we will look at the drawings that allow you to assemble this part yourself.
The fixed type belongs to the class of the most easily created hillers. The base is obtained using a steel sheet, the thickness of which is at least 3 mm. For its formation, only high-quality materials should be used, because this unit is the first to encounter soil resistance.
To create a bracket, use a four-millimeter steel strip. It is important to harden the part after the forming process. A spring leaf can be used as a field board. But first, the metal should be “released” and hardened. For the stand, it is important to choose strips with a thickness of at least 8 mm.
Welding is carried out in several passes, on each side of the joint. You can create wings from thinner sheets (2 mm). It is necessary to pay special attention to the dimensions, otherwise the joining of the base to the wings may fail.
To bend the wings, you can use almost any template, even a steel pipe of a suitable diameter.
Concave geometry and welded seams increase structural rigidity. As for the two-row model, its layout is almost the same. You should use the drawings presented below and increase the processing speed of the parts themselves.
Hillers have managed to become an integral part of the lives of many landowners, because if earlier the procedures of loosening the soil and throwing it to the roots were carried out manually, today they are carried out with minimal physical and time costs.