Good afternoon dear friends. If the first signs of a car pump malfunction appear, then it’s time to change it. The sooner this is done, the fewer problems will arise during further operation of the machine. The consequences can be serious: from its jamming and rupture of the attachment belt or timing belt, to engine overheating. The latter case will result in expensive engine repairs. Therefore, today we will look at how to change the pump on a VAZ 2107 and the entire classic AvtoVAZ range .
Let's look at the nuances and features of its replacement with detailed photographs and an instructive video with a clear example.
Pump VAZ 2107
On cars with a liquid cooling system, one of the main elements responsible for maintaining the operating temperature of the engine is the pump. Thanks to this unit, the circulation of coolant is ensured. If problems arise or if the water pump fails, the normal operation of the power unit is disrupted, which can lead to serious consequences and expensive repairs.
The pump circulates coolant through the engine cooling system
Purpose
The operation of the pump is aimed at continuous circulation of coolant (coolant) through the engine cooling jacket. The antifreeze is heated under the influence of the rubbing elements of the power unit, and the necessary pressure in the system is created by a water pump. The liquid is directly cooled in the main radiator, after which the coolant again enters the cooling jacket. If circulation is interrupted for at least 5 minutes, the motor will overheat. That is why it is so important to monitor the proper operation of the node in question.
Features of the cooling system of classic Lada
The cooling system of the VAZ 2107 is actually no different from other engines built on the basis of the Fiat 124 engine. It is not our plan to describe its operation and design, however, the pump bears the main load and is responsible for the circulation of the coolant. Despite the simplicity of the water pump design, it is subject to a whole bunch of requirements, and failure to comply with at least one of them can cause an antifreeze leak or disruption of its circulation. As a result, the motor will overheat with all the ensuing consequences.
The Zhiguli water pump is a two-part housing in which an impeller is placed on an axis. Bearings or bushings on which the axle rotates are pressed into the housing. There are also many questions about the bearings, since they must be completely sealed, and in addition, they experience a rather serious load, which is exerted by the drive V-belt. Most problems with the pump are caused by the bearings - they wear out, play appears on the pump shaft, the cooling system depressurizes and antifreeze leaks.
How to check the pump on a VAZ 2107
Since there is a need to check the pump, there are problems in the cooling system, namely, overheating of the engine or obvious signs of a pump malfunction. It could be:
- increased noise coming from the pump when the engine is running;
- obvious leaks on the shaft under the pulley;
- antifreeze leakage through the housing gasket;
- increased play on the pump shaft;
- lack of antifreeze circulation and, as a result, engine overheating.
The fluid circulation may simply be insufficient, that is, the pressure in the cooling system is not normal. This can only happen in one case. The VAZ 2107 injector pump is designed for high performance, and if you install a conventional pump from a carburetor engine, its performance may not be enough and the engine will overheat.
Actually, diagnosing the condition of the pump is not difficult. Obviously, the pump requires replacement if there are gaps and fluid leaks. However, it is possible to check the pump's performance by eye. To do this, with the engine warmed up to operating temperature, you need to briefly clamp the upper hose going to the radiator. If, after releasing the hose, a pressure surge is felt, there is nothing wrong with the impeller and the fluid is circulating normally.
Decreased performance
Whatever antifreeze is used in the cooling system, it is a chemical substance. Over time, erosion occurs in the pump housing or impeller, which can lead to a decrease in the flow of pumped liquid. As a result, the motor may overheat with all the ensuing consequences. Therefore, if the coolant temperature sensor on the instrument panel begins to exceed +90˚С (operating temperature), it is worth thinking about a possible replacement of the pump or, at least, a revision of this unit.
Video: how the pump on a VAZ makes noise
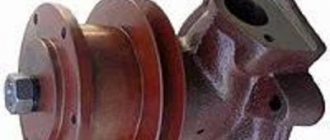
The pump impeller is inserted into a separate housing mounted on the cylinder block
Almost all pump problems are the result of bearing wear. With little wear and play of the shaft, the pump operates normally. As the gaps in the bearing separators increase, the oil seal begins to leak antifreeze, and unnatural noises are heard from the pump installation site when the engine is running - a hum or crackling sound. As a result, the shaft becomes distorted. The further scenario can develop in three ways.
- The bearing jams and the belt jumps off the pulleys. The engine continues to run, but the red battery discharge lamp lights up on the dashboard, and the coolant temperature rises sharply to the maximum.
- As a result of bearing jamming, the shaft breaks into two parts. As in the first case, when the engine is running, the battery discharge lamp lights up and the maximum coolant temperature is observed.
- Due to the skewed shaft, the rotating impeller breaks a hole in the wall of the pump housing, through which all the antifreeze comes out within a few seconds, and the engine instantly overheats. In this case, you will have to change not only the pump, but also the housing in which the impeller broke the wall.
Read, it may come in handy: How to prepare the cooling system of a VAZ-2107 for winter
As a result of bearing wear and misalignment, the pump shaft may break.
Unlike front-wheel drive VAZ models, where the pump is hidden under the timing cover, in the “classic” it is in plain sight. Therefore, it is much easier to avoid unpleasant consequences. You only need to periodically check the pump as follows.
- Start the engine, open the hood and listen. If there are suspicious noises from the front of the engine, manually press the accelerator and increase the speed until the hum becomes clearly audible.
- Carefully inspect the front of the engine for coolant leaks.
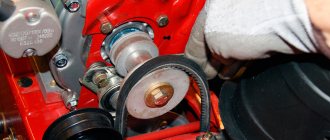
- If you find traces of leaking antifreeze, grab the pump pulley with your hand and shake it along the shaft axis in order to detect any play.
- If you feel a slight play when the belt is tensioned or you doubt the diagnostic result, unscrew the nut securing the generator to the adjusting bracket and loosen the belt. After this, pump the pump pulley again.
The nut keeps the belt taut
Due to the considerable age of these cars, the “native” plant no longer produces original spare parts for them. Commercially available parts rarely last more than 50 thousand kilometers. You should focus on this figure when servicing your car, which will help you detect a malfunction in time.
If you notice a slight play, you should not immediately start replacing the water pump. It will still “live” for 3-5 thousand kilometers. However, its condition will have to be constantly monitored and a new pump will have to be purchased in advance.
If there is any leakage of antifreeze, noticeable play in the shaft, and a cracking sound is heard during operation, the pump should be immediately replaced with a new one.
Disassembly and repair of the fuel pump
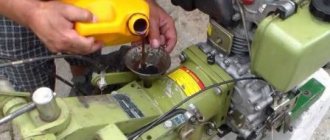
Before disassembling, it is necessary to thoroughly rinse the fuel pump, for which you can use the gasoline in its cavity. It is best to start disassembly with the top cover 4, screwed with a bolt 5 with an 8 mm socket head. Under the lid there is a nylon mesh filter.
Let us remind you that the deformed cover and the broken filter must be replaced with new ones. Under the strainer in the fuel pump housing you will see a pressed and rolled suction valve 6. There are cases when, due to valve failure, you have to replace the entire fuel pump housing since the valves are not supplied separately as spare parts, and replacing them at home is quite difficult .
To remove the fuel pump housing, you need to unscrew six screws 7 with a screwdriver. Before separating the housing from the bottom cover, try to replace their relative positions. This will come in handy during assembly.
The discharge valve is pressed and rolled on the inside of the removed housing. Wash the housing thoroughly in clean unleaded gasoline.
Remember that even the smallest grains of sand trapped between the valve and the seat disrupt the tightness of the valves, which leads to failure of the fuel pump.
Using a thin screwdriver or a match, you can check the mobility of the valves and the tightness of their fit to the seat under the action of the springs. If you can check the operation of the suction valve again on the assembled fuel pump, then the operation of the discharge valve can only be checked now, with the pump disassembled. When blowing air into the discharge pipe, monitor the behavior of the valve, which should sit in the seat and not allow air to pass through.
To inspect the diaphragm assembly, it is advisable to remove it from the bottom cover of the fuel pump; to do this, simply turn the rod 90°. Together with the diaphragm assembly, the outer and inner spacers 1, as well as the diaphragm spring 9, are removed.
Carefully inspect the working and auxiliary diaphragms. Remember that they should not have scratches, cracks, tears, or local hardening. The presence of one of the listed defects requires replacing the defective part with a new one. It should be remembered that the diaphragm assembly is collapsible. The diaphragms and internal spacer sit on the stem and are tightened with a nut. If the fuel pump suddenly fails along the way and you determine that the cause is a deformed diaphragm, plastic film can be used as a temporary measure.
Make a homemade diaphragm from a piece of film. At the same time, do not throw away damaged diaphragms, but place homemade ones between them. This recommendation should only be used as a last resort, but if you have a spare diaphragm assembly, play it safe and replace the entire assembly.
Replacing the water pump
The work of installing a new pump on a classic VAZ model consists of several stages.
- Selecting and purchasing a new part.
- Preparing tools and work area.
- Dismantling the old pump and determining whether it can be repaired.
- Installing a new pump and checking its performance.
When choosing a new pump, you should focus on well-known brands
It makes sense to purchase a new pump in advance only if you are sure that the old one is faulty or its service life is coming to an end. If there is an auto shop near the work site, you can purchase a pump during disassembly.
Is it possible to eliminate a pump leak on the way?
The loss of some antifreeze on the road is indicated by an increase in the temperature of the coolant and a decrease in the level in the expansion tank. If you have located the leak and are convinced that the pump is to blame, you can try to fix the problem. Failures that cause antifreeze leakage are as follows:
- The joint between the flanges of the pump and the cylinder block has lost its tightness, antifreeze is leaking from under the gasket;
- a crack has formed in the pump body;
- the housing was destroyed by the impact of the impeller.
You can insert a wedge into the hole in the housing from the front side and coat it with cold welding.
As a rule, problems with a leaking water pump are critical and are quite difficult to fix on the road. Try to tighten the leaking gasket by tightening the 4 pump mounting nuts, which will require removing the generator drive belt and pulley. Don't overdo it - it's easy to strip the threads on Ø8mm studs.
Try to seal a small crack with a chemical composition - cold welding. If possible, tape the patch to the body with something so that it does not fall off, add water and get to the garage. It will not be possible to seal a large hole from the impeller; you need to look for an option to tow the car or call a tow truck.
Video: repairing a hull crack
From a financial point of view, pump restoration is more profitable than a complete replacement; the savings are about 50% of the cost of a new part. Considering how often minor breakdowns occur on Zhiguli cars, such a difference in price plays a role. The technology for replacing the bearing and oil seal on the VAZ 2101 water pump is also suitable for other cars equipped with a classic engine: VAZ 2121 Niva and its modifications, Niva-Chevrolet.
Pump selection
The VAZ 2107 is equipped with pumps with the following catalog numbers:
- 21073–1307010 – standard;
- 2123–1307011–75 – pump with a reinforced design.
Pumps for “sevens” are produced by many companies. We recommend paying attention to:
- luzar;
- Fenox;
- Hepu.
The impellers on new pumps are made of plastic, cast iron, and steel. We recommend purchasing with a plastic or cast iron impeller.
Pumps are also sold with or without housings. If you have no mechanical damage to the body, you should not overpay; buy a separate pumping element.
Danger of water in oil
Car owners are really afraid of this disease, very afraid. And they do it right, because over time the consequences can be very sad. Let’s say right away that the oil is changed on time and you won’t have any problems, but here’s what can happen if you don’t do this.
Consequences:
- Over time, everything turns into an emulsion with poor density and, accordingly, fluidity. Lubrication decreases and over time this can easily lead to the repair of many components of the power unit. The parts that will suffer the most are the parts that are lubricated by pressure, such as the piston pins, crankshaft and camshaft.
- Piston rings may fall off, as the emulsion gradually remains in the cavities.
- All this affects the piston group and thus fuel consumption can increase significantly, and this is an extra expense, in general, no one needs it.
Tools and materials for work:
- ratchet crank;
- head for ten;
- extension;
- mount;
- socket wrench for thirteen, seventeen;
- slotted screwdriver;
- rags;
- basin.
Replacement algorithm
Let's start.
- Open the drain hole and carefully drain the liquid. How much antifreeze comes out, that much will need to be added (if there was no leak before). If there was a leak, then it is advisable to completely empty the system of coolant and fill it with 9.8 liters according to the instructions.
- Disconnect the battery. Disconnect the electric fan connector.
- Remove the fan protective cover.
Access to various elements of the cylinder block is now open.
- Loosen the generator belt tension nut (M17) and remove the belt.
- Unscrew the bracket fixed to the pump and move it to the side.
- Holding the pump pulley, unscrew the three mounting bolts.
- Then unscrew the four nuts securing the pump to the engine.
- Dismantle the pump and clean the seat with sandpaper.
- Install a new pump, first lubricating the seat with sealant.
Read, it may come in handy: Tuning the ignition of a carburetor VAZ-2107 - comparing Sonar IR and BSZ
The rest of the assembly process is carried out in reverse order.
Replacing the impeller
If the impeller is damaged, for example, the blades are broken, then the part can be replaced. Damage usually occurs upon contact with the housing due to severe wear of the shaft or bearing. Regardless of the material of the impeller, the part is attached to the axle by pressing. To replace the plastic impeller you will need:
- Having secured the shaft on the reverse side in a yew, use an M18 tap with a pitch of 1.5 mm to cut the threads inside the impeller, having previously lubricated the tool with engine oil.
- Screw a special puller into the hole and tighten the outer bolt.
- By rotating the head of the inner bolt clockwise, press out the impeller and remove it from the shaft.
- The metal impeller has threads cut from the factory, so the part is simply pressed out with a puller.
To dismantle the impeller you will need a puller and taps m18*1.5 mm
When reinstalling, the part is pressed onto the shaft using a hammer and a suitable attachment, avoiding damage to the blades. You need to make sure that the lower part of the impeller rests against the ring on the oil seal, after which it needs to be seated 2-3 mm inward. This will ensure a tight fit of the rotating part to the ring.
Changing the pump on a classic
Replacing a VAZ 2107 pump will not cause any difficulties and will only take an hour or an hour and a half. You don’t need to have any special devices; a standard set of keys will be enough. The operating algorithm is simple:
- Drain the antifreeze through the tap on the cylinder block (if you do not need to change it completely).
- Remove the drive belt of the generator and pump; to do this, loosen the nut securing the generator to the bracket and move it as far back as possible.
- Unscrew the pump pulley and remove it.
- Unscrew the pump, remove it from the block, clean the mating surface of the old sealant or gasket.
- The new gasket is coated with sealant on both sides, but before that it is tried on in the holes, after which it is installed on the prepared, cleaned mating plane, a new pump is installed, and assembly is done in the reverse order.
This way you can quickly and effortlessly replace the pump on the seven, saving at least one and a half thousand rubles. This is exactly how much they charge at the service station for this operation. Don't overheat the engine and good luck to everyone!
Features of pouring antifreeze (antifreeze)
After replacing the VAZ 2107 pump, all that remains is to tighten the alternator belt and fill in the coolant. The latter will need about 10 liters.
To add antifreeze without creating air locks in the cooling system, you should do the following:
- position the car so that the front is higher than the rear. Then the heating radiator will be lower than the other elements of the system.
- disconnect the thin hose of the cooling system going to the carburetor or throttle valve (depending on whether the carburetor or injection type of engine is installed on the car);
- open the plugs on the expansion tank and radiator;
- make sure that the drain plugs are installed and carefully tightened;
- pour antifreeze (antifreeze) into the radiator using a watering can;
- push the rubber hoses of the cooling system with your hands, expelling the air (the fluid level will drop);
- fill the radiator to the brim and close the cap;
- pour coolant into the expansion tank and close it;
- start the engine, warm it up to operating temperature;
- With the engine running, squeeze and release the cooling hoses several times to remove remaining air from the system;
- add fluid to the expansion tank to the recommended level.
- install the hose going to the throttle and tighten the clamp.
Leak between coolant drain pipe and pump
Anything that does not fit into any section of the auto repair shop
Alexey_from_MGN Beginner classicist Messages: 190 Registered: Thu Dec 30, 2010 19:56:17 Car model: LADA 210740, 2010 onwards, color White cloud, BC State 07X1 Engine type: Injection From: Magnitogorsk Thanks to: 1 time Thanked: 6 times
Leak between coolant drain pipe and pump
Unread message Alexey_from_MGN » Tue Sep 11, 2022 16:58:06
Good day! The third day I can’t overcome the leak between the coolant drain pipe and the pump. The problem started after replacing the original gasket with a paronite gasket, because... In the winter, my dear one let the generator through quite a bit when it was cold and soaked it. As a result, the diode bridge burned out, which was replaced last winter. In order not to drain the coolant several times, it was decided to replace the gasket along with the radiator, which also died for a long time. Well, in the end, after replacing the gasket, a serious leak formed, which I don’t know how to overcome. Maybe someone has encountered something similar and can suggest something. And yes, I applied sealant. It also tightened well.
Alexey_from_MGN
Violent General of the Automotive Troops semerka.info Messages: 40652 Registered: Thu Dec 11, 2008 17:11:37 Car model: Priora station wagon. There was a whole range of “classics”. Engine type: Injection From: Krasnodar region, Khadyzhensk Thanked: 2250 times Thanked: 4630 times
Re: Leak between coolant drain pipe and pump
Unread message Buiny » Tue Sep 11, 2018 17:59:15 Alexey_from_MGN
, is the tube flange not bent? Could there be a leak not from under the flange, but from the place where the flange is welded to the tube? There is no need to pull too hard, by the way. The sealant needs to be tightened only after it has pre-cured, and not immediately.
Alexey_from_MGN wrote: In order not to drain the coolant several times, it was decided to replace the gasket along with the radiator
Here I don’t see the connection - where is the heater radiator and where is the pump?
. Are we talking about this flange?
Attachments
Violent
Alexey_from_MGN Beginner classicist Messages: 190 Registered: Thu Dec 30, 2010 19:56:17 Car model: LADA 210740, 2010 onwards, color White cloud, BC State 07X1 Engine type: Injection From: Magnitogorsk Thanks to: 1 time Thanked: 6 times
Re: Leak between coolant drain pipe and pump
Unread message Alexey_from_MGN » Tue Sep 11, 2022 19:03:10
Buiny wrote: Alexey_from_MGN
Here I don’t see the connection - where is the heater radiator and where is the pump?. Are we talking about this flange?
I wrote about this one, but about the radiator just to complete the picture. The main radiator was changed.
I also suspected the tube flange. Oh, and it will be inconvenient to take it off. The air manifold is in the way.
I'll try to examine it with a mirror.
The injector is still a hassle.
Alexey_from_MGN
Misha Pirate chatterbox Messages: 11878 Registered: Sun Mar 04, 2012 19:01:13 Car model: VAZ 2107 1.8i Engine type: Injection From: Country of Heroes and Thieves Thanked: 391 times Thanked: 848 times
Re: Leak between coolant drain pipe and pump
Unread message Misha » Wed Sep 12, 2018 13:27:35
yes, I always had a rubber one there, from the stove. there were no problems... but this flange... is crap, to put it mildly. like this whole pipe
Before you judge the mistakes of others, pay attention to yourself. One who throws dirt cannot have clean hands.
Yozhyk wrote: If someone's opinion does not coincide with yours, this is not a reason to call a person a moron.
Misha
Alexey_from_MGN Beginner classicist Messages: 190 Registered: Thu Dec 30, 2010 19:56:17 Car model: LADA 210740, 2010 onwards, color White cloud, BC State 07X1 Engine type: Injection From: Magnitogorsk Thanks to: 1 time Thanked: 6 times
Re: Leak between coolant drain pipe and pump
Unread message Alexey_from_MGN » Wed Sep 12, 2022 19:00:47
Misha wrote:
yes, I always had a rubber one there, from the stove. there were no problems... but this flange... is crap, to put it mildly. like this whole pipe
From the stove tap or something?
Has anyone managed to remove the tube without removing other attachments from an injection engine?
I personally suffered for an hour today, and I couldn’t get it out, even those band clamps (damn them). In short, hello to AvtoVAZ!
Alexey_from_MGN
Misha Pirate chatterbox Messages: 11878 Registered: Sun Mar 04, 2012 19:01:13 Car model: VAZ 2107 1.8i Engine type: Injection From: Country of Heroes and Thieves Thanked: 391 times Thanked: 848 times
Re: Leak between coolant drain pipe and pump
Unread message Misha » Thu Sep 13, 2018 11:36:51
Alexey_from_MGN wrote: Misha wrote:
yes, I always had a rubber one there, from the stove. there were no problems... but this flange... is crap, to put it mildly. like this whole pipe
From the stove tap or something?
Has anyone managed to remove the tube without removing other attachments from an injection engine?
I personally suffered for an hour today, and I couldn’t get it out, even those band clamps (damn them). In short, hello to AvtoVAZ!
everything is removed. the main thing is to unscrew it from the manifold.
Before you judge the mistakes of others, pay attention to yourself. One who throws dirt cannot have clean hands.
Yozhyk wrote: If someone's opinion does not coincide with yours, this is not a reason to call a person a moron.
Misha
Alexey_from_MGN Beginner classicist Messages: 190 Registered: Thu Dec 30, 2010 19:56:17 Car model: LADA 210740, 2010 onwards, color White cloud, BC State 07X1 Engine type: Injection From: Magnitogorsk Thanks to: 1 time Thanked: 6 times
Re: Leak between coolant drain pipe and pump
Unread message Alexey_from_MGN » Thu Sep 13, 2022 6:56:42 pm
I changed the tube today, having first removed all the hoses from it and placed a cardboard gasket on a thin layer of sealant. I applied the sealant, waited 20 minutes as stated in the instructions, then pulled the flanges together without overdoing it. I left it to dry as per instructions for 4 hours. Tomorrow I will fill the system. Today I worked with an assistant who shined a flashlight in the right places, it turned out much faster.
Alexey_from_MGN
VladiZlav Administrator Messages: 17354 Registered: Sat Jun 07, 2008 21:11:19 Car model: VAZ 2111, red, ESP and all that