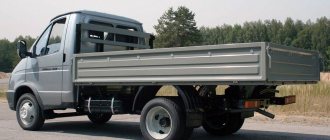
Each car has its own use, largely depending on the owner. But if the conversation turns to Gazelle, then almost always we are talking about commercial transportation.
Moreover, the routes often end far from illuminated city streets.
Installing fog lights - Gazelle gets more luminous flux
Therefore, the issue of improving roadway lighting is more relevant than ever:
- After all, standard headlights are not enough to maneuver in tight yards for loading and unloading operations;
- And if we take into account weather conditions, then installing fog lights on a Gazelle is a conscious necessity, designed to protect the vehicle’s movement in poor visibility conditions.
If PTFs are inoperative
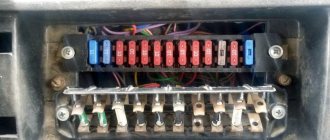
Let's briefly consider the main reasons for the failure of fog lights or problems in the operation of control mechanisms (see photo). Unfortunately, long-term use and not always favorable climate cause corrosion and oxidation of wires and contacts.
- Each fog light has its own fuse located in a block under the hood. Check first to see if it is faulty. If both headlights do not work at once, then the problem is different, since the fuses do not fail in pairs.
- If the lamps burn out, you can’t think of anything else other than replacing them, and the reason may be in the breaker relay. There should be a clicking sound when the headlights are turned on. If not, then either it is not working, or there is no power to it, or, as an option, there is no normal mass on the body, or from the relay.
The dimensions on one side do not light up.
When the rear lights on a Gazelle don’t work, we figured it out. If the lights on one side do not light up, then you need to check the fuses and replace the blown ones. If the fuse blows again during installation, there is a short circuit in the circuit. To find it, you need to disconnect the connector of the rear and front harness. This will allow you to determine which harness contains the short circuit. You should do the same in order to eliminate short circuits in headlights and rear lights. The specific location can be determined by examining the corresponding harness.
Choosing a location for installing headlights
Since the Traffic Rules must be strictly observed, the only correct place for installing fog lights can be the front bumper of the car.
When choosing a PTF, you need to pay attention to the appearance of the kit; the product marking must contain the letter “B”. Particular attention should be paid to the tightness between the housing and the diffuser
If the seal is broken in this place, this will lead to a reduction in the life of the optics.
Fog lights on Gazelle differ in their design. They can be square, round and oval. PTFs differ in optical designs, in which minimum power consumption is used to achieve maximum luminous flux (video author - ZapPri TV).
To increase safety on the road, there are various ways, for example, installing snow chains (TSN) in winter weather. Xenon is used to increase the brightness of the light.
If visibility is poor during snow, fog, or rain, fog lights are installed. On some models, the headlight on Gazelle cars is not equipped with fog lights at the factory.
The article describes PTFs, provides recommendations for selection and installation instructions.
Front optics are used to illuminate the road. If visibility is poor during precipitation, conventional optics do not perform their function well, even if xenon is installed. This happens because the light is reflected from raindrops, fog, etc., creating a white veil in front of the car, which limits visibility.
In this situation, the solution is to install fog lights. They illuminate the road evenly and reduce the risk of dangerous situations on the road. On Gazelle Next, fog lights are installed at the factory. You can install xenon in the PTF.
Gazelle Next green
The installed daytime running light (DRL) helps to determine the position of the vehicle during the daytime. You can install fog lights with DRLs. The rear lights on the Gazelle perform the functions of warning and signaling drivers moving behind the car about braking, turning, etc.
LEDs in the rear lights
Many drivers are not satisfied with the standard lighting, so they install LED lights or xenon lights instead of incandescent lamps. However, after replacing the headlight bulbs with xenon, the headlights may need to be adjusted. The headlight range control is designed for these purposes.
The most common cause of headlight failure is corrosion and oxidation.
In addition, there are a number of malfunctions that are possible with PTF:
- fuse is blown;
- the light bulb burned out;
- relay is faulty;
- PTF switch does not work;
- poor ground to the body from the relay or from the fog lights;
- there is no power, the integrity of the wiring may be damaged.
PTF selection
To install, you first need to decide on the installation location. According to the rules, fog lights must be located below the head light, so they are installed on the front bumper.
An important requirement when installing and operating a PTF is autonomous activation. This is due to the high power of the lamps required to diffuse light along the road surface. An intermediate relay is used for this purpose.
It is better to purchase a bumper with an improved design. This will simplify installation and eliminate unnecessary steps.
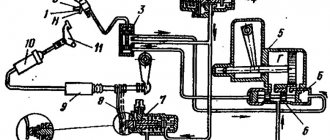
1. PTF connection diagram 2. Kit for installing fog lights 3. Connecting PTF to the control unit
Installation and connection of fog lights consists of a sequence of actions:
- First of all, you should install the PTF on the seats.
- Installed headlights must be connected with wires.
- The block with wires is led out into the engine compartment.
- Next, you should mark the place where the interrupting relay will be installed.
- Then you need to install an interrupt relay.
- Next, the PTFs are connected to the ECU.
- The next step is to connect the relay and headlights.
- A technological hole is provided for connecting wiring to the cabin.
- If there is no position for fog lights in the switch on the dashboard, then you need to mount the button and connect it to the standard electrical circuit.
Loading …
This video demonstrates how to install fog lights on a Gazelle (the author of the video is prosto gazelle).
Where to post
We need to start by choosing the place where our new foglights will be located. Traditionally, either a car bumper or a cab roof is used for these purposes. However, with the second option there may be difficulties in coordinating with traffic rules.
Note! According to these standards, the use of the roof is permitted for vehicles with all-wheel drive or in difficult operating conditions - dirt roads, potholes, etc.
What kind of lighting do you prefer?
Built-in Chandelier
Additionally, you need to know other requirements of the traffic police rules.
So, the installation of Gazelle fog lights must meet the following standards:
Among other nuances that can be caused by installing fog lights on a Gazelle, you should pay attention to the shape of the products, as they can be rectangular, square, oval, etc. Place them in the places recommended by the manufacturer.
If this does not work, then you can cut holes in the existing bumper or buy a new one, specially prepared for this. The price of purchasing a new bumper may not be acceptable for every Gazelle owner, so we will further discuss how to do this without extra costs.
Expert opinion
It-Technology, Electrical power and electronics specialist
Ask questions to the “Specialist for modernization of energy generation systems”
Installing PTF on a gazelle business - Property protection When connecting, keep in mind that the new Gazelle instrument panels are equipped with a central switch, which has a separate position for the fog lights, so you don’t have to embed a separate button. Ask, I'm in touch!
Installation and connection of PTF
To install, you first need to decide on the installation location. According to the rules, fog lights must be located below the head light, so they are installed on the front bumper. An important requirement when installing and operating a PTF is autonomous activation. This is due to the high power of the lamps required to diffuse light along the road surface. An intermediate relay is used for this purpose. In addition, fuses are used to provide additional safety.
Installation and connection of fog lights consists of a sequence of actions:
- First of all, you should install the PTF on the seats.
- Installed headlights must be connected with wires.
- The block with wires is led out into the engine compartment.
- Next, you should mark the place where the interrupting relay will be installed.
- Then you need to install an interrupt relay.
- Next, the PTFs are connected to the ECU.
- The next step is to connect the relay and headlights.
- A technological hole is provided for connecting wiring to the cabin.
- If there is no position for fog lights in the switch on the dashboard, then you need to mount the button and connect it to the standard electrical circuit.
Connection diagram
headlights
To improve visibility in foggy conditions in summer, and during snowstorms in winter, fog lights are used. Previously, these headlights had yellow glass, but in the near future, thanks to an increase in the luminous power of the lamps, they are being made with transparent reflectors (glass). Fog lights are not an essential lighting device and therefore not all trim levels of cars are installed with them. For this reason, the installation, if desired, has to be done by the owners themselves or contacted by a car service center. The main requirement for connecting fog
headlights, is the presence of a separate switch. Because the power of the lamps is quite high, and the current switched by the existing buttons and keys is small, an intermediate relay must be used when connecting. When connecting, do not forget about protecting the circuits with fuses. A common mistake is connecting fog lights specifically to the side lights in the headlights. The headlight switch and wires are not designed for the current consumed by the lights.
connection diagram
VAZ 2110 headlights. According to the connection diagram proposed by the factory, presented below, the fog lights turn on after the side lights are turned on. The disadvantage of this circuit is the lack of dependence on the ignition switch. This can lead to leaving the headlights on while the engine is not running for a long time. To prevent this, I recommend connecting the wire to the headlights switch not to pin 58, but to pin “X”. In this case, switching on will occur regardless of external lighting, but when the ignition is turned on.
Replacing the headlight
Headlights on a GAZ-3302 with an on-board 12 V power supply are marked by type: 0 301 215 203 for the right unit, 0 301 215 204 for the left unit. The DRL lamp unit provides the following illumination:
- high beam - H1 12 V, 55 W lamps are used;
- low beam lighting - H7 12 V, 55 W bulbs are installed;
- front marker – W5W 12 V, 5 W;
- front turn signal - a PY21W 12 V, 21 W bulb is used.
Light elements change independently. After replacement, the light beam is adjusted through a gear wheel for the vertical and horizontal planes.
Main stages of work execution
The old-style GAZelle has standard headlights with a soft reflector, which gradually rusts. Often blocks lose the tightness of the lid connection, and drivers often complain about incorrect connection of wires. To correct the situation, the structure is disassembled, all the light bulbs are removed and a complete reinstallation is carried out.
Self-replacement begins with the preparation of new elements; an LED strip is installed as side lights:
- Thoroughly degrease the inner surface.
- Wait 3 minutes until the solvent evaporates.
- Apply double-sided tape to the LED strip.
- Place the LED strip along the edge of the turn signal.
Removing glass for the GAZ-3302 model:
- Warm up the old headlights with a hairdryer, directing the air flow onto the glass.
- Use a thin screwdriver to pry the glass, lift it, and run the tool around the perimeter.
- Clean the reflector or replace the part.
- Prepare the seat, remove any remaining glue.
- Apply a layer of sealant to new glass.
- Twist the wires and bring them out behind the reflector.
- Install the glass into the seat; use a tourniquet to tighten the structure.
- Install the turn signal.
- Connect the new dimensions: the plus is connected to the yellow wire of the marker wire, the minus is connected to the common cathode of the headlight.
Replacing the front lights with GAZelle Next will be different:
- Disconnect the negative terminal from the battery.
- Remove the front bumper.
- Unscrew the headlight bolts from the base of the radiator frame.
- Release the pad lock.
- Disconnect the block from the connector.
- Pull the block forward, remove the hinge socket on the lower housing support (it is attached to the base of the radiator frame).
- Remove the headlight unit.
Installing a new unit is done in the reverse order.
Block headlights for GAZelle, produced after 2000, come with a built-in electrical corrector for standard single-filament lamps with an H7 socket for high beam, H1 for low beam.
Article: RK 3302-3724030-03more, additional articles: STsAZ-2-6(V+R)SB6, 3302-3724030hide
Order code: 145117
Available for order – >10 pcs. Data updated: 07/02/2022 at 15:30
Order code
145117 Articles RK 3302-3724030-03, SCAZ-2-6(V+R)SB6, 3302-3724030 Manufacturer AENK Catalog group: ..Electrical equipment Electrical equipment Width, m: 0.03 Height, m: 0.13 Length, m: 0.12 Weight, kg: 0.05
- Wiring for GAZ-3302 rear light with block (2 parts) AENK Article: RK 3302-3724030-03, STsAZ-2-6(V+R)SB6, 3302-3724030 Order code: 145117 335 ₽ or place an order by calling 8 800 6006 966
Availability of goods in warehouses and stores, as well as the price of the goods is indicated on
Prices and availability of goods in all stores and warehouses are updated once an hour. If there is a sufficient quantity of goods in the store you need, you can buy it without pre-ordering.
– valid when ordering on the website or through a call center operator by phone
. Subject to sufficient quantity of goods at the time of order.
Price in stores
– retail price of goods in store sales areas without pre-order.
The period for moving goods from a remote warehouse to the warehouse of an online store.
The parts data presented on this page is for informational purposes only.
Expert opinion
It-Technology, Electrical power and electronics specialist
Ask questions to the “Specialist for modernization of energy generation systems”
Connection diagram for the wiring harness of the GAZelle-Business engine management system Self-replacement begins with the preparation of new elements; an LED strip is installed as side lights. Ask, I'm in touch!
Installation and connection of PTF
To install, you first need to decide on the installation location. According to the rules, fog lights must be located below the head light, so they are installed on the front bumper. An important requirement when installing and operating a PTF is autonomous activation. This is due to the high power of the lamps required to diffuse light along the road surface. An intermediate relay is used for this purpose. In addition, fuses are used to provide additional safety.
It is better to purchase a bumper with an improved design. This will simplify installation and eliminate unnecessary steps.
Installation and connection of fog lights consists of a sequence of actions:
- First of all, you should install the PTF on the seats.
- Installed headlights must be connected with wires.
- The block with wires is led out into the engine compartment.
- Next, you should mark the place where the interrupting relay will be installed.
- Then you need to install an interrupt relay.
- Next, the PTFs are connected to the ECU.
- The next step is to connect the relay and headlights.
- A technological hole is provided for connecting wiring to the cabin.
- If there is no position for fog lights in the switch on the dashboard, then you need to mount the button and connect it to the standard electrical circuit.
After installing the PTFs and connecting them to the on-board network, you need to check the system for functionality and correct connection.
Installation Guidelines
Fog lights on the Gazelle are installed with the obligatory consideration of the power of their flow. The use of PTF is prohibited if this indicator exceeds the power of the main light sources.
Headlights must be installed symmetrically relative to the axis of the car.
If the factory has already provided and marked on the bumper the installation locations for fog lights, then you should follow the factory recommendations and install the headlights in these areas.
After fixing the PTFs, the correctness of their adjustment must be checked. It is advisable that this be done at a service station by a qualified electrician. This step is perhaps the most important of the previous ones, since the quality of the fog lights depends on it. Only in this case will they be useful equipment.
Instructions for installing fog lights on a car via a relay.
- It is necessary to remove the main panel, under which the light bulbs for the backlight of the furnace regulator are located. The light bulbs can be put aside; they will no longer be needed.
- Now you need to find the two-pin connector. It is located at the end of the wire from the backlight. You will need to run your hand over it to find the part you need.
- We connect the first wire from the relay to the two-pin connector, and attach the second to the PTF power button.
- To establish a 12-volt network from the dimensions and 84 contacts in the system, you will need to connect a wire to the relay. The relay can be removed to any place convenient for the driver - behind or under the instrument panel, under the body trim, in the fuse box, etc.
If you connected the radio yourself, there should be no problems. The connection principle, although not identical, is similar.
Now you need to extend contact number 87 to the battery under the pedals or along the wiring into the engine compartment.
- We extend contact number 86 to ground to the body.
- Fog lights have two wires - minus and plus. The latter (“positive”) will need to be connected to each other and sent to the battery.
- Then you need to direct them to the relay and connect to connector number 30.
- “Minus” is directed to the body.
- It is necessary to wrap all exposed wires with electrical tape and check the reliability of the connections.
If the fog lights do not work, check that the relay connectors are connected correctly. When installed correctly, clicks will be heard.
Here we looked at the option of connecting fog lights powered by the interior heater. You can also connect from the rear window heating block. To do this, you will need to use wires from the rear window heating button for power. The connection principle is the same as described above, only using a different power source
In the first version, the fog lights will work together with the headlights, and “recharge” from the rear window heating button assumes that these headlights operate from the ignition switch. The second option is better suited for daytime driving, since fog lights can be used instead of running lights, without turning on the headlights.
Features of installing fog lights
- The installation of fog lights should be carried out strictly at the bottom of the car, so if your car does not have a special place for them, place them as close to the roadway as possible. This creates a “layer” between fog and light, which provides good visibility to the driver. Fog lights must not be installed higher than headlights.
- It is necessary to keep the headlights clean; you can also protect them with special safety grilles that will protect them from impacts from stones, sticks, etc.
- To avoid fogging or clouding of the glass, it is recommended to polish it with a special solution once every few months. This procedure is especially relevant for drivers who often drive on sand. You may also need this type of glass treatment after winter.
Adjustment
When the installation of fog lights is completed, the Gazelle is driven onto a horizontal platform to adjust them. To perform this work efficiently, you should:
- bring the tire pressure to normal;
- fill the fuel tank completely;
- load the car to normal condition;
- on a vertical screen (located 10 m from the car), a vertical (car axis) and two parallel lines are marked (the upper one is the distance from the center of the headlights to the surface of the site, the lower one is 100 mm).
Each headlight is adjusted separately according to the lines marked on the screen.
Installation of fog lights
To replace or repair the PTF on a GAZelle, the body liner is dismantled. The tools you will need are a mounting spatula, preferably a plastic one, and a universal set of screwdrivers. Procedure:
- Remove the clamp that holds the block with wires.
- Unscrew the 3 screws securing the headlight unit to the GAZelle bumper.
- Pull the headlight off the bracket.
Installation is carried out in reverse order.
Usefulness of fog lights
There are 2 types of foglights for GAZelle Next:
- front PTF with 55 W lamps, size H11;
- a 21 W lamp marked P21W is installed on the rear light.
On GAZelle Business, the fog lamp is installed as additional optics. The installation location, according to traffic regulations, is lower than the head lighting line.
The PTF on the GAZelle must be turned on autonomously; for this, an intermediate relay with circuit fuses is installed.
Fog lights provide the driver with optimal visibility in rain and fog. Manufacturers do not always standardly equip factory models with PTF lamps. Often, the front bumper has prepared seats for the further installation of additional lighting units.
Mounting methods
Installation of GAZelle Business fog lights is carried out at a height of at least 25 cm from the road surface. If the front bumper does not have a seat for the PTF, it is recommended to disassemble the panel and cut out two spaces for the bolts according to the rules:
- Maintain the axis of symmetry.
- Place the PTF below the headlights.
- Headlights should not protrude beyond the dimensions of the car by more than 40 cm.
To connect the PTF there is a standard button on the dashboard; the driver does not need to install an additional adjustment element.
Connection diagram
GAZelle cars produced after 2005 have a central switch on the dashboard, which provides a position for PTF operation. The connection diagram for fog lights involves the primary layout of the PTF circuit with its subsequent input into the central network.
The PTF kit includes:
- block headlights;
- wiring kit for connection;
- relay and button to start the optics.
The instructions with a graphical drawing of the electrical circuit and rules for connecting the contacts will help you assemble and connect the circuit correctly. Self-installation is simple:
- Install the headlight on the bumper.
- Connect the wires to the block.
- Place the block under the hood.
- Determine the location for the intermittent relay and install a mark.
Connecting fog lights to the control panel on the dashboard or in the cabin is carried out in the following stages:
- Connect the wiring between the intermittent relay and the headlight unit according to the diagram.
- Lead the PTF wiring through the technological hole into the passenger compartment.
- If there is no regular place on the dashboard for a switch button, designate a place for the switch.
- Mount the button and connect it to the standard wiring.
- Replace all unprotected sections of the circuit, check the correct connection.
Drivers experience the greatest difficulty when installing additional lighting when inserting the headlight wire into the standard electrical circuit. If the driver does not have experience as an auto electrician, it is better to contact a service station.
source
Installation process
The fact is that the shape of the fog lights is different both in size and shape. Therefore, the connection of fog lights on the Gazelle will be carried out by you based on the dimensions of the selected lighting devices.
And the question after purchasing the set you like is how to install lighting fixtures in places not intended for them. The thing is that companies strive to produce universal lighting devices, while there is no uniform standard among automotive manufacturers.
Bumper mounting methods
The difficulty is that the standard front bumper does not have slots for installing additional lighting fixtures.
Advice! If the second option seems too expensive for you, since price is a decisive factor, then you still have the option of installing fog lights directly on the bumper using homemade fasteners.
Integration into the electrical circuit
Having figured out the mounting location, you have to connect the electrical components into a single circuit and integrate it into the standard one.
- Electrical wiring with connectors for connection to the Gazelle circuit;
- Relay interrupter;
- Power button designed for installation on the instrument panel;
- Instructions for connecting and pinouting terminals.
Advice! If the kit does not include a relay, then purchase one from Gazelle 3302 - this relay is responsible for the operation of the rear foglights.
- We connect the wires to the relay from the headlights;
- We start the wires from the relay through the technological hole into the passenger compartment;
- We determine the installation location of the power button;
- We install it and connect it to the standard Gazelle wiring diagram.
Let's figure out how to connect the wires to the relay. The fact is that the relay itself is required to protect the power button, since it is not designed for the current that powerful fog lights consume.
Having assembled the entire circuit together, check that the wires are connected correctly to the relay installed under the hood:
How to Connect Fog Lights to a Gazelle
Installation process
Installing fog lights on your own begins with developing a connection diagram. A properly designed circuit avoids unnecessary wires and ensures reliable operation of the electrical circuit. It is recommended to carry out installation work in the garage, although many owners install it outdoors.
There are three installation methods:
- into standard openings;
- on the outer bracket;
- into a blank bumper not intended for installing headlights.
Approximate view of the template for customization
Adjusting your fog lights increases driver visibility and reduces the risk of blinding oncoming drivers.
To bet or not to bet? Drivers' opinion
Judging by the reviews, drivers unanimously welcome the installation of fog lights. The only question is what kind of headlights to put on the Gazelle. The automotive industry has only now “grown up” to install them, and the first models were deprived of this. Therefore, drivers most often address this problem in specialized forums.
Drivers also believe that it is better to use yellow fog lights, but they should not skimp on good PFCs.
They recommend Osram All lamps for fog, and Night Breaker or Bosch lamps for snow.
Fog lights for Gazelle - practical installation details
Fog lights have long been used to improve visibility on the road. They pay off not only in fog, but also in winter during a snowstorm or at night on a bad road. Everyone has seen the yellow light from fog lights, but recently, thanks to the power of the lamps, the light output has changed. It remains to consider the question of how to install such light sources on a Gazelle commercial vehicle.
PTF can also be installed on the bumper
PTF for "Gazelle" series "Business" and "Next"
The problem of safe driving in difficult weather conditions gives rise to the following question: “Which fog lights (Gazelle-Business - your car) should I buy? Is it possible to install PTFs designed for other cars?”
The difficulty lies in mounting the headlights specifically for this car. A mistake in choice can be costly for the owner of Gazelle Business. According to the majority of drivers and car service specialists, the best option may be the Lada-Priora fog lights, although the mount will still have to be modified: an adapter will be required.
The fog lights installed on the Gazelle-Next will not create problems for the driver similar to those encountered by the Gazelle-Business.
This model is equipped with anti-fog devices from the manufacturer.
Adjusting the fog lights
The installation and connection of the fog lights are complete, but that's not all. Now we need to adjust our headlights so that they shine and do not blind oncoming drivers. This is a very responsible and important operation, since both our lives and the lives of oncoming traffic participants depend on it.
You can, of course, turn to a service station for help, but if you have patience, you can do everything yourself. To work, we need a vertical wall and a flat horizontal area in front of it. The dimensions of the site should allow you to park the car at a distance of 10 m from the wall. Take a piece of chalk and make the necessary markings on the wall.
- We draw a vertical line corresponding to the central axis of the machine (line 1 in the figure below).
- We draw two vertical lines that pass through the center of the fog lights (lines 2 and 3 in the figure below).
- Draw a horizontal line H at the height of the centers of the fog lights from the road surface.
- We draw a horizontal line 4 at a height that depends on the distance from the car to the wall and on the installation height of the fog lights. We chose a distance of 10 m. If the headlights are located at a height of 250-500 mm from the road surface, which corresponds to the standard installation height of PTF on a Gazelle, then the height of line 4 will be about 100 mm.
The marking is complete. The remaining operations are carried out in the dark. We place the car at a distance of 10 m from the wall as horizontally as possible and so that its central axial line coincides with the central vertical line on the wall.
We turn on the PTF, cover one headlight with a piece of dense material, and adjust the second so that its light spot coincides with the yellow oval marked in the figure. We change the headlight tilt using the adjusting screw, which is marked with an arrow in the photo below.
Adjusting screw for fog lamp Kirzhach
We repeat the operation for the other headlight, covering the adjusted one with a cloth. Then we open both headlights and make sure that the light spots with centers A and B are in their place.
That's all, now our Gazelle Business is equipped with a fog light. This will ensure safe driving in any weather for both us and other road users.
Conventional headlights are of little use in fog, rain, or heavy snowfall: they make the space in front of the car not visible and are limited by a whitish veil, especially in long-distance mode. This happens due to the reflection of light from drops of fog, rain, and snowflakes.
In such a situation, an indispensable assistant is a fog lamp unit (FTL), the installation of which on any car will allow you to evenly illuminate the road and avoid dangerous situations.
View gallery
But it is important not to forget that headlights are different, and knowing something about this will not hurt any driver. Russian fog lights produced at the Bosch-Ryazan and Avtosvet enterprises have good characteristics.
Quite a budget price – another advantage of such products
Russian fog lights produced at the Bosch-Ryazan and Avtosvet enterprises have good characteristics. Quite a budget price is another advantage of such products.
Headlights from Asian companies Al Khateeb and Saca are more attractive in appearance, but their cost is twice as high as Russian ones, and high power often leads to overheating and deformation of plastic parts.
The devices of the German company Hella are considered to be the highest quality fog optics, but this pleasure is not available to every driver due to the cost.
When purchasing, first of all, pay attention to the appearance of the headlight (set): “fog lights” have a marker in the shape of the letter “B”. Next, check the tightness between the diffuser and the reflector (housing)
Violation of the tightness of this connection will reduce the life of the headlight.
What is this?
What are the first questions that come to your mind? I think what is it and why is it needed? Many automakers think the same way, since the same VAZ 2110, 2114 or 2115 do not have fog lights from the factory.
Things are somewhat different with Nissan, Kia Rio, Toyota Corolla or Camry, Ford Focus, Chevrolet Cruze, Renault Duster and so on. Almost all new cars are equipped with fog lights. That is, you will rarely find Hyundai, Honda, Opel Astra, Skoda Octavia, Volkswagen, Audi, Mazda, Mitsubishi Outlander or other quite expensive cars that do not have PTF.
Yes, there are some foreign cars such as Daewoo Nexia, Renault Logan, Chevrolet Lacetti, Lada Priora (oops, ours got in here), Chevrolet Niva, where the absence of foglights is par for the course.
So why do some have them and others don’t? It's simple. According to traffic regulations, fog lights (FTL) are not a mandatory component of the vehicle's lighting equipment. But some companies install them on all their models, regardless of the price segment, others install standard PTFs selectively, and still others don’t bother with this at all.
But I believe that PTF should be the norm and rule for all auto companies. Why, you ask? I'll explain. Only with them can you feel confident and safe when it’s raining or heavy fog outside. Regular headlights will not help you in any way. No ordinary LED screwed into a base, xenon or other optics that can be easily installed as the main light, can penetrate the fog with its rays. The low beam functions do not apply to this either.
An important aspect of PTF is that it not only illuminates the road during fog, allowing you to determine the presence of other cars, obstacles or people ahead. They are also more visible from oncoming cars.
This is especially important when there is thick fog on the road and traffic is on a fairly narrow road with two lanes.
It is noteworthy that some even install PTF in the rear lights. This is also correct, since this way the chances of getting hit in the rear bumper are much less.
A little physics
I wonder why conventional optics cannot cope with fog, but PTF does. It's all about the laws of physics. Fog is a mixture of small drops of water that are in the air, they float. Light falling on the drops is reflected from them. You can clearly see this if you turn on the high beam in the fog. A white wall appears in front of you, so it is impossible to go further.
PTF has a different operating principle. They are located at the bottom, usually the light is built into the bumper. The light flux is directed downwards and horizontally. This allows you to illuminate the road surface itself.
Also, fog lights have a different spectrum of light. The yellow filter is especially useful. The low location of the PTF has another trick. The fact is that the fog does not fall on the road itself, but rises somewhat above it. Visual videos will prove this to you.
Kinds
There are lensed, round, built-in, bumper-mounted and all sorts of other subtypes of foglights. Their prices vary, as do the connection methods. I can’t answer unequivocally which one you should choose. This largely depends on the car, your needs and financial capabilities.
Three types can be distinguished, depending on the types of lamps used.
LED. They are the most popular and economical. Such lamps consume practically no energy, so they do not load your car’s generator. High power levels with simultaneous efficiency and durability make LEDs the most expensive type of fog lights. But such costs are completely justified. LED PTFs are presented in a wide range. You can easily buy 4 headlights for installation in front and behind the car. There are different colors of radiation and brightness of light streams
An important advantage is that LEDs do not heat up the headlights. Xenon. Xenon is most often used on expensive cars
The spectrum of their glow is close to that of sunlight, which is why it passes through fog perfectly and provides effective illumination of the roadway. Also, such a light does not burden the vision of drivers and does not dazzle oncoming cars when installed correctly. They have excellent efficiency, long service life and low energy consumption. Halogen. Their technical characteristics are inferior to their main competitors. But they are still popular due to their low cost. They work well, but if possible, buy halogen or LED devices. A halogen lamp does not last as long and has more disadvantages than advantages.
The main stages of connection work
Here are sample connection instructions:
- First of all, in symmetrical places on the bumper we cut out two holes in which the light sources will be attached and thoroughly lubricate them with an anti-corrosion agent.
- We connect the purchased pair of foglights with wires. Check that the cross-section of the main wiring of the car is the same as that supplied with the headlights. It is generally accepted that the minimum cross-section diameter should be at least 0.75 mm.
- We de-energize the car battery.
- Wiring is carried out in accordance with the diagram that comes with the package.
Decoding connectors for connecting headlights to Gazelle
- You need to open the housing of each headlight and pull out its optical element. This will be required so that you can carefully insert the halogen light bulb and not damage the housing with glass during the installation process.
- After tightening the headlight housings, install the contact relay with the wiring facing down. This way we will protect it from moisture.
- When you insert a halogen lamp into its optical element, do not allow your fingers to contact the surface of the bulb. Wear gloves or even wrap a rag around the flask. Grease on the surface of the bulb will significantly shorten the life of the light bulb.
- We connect the wiring kit to the lamp and install the optical element.
- Gazelle fog lights will be considered installed when you have completed all stages of work and provided power to the battery again. Now you can check the functionality of the device. Turn on the headlight only after complete assembly. The video in this article will give you the opportunity to visually see some of the work.
The role of relays and buttons
If the fog light kit you purchased does not have a relay, purchase one for the 3302. There it operates the rear fog lights.
Normally, each kit should be equipped with electrical wiring with connectors, a relay breaker, a power button and a detailed instruction diagram for the assembly steps
Pay close attention to the quality of wiring. Note! The wiring harness is not only possible, but also necessary to be routed into the space under the hood
After this, decide on the place where the breaker relay will be attached:
Note! The wiring harness is not only possible, but also necessary to be routed into the space under the hood. After this, decide on the place where the breaker relay will be attached:. After this, decide on the place where the breaker relay will be attached:
After this, decide on the place where the breaker relay will be attached:
- The wiring from the relay will be led into the cabin through a specially designed technological hole.
- You now need to find out where the button that turns on the fog light will be located in order to find out how to connect it to the standard electrical wiring of the Gazelle.
- We need a relay for the reason that it saves the button - it may not withstand the current consumed by the fog lights. Some are used to connect a 3-position key: 1 wire is stretched to the dimensions circuit, the 2nd to the ignition, and the 3rd to the relay itself. This achieves 3 operating modes.
Light control unit for Gazelle
Installation process
The fact is that the shape of the fog lights is different both in size and shape. Therefore, the connection of fog lights on the Gazelle will be carried out by you based on the dimensions of the selected lighting devices.
And the question after purchasing the set you like is how to install lighting fixtures in places not intended for them. The thing is that companies strive to produce universal lighting devices, while there is no uniform standard among automotive manufacturers.
Bumper mounting methods
The difficulty is that the standard front bumper does not have slots for installing additional lighting fixtures.
Advice! If the second option seems too expensive for you, since price is a decisive factor, then you still have the option of installing fog lights directly on the bumper using homemade fasteners.
Integration into the electrical circuit
Having figured out the mounting location, you have to connect the electrical components into a single circuit and integrate it into the standard one.
- Electrical wiring with connectors for connection to the Gazelle circuit;
- Relay interrupter;
- Power button designed for installation on the instrument panel;
- Instructions for connecting and pinouting terminals.
Advice! If the kit does not include a relay, then purchase one from Gazelle 3302 - this relay is responsible for the operation of the rear foglights.
- We connect the wires to the relay from the headlights;
- We start the wires from the relay through the technological hole into the passenger compartment;
- We determine the installation location of the power button;
- We install it and connect it to the standard Gazelle wiring diagram.
Let's figure out how to connect the wires to the relay. The fact is that the relay itself is required to protect the power button, since it is not designed for the current that powerful fog lights consume.
Having assembled the entire circuit together, check that the wires are connected correctly to the relay installed under the hood:
Expert opinion
It-Technology, Electrical power and electronics specialist
Ask questions to the “Specialist for modernization of energy generation systems”
We install fog lights on the Gazelle on a vertical screen placed 10 m from the car, the vertical axis of the car and two parallel lines are marked, the top distance from the center of the headlights to the surface of the site, the bottom 100 mm. Ask, I'm in touch!
Instructions - how to connect fog lights via a relay and a button using the example of a Chevrolet Niva
As can be seen from the diagram above, to connect the fog lights you will need:
- PTF themselves;
- fog lamp relay;
- headlight on/off button;
- fuse 10 A;
- wires and connecting terminals.
You will also need some tools for the job: screwdrivers, a sharp wire stripper and electrical tape.
- Determine the location of the relay. Since this component is small in size, it can be easily hidden behind the dashboard.
- We determine the location of the PTF on/off button;
- We measure the length of wires required for connection;
- Next, we stretch the copper wire from pin 30 to the battery (+), after installing a 10 Amp fuse in a convenient place;
- We connect the fog lamp button to pin 85 and install it in the selected location. As a rule, the front PTF button is installed in place of the standard buttons, where the plug is located;
- Relay contact 86 is connected to ground in any convenient place;
- We install fog lights. Manufacturers have made sure that those owners who wish to install fog lights do not invent a “bicycle”. The front bumpers of the Chevrolet Niva have special niches for this purpose, which are closed with plugs. In order to remove them, you need to unscrew the screws on the inside of the bumper. We insert the headlights and look at the wire markings.
- We supply the positive wire to them from pin 87, the negative wire from the car body;
- We are testing.
Replacement of rear light glass
The part is replaced in the second year. The rear light glass for the GAZelle is made of high-strength plastic, but it also fails: the surface cracks from vibrations due to leaky installation and damage during driving.
For replacement, an original part is selected that covers all rear light optics: dimensions, stops, turn signals. A total of 4 technical light lamps are installed on the block. During repairs, it is recommended to go through all the electrical wiring: the connectors on the rear lights in the GAZelle oxidize within 6 months, the electrical wiring often breaks due to incorrect connection and installation of the line.
Sequencing
When disassembling the element, the negative terminal from the battery is first removed. The glass is held on the block with 4 screws. The algorithm is as follows:
- Remove the fastening bolts.
- Remove the diffuser.
- Prepare corrugation for packaging the electrical wiring harness.
- Clean the unit and change lamps if necessary.
- Install a new diffuser.
- Screw the glass.
GAZelle drivers note frequent malfunctions of the signal lighting. During factory assembly, the left rear turn signal is powered directly from the front one and they forget to properly hide the wires in the engine compartment, as a result the elements quickly fail.
Adjusting the fog lights
The installation and connection of the fog lights are complete, but that's not all. Now we need to adjust our headlights so that they shine and do not blind oncoming drivers. This is a very responsible and important operation, since both our lives and the lives of oncoming traffic participants depend on it.
You can, of course, turn to a service station for help, but if you have patience, you can do everything yourself. To work, we need a vertical wall and a flat horizontal area in front of it. The dimensions of the site should allow you to park the car at a distance of 10 m from the wall. Take a piece of chalk and make the necessary markings on the wall.
- We draw a vertical line corresponding to the central axis of the machine (line 1 in the figure below).
- We draw two vertical lines that pass through the center of the fog lights (lines 2 and 3 in the figure below).
- Draw a horizontal line H at the height of the centers of the fog lights from the road surface.
- We draw a horizontal line 4 at a height that depends on the distance from the car to the wall and on the installation height of the fog lights. We chose a distance of 10 m. If the headlights are located at a height of 250-500 mm from the road surface, which corresponds to the standard installation height of PTF on a Gazelle, then the height of line 4 will be about 100 mm.
Marking the wall for setting the fog lights
The marking is complete. The remaining operations are carried out in the dark. We place the car at a distance of 10 m from the wall as horizontally as possible and so that its central axial line coincides with the central vertical line on the wall.
We turn on the PTF, cover one headlight with a piece of dense material, and adjust the second so that its light spot coincides with the yellow oval marked in the figure. We change the headlight tilt using the adjusting screw, which is marked with an arrow in the photo below.
We repeat the operation for the other headlight, covering the adjusted one with a cloth. Then we open both headlights and make sure that the light spots with centers A and B are in their place.
That's all, now our Gazelle Business is equipped with a fog light. This will ensure safe driving in any weather for both us and other road users.
Previous Fog lightsHow to install fog lights on a Priora Next Fog lightsHow to install PTF on a VAZ 2114 and change the bulbs in them
Thank you, it helped! It didn’t help
Adjusting headlights on sable
Check and adjust the headlights when the vehicle is equipped (with a fully filled fuel tank, a set of tools and a spare wheel).
You will need a Phillips blade screwdriver.
1. Pre-check and, if necessary, adjust the tire pressure to normal.
2. Place the car perpendicular to a smooth wall (for example, a garage) at a distance of 10 m. Place an additional weight weighing 75 kg on the driver’s seat. Mark the screen on the wall as shown in Fig. 4.10. The longitudinal plane of symmetry of the car should pass along line 0 on the screen. Rock the car sideways so that the suspension springs self-align.
3. Measure the height of the headlight centers to the floor on the vehicle. This will be the distance h on the screen.
4. Set the headlight electric adjustment control on the instrument panel to position “0”, corresponding to the load of a car with one driver or with a driver and a passenger in the front seat.
5. Turn on low beam.
6. It is recommended to adjust the direction of the light spot for each headlight separately. Cover the second headlight with opaque material during adjustment.
7. If the location of the light spots does not correspond to the picture, move the brightest sections of the light beams to the points of intersection of the lines on the screen using adjusting screws 1 and 2 vertically or horizontally, respectively.
Rice. 4.10. Adjusting the headlights.
The photo shows the left headlight. The adjustment screws on the right headlight are located symmetrically.
8. Open the hood and, using a screwdriver, rotate the gears of the adjusting screws to adjust the position of the light spot on the screen for each headlight vertically.
9. . and horizontally, if the location of light spots on the screen does not correspond to the picture.
The rotation of the adjusting screws is shown on the removed headlight for clarity.
In addition to a screwdriver, the vertical adjustment screw can also be rotated with a 10mm wrench.
10. The headlights are considered adjusted when the upper boundaries of the left parts of the light spots coincide with line 4 (see Fig. 4.10), and vertical lines 1 and 2 pass through the intersection points E1 and E2 of the horizontal and inclined sections of the light spots.
If fog lights are installed on the car, then the direction of the beam of their light is adjusted only in height. The adjusting screw with a slot for a Phillips-blade screwdriver is located deep in the hole in the front surface of the fog lamp trim, made next to the lens.
Place the car at a distance of 3 m from the screen and, by rotating the adjusting screws, ensure that the upper boundaries of the light spots are 6 cm below line 4.
Adjusting the direction of beams of light from GAZelle Business headlights.
We adjust the direction of the headlight beams in accordance with the maintenance regulations every 30 thousand km of the vehicle.
The adjustment is carried out on a fully fueled and equipped vehicle, with normal air pressure in the tires. We install the car on a flat horizontal area at a distance of 10 m from the screen (you can use a garage wall, a sheet of plywood or hardboard measuring 1 × 2 m). We draw a horizontal line HH on the screen at a height equal to the distance from the center of the headlights to the floor. Below it, 88 mm (100 mm for 4x4 vehicles), draw a parallel line XX. We draw on the screen the center line VV (the distances from it to the centers of the left and right headlights should be equal) and the lines DD and GG corresponding to the centers of the headlights.
The location of the light beam direction regulators on the headlight housing.
1 – regulator of the light beam in the vertical plane; 2 – screw for adjusting the light beam in the horizontal plane.
Set the headlight range control switch to the “ ” position and turn on the low beam headlights. Cover one of the headlights with opaque material.
By turning the screw, we change the position of the headlight beam in the horizontal plane.
By turning the regulator with a Phillips screwdriver, we change the position of the light beam in the vertical plane.
When adjusting, the upper boundary of the light beam should coincide with the lower horizontal line (see figure), and the point where the beam breaks (the point of intersection of the horizontal and inclined sections of the light beam) should coincide with the vertical line corresponding to the center of the headlight.
Screen markings for adjusting the direction of headlight beams.
a – headlights marked “^L” on the lens; b – headlights with the “OSVAR” marking on the lens.
Similarly, we adjust the direction of the light beam of the other headlight.
Types of fog lights
How far should the fog lights shine? adjusting car fog lights
Based on their shape, Gazelle fog lights are divided into rectangular, square and oval, but the shape of the body does not play a special role and does not give any special advantages to one over the other.
“Fog lights” may differ in optical designs. Thanks to the use of different options, the issue of the optimal ratio of the maximum luminous flux and the minimum power consumed to provide it is resolved to varying degrees.
The most widely used headlights are those with a parabolic reflector. With this scheme, the installation location of the light bulb is aligned with the focal point, which allows the luminous flux to be formed in the form of a horizontal strip. A special screen limits its upward spread. The headlight efficiency is 27%.
Fog lights with a free-form reflector have higher efficiency (up to 45%). The design allows the use of a significant amount of light, providing a maximum area of its distribution. However, headlights with this optical design are expensive and have not yet become widespread.