Change of oil
- engine oil is removed;
- the oil filter is replaced;
- The sealing washer is replaced and the magnet is cleaned. Oil is poured in accordance with the specified values for filling volumes.
Refill capacity
| Engine model | Volume |
| 5 cylinder engine | 30-37 liters |
| 9 liter engine | 23-30 liters |
| 11 liter engine with two valves per cylinder | 23-30 liters |
| 11 and 12 liter engine with four valves per cylinder | 28-35 liters |
| 14 liter engine | 22-30 liters |
| 16 liter engine | 26-32 liters |
Note: It is imperative to check the filled oil level with an oil dipstick - the indicated values are approximate. If necessary, add oil to normal level.
The oil dipstick should move freely along the guide tube, without jamming. To do this, it is installed in the correct position.
Important! The viscosity properties of the oil used must correspond to the ambient temperature ranges expected before the next oil change.
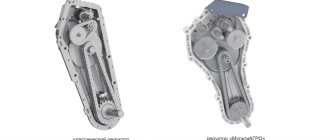
Centrifugal type oil purifier
Cleaning mechanism design
Instructions for the old version of the mechanism design
The design option (new or old) is preliminarily determined and then according to the instructions:
- The fastening nut is unscrewed and the cover is removed, first cleaning it.
- The rotor is removed. Unscrew the rotor nut three turns.
- If difficulties arise, the nut must be clamped in a vice. The rotor must not be clamped in a vice! Manually or using a tool, turn the rotor three turns.
- By lightly tapping the nut (you can tap it with your hand or with a plastic hammer), you can separate the rotor from the base.
- The nut is unscrewed and the rotor housing is removed. Carefully remove the mesh filter from the base.
- The plaque formed on the inner surface of the rotor is removed mechanically. Considering that when the deposit thickness is more than 25 mm, the frequency of maintenance of the centrifugal oil purifier must be increased.
- The removed parts are washed in diesel fuel.
- The condition of the sealing ring is checked - it should not be damaged. The ring is installed in the rotor housing.
- The rotor is being assembled.
- The rotor nut is tightened by hand.
- The rotor is installed in place, and it is checked whether the part rotates easily.
- The condition of the sealing ring of the purifier cover is checked - it should not be damaged. The cover is put in place. The fastening nut is tightened with a force of 10 N∙m.
Instructions for a new version of the mechanism design
First, the design option must be determined and then you must follow the appropriate instructions.
Important! It is necessary to monitor the presence and thickness of deposits formed on the internal surfaces of the oil filter bell. This must be done every time you clean. The absence of plaque indicates that the rotor is not rotating. This sign requires you to immediately determine the cause of the malfunction.
If the coating thickness is more than 28 mm, the maintenance frequency of the centrifugal oil purifier should be increased.
Procedure:
- Remove dirt from the lid. The fastening nut of the casing cover is unscrewed.
- Wait until the oil drains from the rotor.
- The rotor is removed and wiped outside. The rotor bell mounting nut is loosened, then the nut is turned one and a half turns. This is necessary to protect the bearing.
- If difficulties arise with unscrewing the nut, the rotor is turned over and the nut is clamped with a vice. The rotor is turned counterclockwise by hand. If it doesn’t work out manually, then an M20 bolt with two screwed nuts is inserted into the hole and the bolt and rotor are turned using a wrench.
Important! To avoid possible imbalance, do not knock on the rotor bell. Do not clamp the rotor itself with a vice.
- To remove the bell, you need to tap it with the nut on the edge of the working surface. At the same time, hold the bell itself in your hands. Do not knock on the bell - this could damage the bearings.
- Remove the strainer from the bell. If it does not come out, then you need to insert a screwdriver into the gap between the rotor bell and the mesh filter, and then lightly press on the filter.
- Contaminants on the internal surfaces of the rotor bell are removed mechanically.
- The removed parts are washed.
- The nozzles on the rotor are inspected. The two nozzles must not be covered with dirt or damaged. Injectors with defects must be replaced.
- The rotor bearings are inspected for defects.
- Place the mesh filter in place.
- A new sealing ring is installed through the filter.
- The rotor bell is being installed. Check that the O-ring is installed correctly.
- The rotor fastening nut is tightened by hand.
- Check for possible shaft slack in the filter housing. The slack is removed using thread locker 561 200. It is thoroughly cleaned with solvent beforehand. The rotor mount is tightened with a head 99 520 with a force of 34 N∙m.
- After installation in place, the rotation of the rotor is checked. Rotation must be free; the rotor must be rotated manually.
- The round o-ring on the oil filter housing cover is checked - it should not be damaged. The ring is put on and the lock nut is tightened with a force of 15 N∙m.
Checking the operation of the cleaning mechanism
Such a check is required only in cases where deviations from normal operation may occur. One of the reasons for checking may be the absence or small thickness of plaque in comparison with that expected during the actual mileage of the vehicle.
After stopping the internal combustion engine, the rotor must continue to rotate at high speed until it stops after a certain time.
- The engine is warming up.
- Turn off the engine. Listen to the noise produced by the centrifugal oil purifier. With your hand leaning against its cover, determine whether there is vibration from the rotation of the rotor.
- The operation of the cleaner is checked if no signs of rotor rotation are noticeable.
Replacing the oil pump filter element
- The socket 588 475 is used to remove the filter cover.
- When the filter element is removed, the oil will drain from the housing automatically.
- The O-ring on the filter cover is replaced. The new ring is lubricated with engine oil.
Important! To avoid damage to the filter element, lower it into the filter housing only after it has been inserted into the cover.
- After installing the filter element, previously inserted into the cover, in the filter housing, the cover is tightened with a force of 25 N∙m ± 5 N∙m.
Checking the condition of the ridge belt
Important! It is necessary to maintain the initially specified direction of movement of the ribbed (ribbed) belt in case of its removal and further installation.
- After removal, the belt is left on the fan shaft. This makes it easier to maintain the initially set direction of movement when you need to put the belt on the pulleys.
- The belt is carefully inspected.
Small cracks on the working side of the belt are acceptable
If there are deep cracks on the working side of the belt or missing ridge fragments, the belt is replaced.
- The degree of wear of the ridge belt is checked.
Signs of acceptable wear of the serpentine belt - can be used.
The poly V-belt has worn down to the cord and must be replaced.
Checking the ridge belt tension
Automatic ripple belt tensioner
It is not allowed to make changes to the design of the automatic tensioner (tensioner), disassemble it, or attempt to make repairs or adjustments. The tensioner should be replaced if the device no longer provides the required tension on the ridge belt.
The noise level from the belt drive has increased
In this case, it is necessary to check the operation of the tensioner. It must be slowly moved away from the ripple belt until it stops, then also carefully returned to its original position. The operation must be repeated up to three times. Do not allow jerking or jamming in the operation of the tensioner.
Taking measurements
Recommendations for the tension force of rip belts type FO
| New belt | 370 N∙m |
| Belt used | 310 N∙m |
The higher stiffness of new belts means that more tension is required.
Scania diesel engines (Sweden)
Scania is Sweden's largest manufacturer of trucks, buses and diesel engines, exporting them to more than ninety countries around the world. Scania unites several of its divisions, which are engaged in the production of engines, as well as various components and assemblies for them.
Thanks to its basic principle - “Maximum efficiency and productivity”, all manufactured equipment has extremely low fuel consumption, trouble-free operation even under harsh operating conditions, as well as high productivity and environmental friendliness.
Since the performance of any vehicle depends on the quality of the engine, Scania engineers pay special attention to the reliability and technical characteristics of the equipment they develop and manufacture. All diesel engines of the Swedish automaker undergo comprehensive and high-quality testing in the operating modes and under the load for which they are intended and only then are sent to their customers for further assembly. Because Since Scania supplies its products to the world market, its products comply with the uniform environmental standards adopted for the EU countries and Russia, and are adapted for the use of those fuels and lubricants that are used in these countries.
Thanks to all these tests, conditions and quality manufacturing, Scania products have a long service life, low operating costs and long turnaround times.
Adjusting valve clearances and PDE pump injectors (9-liter displacement of a five-cylinder internal combustion engine)
The size of the gaps and installation size
| Installation size and clearances | Size, mm |
| Pump injectors, installation size (on a cold internal combustion engine) | 66,9 ± 0,1 |
| Intake valves | 0,45 |
| Exhaust valves | 0,70 |
Torque table
| Fastener | Force, N∙m |
| Lock nut of the pump injector drive rocker arm adjusting screw | 39 |
| Valve rocker arm adjusting screw locknut | 35 |
Adjustment of clearances on a cold internal combustion engine is carried out in the pump injectors and valve actuators after checking them.
Instructions for operating procedures on a five-cylinder internal combustion engine with a displacement of 9 liters
Before making adjustments, ensure that the valve actuators and unit injectors are in the correct position. For this:
- The 72° mark on the flywheel should be visible in the lower window of the part housing, so the flywheel rotates accordingly. It is necessary to ensure that the valves of the 5th cylinder are in the overlap phase at this moment.
- The flywheel turns until it passes the TDC Down mark (this is 0º). It must pass the indicated mark by 20°. After this, the flywheel is turned counterclockwise so that the TDC Down mark is visible in the lower window of the part casing. Rotating the flywheel clockwise through the TDC Down mark by 20° and reverse rotation are required to fully select the clearances in the timing gear drive.
This crankshaft position corresponds to the stroke in the 1st cylinder. In this position, the valve clearances and pump injector drive are adjusted.
- Using tool 99 309, the flywheel is turned counterclockwise so that the mark on the part is visible in the lower window.
| Mark on flywheel (degrees) | Crankshaft revolution | Adjust the pump injector on the cylinder | Adjust the clearances of the intake and exhaust valves on the cylinder | Valve overlap (cylinder number) |
| EBC Down (BMT down) (0°) | 1 | 2 | 1 | |
| 2 | 1 | |||
| 144 504 | 1 | 4 | 2 | |
| 2 | 2 | |||
| 288 648 | 1 | 5 | 4 | |
| 2 | 4 | |||
| 72 432 | 1 | 5 | ||
| 2 | 3 | 5 | ||
| 216 576 | 1 | 3 | ||
| 2 | 1 | 3 |
View of the flywheel through the lower window in the casing *direction of rotation during adjustment.
The flywheel has marks 240°/600° and 120°/480° - they are needed to adjust the six-cylinder internal combustion engine.
- Before starting work, you must turn the flywheel - the corresponding mark should be visible in the lower window (when adjusting, the marks are read only through the lower window of the flywheel).
- Adjusting device 99 414 is installed on the unit injector.
- Before adjusting the pump injectors, loosen the lock nut and unscrew/tighten adjusting screw 1. The position of the pump injector is considered correct if plunger 2 is flush with the upper flange of the adjusting device. This shelf is flat. Run your finger along the shelf and determine whether the plunger is installed correctly. With an installation dimension of 66.9 ± 0.1 mm, the finger is able to detect a difference of ≥ 1 mm.
- Having completed the adjustment, you need to tighten the locknuts of the adjusting screws with a force of 39 N∙m.
- The device 99 414 is removed.
Important! When installing electrical wires, their terminals must face the required side towards the unit injectors.
- Electrical wire terminals are connected to the unit injectors; their relative position can be ignored. Using a torque screwdriver 588 179, tighten the screws with a force of 2 N∙m.
Important! Using a torque screwdriver 588 179 prevents the screws from being sheared. If this happens, the pump-injector assembly is replaced.
- The excess length of the pump injector wires is adjusted using a clamp - attached to the solenoid valve of the pump injector. After installing the valve cover, the bolts are tightened with a force of 18 N∙m. The bleeder valve closes. After this, the hollow bolt is tightened. Fuel is supplied to the fuel system, fuel is pumped to remove air from the system.
Price
Swedish-made cars are in the middle price sector. The cost of a Scania truck tractor is the result of a complex calculation, when the price of the vehicle is formed from many factors. The real estimate for a tractor with average performance starts at $50 thousand. The upper limit is around 142 thousand in dollar equivalent. Scania tractors, the prices of which are considered quite affordable by fans of good equipment, are sold out without delay.
Adjusting valve clearances (six-cylinder internal combustion engine with a displacement of 9, 11 and 12 l)
Note: To check and adjust, the internal combustion engine must be cold.
Examination
Valve clearance values:
| Engine displacement, l | Gap size, mm |
| 9, 11 (except DC11) | Intake – 0.45 Exhaust – 0.80 |
| DC9, DC11, ICE 12 l | Intake – 0.45 Exhaust – 0.70 |
Ways to adjust gaps
You can use one of the following methods to adjust the gaps.
Method 1
- The required piston is installed at Top Dead Center (TDC - end of compression stroke, TDC mark). The clearances of the intake and exhaust valves are adjusted. Using tool 99 309, the crankshaft is rotated 1/3 of a full revolution, after which it moves to the next cylinder. The valve clearances are adjusted in the order corresponding to the operation of the internal combustion engine cylinders: 1 – 5 – 3 – 6 – 2 – 4.
Method 2
- The piston of the 1st cylinder is installed at Top Dead Center (TDC). The valves are adjusted:
| Cylinder | Valves |
| 1 | Inlet and outlet |
| 2 | Intake |
| 3 | Intake |
| 4 | Intake |
| 5 | Graduation |
- A full rotation of the crankshaft is made. The valves are adjusted:
| Cylinder | Valves |
| 2 | Graduation |
| 3 | Intake |
| 4 | Graduation |
| 5 | Intake |
| 6 | Inlet and outlet |
Model "Scania R420"
There are quite a lot of modifications in the line of trucks of the Swedish manufacturer. The most popular Scania truck tractors are the R420 and G380 models.
The R420 model is rational, economical and affordable. The curb weight of the tractor is 7140 kg, the maximum length is 16.6 meters. The width of the road train is 2.55 meters, the height at the top of the cabin is 2.24 meters, the wheelbase is 3550 mm. The tractor tires are an impressive size - 315/70 R22.5. The fuel tank with a capacity of 600 liters is located on the left side.
The power plant of the R420 model is a six-cylinder turbodiesel with a displacement of 12 liters. Engine power - 420 hp. s., torque - 2100 Nm, rotation 1350 rpm. Fuel consumption is about 40 liters in city mode and 23 liters outside the city. Maximum speed is about 90 km/h.
The car is equipped with a 12-speed manual transmission. The clutch is only depressed when starting off in first gear. The modern R420 is equipped with disc brakes.
Adjusting valve clearances in internal combustion engines with a displacement of 14 and 16 liters
Note: To check and adjust, the internal combustion engine must be cold.
Examination
Valve clearance values:
| Engine displacement, l | Gap size, mm |
| 14 | Intake – 0.45 Exhaust – 0.80 |
| 16 | Intake – 0.45 Exhaust – 0.70 |
ICE with a displacement of 14 liters
To adjust the gaps, use one of the methods below.
Method 1
- The piston of the 1st cylinder is installed at Top Dead Center (TDC - end of the compression stroke, TDC mark).
- The clearances of the intake and exhaust valves are adjusted.
- Using tool 99 309, the crankshaft rotates 1/4 of a full revolution, after which you can move on to the next cylinder.
- The valve clearances are adjusted in the order corresponding to the operation of the internal combustion engine cylinders: 1 – 5 – 4 – 2 – 6 – 3 – 7 – 8.
Method 2
- The crankshaft is turned in the direction of rotation so that the piston of the 1st cylinder is at the 20° position after passing the TDC (Top Dead Center) mark. On the flywheel this position is marked ┴.
- The valves are adjusted:
| Cylinder/Row | Valves |
| 1/Right | Inlet and outlet |
| 2/Right | Graduation |
| 4/Right | Graduation |
| 5/Left | Inlet and outlet |
| 7/Left | Intake |
| 8/Left | Intake |
- One full revolution of the crankshaft is made in the direction of rotation. The piston of the 1st cylinder is set at the 20° position after passing the TDC (Top Dead Center) mark on the intake stroke.
- The valves are adjusted:
| Cylinder/Row | Valves |
| 2/Right | Intake |
| 3/Right | Inlet and outlet |
| 4/Right | Intake |
| 6/Left | Inlet and outlet |
| 7/Left | Graduation |
| 8/Left | Graduation |
ICE with a displacement of 16 liters
The crankshaft is rotated using tool 99 309, and adjustments are made using the corresponding mark. The mark should be visible in the lower window of the casing:
| Marker, degree indicator | Cylinder No. – valve overlap | Adjusting the intake valves on the cylinder | Adjusting the exhaust valves on the cylinder |
| 0º, compression | 6 | 7, 8 | 4, 5 |
| 180º, inlet | 7 | 1, 5 | 2, 6 |
| 360º, compression | 1 | 2, 4 | 3, 7 |
| 540º, intake | 4 | 3, 6 | 1, 8 |
Recommendation: in order to simplify control over the valve adjustment, mark the valve rocker arms after completing their adjustment.
After completing the adjustment work, the locknuts of the adjusting screws are tightened with a force of 35 N∙m.
Model "Scania R340"
This modification of the Swedish-made truck tractor has established itself as a hardy stayer, capable of covering long distances.
It differs from other models in its fully air suspension, low frame and, accordingly, low saddle.
The machine is equipped with a valve for adjusting the braking forces on the rear wheels depending on the load of the rear axles, a pneumatic dual-circuit braking system, an air dryer, and a parking brake acting on all wheels.
The Scania DS11 340 engine is a four-stroke, six-cylinder in-line, direct injection, turbocharged and cyclic air cooling. Volume 11 liters, power - 340 hp. With. when rotating 1400 rpm.
PDE Scania pump injectors (number of cylinders – 6 or
Spring thrust washer. Checking and adjusting the height
Note: To check and adjust, the internal combustion engine must be cold.
- Contaminants are removed from the valve cover and adjacent surfaces.
- The cover is removed.
- The crankshaft is rotated using tool 99 309. The adjustment is carried out, focusing on the corresponding mark, which is visible in the lower window. When adjusting, the marks are read only through the lower window of the flywheel. Before starting work, you need to turn the handwheel - the corresponding mark should be visible in the lower window.
6 cylinder engine
| Mark on flywheel (degrees) | Valve overlap (cylinder number) | Adjust the pump injector on the cylinder |
| TDC Down 0˚ Valve 2, 5, 120° | 1 5 | 2 4 |
| Valve 3, 4, 240° TDC Down 0˚ | 3 6 | 1 5 |
| Valve 2, 5, 120° Valve 3, 4, 240° | 2 4 | 3 6 |
8 cylinder engine
| Mark on flywheel (degrees) | Valve overlap (cylinder number) | Adjust the pump injector on the cylinder |
| TDC Down 0˚ TDC Up 180˚ | 6 7 | 4 and 5 2 and 6 |
| TDC Down 360˚ TDC Up 540˚ | 1 4 | 3 and 7 1 and 8 |
- Adjusting device 99 414 is installed on the unit injector.
- Before adjusting the pump injector, the lock nut is loosened and adjusting screw 1 is unscrewed/tightened. The correct position of the pump injector plunger 2 is considered to be flush with the upper flange of the adjusting device. This shelf is flat. Run your finger along the shelf and determine whether the plunger is installed correctly. With an installation dimension of 66.9 ± 0.1 mm, the finger is able to detect a difference of ≥ 1 mm.
- The adjustment is completed, the locknut of the adjusting screw is tightened with a force of 39 N∙m.
- The device 99 414 is removed.
Model "Scania G380"
Repeats the main technical parameters of the R340 version, but differs in a technologically advanced cabin with a high level of comfort and a more powerful engine.
The all-metal cabin is equipped with two sleeping modules. The doors have electric windows. The roof is equipped with a wide hatch made of translucent glass. The recreation area is fenced off with a mosquito net. The cabin is equipped with an efficient autonomous heater, which turns on when parked when the engine is turned off and maintains the temperature within 20-23 degrees Celsius.
The steering mechanism is equipped with a hydraulic booster of the latest model, the column changes its angle and extends upward by 6 centimeters. Is the driver's seat on air suspension? with height and backrest tilt adjustment.
The wide instrument panel is equipped with an on-board computer; from the cockpit you can adjust the headlights, change the angle and intensity of the lighting.
Maintenance of Scania HPI unit injectors
Note: To check and adjust, the internal combustion engine must be cold.
Adjusting unit injectors (preload OBL)
Work on adjusting the pump injectors is carried out together with work on checking and adjusting the valves.
- Contaminants are removed from the valve cover and adjacent surfaces.
- The cover is removed.
- The crankshaft is rotated using tool 99 309. The adjustment is carried out by focusing on the corresponding mark, which is visible in the lower window. When adjusting, the marks are read only through the lower window of the flywheel. Before starting work, turn the handwheel - the corresponding mark should be visible in the lower window.
- The adjusting screw and locknut are loosened.
- The adjusting screw is lubricated and then tightened with a force of 6 N∙m. An additional tightening is done with a rotation of 60°. The force for tightening the locknut is 39 N∙m.
| Marker, degree indicator | Cylinder No. – valve overlap | Adjusting unit injectors (preload OBL) |
| 0º, compression 120º/480º | 6 2 | 4 1 |
| 240º/600º 360º, compression | 4 1 | 5 3 |
| 120º/480º 240º/600º | 5 3 | 6 2 |
"Scania": tractor. Specifications, reviews, customer opinions
The advantages of Swedish-made trucks are obvious. All Scania truck tractors are united by one common feature - a powerful engine. The engine thrust of the Swedish heavy truck varies from 280 to 500 horsepower with a relatively low torque. And here the point is not even in the number of newtonometers, but in the jeweler’s precision in the selection of transmission gear ratios and the parameters of hypoid planetary mechanisms. Accurate calculation helps optimize technical characteristics, and ultimately the car goes along the highway easily, freely and with the lowest fuel consumption.
Scania tractors, according to buyers, are ideal vehicles for delivering goods to their destination on time and without loss. Owner reviews are favorable. All of them unanimously note the reliability and relatively low operating costs. Car owners believe that if the question arises about purchasing one or more truck transporters, it will definitely be Scania tractors. The technical characteristics of the machine, which are constantly being improved, encourage such a choice.
Air purifier
The air entering the air purifier is cleaned of dust particles using a paper filter element. Air enters through the side opening, then the air passes through the filter element and is directed to the inlet of the turbocharger compressor through the upper opening in the housing.
Water that gets into the air cleaner housing along with the air accumulates near the drain valve. The valve is rubber; water is removed from the body at the moment when its pressure on the valve exceeds the pressure of the outside air. The valve opens and water is removed.
The air filter is replaced after dismantling the right section of the bumper. This section is secured with 3 screws. On cars with a steel bumper, replacing the air filter occurs differently.
The air cleaner cover is secured with spring clips.
The housing must be removed and a new filter element installed.
Vacuum indicator
Location of the vacuum indicator:
| Cabin type | Indicator location |
| P/R | On the right side of the cab behind the step guard |
| T | Behind the right service step |
A drop in engine power may be due to insufficient air entering the engine. The reason is severe contamination of the filter. When the driver presses the accelerator pedal in order to compensate for the drop in power, it leads to a decrease in the fuel efficiency of the internal combustion engine. In addition, the soot content in the exhaust gases increases. Another risk is possible turbocharger failure.
The indicator has two windows on its body. A smaller window may change color. This is a signal that the filter element needs to be replaced. The second window, which is larger in size, has a scale by which you can determine the amount of vacuum. The filter element must be replaced when the vacuum value is ≥ 5.0 kPa.