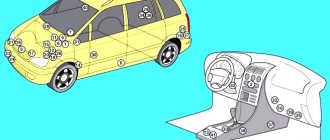
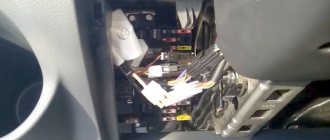
In the event of a vehicle electrical equipment failure, it is first necessary to check the fuses that service this equipment.
Fuses and fuses in Mitsubishi 1 (from 2008) are located in three zones:
- under the tidy;
- in the engine compartment;
- to battery + terminal.
The covers have pictograms and fuse labels. They can be done in different languages.
Replacement of faulty fuses is carried out using special tweezers.
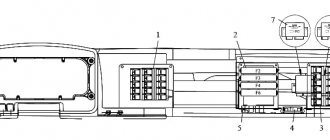
Cabin fuses
They are located under the decorative cover on the dashboard. It can be easily removed without special tools.
Fig.1
Fig.2
Access to the fuses is normal.
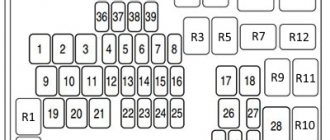
Explanation for Figure 2
| Purpose | Position number | Denomination |
| Stove engine | 1 | 30A |
| Feet | 2 | 15A |
| Rear fog lights | 3 | 10A |
| Wipers | 4 | 30A |
| Additional devices | 5 | 10A |
| Central lock | 6 | 20A |
| Radio tape recorder | 7 | 15A |
| ECU main relay | 8 | 7.5A |
| Interior lighting | 9 | 15A |
| Emergency crew | 10 | 15A |
| Rear wipers | 11 | 15A |
| Dashboard | 12 | 7.5A |
| Cigarette lighter, additional socket | 13 | 15A |
| Start key | 14 | 10A |
| Power sunroof | 15 | 20A |
| Mirrors | 16 | 10A |
| Differential lock | 17 | 10A |
| Reversing light | 18 | 7.5A |
| Additional connector | 19 | 15A |
| Glass control | 20 | 30A |
| Heated rear window | 21 | 30A |
| Heated mirrors | 22 | 7.5A |
| Additional power (antenna amplifier) | 23 | 15A |
| Seat drive | 24 | 25A |
| Heated seats | 25 | 30A |
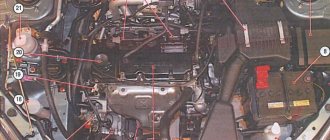
Blocks under the hood
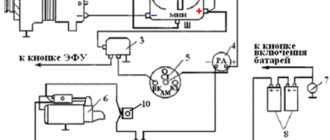
Main block
Installed on the left side of the engine compartment.
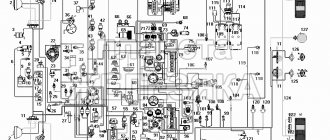
Scheme
Fuse designation
| 1 | 30A Input-output device |
| 2 | 40A Cooling fan motor |
| 3 | 30A Condenser Fan Motor |
| 4 | 30A ABS |
| 5 | 40A ABS |
| 6 | Reserve |
| 7 | 30A Starter |
| 8 | 15A Front fog lights |
| 9 | 7.5 Engine management |
| 10 | 20A automatic transmission |
| 11 | 10A Horn |
| 12 | 7.5A Generator |
| 13 | 20A Headlight washer |
| 14 | 10A Air conditioner |
| 15 | 15A Throttle valve |
| 16 | 20A Anti-theft alarm sound |
| 17 | 15A Wiper blade heater |
| 18 | Reserve |
| 19 | 30A Electric tailgate drive |
| 20 | 10A Outdoor lighting system during daytime |
| 21 | 10A High beam headlight (left) |
| 22 | 10A High beam headlight (right) |
| 23 | 30A Audio Amplifier |
| 24 | 30A Electrical equipment of diesel engine |
| 25 | 20A Left low beam headlight (with gas discharge lamps) |
| 26 | 20A Right low beam headlight (with gas discharge lamps) |
| 27 | 10A Left low beam headlight (with halogen lamps) |
| 28 | 10A Right low beam headlight (with halogen lamps) |
| 29 | 10A Engine electrical power supply circuit |
| 30 | 10A Ignition Coil |
| 31 | 20A Engine electrical power supply circuit |
| 32 | 15A Fuel pump |
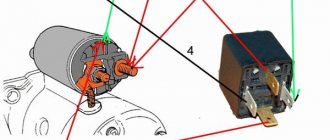
Relay decoding
| R1 | Glow plug relay (for diesel engines) |
| R2 | Radiator Fan Relay |
| R3 | Heater relay |
| R4 | Engine control relay |
| R5 | Stability control relay |
| R6 | A/C Radiator Fan Relay |
| R7 | Engine control relay |
| R8 | Low beam relay |
| R9 | Engine control relay |
| R10 | Wiper Blade Heater Relay |
| R11 | Daytime lighting relay |
| R12 | Engine control relay |
| R13 | Anti-theft horn relay |
| R14 | Automatic transmission relay |
| R15 | Headlight washer relay |
| R16 | High beam relay |
| R17 | Front fog lamp relay |
| R18 | Horn relay |
| R19 | Air conditioner relay |
Relay block
Located next to the main one.
Scheme
Description
- R1 Low speed relay for engine cooling fan
- R2 A/C fan relay
- R3 Engine cooling fan high speed relay
Battery block
At the positive terminal of the battery there is a high power fuse block in the form of fuse links.
Scheme
Purpose
- 33 - 120A Fusible jumper No. 37 / Fusible jumpers No. 34-36
- 34 - 80A Fuses No. 2, 4, 5, 10, 11, 12, 14, 15, 17, 18, 23, 24, 25 and fuse No. 20 in the passenger compartment, and ETACS-ECU
- 35 - 80A Reserve
- 36 - 120A Fuses No. 1-23, 30-32 and fusible links No. 24-29 in the engine compartment, engine control relay, headlight relay (high beam) and headlight relay (low beam)
- 37 - 80A Fuse links No. 1 and 21, fuses No. 3, 6, 13, 16, 19, 22 in the passenger compartment, fan relay and ETACS-ECU
If you have any questions, write them in the comments.
General recommendations for troubleshooting faults related to blown fuses
- If several Lancer 10 electrical equipment systems fail, then most likely one of the fuses installed on the positive terminal of the battery or in the engine compartment unit has failed.
- If the engine fails to start, the fuses labeled ECU should be checked.
- Checking the fuses should be done with a multimeter turned on in the “dial” mode (buzzer). The fuse must be removed from its original location. The visual inspection method should not be trusted. As a last resort, you can swap fuses of the same color (value). You cannot remove several fuses for testing at the same time.
It is allowed to increase the value of the cigarette lighter fuse when powering auto gadgets to 25 Amperes.
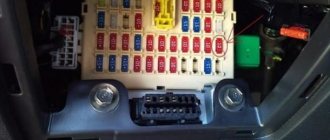
Car salon
To gain access to the fuse mounting block located in the passenger compartment, remove the cover, overcoming the elastic resistance of the latches.
| Purpose of fuses in the block located in the interior of the Mitsubishi Lancer | |
| Protected circuit | Current, A |
| Heater (Fuse Link) | |
| Brake lights | |
| Rear fog light | |
| Windshield wiper | |
| Accessory circuits | |
| Electric door locks | |
| Audio system | |
| Control unit relay | |
| Interior lighting lamps (plafonds) | |
| Hazard warning lights | |
| Rear window wiper | |
| Instrumentation | |
| Cigarette Lighter Fuse/Power Socket | |
| Egnition lock | |
| Luke | |
| Exterior mirrors | |
| All-wheel drive system | |
| Reversing lights | |
| Power outlet | |
| Electric windows (Fuse link) | |
| Heated rear window (Fuse link) | |
| Heated exterior mirrors | |
| AC power supply | |
| Electric seats | |
| Seat heating | |
| Relay | |
| A | Optional equipment |
| B | Heater fan relay |
| C | seat heating |
| D | heated rear window |
Changing the fuel filter in Mitsubishi Lancer
Often, many car enthusiasts forget to replace the fuel filter on time. This can lead to various malfunctions in the fuel system, and subsequently to interruptions in engine operation and its complete stop.
According to instructions from the Mitsubishi car manufacturer, the fuel filter for Lancer 9, Lancer 10 and Lancer X should be replaced after 120 thousand kilometers. However, there is one significant point that darkens this rosy picture completely - this is the low quality of our fuel.
Much to our chagrin, in our country not a single person is immune from gasoline with various impurities, dirt, metal particles, squeaks and other elements that can harm various systems of your car.
According to Russian standards, the allowed content of impurities in fuel is from 100 to 450 grams per 1 ton.
However, research work has demonstrated that over 5 thousand kilometers, the filter has the ability to accumulate about 50 grams of dirt. In accordance with this, replacement must be carried out much earlier than the mileage of your car approaches 120 thousand kilometers. The main signs with the appearance of which it is necessary to replace the Lancer fuel barrier (9,10, X):
- the engine does not start the first time;
- the car's power has decreased;
- in case of sudden acceleration, the engine stalls;
- uneven operation at idle.
But here you need to be careful, since the fuel pump and the dirty air filter of your Lancer may show similar signs. If you notice that fuel consumption has increased and black smoke is coming out of the exhaust pipe, this means that the air filter is faulty.
In all other cases, the issue will be in the fuel filter. To change it, you must first purchase it. Here a lot depends on the state of your finances, since the official filter is very expensive.
But you shouldn’t be upset and you can get by just fine by purchasing a Chinese-made part, which is almost ten times cheaper.
New fuel filter
In order to save on filter replacement services, this work can be done independently. If you carefully read the instructions, it will take you no more than 30 minutes. Let’s say right away that the work on replacing the fuel purification barrier for the Lancer 9, Lancer 10 and Lancer X models is almost identical, so let’s look at everything using one example.
Before starting work, it is necessary to reduce the pressure in the system in advance. To do this, you need to stop the engine and let the car sit for several hours. This is in principle optional, but it won’t be superfluous. It is better when there is as little gasoline in the tank as possible, and ideally no more than a quarter. The car must be set to the handbrake and set to neutral speed.
Step-by-step replacement instructions
We remove the back seat. To do this, you need to pull it up from both sides, tearing it off its seats. Rear seat with sound insulation
We remove sound insulation. Four screws that need to be unscrewed
Unscrew the four screws. The fuel tank may be covered in dirt or debris. Be sure to clean everything with a brush and rag. This is necessary so that debris does not accidentally end up in the tank. Debris in the fuel tank
After completing the cleaning, remove the fuel supply and return hoses. Unscrew the six nuts
Here you need to act very carefully, since during the operation of the car they may well become stuck and unscrew along with the stud. To prevent this from happening, you need to spray them with WD-40.
The place where the filter was located
Remove the pressure plate. Remove the filter. Fuel filter
Let's take it apart. We change the fine filter, and, on the contrary, just clean the coarse filter. Fuel filter disassembled
We assemble everything in reverse order.
As you can see, there is nothing complicated in replacing the Lancer fuel cleaning element (9, 10, X). Any car enthusiast can do it without spending money on the services of a mechanic.
Payment via WebMoney
After selecting payment via WebMoney, the payment system will launch, where you need to select the payment method: bank card or WebMoney wallet.
If you already have a WebMoney wallet, then you need to log into it and make a payment.
If you do not have a WebMoney wallet and you want to pay in another way, you need to select any of the methods that WebMoney offers and make the payment
After specifying payment details and confirming payment, payment for the goods will occur.
Consumer table
| Consumer power supply circuit | Classification | Current, A | Color | Load circuit | |
| 1 | Jumper No. 37 | Fuse link | 30 | Pink | Heater |
| 2 | Jumper No. 34 | Fuse | 15 | Blue | Brake lights |
| 3 | Jumper No. 37 | 10 | Red | Rear fog light | |
| 4 | ETACS-ECU" | 30 | Green | Windshield wiper | |
| 5 | Jumper No. 34 | 10 | Red | Accessory circuits | |
| 6 | Jumper No. 37 | 20 | Yellow | Electric door locks | |
| 7 | Jumper No. 30 | 15 | Blue | Audio system | |
| 8 | 7,5 | Brown | Control unit relay | ||
| 9 | 15 | Blue | Interior lighting lamps (plafonds) | ||
| 10 | Jumper No. 34 | 15 | Blue | Hazard warning lights | |
| 11 | ETACS-ECU | 15 | Blue | Rear window wiper | |
| 12 | ETACS-ECU | 7,5 | Brown | Instrumentation | |
| 13 | ETACS-ECU | 15 | Blue | cigarette lighter fuse Mitsubishi Lancer 10 power socket | |
| 14 | ETACS-ECU | 10 | Red | Egnition lock | |
| 15 | 20 | Yellow | Luke | ||
| 16 | ETACS-ECU | 10 | Red | Exterior mirrors | |
| 17 | Jumper No. 34 | 10 | Red | All-wheel drive system | |
| 18 | ETACS-ECU | 7,5 | Brown | Rear code lights | |
| 19 | Jumper No. 37 | 15 | Blue | Power outlet | |
| 20 | Jumper No. 34 | Fuse link | 30 | Pink | Electric windows |
| 21 | Jumper No. 37 | 30 | Pink | Heated rear window | |
| 22 | ETACS-ECU | Fuse | 7,5 | Brown | Heated exterior mirrors |
| 23 | Jumper No. 34 | 15 | Blue | AC power supply | |
| 24 | 25(20) | White yellow) | Electric seats | ||
| 25 | 30 | Green | None There are two mounting blocks of fuses, relays and fuse links in the engine compartment. |
Causes of the problem
The fuel system is a very “sensitive” element of a car, akin to the human circulatory system, consisting of many parts designed to ensure a reliable and timely supply of fuel to the car’s engine. And if any even minor problems arise, a whole series of malfunctions can occur that can cause a lot of trouble to the car owner.
The most common reason is poor quality fuel. Yes, it is this that can most quickly damage the fuel system. Low-quality fuel contains a large number of harmful additives.
Very often, unscrupulous fuel suppliers use low-quality gasoline, for example, AI-92 class, add harmful additives to it and sell it as AI-95. The additives contained in this fuel are detrimental to the fuel system. The injectors, fuel pump and filter wear out much faster than they should.
Another reason for poor fuel system performance is dirt (sand suspension, etc.) getting into the fuel tank. Large objects cannot get there due to a specially installed filter, but small ones can easily.
Design
The appearance of the car really turned out to be bright. And if the “nine” was boring in many ways, then this generation will not leave anyone indifferent. The car looks good primarily due to its shark silhouette and wide radiator grille. In the new generation, the Japanese have redesigned almost all parts of the body. Thus, the optics, hood, geometry of the bumper, rear lights and even the side line were changed. Mitsubishi Lancer 10 is not at all similar to its predecessor. The car comes standard with 16-inch spoked wheels. But many people do tuning. Mitsubishi Lancer 10 looks great with wheels from Evolution, as well as various plastic body kits. And although the car comes from the factory with decorative overlays, the owners glue an additional “lip” to the bumper (a la the budget “Evik”). This gives the car even more aggression and sportiness. Unlike the Nine, the Mitsubishi Lancer 10 is very easy to tune. It is impossible to go unnoticed with this car. The Japanese created too vivid an image.
A distinctive feature of the tenth generation is the high spoiler on the trunk lid. But it is not available in all trim levels. With it, the image of the car is more harmonious and complete. Spoilers from the sports version of the Mitsubishi Lancer Evolution also fit here.
What do owner reviews say about the body and paintwork of the Japanese car Mitsubishi Lancer 10? The metal on this sedan is thinner than on the Nine. However, rust does not form for a long time. Over five to seven years of operation, barely noticeable “spiders” may appear in the trunk lid area. And that’s because it’s constantly humid in this place. But the paintwork leaves much to be desired. The front gets chipped quickly. Yes, the metal does not rust. But who needs a car with such paint flaws? Therefore, it makes sense to “roll up” the car in transparent armored film, at least from the front. This way you can really preserve the original appearance of the paintwork.
How to Remove the Lancer Cigarette Lighter Driving Tips and Reviews
Mitsubishi Lancer FAQ
Replacing the fuse in the cigarette lighter
If your cigarette lighter does not work, first check the 15A fuse in the passenger compartment. If it is intact, but the cigarette lighter still does not work, then most likely the fuse located in the cigarette lighter itself has failed and needs to be replaced.
Please note that a tin wire is used as a fuse in the cigarette lighter, which is designed for a certain load, above which the fuse must melt, thereby breaking the circuit. If you install a regular metal nail, aluminum or copper wire instead of a tin wire, then your new fuse will not work at the right time, and this can lead to a fire in the wiring.
Therefore, be careful and careful!
The following tools and materials were required for the work:
- wire cutters;
- a piece of tin wire with a suitable cross-section (please indicate in the comments the diameter of the original wire, measuring it with a caliper, after which you can determine its cross-section).
- flat screwdriver;
- 7mm head.
Repairing the cigarette lighter on a Mitsubishi Lancer 9, do it yourself.
I'm in May be useful: Do-it-yourself minor repairs. Cigarette lighter repair on Mitsubishi...
Let's start replacing the fuse in the cigarette lighter
1. Pull out the trim, to do this we pull out the ashtray and pull out first one side then the other using the inner edges of the hole (marked the edges)
2. Disconnect the wires from the cigarette lighter
Wire 1 can be disconnected simply and freely.
Wire 2 is removed by twisting (like a marker lamp), i.e. turned it half a turn and pulled it out.
Wire 3 turned out to be the most difficult, it is difficult to get to it and it just doesn’t leave the contact; on the fastener there is a small button, when pressed, the wire will come off.
There is also a 4th wire, this is the one that goes to the ashtray illumination, it is unscrewed in the same way as the 2nd wire.
3. After disconnecting, you can unscrew the manual transmission knob, or you can unscrew the socket itself (I don’t know how). So I just unscrewed the handle and removed the cover along with the socket
4. We turn it over and see the nut number 7, unscrewing which we remove two plates, the contacts of which are connected by a small tin wire, attached by a plastic black platform, then simply using wire cutters we unbend the contacts and pull out the old wire, you can just barbarically bite the wires and pull out the rest, then for simplicity Use a screwdriver to disconnect the front plastic and plates. And so, we bend the contacts wider with pliers, cut off a new wire, in this case also tin, and press everything as it was, put it in the reverse order.
Point 4 is described, without a photo, but when you analyze it you will see and understand everything for yourself, there is nothing complicated.
The report used materials from the author “BlackSTW”, for which many thanks to him!
Payment via PayPal
After selecting payment via PayPal, the PayPal payment system will launch, where you need to select the payment method: bank card or PayPal account.
If you already have a PayPal account, then you need to log into it and make a payment.
If you do not have a PayPal account and you want to pay using a bank card via PayPal, you need to click on the “Create an Account” button - shown with an arrow in the picture.
PayPal will then prompt you to select your country and provide your credit card information.
After specifying the information required to make the payment, you must click on the “Pay Now” button.
Downloading a book
After successfully completing the payment (by any method) and returning to the KrutilVertel store from the payment system website, you will be taken to the successful payment page:
On this page you need to indicate your e-mail, where access to download the book will be sent.
If you are already registered on our website, then simply follow the link to your personal account.
The book you purchased will be in your personal account, from where you can always download it.
Please note that after making the payment, you need to return back from the payment system website to the KrutilVertel website.
If for some reason you did not return back to the site and closed the payment system tab with a message about the successful completion of the payment, please let us know - we will send you a letter indicating access to download the book.
Payment via Portmone
After selecting payment through Portmone, the payment system will launch, where you need to select the payment method: bank card or Portmone account.
The price in the Portmone payment system is converted into dollars at the exchange rate of the Central Bank of the country where you are located.
If you have a bank card in a currency other than the dollar, then the money will be debited from the card at the rate of the Central Bank of your country at the time of the purchase.
After specifying payment details and confirming payment, payment for the goods will occur.
This is interesting: Replacing an automatic transmission on a Chevrolet Cruze: repairing a tube and filter
Payment via Yandex Cashier
After selecting payment via Yandex, the Yandex Cashier payment system will launch, where you need to select a convenient payment method (bank card, QIWI, Yandex Money account, etc.)
After specifying payment details and confirming payment, payment for the goods will occur.
If you have a bank card in a currency other than the ruble, then the money will be debited from the card at the rate of the Central Bank of Russia at the time of the purchase.
This payment method is optimal for residents of Russia, Kazakhstan and Belarus.
Technical characteristics of Mitsubishi Lancer
As for the technical characteristics of 10th generation Lancer gasoline engines. In our country, the manufacturer offers a 1.6-liter inline 4-cylinder, 16-valve unit with a power of 117 hp as the base engine. The maximum torque is 154 Nm, which is not small. Transmission options in combination with this engine include a 4-speed automatic transmission or a 5-speed manual transmission. Acceleration to the first hundred with an automatic and manual transmission is 10.8 and 14.1 seconds, respectively. Maximum speed 190 (manual transmission) and 180 (automatic transmission) km/h. As for average fuel consumption, the manufacturer indicates 6.1 liters for manuals and 7.1 for automatics.
The more powerful Mitsubishi Lancer X engine with a displacement of 1.8 liters is the same in-line 4-cylinder, 16-valve petrol engine with proprietary MIVEC injection. This unit already produces 140 hp. at 178 Nm of torque. Everything is combined with the same 5-speed manual transmission or a continuously variable CVT transmission. Dynamic characteristics with a manual transmission are not much better; acceleration to a stop occurs in 10 seconds, versus 10.8 seconds. with 1.6 l engine. However, the maximum speed is already 202 km/h. As for fuel consumption, it is noticeably higher than that of the base engine and amounts to 7.5 liters in the combined cycle. The CVT variator also does not spoil the economy with the 1.8 engine. The Lancer consumes 7.8 liters in mixed mode, and in the city in general almost 11 liters. If you consider that in practice the consumption will be even higher, then it’s worth considering whether you need such a motor under the hood.
By the way, the 10th generation Lancer power units consume only AI-95 gasoline as fuel. Below are detailed overall dimensions of the Mitsubishi Lancer
, ground clearance, weight, volumes and other useful technical information about the sedan.
Dimensions, weight, volumes, ground clearance of Mitsubishi Lancer X
- Length – 4570 mm
- Width – 1760 mm
- Height – 1505 mm
- Curb weight – from 1265 kg
- Gross weight – from 1750 kg
- Base, distance between front and rear axle – 2636 mm
- Front and rear wheel track – 1530/1530 mm, respectively
- Trunk volume – 315 liters
- Fuel tank volume – 59 liters
- Tire size – 205/60 R16
- Wheel size – 6.5JX16
- Ground clearance or ground clearance of Mitsubishi Lancer - 165 mm
As for the suspension, the Lancer has the traditional MacPherson strut for front-wheel drive models of this class with a stabilizer bar. At the rear, the sedan has a multi-link independent suspension. As for the brakes, there are ventilated disc mechanisms at the front, and disc mechanisms at the rear measuring 15 and 14 inches, respectively.
This is interesting: Mitsubishi Lancer 10 absorber: location and replacement
Design and principle of operation
To find the reason why the cigarette lighter does not work, you need to understand its structure and principle of operation. The small device is made in a plastic case, inside of which there is a metal spiral. The functions of the heating element are performed by nichrome or other material with increased resistivity. The product is connected to the corresponding socket on the dashboard, and the positive contact is connected to the heater.
When heated, the nichrome spiral turns red. The system is equipped with a thermal relay that turns off the power supply when the permissible temperature threshold is exceeded.
The cigarette lighter socket is illuminated, so finding it in poor lighting conditions is quite easy. There is also a 10 A fuse in the socket.
Before turning to specialists with the question of why the cigarette lighter stopped working, you should consider the main reasons for this incident.