Mini tractors with an engine capacity of less than 50 cubic centimeters
Mini tractors with an engine capacity of less than 50 cubic centimeters and an engine power of up to 5.5 liters.
With. are means of small-scale mechanization for gardening use / agricultural machine and tractor units (motorized tools, object position code according to OK 005-93 - 473791). Taking into account their technical characteristics, they are not subject to the requirements for issuing passports for self-propelled vehicles; to operate them, it is not necessary to obtain a tractor driver’s (tractor driver) license. Mini tractors with an engine capacity of less than 50 cm3. are not a vehicle, nor a self-propelled machine, are intended for agricultural work only within the garden plot and cannot be used for transporting people, cargo or equipment on roads. * “Agricultural machine-tractor unit” is a complex that is a combination of a mobile power vehicle with a trailed, semi-trailer or mounted machine (or machines) and is intended for performing technological agricultural operations; — TR TS 10/2011.
*"Motor vehicle" is a vehicle driven by an engine. The term also applies to any tractors and self-propelled machines. — Traffic regulations.
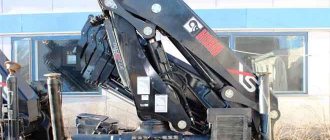
Loader for tractor T-25
Among the important and necessary equipment in agriculture, a loader can be distinguished; its task is to automate various land works. It is easy to use a loader to level earthen piles, remove construction waste, transport various loads and load various products.
You can buy the equipment ready-made or make it yourself; manufacturers offer a more or less adequate price, but not everyone will be happy with it. The only option is to create a homemade loader for the T-25 tractor, which will perform the above functions. If the necessary materials for collection are available, the loader is built at low cost and mounted on the rear suspension. The disadvantages of this invention include:
- possible lack of certain material, which will have to be purchased for a considerable amount. Sometimes it's better to look at used forklifts;
- lack of experience in the manufacture of attachments, you need to be able to work with metal products and carry out proper docking to ensure maximum strength of the future loader.
When you have decided to test your skills and have all the necessary consumables, you can begin making a forklift. The simplest and most popular is a homemade loader on the rear linkage of the T-25 tractor. It can also be installed on the T-40 tractor model.
DIY loader
We have already decided that we will make a loader with a rear suspension, now it is important to create or take ready-made drawings. You can search on the Internet or create it yourself; you will have to clearly calculate all the measurements and proportions. The next step is to acquire the necessary materials. You'll need:
- The basis of the loader is metal sheets and profiles; choose good quality metal and suitable thickness.
- Hinged joints in the shape of a cylinder - dimensions and quantity are selected according to the finished drawing;
- Three hydraulic cylinders, can be taken from the hydraulics of an old tractor or other machine. Two cylinders will tilt the bucket in the specified direction, and the third one will raise the boom.
To work with metal, also make sure you have a good welding machine, a powerful grinder (a metal cutter will do) and small tools - a hammer, pliers, washers, etc.
Assembly steps
Let us divide the entire procedure into several stages, which are performed exactly with the specified data and in sequential order:
Stage 1: Solid foundation. The future loader will work with heavy weight and complex materials, so it is important to create the strongest possible foundation. You can use pipes or metal corners that are welded to form a rectangular shape. The rectangular structure at the bottom will be fixed to the tractor canopy; for full functionality, another pipe is welded to the middle of the frame. Subsequently, a hydraulic cylinder is attached to the pipe. The boom will be installed on top, so you will have to create a spacer under it. You will also need 4 hinges.
Stage 2. When the metal base is ready and you have checked the calculations, the next step is to create the arrow. The arrow is created from the same pipes or angles, which are welded together at an angle of 30 degrees. The upper part of the resulting boom is installed to the base, and a mount for the hydraulic cylinder is also created at the top.
Stage 3. Cylindrical hinges will be installed on the middle part of the boom, so it is important to create 2 segments that will be connected in a movable way. The purpose of such sections is to connect small hydraulic cylinders and crossbars during operation for mounting the bucket. It is also done according to the drawings, with which the described procedure will look simpler.
Stage 4. Creating a bucket. Here we use previously prepared metal sheets, just take 4 small sheets and 1 large one, use a tool to cut out rectangular sheets and weld them together with high quality. Please note that the front bucket should be installed at an angle for more efficient use.
These are the main stages of creating a homemade loader for the T-25 tractor; keep in mind that this tractor model will be able to work with a boom up to 2 meters high. Higher equipment may overturn the tractor.
Front loader for tractor T-25
If we have decided on the procedure for creating a loader to attach the T-25 tractor, it is important to understand that there is also a need to create a front loader. The front loader can be installed if there is a driven front axle on the tractor. Similar to the above option, the first and main stage will be the creation of a drawing. The front of the bucket may be different, so 3-4 sheets of steel are required to make it. The result will be an arched ladle; you can create a rectangular product. As for hydraulic cylinders, in this case you will need 4 pieces. The tool kit is similar to that of a rear-mounted loader.
Assembly steps
Stage 1. In order to provide reliable support for future equipment, first of all, a steel platform is welded in front. Already in the platform itself it will be necessary to make special recesses for future installation of rods.
Stage 2. Similar to the rear loader, a boom is created; you can use steel pipes or profile sections. The angle for the connection remains 30 degrees, but two additional jumpers are welded in the middle and along the edges. This will give the forklift better strength and confidence to handle larger loads.
Stage 3. One vertical support is welded to the contours (two sides) of the boom; the support must have a protrusion. Another spacer needs to be welded directly to the support, that is, on one side it will be attached to the support, on the other to the corner on the central part. This creates a finished structure in the form of a support with an arrow.
Stage 4. We create a bucket according to the instructions described above; for installation, we first make two eyes on the back of the bucket. You will have to attach a boom to the bottom eye; two hydraulic cylinders on one side can be installed on the top one. The second side of the hydraulic cylinders is fixed in the center of the boom.
Stage 4. Fastening large hydraulic cylinders. They need to be installed from the center of the boom to the vertical support, which will ensure correct lifting when the hydraulics operate. The bucket will rise and fall.
The entire resulting structure must be attached to the front linkage of the tractor. The task of the hydraulic cylinders in front is to rotate the bucket during operation, the large hydraulic cylinders at the rear are responsible for bending and extending the boom. If you are guided by the provided photos and the finished drawing, there will be no problems with creating a front or rear loader
Video
What is a recycling fee?
On January 1, 2016, the Federal Law of December 29, 2015 came into force. No. 392-FZ, which amended the wording of Article 24.1 of the Federal Law of June 24, 1998. No. 89-FZ “On production and consumption waste”, which obliges the payment of a recycling fee in the amount of 69,000 rubles for tractors with an engine power of 5.5 liters or more. With. up to 30 l. pp., 86,250 rubles for tractors with an engine power of more than 30 hp. pp., but not more than 60 l. s., and 120,750 rubles for tractors with power from 60 to 90 hp. With. The importing company can pay the recycling fee immediately and include it in the cost of the equipment, or it can provide the choice of whether to pay the end consumer. In any case, payment of this fee ultimately falls on the shoulders of the end consumer.
We, as a retailer, sell equipment directly, and also, if necessary, undertake the obligation to issue a Self-Propelled Vehicle Passport (PSM), subject to a corresponding application from the buyer, and payment by him of the recycling fee in the amount established by current legislation.
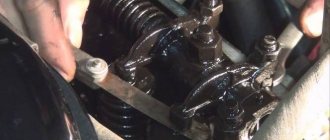
How to make a homemade kun on the T-25
Kun can be classified as one of the main types of tractor equipment, as it is used to perform many tasks. Having made a homemade kun on the T 25, it can be used for leveling the ground, loading various bulk substances into trucks, while saving on the purchase of such a tool.
How to make kun on T-25 at home
Before determining the dimensions of the kun on the T-25 and starting to manufacture it yourself, you need to familiarize yourself with its main advantages. First of all, this is a significant cost savings compared to purchasing a factory-made kuna, which allows farmers to reduce their costs.
In addition, other advantages of a homemade tool should be mentioned:
- versatility. A kun made independently can be used with various models of tractor equipment;
- ubiquitous equipment and tools are used to manufacture the device;
- simple design, easy to maintain and repair.
However, it should be remembered that making kuna yourself has a number of disadvantages, the main one of which seems to be the probable lack of necessary materials from the farmer. This will lead to the fact that due to the purchase of missing blanks and parts, the cost of the product may increase slightly.
Most often, you need to make a rear-mounted coon, which will require the following elements:
- metal profiles, steel sheets;
- hinged-cylindrical elements, which should be selected in accordance with the dimensions of the unit;
- 3 hydraulic cylinders.
You will also need various hand tools, welding equipment, a circular saw or a gas cutting machine. In order to avoid mistakes, it is advisable to adhere to the following procedure:
- Assemble a rectangular kun base using metal pipes. Its rear part is fixed to the attachment, slightly exceeding its boundaries.
- In the middle of the base it is necessary to place another rectangular element made of pipes into which the hydraulic cylinder is mounted.
- In the upper part of such a rectangle there is a spacer and 4 hinges for securing the boom.
- Make an arrow using a metal profile. On top of the assembly you will need to place fasteners for the hydraulic cylinder and base.
- Mount the hinges in the middle part of the tractor.
- Assemble the bucket using a large sheet of steel, as well as 4 smaller pieces. The parts of the bucket are connected to each other by welding.
After successful manufacturing, you need to install the kun on the general structure, which will allow it to be used in the future. In order to avoid mistakes, you can read the special video instructions.
Drawings with dimensions
In order to independently produce a high-quality, reliable and durable structure, the craftsman will need to use the Kuna drawing for T 25. This will ensure that the finished product meets the required dimensions and parameters, which will make it possible to use it together with a tractor.
The kun can be placed in the rear of the unit or the front at the master’s choice. But it must be taken into account that the length of the boom on which it is supposed to be placed should not exceed 2 meters. Otherwise, when operating and loading the bucket, the tractor may overturn.
To successfully make a bucket, the craftsman will need the following components:
- several steel sheets, whose dimensions must correspond to the dimensional parameters of the tractor for which the kun is being made;
- 2 large and 2 small hydraulic cylinders;
- connecting elements - bolts, nuts and others;
- necessary tools.
The last point requires a separate explanation, since to perform most manipulations you will need a grinder, a drill, and a welding machine. In this case, hand tools are also necessary, for example, pliers, screwdrivers and wrenches.
What documents are issued when purchasing a mini-tractor?
Our company is a supplier of agricultural machinery for the end consumer. We purchase mini-tractors directly from the importing company, and provide you with the documents that accompany the equipment directly from the importer.
When purchasing equipment, you receive:
- Contract of sale;
- The act of transfer and acceptance of goods;
- Consignment note;
- Warranty card;
- Operating instructions in Russian.
If necessary, we can provide assistance in obtaining a passport for a self-propelled vehicle at the customs authorities. This requires an application from the buyer and payment of a recycling fee.
What documents are required for an individual to register a new tractor?
To register a mini-tractor, you must bring it to the nearest registration office and provide the following documents:
- Identification documents of the owner (passport). If the registration process is not carried out by the owner of the vehicle, then a notarized power of attorney and a passport of the representative of the owner of the technical device are required.
- Documents confirming ownership of the tractor (purchase and sale agreement);
- OSAGO policy;
- Self-propelled vehicle passport;
- Completed application;
- A document confirming payment of the state fee.
*Requirements may vary by region