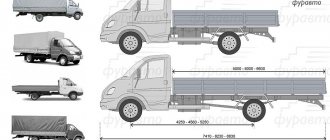
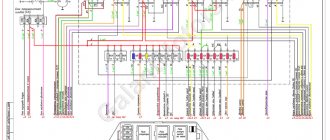
The dimensions of the Gazelle are almost the same for all models. All the differences come down mainly to the switches. On the first models of Gazelles type 3302, switching is carried out by the central light switch. Subsequent models were equipped with lighting control units. The operating principle of these modules boils down to the closure of certain contacts when the control handle is turned. The connection diagram for Gazelle 3321 is somewhat different. They use an intermediate relay to unload the switch contacts. This would not hurt to do business with Gazelles, but the designers considered it unnecessary.
To watch online, click on the video ⤵
Repair of the gazelle instrument panel Read more
gazelle instrument panel Read more
Dashboard 3110 backlight Read more
The dashboard of the Gazelle 2008 is buggy. More details
Replacing light bulbs on the Gazelle dashboard Read more
The devices on the Gazelle 3302 panel were not demonstrated. More details
Gazelle, Sobol, Valdai e-3 e-4 replacing dashboard light bulbs Read more
Do-it-yourself instrument lighting from LED strip on a business-class gazelle Read more
Removal and repair of the Gazelle instrument panel Read more
We restore the illumination of the Gazelle heater unit Read more
Dashboard for gas31105. More details
How to find errors and remove them on ZMZ 406! More details
diagnosis (the process of establishing a diagnosis, that is, a conclusion about the nature of the disease and the patient’s condition)
gazelle business! the check is on! looking for prerequisites))) https://www.arkmebel.ru/ Read more
Tuning the instrument panel – part 5 (colorful lighting and changing the color of the arrows) More details
GAZELLE CABIN FILTER. WHY DOES THE OVEN BLOW BADLY AND HEAT AND DO THE GLASSES SWEAT A LOT Read more
FIERCE HEADLIGHTS for Gazelle for Kopeks Read more
GAZelle REPLACEMENT OF THE NEWEST STANDARD DEVICE Read more
Is the tachometer jumping or the tachometer needle twitching? How to fix it - watch in this video! More details
Chrysler Voyage reason the instrument panel is not working Read more
Source: putinizm.ru
Gazelle dimensions diagram check.
Rear lights do not light up
What to do if the Gazelle’s dimensions do not light up completely, or some individual lamps? Most often, the rear lights on gazelles do not light up. If this happens, then first you need to check the simplest thing, the presence of power in the sockets and the serviceability of the lamps. If there is no plus, you need to check the condition of the contacts in the connector; for on-board gazelles this is the most problematic place.
The fact is that the size wire has constant power while driving, since according to traffic rules, all cars drive with their headlights on. Despite the protective rubber bands, water gets into the connector and, under the influence of electrolysis, the metal of the contacts is destroyed very quickly. This can be determined by the green coating in the connector. On minibuses, the connection is made in the cabin and they are practically indestructible.
But there is one more problem area that is characteristic of absolutely all Gazelles. The fact is that the rear part of the wiring has a connection of wires in the area of branching into the right and left sides. This place is also highly susceptible to electrolysis destruction, since water, getting under the insulation, remains there and constantly affects the wires. But before you go there, check that there is power in the front harness connector and the rear harness connector. These connectors are located in the engine compartment in the area of the vacuum brake booster and are also exposed to liquids.
Dashboards for Gazelle
Is it worth installing the latest Gazelle instrument panel in your car, or is the ancient panel completely suitable for use? The question is quite common, especially among those drivers who have had the opportunity to slightly update their own car. It’s worth installing a new thing, but how much it will cost is another question.
Traditional Gazelle dashboard
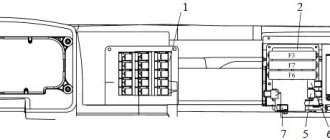
Blocks under the hood
The engine control unit
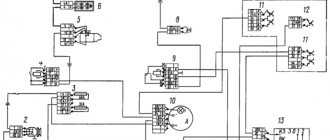
Relay block diagram
Decoding
p, blockquote 13,0,0,0,0 —>
- Fuel pump relay
- Fan clutch relay
- Main relay
The starter relay is mounted on the front panel, next to the vacuum booster.
Fuse box
It is located on the battery mounting bracket, behind the closed cover.
Designation
p, blockquote 18,0,0,0,0 —>
| Fuse box on vehicles with ABS | |
| 1 | 90A UMZ-4216: Generator power circuit (connection of the generator with the battery), starter relay contacts, ignition switch, fuses F9, F10, F18, F21–F24, F26–F28, air conditioner circuit |
| 1 | 125A ISF2.8s4129Р: Air heater |
| 2 | 25A UMZ-4216: ABS control unit |
| 2 | 40A ISF2.8s4129Р: Car light circuit and air conditioner circuit |
| 3 | 40A UMZ-4216: ABS control unit |
| 3 | 30A ISF2.8s4129Р: Engine control unit |
| 4 | 90A UMZ-4216: Low and high beam relay contacts, lighting control unit |
| 4 | 6A F2.8s4129Р: Fuel heater and the general positive circuit of the car, except for the light, positive generator, starter and air conditioner circuits, fuse link |
Fuse box on vehicles without ABS
p, blockquote 19,0,0,0,0 —>
- 90A Light circuit and generator positive circuit
- 60A Common positive circuit of the vehicle, except for the light, generator and starter circuits
Additional fuse box on vehicles with ABS and diesel engine
p, blockquote 20,0,0,0,0 —>
- 40A ABS control unit
- 25A ABS control unit
Under the hood, on the front panel, near the engine control system relay, a 15A fuse is inserted into the KPMSD wiring harness to protect the gas control unit.
Panel purpose
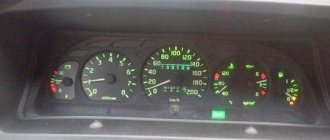
The instrument panel has one function - informational. In a small area in the dashboard of the car there are all the instruments with indicators about the car’s performance, this is both excellent and not very good. While the driver is looking for the indicator, the speed indicator, he is distracted from the road, creating conditions for an emergency situation. However, most Gazelle users over time get used to the external appearance of the panel and intuitively inspect one or another section of it to obtain information.
A regular panel on most modifications of the Gazelle looks like 3-5 round dials surrounded by several alarms. The main sensors - the speedometer and tachometer are huge.
The speedometer is always placed in the center, because it is the main device that the driver focuses on. The top three huge devices most often include the cooling water temperature sensor. Other dials indicate either the amount of gasoline or the battery charge, and, less often, the amount of oil. All the characteristics that the driver needs can also look like warning lights. Their indicators light up occasionally. The devices are located compactly and do not interfere with each other.
The dimensions on one side do not light up.
When the rear lights on a Gazelle don’t work, we figured it out. If the lights on one side do not light up, then you need to check the fuses and replace the blown ones. If the fuse blows again during installation, there is a short circuit in the circuit. To find it, you need to disconnect the connector of the rear and front harness. This will allow you to determine which harness contains the short circuit. You should do the same in order to eliminate short circuits in headlights and rear lights. The specific location can be determined by examining the corresponding harness.
Functional
Everything almost always works properly without the slightest breakdown, but even the newest panel can be improved. Almost everyone doesn’t like the weak instrument lighting, which is virtually useless at night. It is recommended to install LED lighting and diodes inside the devices and around the entire perimeter of the panel for the best visual perception. The newest Gazelle instrument panel has almost 20 indicators that light up when defects appear.
4 of them, which indicate the level of emergency oil pressure, overheating of the cooling water, emergency amount of water in the brakes and the parking brake sensor, may indicate severe damage to the system.
If one of the mentioned indicators lights up together with the “STOP” button, it is recommended not to start driving until the damage has been repaired.
In addition, the dashboard has various alarm signals about the lighting system, brakes and engine condition. The driver has access to the most complete information about all the main components of the car.
Circuits of cars manufactured before 2003, protected by fuses
Electrical circuits protected by fuses
Upper fuse box
Fuse no.
(rated current)
Name of equipment of protected electrical circuits
Heater motor, heater pump*
Additional heater motor*
Instrument cluster, parking brake warning relay, EPH system,
heater control timer**,
reverse light,
microprocessor ignition system fault indicator (ZMZ -4061, - 4063)
Hazard warning lights
lighting fixtures for the right row of seats in the passenger compartment, * buzzer and platform lamp**
Remote battery switch, radio equipment
Windshield wiper and washer motors
Horn, cigarette lighter, portable lamp socket
Lower fuse block
Fuse no.
(rated current)
Name of equipment of protected electrical circuits
Cabin lighting lamp(s**),
cargo compartment lamp (GAZ -2705, -27057)
Instrument lighting, heater - heater
Rear fog light
Likely tasks
Even if you change the panel to a Gazelle, you won’t be able to get rid of all the problems. Quite often problems occur after a replacement. Here are the most common of them:
- individual sensors or the entire panel stops working;
- instrument readings “freeze”;
- The sensors lie, the characteristics are incorrect.
Most drivers panic and then disassemble the panel piece by piece, which only makes things worse. Here are some solutions for most panels:
- The first thing that should be constantly done when there is a problem with such devices is to inspect the wire contacts. A break or breakdown may cause a malfunction. You should also look at the food.
Pinout and composition of devices on the Gazelle panel
Since the electrical system is not improved by replacing the panel, and the devices are the most demanding, problems occur specifically with the electronics. Replacing the wiring and fuses most often solves the problem. In general, reviews about the operation of the instrument panel are laudatory, but on some older car models there are a number of problems that can only be solved by installing original instruments.
The dimensions on one side do not light up.
When the rear lights on a Gazelle don’t work, we figured it out. If the lights on one side do not light up, then you need to check the fuses and replace the blown ones. If the fuse blows again during installation, there is a short circuit in the circuit. To find it, you need to disconnect the connector of the rear and front harness. This will allow you to determine which harness contains the short circuit. You should do the same in order to eliminate short circuits in headlights and rear lights. The specific location can be determined by examining the corresponding harness.
Installing and removing the torpedo
The instrument panel is only part of the euro set for the Gazelle business.
Gazelle instrument panel lighting
In some cases, for example, to repair the heating system, you have to completely dismantle the torpedo. This process is not the most common one, since you need to know which side to approach such an issue.
In fact, the panel can be removed in almost half an hour. To do this you need the following:
Gazelle dimensions diagram check.
Rear lights do not light up
What to do if the Gazelle’s dimensions do not light up completely, or some individual lamps? Most often, the rear lights on gazelles do not light up. If this happens, then first you need to check the simplest thing, the presence of power in the sockets and the serviceability of the lamps. If there is no plus, you need to check the condition of the contacts in the connector; for on-board gazelles this is the most problematic place.
The fact is that the size wire has constant power while driving, since according to traffic rules, all cars drive with their headlights on. Despite the protective rubber bands, water gets into the connector and, under the influence of electrolysis, the metal of the contacts is destroyed very quickly. This can be determined by the green coating in the connector. On minibuses, the connection is made in the cabin and they are practically indestructible.
But there is one more problem area that is characteristic of absolutely all Gazelles. The fact is that the rear part of the wiring has a connection of wires in the area of branching into the right and left sides. This place is also highly susceptible to electrolysis destruction, since water, getting under the insulation, remains there and constantly affects the wires. But before you go there, check that there is power in the front harness connector and the rear harness connector. These connectors are located in the engine compartment in the area of the vacuum brake booster and are also exposed to liquids.
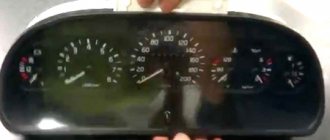
Why do the devices on the Gazelle not work?
The instrument cluster of a Gazelle car can be of two types: old and new, electronic . Like most other cars, it includes four instruments (speedometer, tachometer, coolant temperature indicator, fuel level indicator) and indicator lamps, twelve of them. A printed circuit board is installed on the inside of the case, the leads of which go to two plugs: white (X1) and red (X2).
two options for complete failure of the instrument cluster of a Gazelle car : the first option, when the arrows of all instruments are at zero and do not respond to turning the key in the ignition switch; the second option, when the instrument needles do not lie at zero, but, on the contrary, go off scale. Of course, the ideal option would be to check a non-working instrument cluster on a stand, but this can only be found in a specialized workshop, of which there are not many in the vast territory of Russia.
If the instrument needles are at zero , then what can the driver do in this situation? Most likely, in this case, the contact in the circuit from the battery to terminal “87” of the ignition switch unloading relay is broken. Therefore, he will have to check the safety of the fuses, the condition of the pads included in this electrical circuit and the connection of the instrument cluster to ground. On the white block (X1) of the instrument panel, the ground wire goes to the 1st plug, and on the red block (X2), the ground wire goes to the 3rd plug.
If the above actions did not give any result, then there are again two options: either, you will have to replace the instrument cluster by purchasing a new one; or try to check the printed circuit board yourself for breaks. True, the cost of a new instrument cluster is quite high, more than 10 thousand rubles. So you can try to restore it, although the manufacturer believes that the instrument cluster cannot be repaired. Often peeling of the circuit board tracks occurs due to strong pressure on the connector of the block during their assembly. Therefore, you can try to solder the broken tracks to restore the functionality of the instrument panel.
The reason for the instruments going off scale may be a malfunction of the controller of the Mikas 10.3 electronic control unit; this malfunction more often occurs in the cold season. In this case, it is necessary to carry out diagnostics and erase the error that has arisen by updating the software to a more recent serial version. Also, a similar malfunction may appear after updating the controller firmware.
Source
How to remove a GAZelle Business panel
In order to dismantle the GAZelle Business panel, you need to disassemble this panel. To do this, remove the old shield, disconnect the steering wheel with a special tool, unscrew the decorative trim screws and fastening bolts.
In case of some breakdowns, not only the instrument panel is dismantled, but also the dashboard. Removal of the kit should be done with care to avoid any conflict with the electronics.
The torpedo is attached like this:
- after removing the shield, turn off the interior lighting, rear fog lights, and electric headlight range control;
- unscrew the torso of the air damper and disconnect it from the carburetor;
- turn off the hazard warning lights, cigarette lighter;
- unscrew the fasteners in the amount of 10 pieces and disconnect the air duct hoses from the deflectors;
- remove the damper from the carburetor;
- turn off the air ducts;
- remove the torpedo.
Installation is carried out in reverse order.
Blocks under the hood
The engine control unit
Relay block diagram
Decoding
- Fuel pump relay
- Fan clutch relay
- Main relay
The starter relay is mounted on the front panel, next to the vacuum booster.
Fuse box
It is located on the battery mounting bracket, behind the closed cover.
Scheme
Designation
| Fuse box on vehicles with ABS | |
| 1 | 90A UMZ-4216: Generator power circuit (connection of the generator with the battery), starter relay contacts, ignition switch, fuses F9, F10, F18, F21–F24, F26–F28, air conditioner circuit |
| 1 | 125A ISF2.8s4129Р: Air heater |
| 2 | 25A UMZ-4216: ABS control unit |
| 2 | 40A ISF2.8s4129Р: Car light circuit and air conditioner circuit |
| 3 | 40A UMZ-4216: ABS control unit |
| 3 | 30A ISF2.8s4129Р: Engine control unit |
| 4 | 90A UMZ-4216: Low and high beam relay contacts, lighting control unit |
| 4 | 6A F2.8s4129Р: Fuel heater and the general positive circuit of the car, except for the light, positive generator, starter and air conditioner circuits, fuse link |
Fuse box on vehicles without ABS
- 90A Light circuit and generator positive circuit
- 60A Common positive circuit of the vehicle, except for the light, generator and starter circuits
Additional fuse box on vehicles with ABS and diesel engine
- 40A ABS control unit
- 25A ABS control unit
Under the hood, on the front panel, near the engine control system relay, a 15A fuse is inserted into the KPMSD wiring harness to protect the gas control unit.