Is it worth installing a new Gazelle instrument panel in the car, or is the old panel quite suitable for use? The question is quite common, especially among those drivers who have had the opportunity to slightly update their car. It’s worth installing a new thing, but how much it will cost is another question.
Classic Gazelle dashboard
Panel purpose
The instrument panel performs one function - informational. In a small area in the dashboard of the car, all the instruments with indicators about the car’s performance are located, this is both good and not very good. While the driver is looking for the indicator, the speed indicator, he is distracted from the road, creating conditions for an emergency situation. However, most Gazelle users eventually get used to the appearance of the panel and intuitively examine one or another section of it to obtain information.
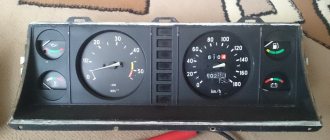
The standard panel on most modifications of the Gazelle looks like 3-5 round dials surrounded by several signaling devices. The main gauges—the speedometer and tachometer—are large.
The speedometer is always located in the center, since it is the main device that the driver focuses on. The three largest devices most often include the coolant temperature sensor. The remaining dials indicate either the amount of gasoline, or the battery charge, and less often, the amount of oil. All the indicators that the driver needs can also look like warning lights. Their indicators light up from time to time. The devices are placed compactly and do not interfere with each other.
Instrument panel, Gazelle: device, principle of operation and reviews
"Gazelle" is a very popular truck in Russia. A lot of vehicles for other purposes are also produced on the basis of the GAZ-3302. This includes both public transport and passenger minibuses.
What do all these models have in common? They are united not only by a common frame structure, but also by a single instrument panel. "Gazelles" of different years of production were equipped with different instrument panels.
Well, let's look at exactly what and what the features of each shield are.
Where is it installed?
Note that the Gazelle instrument panel can be found on other cars. These are Sobol and Volga. The device has the same connection diagram. Externally, these shields look identical.
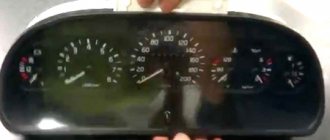
Panel "Euro-2"
This device is also called “Rizhskaya”. It was also installed on the Volga, in particular the 31105 series. This shield has a slightly different design and appearance. It was developed specifically for the new torpedo, with a rounded visor. There are no new sensors here, but the layout of some dials has changed.
The speedometer scale has now become larger in diameter, and the antifreeze temperature and oil pressure sensors are combined into one “well”. The changes also affected the odometer.
If previously the main odometer was designed for a mileage of up to one hundred thousand (after which it was reset), now its limit is one million kilometers.
Of course, few people have seen a Gazelle with similar mileage, but still adding one digit has made some work and maintenance much easier (no need to guess and think about when to replace the chain, or even overhaul the engine).
According to reviews from owners, the new Riga Gazelle instrument panel is much more convenient to use. Also, the tachometer and speedometer needles do not “walk” here. Since 2003, these scales are electrically operated rather than cable operated. The readings have become more accurate.
Appearance of the update
The reason why many drivers install a Gazelle business dashboard is simple - it looks better. The second reason why you should buy this particular panel option is the functionality and increased number of opportunities to monitor the performance of the car.
Design of the Gazelle business instrument panel
The Euro type panel has 2 large dials - speedometer and tachometer, as well as 2 small ones, which display the amount of gasoline and the temperature of the coolant. The rest of the information about the state of the nodes and any errors that have occurred is displayed using illuminated indicators in the middle of the panel. A simpler design significantly relieves the driver’s attention.
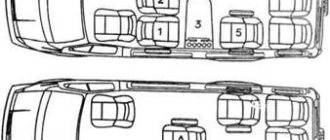
Block in the cabin
It is located under the panel on the left side, behind the protective cover.
Old style block
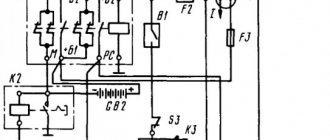
Scheme
Description
Upper block
| 1 | 16A Electric heater motor, electric heating pump (vehicles with two rows of seats) |
| 2 | 8A Reserve for the electric motor of the additional heater (vehicles with two rows of seats), relay for the electric fan of the engine cooling system (installed on parts of vehicles) |
| 3 | 8A Direction indicators |
| 4 | 8A Instrument cluster, parking brake warning lamp switch, EPH system, windshield wiper relay, reverse light, diagnostic warning lamp |
| 5 | 8A Hazard alarm |
| 6 | 8A Buzzer and lamp for onboard platform lighting, brake signal |
| 7 | 8A Radio equipment, remote battery switch, |
| 8 | 8A Electric motors for windshield wiper and washer |
| 9 | 16A Cigarette lighter , horn, portable lamp sockets |
| 10 | 16A Reserve |
Bottom block
| 1 | 16A Fog lights |
| 2 | 8A Cabin lighting lamp(s), cargo compartment lamp (GAZ-2705, -27057), engine compartment lamp, lamps for the left row of passenger compartment seats and footrest lighting |
| 3 | 8A Instrument cluster illumination |
| 4 | 8A Rear fog lights |
| 5 | 8A Right front side light, left rear side light, license plate lights, side light warning lamp |
| 6 | 8A Left front side light, right rear side light, fog light relay |
| 7 | 8A Left headlight (low beam), electric headlight range control |
| 8 | 8A Right headlight (low beam), electric headlight range control |
| 9 | 16A Left headlight (high beam), high beam indicator lamp |
| 10 | 16A Right headlight (high beam) |
Functional
In most cases, everything works properly without the slightest breakdown, but the new panel can still be improved. Many people do not like the dim illumination of devices, which is practically useless at night. It is recommended to install LED lighting and diodes inside the devices and around the entire perimeter of the panel for better visual perception. The new Gazelle instrument panel has almost 20 indicators that light up when a malfunction occurs.
4 of them, which indicate the level of emergency oil pressure, overheating of the coolant, emergency amount of fluid in the brakes and the parking brake sensor, may indicate serious damage to the system.
If one of the mentioned indicators lights up along with the STOP button, it is recommended not to start driving until the damage has been repaired.
In addition, the dashboard has various alarms about the lighting system, brakes and engine status. The driver has access to the most complete information about all the main components of the car.
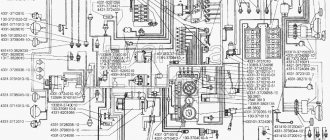
GAZ Gazelle business 4x4 Titan – pinout
1 - not connected 2 - 382.3801 has an open door alarm (may not be present). You can run a wire to the limit switch on the driver's door. 3 - 382.3801 has an oil overheating indicator (may not be present). You can run a wire to the TM-108 overheating sensor, and put the sensor itself into the crankcase. 4 - 385.3801 has an open door alarm (may not have one). You can run a wire to the limit switch on the driver's door. 5 - 382.3801 has a test. If ground is applied to this contact, the indicators for brake fluid level, oil overheating, open doors and coolant overheating light up. Can be connected to a button or relay. In the second case, the relay winding is connected to ground and the wire from the lock to the starter (i.e., when the starter is turned on, the lamps will be tested). 6 - 382.3801 has a seat belt warning indicator (may not be present). 7 - 382.3801 has a fuel reserve indicator. Connect the blue wire with the red stripe. 8 — fuel level indicator. Connect to the pink wire with the red stripe. 9 — oil pressure indicator. At 382.3801, run a wire to the sensor (you need a VAZ-2106 tee) from GAZ under the ZMZ-406 engine. With 385.3801, if you install a sensor, it will squeak about low pressure at idle, so a sensor is not needed, you need to connect the wire from the device to ground through a resistor, select it experimentally. 10 — emergency oil pressure indicator. Connect to the gray wire with a blue stripe. 11 — engine overheat indicator. Can be connected to overheat sensor TM-111-02. The sensor itself must be in contact with the coolant. 12 — coolant temperature indicator. Connect to the green wire with a white stripe. The pointer will exaggerate the readings; you can connect a resistor to the wire gap and select it experimentally. 13 - indicator for closing the carburetor air damper. Connect to the gray wire with an orange stripe if the car is a carb. 14 - for 382.3801 the indicator may be on and will light up when the mass is supplied. 15 - downshift indicator (may not be present), will light up when the mass is supplied. 16 - differential lock indicator (may not be present), will light up when the mass is supplied. 17 - for 382.3801, the seat heating indicator will light up when positive is applied. 18 - rear PTF indicator (may not be present), lights up when positive is applied. 19 — side light indicator. Connect to the yellow wire. 20 — instrument lighting lamps. Connect to the white wire. 21 - 385.3801 has power supply to the meter. Connect to constant power (red-white wire of stop switch). 22 and 23 - right and left turn signal indicators, respectively. You can connect them together and connect to a blue wire with a white stripe (the arrows will light up when the left or right turn signal is turned on), or to the hazard warning switch: blue - right, blue-black - left, insulate the blue wire with a white stripe (each arrow will correspond to the activation of its turn signal). 24 - parking brake indicator. Connect to the brown wire. 25 - high beam headlight indicator. Connect to the green wire with a black stripe. 26 - front PTF indicator (may not be present), lights up when positive is applied. 27 - ABS indicator. When the mass is supplied it will light up. 28 - 385.3801 has a rear window heating indicator. Lights up when positive is applied. 29 — speed signal output to the on-board computer. If it is, then take the speed signal from this contact. 30 - to the vehicle speed sensor. 31 - low brake fluid level indicator. Connect to the pink wire with a blue stripe that goes to the lamp above the cigarette lighter. 32 - power supply for lamps and devices. Connect to the orange wire with the blue stripe. 33 - battery charge indicator. Connect to the brown wire with a white stripe. 34 - mass. Connect to the black wire. Wow, I wrote a lot... 35 — speedometer power supply. Connect to the orange wire. 36 — speedometer mass. Connect to the white wire with a black stripe. 37 - tachometer. Connect to the brown wire with a blue stripe, but if the readings drop, connect to pin 38. 39 - 385.3801 has a low beam indicator (it may not be present), it will light up when positive is applied. 40 - low oil level indicator (may not be present), will light up when the mass is supplied. 41 - if the car is injection, connect to the orange wire too. 42 - if the car is injection, connect to the remaining wire (I don’t know the color) it went to the 8-terminal block on the old device. 43 - brake pad wear indicator (may not be present), will light up when the mass is supplied. 44 - glow plug indicator. 45 and 46 - does not connect. 47 - low coolant level indicator (may not be present), will light up when the mass is supplied. 48 - low washer fluid level indicator (may not be present), will light up when mass is supplied. 49 - low power steering oil level indicator (may not be present), will light up when the mass is supplied. 50 - the indicator for burnt out lamps on 382.3801 or the presence of water in the fuel filter on 385.3801 (may not be present) will light up when the mass is supplied. 51 and 52 - 382.3801 has indicators (may not be present) that will light up when the mass is supplied.
Useful: Cable pinout for professional audio equipment
Possible problems
Even if you change the panel to a Gazelle, you won’t be able to get rid of all the problems. Quite often problems occur after replacement. Here are the most common ones:
- individual sensors or the entire panel stops working;
- instrument readings “freeze”;
- The sensors lie, the indicators are incorrect.
Most drivers panic and then take the panel apart, which only makes things worse. Here are some solutions for most panels:
- The first thing you should always do if such devices malfunction is to check the wire contacts. A break or breakdown can cause a malfunction. You should also inspect the food.
Pinout and instrument cluster on the Gazelle panel
- If everything is in order, but the panel still does not work, the controller is broken. In most cases, it is easier to buy a new panel than to replace the controller.
- Individual sensors may fail due to broken contact. Another reason could be faulty fuses.
- The “Mode” button will help restore instrument performance if a system malfunction occurs.
Installation instructions
For installation, in addition to the GAZ Volga dashboard itself, you will also need car wires and heat shrink. And several terminals for pins XP 1, XP 2, XP 3, XP 4. You can find everything you need at an auto parts store. The part itself must be accompanied by instructions for its assembly.
To replace the old shield with a new one, you should follow these steps.
- First, remove the 4 screws that secure the panel. Also, 6 screws of the column casing, remove it.
- Now unscrew the 4 screws that secure the shield itself.
- After disconnecting the 5 XP connectors, remove the part.
- Now you need to connect the wiring using the instructions for your specific panel model and XP terminals.
- Turn off the ABS and EBD indicators if your car does not have such devices.
- Install in the reverse order of dismantling.
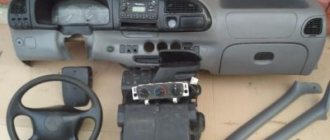
Installing and removing the torpedo
The instrument panel is only part of the euro kit for the Gazelle business.
Illumination of the Gazelle instrument panel
New Gazelle models come out with updated internal contents, including a torpedo in which the panel is located.
Is it possible to install a new torpedo instead of the old one? Many drivers are considering this option, but most do not dare to undertake such a serious interior tuning. Installation of the instrument panel is simple in that almost nothing needs to be completed in the design of the fasteners, and the seat coincides with the dimensions of the panel. The gazelle torpedo differs not only in its fastenings, but also in its shape, which makes it impossible to install it without significant modification of the design. You will have to figure out what to do with the Euro torpedo on your own. In some cases, for example, to repair the heating system, it is necessary to completely dismantle the torpedo. This process is not the easiest, since you need to know from which side to approach such an issue.
In fact, the panel can be removed in just half an hour. To do this you need the following:
- a set of keys;
- screwdrivers;
- assistant.
Let's start disassembling:
- Use a Phillips screwdriver to unscrew the 3 upholstery fasteners.
- Carefully remove all upholstery pads so as not to damage anything.
- We dismantle the steering column with all connections to it.
- We remove the instrument panel by disconnecting all wires.
- Next you will need to turn off the interior lighting and rear fog lights. Then we turn off the electric headlight adjustment.
- We arm ourselves with keys 7 and 8, get to the bolted fastening of the choke cable. Hold it with one key and unscrew it with the other.
- We unscrew the screw of the cable sheath and disconnect the cable from the Gazelle carburetor.
- We turn off the hazard warning lights and cigarette lighter plugs.
- Again, take a screwdriver and tighten 2 screws near the stove control.
- We unscrew all the screw fastenings of the panel, there are 10 of them in total. Lightly pull the panel towards you so that it comes off the installation site. Now you can disconnect the air duct hoses from the deflectors.
- We take out the damper from the carburetor. We remove the panel. We turn off the right and left air ducts of the stove.
- We remove the torpedo. You will need an assistant here, since the torpedo is very heavy.
- We twist the fastenings of the torpedo lining and remove the lining itself.
- Installation is carried out in reverse order.
Dashboard,
"Gazelle" is a very popular truck in Russia. A lot of vehicles for other purposes are also produced on the basis of the GAZ-3302. This includes both public transport and passenger minibuses.
What do all these models have in common? They are united not only by a common frame structure, but also by a single instrument panel. "Gazelles" of different years of production were equipped with different instrument panels.
Well, let's look at exactly what and what the features of each shield are.
Purpose
The function of any “tidy” is informational. This also applies to the Gazelle Business instrument panel. In a small area of the dashboard there are all the necessary indicators, lights and scales. Usually the shield is located behind the steering wheel, in front of the driver’s eyes. But there are also exceptions.
For example, in the UAZ Hunter the panel is located in the center. But we won’t consider the tidy of this car for now. Let's return to our Gazelles. Externally, their panels consist of three to five round dials with several alarm sensors.
In any shield, the main dials are:
They are the largest in size and located in the center. In addition, on the instrument panel (Gazelle old and new) there are a lot of auxiliary elements. These scales inform the driver about:
- The current engine temperature (namely the coolant in the engine jacket).
- Oil pressure in the system.
- Fuel level in the tank.
- Voltage in the on-board network.
If we consider more modern devices, information about the current time will also be shown here.
Note that the Gazelle instrument panel can be found on other cars. These are Sobol and Volga. The device has the same connection diagram. Externally, these shields look identical.
Types
There are several types of these panels:
- Old Euro-1 model. Installed on cars from 1994 to 2002 inclusive.
- Old Euro-2 model. These shields can be found on Gazelles with a new “face” (with teardrop-shaped headlights).
- New sample. They are still installed to this day on Next, starting with Gazelle Business.
Below we will look at the features of each Gazelle instrument panel.
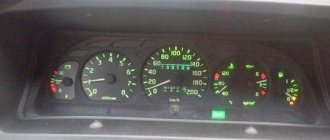
Panel "Euro-1"
This tidy was installed on both “Sable” and “Gazelle” of all modifications. The reader can see what its design is in the photo below.
From a distance, this shield resembles the panel of a Zhiguli-seven. But still, this is an original development. There are no electronic signs here. Only available:
The shield was produced in this form for about eight years. No changes were made during this period.
This device is also called “Rizhskaya”. It was also installed on the Volga, in particular the 31105 series. This shield has a slightly different design and appearance. It was developed specifically for the new torpedo, with a rounded visor. There are no new sensors here, but the layout of some dials has changed.
The speedometer scale has now become larger in diameter, and the antifreeze temperature and oil pressure sensors are combined into one “well”. The changes also affected the odometer.
If previously the main odometer was designed for a mileage of up to one hundred thousand (after which it was reset), now its limit is one million kilometers.
Of course, few people have seen a Gazelle with similar mileage, but still adding one digit has made some work and maintenance much easier (no need to guess and think about when to replace the chain, or even overhaul the engine).
According to reviews from owners, the new Riga Gazelle instrument panel is much more convenient to use. Also, the tachometer and speedometer needles do not “walk” here. Since 2003, these scales are electrically operated rather than cable operated. The readings have become more accurate.
"Euro-3"
For the first time, such a tidy appeared on Gazelle Business cars. The old-style Gazelle instrument panel went out of fashion, and all Gazelle drivers began installing the updated panel in their car. The Volga owners also made the same modifications.
Indeed, the new dashboard has become much more informative, convenient and practical. What can I say, its design is much more modern. As reviews say, it makes the interior look fresher and less dull.
The reader can see what the updated tidy looks like in practice in the photo below.
But it is worth noting that this shield has slight differences in design. So, on some models the instrument scales had a darker shade. But this did not affect the information content in any way - the reviews say. Another feature of the new shield is the presence of sound indication. Now the driver can hear a characteristic signal if:
- The fuel level has dropped to the minimum level.
- The engine temperature increased to 105 degrees Celsius or more.
- The handbrake was not released. What is noteworthy is that the signal is triggered only when the car starts moving at a speed of 2 kilometers per hour or more.
The new tidy has large modern dials. Now the speedometer and tachometer scales are in opposite places (compared to the “Rizhskaya”), and their diameter has become the same. On the left is the fuel level indicator, and on the right is the coolant temperature sensor.
But where did the mains voltage and oil pressure indications go? The answer is simple - this data is in the on-board computer. It is located in the tachometer “well”. By default, only time is shown here. But if you click on the button on the right, you can switch the mode.
So, the driver can find out the data from the voltmeter and oil pressure in real time.
What’s noteworthy is that when the oil drops below 0.2 bar, a flashing window with a sensor will light up.
There is a digital odometer on the left side. The top shows the total mileage and the bottom shows the daily mileage. It is reset by pressing the key on the left. Also on the new model panel there are 20 indicators (including ABS and EBD), which light up in the event of a malfunction of one or another system.
Principle of operation
The algorithm of action for all panels is the same. Each light bulb and arrow interacts with a specific element. So, the readings of both speed and mileage come from the sensor that is screwed onto the box. Engine information comes from the crankshaft sensor. And the voltage data comes from the generator terminals.
What is noteworthy: if you do not connect the voltage contact, the car will not charge even with a working generator. This problem is accompanied by a red battery light on the panel. If it lights up, it means there has been a break and the wire does not fit into the connector of the device.
As for oil pressure and coolant temperature, this information comes through the terminals from the corresponding sensors.
What else?
The new Gazelle instrument panel does not work even when installed in an old Gazelle. It needs to be mounted correctly - simply switching the pads with contacts will not work. For successful installation, you need a pinout of the Gazelle Business instrument panel.
Among other malfunctions, it is worth noting that the speedometer and tachometer needles are stuck in one position. Most owners begin to panic and completely disassemble the shield. But you don't need to do this. The problem lies in insufficient contact of the connectors.
Installation
To install the panel, you must remove the old shield. To do this, you need to dismantle the steering wheel using a special puller and unscrew a couple of screws of the decorative lining of the dashboard. You should also unscrew the bolts securing the tidy itself.
To do this you will need a 8" head. After this, you can remove the old panel and put a new one in its place. But as we said earlier, simply switching the connectors will not work. You need a pinout for the Gazelle Business instrument panel. There are four pads in total - XP1, 2, 3 and 4. Let's look at how to connect each:
- XP1. The first, fifth, sixth, seventh contacts are connected to ground. As for the rest, they connect to the sensor signals. The first contact is the air damper closing relay, the third is the DTOZH, the ninth and eleventh are the oil pressure and fuel level sensors in the tank, respectively. The remaining contacts are “Reserve”. We do not touch them and do not connect anything to them.
- XP2. Contacts number two, four, nine are connected to ground. The “plus” terminals are all from the fifth to the thirteenth.
- HRZ. Terminals two and thirteen are connected to the +12V positive contact. The first, eighth and twelfth terminals are connected to ground. The sixth connector is the speedometer speed sensor, the ninth is the ignition coil, the eleventh goes to the engine control unit.
- XP4. Here, almost all contacts need to be connected to ground. This applies to connectors from the first to the seventh inclusive. Only the sensor for the presence of water in the fuel filter (if there is one) and the glow plug switch are positive. These are connectors number eight and nine respectively.
By the way, if the car does not have an ABS and EBD system, the outputs to these sensors must be plugged. How? It is enough to connect them to ground.
So, we found out what the Gazelle instrument panel is, what types it comes in and how it is connected.
Source: https://FB.ru/article/370982/schitok-priborov-gazel-ustroystvo-printsip-rabotyi-i-otzyivyi
Typical faults
After replacing the device, the following malfunctions are possible:
- either part of the instruments or the entire panel does not work;
- the arrows on the instruments stop;
- incorrect sensor readings.
You can solve the problem by doing the following:
- First you need to check the power: the integrity of the wires, the quality of the contacts.
- If everything is fine with the wiring, it is possible that the controller is broken. It is better to replace the entire panel than to repair the controller.
- The sensors may not work if the connection is poor or the fuse is blown.
- You can try to restore the operation of the sensors by pressing the “Mode” button.
When replacing the instrument cluster, the electronics are not affected, but problems occur with them. The problem is solved by replacing the fuses and updating the wiring.