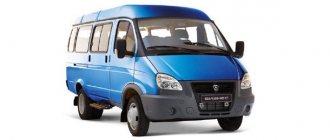
Is it worth installing a new Gazelle instrument panel in the car, or is the old panel quite suitable for use? The question is quite common, especially among those drivers who have had the opportunity to slightly update their car. It’s worth installing a new thing, but how much it will cost is another question.
Classic Gazelle dashboard
Panel purpose
The instrument panel performs one function - informational. In a small area in the dashboard of the car, all the instruments with indicators about the car’s performance are located, this is both good and not very good. While the driver is looking for the indicator, the speed indicator, he is distracted from the road, creating conditions for an emergency situation. However, most Gazelle users eventually get used to the appearance of the panel and intuitively examine one or another section of it to obtain information.
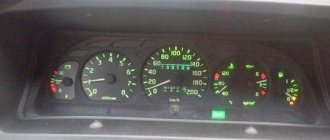
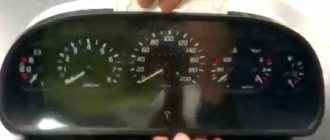
The standard panel on most modifications of the Gazelle looks like 3-5 round dials surrounded by several signaling devices. The main gauges—the speedometer and tachometer—are large.
The speedometer is always located in the center, since it is the main device that the driver focuses on. The three largest devices most often include the coolant temperature sensor. The remaining dials indicate either the amount of gasoline, or the battery charge, and less often, the amount of oil. All the indicators that the driver needs can also look like warning lights. Their indicators light up from time to time. The devices are placed compactly and do not interfere with each other.
Old style instrument panel
- Speedometer.
- Speedometer.
- Oil pressure sensor (not level.
- Network voltage indicator.
- Fuel level and antifreeze temperature sensor.
The shield was produced in this form for about eight years. No changes were made during this period.
This shield has a slightly different design and appearance. It was specially designed for the new torpedo, with a rounded visor.
There are no new sensors here, but the position of some dials has changed. The speedometer scale has now become larger in diameter, and the antifreeze temperature and oil pressure sensors are combined into a “pan”.
The odometer has also been changed.
Appearance of the update
The reason why many drivers install a Gazelle business dashboard is simple - it looks better. The second reason why you should buy this particular panel option is the functionality and increased number of opportunities to monitor the performance of the car.
Gazelle business dashboard design
The disadvantage of such a panel is that on most Gazelles you will have to sweat a little when connecting. The device's pinout diagram is included in the kit, so there will be problems with the connection if you have not encountered such work before. You will also have to add several terminals and change several contacts so that all devices and sensors work correctly.
Pinout of the instrument panel Gazelle old model 2022
can be connected together and connected to a blue wire with a white stripe (the arrows light up when the turn signal is left or right) or to the emergency light switch: blue - right, blue-black - left, blue wire insulated with a white stripe (each arrow will correspond to the turn signal being turned on ) .24 - parking brake indicator. Connect to brown wire 25 - high beam warning lamp.
Connect to the green wire with a black stripe 26 - Front PTF indicator (may not be present), it will light up at plus 27 - ABS indicator. When the mass is turned on, 28 will light up - for 385.3801 the rear window heating indicator will light up.
Lights up when plus 29 is applied - Output of the speed signal to the on-board computer. If so, send a speed signal from this pin 30 - to the vehicle speed sensor 31 - low brake fluid level indicator.
Functional
In most cases, everything works properly without the slightest breakdown, but the new panel can still be improved. Many people do not like the dim illumination of devices, which is practically useless at night. It is recommended to install LED lighting and diodes inside the devices and around the entire perimeter of the panel for better visual perception. The new Gazelle instrument panel has almost 20 indicators that light up when a malfunction occurs.
4 of them, which indicate the level of emergency oil pressure, overheating of the coolant, emergency amount of fluid in the brakes and the parking brake sensor, may indicate serious damage to the system.
If one of the mentioned indicators lights up along with the STOP button, it is recommended not to start driving until the damage has been repaired.
In addition, the dashboard has various alarms about the lighting system, brakes and engine status. The driver has access to the most complete information about all the main components of the car.
Instrument panel, “gazelle”: device, principle of operation and reviews
The pressure gauge shows the approximate amount of fuel in the tank. The scale has divisions 0 - the tank is empty; 1/2 - half a tank; 1 - full tank: 16 - fuel reserve warning lamp.
The warning light comes on when there is less than 8 liters of fuel left in the tank; 17 — oil pressure indicator in the engine lubrication system allows you to assess the technical condition of the engine; 19 — control lamp for turning on heated seats (for GAZ 31105 vehicles with heated seats); 20 — coolant temperature gauge allows you to monitor engine temperature; 21 — control lamp for turning on external lighting (side light); 22 - the coolant overheating warning lamp lights up when the coolant temperature exceeds the permissible value; 23 — control lamp for high beam headlights.
Possible problems
Even if you change the panel to a Gazelle, you won’t be able to get rid of all the problems. Quite often problems occur after replacement. Here are the most common ones:
- individual sensors or the entire panel stops working;
- instrument readings “freeze”;
- The sensors lie, the indicators are incorrect.
Most drivers panic and then take the panel apart, which only makes things worse. Here are some solutions for most panels:
- The first thing you should always do if such devices malfunction is to check the wire contacts. A break or breakdown can cause a malfunction. You should also inspect the food.
Pinout and instrument cluster on the Gazelle panel
Since the electronic system is not improved by replacing the panel, and the devices are more demanding, problems occur with the electronics. Replacing the wiring and fuses most often solves the problem. Generally, reviews about the operation of the instrument panel are favorable, but on some older car models there are a number of problems that can only be solved by installing original instruments.
Replacing the speed sensor
We carry out the work in an inspection pit. Having released the latch...
...disconnect the speed sensor wiring harness connectors.
Remove the speed sensor wiring harness from the holder. If the sensor is sealed, then cut the wire of the sensor seal.
Use a 22 key to unscrew the sensor...
...and remove it from the speedometer drive (speed sensor). Install the sensor in reverse order.
Similar articles:
KamAZ. Operation, maintenance and repair of KamAZ family vehicles → 8.3.1. Operation, maintenance and repair of KamAZ family vehicles (KAMAZ-5320, KamAZ-5410, KamAZ-55102, KamAZ-55111, KamAZ-53212, KamAZ-53211, KamAZ-53213, KamAZ-54212, KamAZ-43114, KamAZ-43118, KamAZ-65111, KamAZ-53228, KamAZ-44108, KamAZ-4311. Starter maintenance. Malfunctions and their elimination.
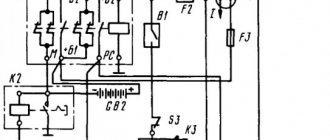
KamAZ. Operation, maintenance and repair of KamAZ family vehicles → 8.1.1. Operation, maintenance and repair of KamAZ family vehicles (KAMAZ-5320, KamAZ-5410, KamAZ-55102, KamAZ-55111, KamAZ-53212, KamAZ-53211, KamAZ-53213, KamAZ-54212, KamAZ-43114, KamAZ-43118, KamAZ-65111, KamAZ-53228, KamAZ-44108, KamAZ-4311. Electrical functional diagrams
KamAZ. Operation, maintenance and repair of KamAZ family vehicles → 8.3. Operation, maintenance and repair of KamAZ family vehicles (KAMAZ-5320, KamAZ-5410, KamAZ-55102, KamAZ-55111, KamAZ-53212, KamAZ-53211, KamAZ-53213, KamAZ-54212, KamAZ-43114, KamAZ-43118, KamAZ-65111, KamAZ-53228, KamAZ-44108, KamAZ-4311. Starter
KamAZ. Operation, maintenance and repair of KamAZ family vehicles → 8.2. Operation, maintenance and repair of KamAZ family vehicles (KAMAZ-5320, KamAZ-5410, KamAZ-55102, KamAZ-55111, KamAZ-53212, KamAZ-53211, KamAZ-53213, KamAZ-54212, KamAZ-43114, KamAZ-43118, KamAZ-65111, KamAZ-53228, KamAZ-44108, KamAZ-4311. Generator
KamAZ. Operation, maintenance and repair of KamAZ family vehicles → 8.4. Operation, maintenance and repair of KamAZ family vehicles (KAMAZ-5320, KamAZ-5410, KamAZ-55102, KamAZ-55111, KamAZ-53212, KamAZ-53211, KamAZ-53213, KamAZ-54212, KamAZ-43114, KamAZ-43118, KamAZ-65111, KamAZ-53228, KamAZ-44108, KamAZ-4311. Rechargeable batteries.
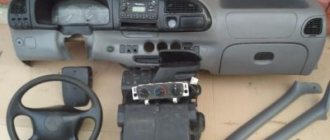
Installing and removing the torpedo
The instrument panel is only part of the euro kit for the Gazelle business.
Gazelle instrument panel lighting
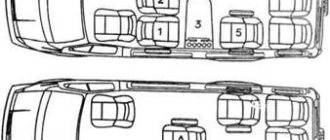
In some cases, for example, to repair the heating system, it is necessary to completely dismantle the torpedo. This process is not the easiest, since you need to know from which side to approach such an issue.
In fact, the panel can be removed in just half an hour. To do this you need the following:
- Use a Phillips screwdriver to unscrew the 3 upholstery fasteners.
- Carefully remove all upholstery pads so as not to damage anything.
- We dismantle the steering column with all connections to it.
- We remove the instrument panel by disconnecting all wires.
- Next you will need to turn off the interior lighting and rear fog lights. Then we turn off the electric headlight adjustment.
- We arm ourselves with keys 7 and 8, get to the bolted fastening of the choke cable. Hold it with one key and unscrew it with the other.
- We unscrew the screw of the cable sheath and disconnect the cable from the Gazelle carburetor.
- We turn off the hazard warning lights and cigarette lighter plugs.
- Again, take a screwdriver and tighten 2 screws near the stove control.
- We unscrew all the screw fastenings of the panel, there are 10 of them in total. Lightly pull the panel towards you so that it comes off the installation site. Now you can disconnect the air duct hoses from the deflectors.
- We take out the damper from the carburetor. We remove the panel. We turn off the right and left air ducts of the stove.
- We remove the torpedo. You will need an assistant here, since the torpedo is very heavy.
- We twist the fastenings of the torpedo lining and remove the lining itself.
- Installation is carried out in reverse order.
The dashboard sparkles with numerous lights, arrows and indicators, which can make a person who sees all this beauty for the first time confused. Meanwhile, it is necessary to navigate the indicators and their purpose, because they inform the driver about the state of the car and its main systems. In this article we will talk about what information can be gleaned from the fact that certain lights on the instrument panel are on or off. All dashboard indicators are divided into three groups: Red. These are warning lights that indicate malfunctions in the system, which can lead to big troubles. Yellow. These indicators usually perform an informational function. There are exceptions, which relate, for example, to the inclusion of all-wheel drive. All the rest are blue, purple, green, etc.
Pinout of an old-style gazelle instrument panel buy
Connect a pressure gauge to the pink wire with a red stripe. At 382.3801, run a wire to the sensor (a VAZ-2106 tee is required) from GAZ under the ZMZ-406 engine.
On 385.3801, if you install a sensor, then at low pressure it will squeak at idle, which means the sensor is not needed, you need to connect the wire from the device to ground through a resistor, experimentally select 10 - oil pressure alarm. Connect to the gray wire with a blue stripe 11 - engine overheating alarm. Can be connected to overheat sensor TM-111-02. The sensor itself must be in contact with the coolant 12 - Coolant temperature gauge. Connect to the green wire with the white stripe. The arrow will overestimate the readings, you can connect a resistor to the broken wire and assemble it experimentally 13 - Carburetor choke cover indicator.