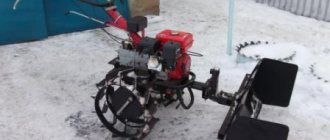
How to make it yourself
To make a blade, you need tools and equipment that are available in every home workshop.
To work you will need:
- welding machine;
- Bulgarian;
- electric drill;
- roulette;
- square;
- durable knife;
- adjustable wrench;
- core;
- sandpaper;
- paint brush.
Necessary materials:
- steel barrel 200 l;
- 2 springs from UAZ or GAZ;
- profile pipe 20x40 mm;
- iron corners 30x30 mm;
- hardware (bolts, washers, nuts);
- car tire;
- acrylic paint.
To make a blade for an UAZ with your own hands, drawings should be prepared for 4 components of this product: an installation device, a subframe, a knife and a lifting mechanism.
The work sequence is as follows:
- Making a shovel. It is cut out of the barrel, half or a third of it is used. Along the perimeter and in the middle, the workpiece is reinforced with a steel angle, which is welded or screwed to it. The width of the shovel can be in the range of 100-200 cm, and the height - 40-80 cm. A knife made of a 100x20 mm steel strip or a cut tire is installed on the lower part.
- Installation kit. It can be central or frontal type. It is preferable to choose the second type, which is more durable and reliable and allows you to evenly distribute the load across the shovel frame. 2 brackets are made from a profile pipe with eyes for fastening. A rotation mechanism is provided.
- Stretcher. Made from durable metal. Designs are made of removable or stationary type. Removable mounts are attached to the bumper, while stationary mounts are rigidly screwed to the car frame.
- Lift. To adjust the height above the ground, a standard or separately purchased electric winch is used. A simpler solution is a manual winch, but you will have to leave the cab to lift it. The simplest option is to attach steel skis with level adjustment to the shovel.
After the individual components are manufactured, they are assembled and installed on the machine.
How to make a rotary snow blower for a tractor yourself?
If, at the same time as the task of clearing snow with a tractor, there is also the task of discarding the removed material beyond the boundaries of the area being cleared, you cannot do without a rotary snow blower.
To assemble a rotary snow blower on a tractor with your own hands:
- We make a detailed drawing;
- Let's recreate the homemade frame. In this case, it will have a rectangular shape, which will be given by metal corners and a profile pipe welded together;
- We weld a hitch to a homemade frame for aggregation with a tractor;
- We construct a rotor with our own hands - an impeller with 2-5 blades, which looks like a household fan. It is important that the size and weight of each blade are the same, in order to avoid sideways skewing and strong vibration after mounting it on the tractor: we take a shaft (from used agricultural machinery) designed for large bearings and a rotor; on a metal sheet we draw circles with a diameter of 30 cm, which we cut out with a metal saw or grinder; in the center of each circle we drill a hole equal in size to the diameter of the shaft. This solution will make it possible to make a collapsible rotor, which will be easier to maintain and repair. In the case of a non-separable structure, the horizontal jumper can simply be welded to the disks; cut a thread on the shaft to secure each circle with nuts;
- We proceed to making the blades, which we cut from the remaining metal;
- We place 2 bearings on the central axis, having previously equipped them with a hub. To do this, you can take a ready-made one from other equipment or make it yourself from an old pipe;
- We weld 4 eyes onto the hub, through which it will be held on the body of the protective casing;
- We are completing the safety housing, which resembles a snail. To do this, take a part of the pipe, one side of which is welded (the shaft hub will fit onto it), and 2 guides are welded onto the second;
- We make a snow removal sleeve - a deflector. A 10-15 cm pipe is cut into the central part of the cochlea with a chute rotating by 90 0 (to set the direction for the waste);
- To avoid snow scattering, the front part of the casing is covered with metal;
- A hole for the axis is drilled inside the cochlea;
- We install the impeller and clamp it with bolt ties;
- We adapt a belt or chain drive to the protruding part of the shaft (requires a motorcycle sprocket);
- We connect the frame with the resulting rotary mechanism and begin clearing the area of snow with a tractor.
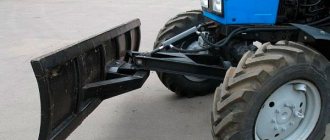
We make the dump ourselves
Making a snow plow with your own hands is not difficult if you have a welding machine, a drill, a tape measure and a grinder on your farm.
Here is one simple version of this design for ATV owners. You won’t have to search for a suitable metal for a long time, since a regular 200-liter steel barrel is quite suitable for this. By carefully cutting it into 3 parts, we will get curved segments for a shovel. Weld two of them along the contour, and the resulting 3 mm thickness of the metal will be quite enough for rigidity.
The lower part of the blade needs to be reinforced with a knife. To do this, you will need a steel strip 5 mm thick and a length equal to the width of the scraper. You need to pre-drill holes in the knife with a diameter of 5-6 mm and a pitch of 10-12 cm to attach the safety rubber strip.
The most complex and critical parts of the entire structure are the mounting frame and subframe, which connect the blade to the ATV. Therefore, it is better to buy them so as not to have to laboriously take pictures of installation dimensions under the car. It is much easier to adapt a homemade snow plow to factory fasteners and this work can be done “on site”.
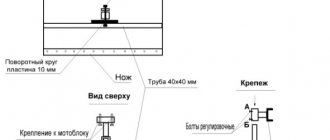
For a walk-behind tractor, the fastener design is much simpler and can easily be made in a home workshop. To do this, a 40x40 mm square pipe needs to be welded to a dump welded from two halves of a barrel for reinforcement. Then a thick steel semicircle with three holes is welded to the pipe, which are necessary to fix the angle of rotation of the shovel.
After this, an L-shaped holder is welded from the same pipe, one side of which is inserted into the mount on the blade, and the other is attached to the walk-behind tractor frame with bolts. To regulate the lifting height of the shovel, two bolts A and B are used. They are screwed into holes drilled in a piece of square pipe welded to the coupling device and placed on an L-shaped holder.
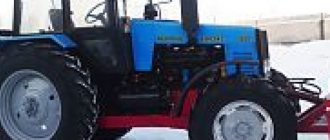
Plow for walk-behind tractors Neva. Review of Neva attachments for snow removal
Harsh Russian winters with heavy snow force people to adapt to the realities of life. And snow removal is an integral part of winter life for many Russians. Manually removing snow is troublesome, time-consuming and difficult. Therefore, the Neva walk-behind tractor, complete with a mounted blade for snow removal, will be of great help in this work.
This brand has a large assortment of various attachments that are designed to perform various types of work.
Snow removal is not a problem for those who have special equipment for it. After all, manual labor has long been out of date, and in the 21st century technology comes to the rescue in many aspects of life.
You can, of course, buy a snow blower specially designed for snow removal, but usually its cost is not justifiably high, and besides clearing snow, you will not use it anywhere else on the farm.
A budget and universal option would be to purchase a blade for a walk-behind tractor. It is a bucket without sides and can be tilted to one side.
Motoblock mounted knife NNM
When driving through snow, the blade will throw the snow to the side, clear the path, leaving behind a smooth strip without snow.
But besides snow removal, there are other options for using a blade - it can also serve as a shovel for leveling sand and gravel mixtures in construction or simply help level a loose surface.
One blade model is presented on the official website of the manufacturer of walk-behind tractors Neva.
Mounted walk-behind knife (HNM)
Setting up and adjusting NNM Neva
The position of the knife is adjustable. It can be either straight or at an angle.
- It is possible to rotate the blade left or right at an angle of up to 25°.
- When working with a straight knife, the width of the processed surface is 90 cm. And when turning the slope, it decreases to 81 cm.
- The average speed of a walk-behind tractor with a blade installed is 3-4 km/h.
- Based on this, productivity can vary up to 0.36 ha/h (when working with a straight blade), and up to 0.33 ha/h when working with an inclined blade.
- The knife is made of durable high quality steel. And the entire structure has the following overall dimensions: 90 cm in length, 42 cm in width and 50 cm in height.
- Before starting work, be sure to check all connections. They should be well tightened.
"Red October", with proper use, guarantees uninterrupted operation of the knife for 5 years.
Do-it-yourself blade for the Neva walk-behind tractor, detailing, diagrams
If you have a grinder, welding, drill and some consumables on hand, then you can make a blade yourself.
For this you will need:
- 200 l barrel (can be taken from an oil container);
- Square pipe size 40x40;
- Mounting bracket;
- Semicircle for creating rotation angles.
Manufacturing process
the working part is the blade itself. To make it, you can take an ordinary steel barrel, then cut it into three parts. Next, take two of them and weld them together along the edges. The result is a blade with a steel thickness of 3 mm, which is usually enough to withstand household loads.
To ensure better snow capture, a knife is installed below. It allows you to trim the lower layers of snow. To make it, a steel plate 5 mm thick is taken. Since it bears the main load, it must be strengthened. Holes are drilled at a distance of 10 cm; they are necessary for installing the rubber fuse. This is a special gasket between the knife and the ladle itself, thanks to it there is no friction of metal on metal.
Approximately in the middle of the dump, a square pipe measuring 40x40 should be welded. And a semicircle is welded to the pipe, which is necessary to rotate the blade. Then holes are drilled in the semicircle and pipe, which will be necessary to create an angle of rotation and fix the blade in the desired position.
The next part is the holder. To make it, you should weld an L-shaped structure and connect it to the pipe from the dump. It will serve to attach the bracket.
This bracket connects the walk-behind tractor and the blade-shovel. Its height can be adjusted using bolts and a hitch.
These are just general guidelines, don't be afraid to experiment with sizes and design improvements.
-reviews
Below is a video of the operation of a factory blade with a Neva walk-behind tractor:
Here is a video example of how you can implement and use a shovel blade for walk-behind tractors “quickly”:
Reviews from forums
Here's what we managed to find on thematic forums:
Stepan writes:
“The main thing when working with a blade is not to load it straight into the snow. The engine must initially warm up and prepare for operation. Otherwise, the motor may not be able to withstand the high voltage and problems may occur."
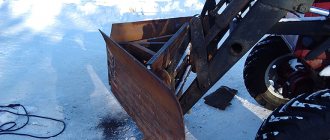
How to make a dump on a Chevrolet Niva
It is better to place a wide washer under the head of the screw, otherwise there is a risk that it will be pressed into the shelf. Here is the final result of strengthening the rear shelf.
Looks normal from above. But not from below. It might be worth considering placing the screws symmetrically.
How to make a dump on a Chevrolet Niva with your own hands
Anyway. The channel parts sticking out from below the shelf will not tear things because everything there is made with curves. And this is just hooliganism at last.
What happens if you insert a wooden piece for furniture into a drill instead of a drill? Here's another interesting solution.
Snow plow for VAZ-2123 Chevrolet Niva
How to make a blade for a Chevrolet Niva with your own hands; description of making a shovel with the size and attaching it to the car. In this article I want to share another homemade product, we will talk about a dump on the Niva for removing snow from the local area and clearing roads Alexander NextUaz Topic author: At the bottom there is a rubber strip reinforced with sawing with a jigsaw.
The width of the blade is 2m, I don’t remember the height now, but it was about 70cm. Attachment to the car - welded to the amplifiers that are additionally installed on luxury trim levels, according to my calculations and concepts it should withstand.
There was an idea to make new amplifiers from a 50x50 profile and leave the factory ones alone and put them in the garage, but I just got lazy and it took a lot of time to make them. Yes, I almost forgot - I spent a very long time fiddling with the spacer bushings between the silent blocks, which I welded into the profile. While looking for a bushing, I came across some old nozzle from a Kamaz truck, the walls are thick, the diameter is less than the required one by some 1mm - I thought it was nonsense, I was wrong, I burned four drills on a drilling machine, not counting sharpening.
By the time the construction of the dump for the Niva was completed, there was not a lot of snow on the road, so it was not possible to carry out severe tests of the welded components of the dump on the Chevrolet Niva with our own hands, but later the weather pleased us, and snow fell every week. The blade showed itself to be excellent, the blade on the Chevrolet Niva was not modified by hand, it was the ability to lift it into the stowed position, if the Niva stalls with this miracle when cleaning the road, accidentally sliding into a ditch, then it is quite difficult to get out, you need to raise the blade, no matter what which didn't bother me.
The first mounting option for lifting the blade That's why the field itself was hastily modified, the stock bumper was removed, I'll still do the power ones, and in its place I stuck this device. It allows you to hang the blade in a stowed position, although for now you have to lift it manually, but this is only required to drive through impassable areas. Unfortunately, the photos are with a raised shovel for some reason. Video of the blade working Well, here’s a video of working with a blade on a Chevrolet Niva with your own hands, as you can see, the blade shovels quite a lot of snow, and is limited only by the Niva’s cross-country ability, so far the tires are ordinary, studded road tires, the Niva is not very passable on it, but this is enough for removing snow from the road.
There are cotton halogen lamps, how they shine is a separate issue; they shine over the blade onto the road, one closer, the other further away.
What not to do Now about why the blade had to be repaired, this nuance should be taken into account by absolutely everyone who wants to make a blade on the Niva with their own hands, the fact is that with short rods of the blade to the Niva, you risk getting such an embarrassment. Everything is fine with the car, a little wrinkled my skirt. Acceleration was in third gear. It turned out this way because the shorter rod on the right after the do-it-yourself repair on the Chevrolet Niva on the same day was slightly shortened.
The blade successfully served faithfully for several months, then during an impact this left link was broken off and welded literally 5 centimeters closer to the car, resulting in a short arm, and as a result, the blade went under the car.
In the photo above this is the minimum shoulder, its size is 60 cm, but it is better to make it larger to be sure that the blade will not turn down under the car in case of a strong impact.
Painting the dump The dump was restored in about three hours and partially painted. We're not expecting any more snow this year, so we didn't put it back on the car.
First tests
In general, now everything is ready for the first trip, look at the photos.
By the time the construction of the dump for Niva was completed, there was not much snow on the road, so it was not possible to carry out severe tests of the welded units, but later the weather pleased us, and snow fell every week. The blade showed itself to be excellent , the only minor improvement was the ability to lift it into the stowed position ; if the Niva stalls with this miracle while clearing the road, accidentally sliding into a ditch, then it is quite difficult to get out, you need to raise the blade so that nothing interferes.
Ears for attaching the blade to the car
This is the eye for attaching the blade to the Niva in the end; I was able to bend it, so I left it as is.
- (1) - this is the factory eye
- (2) and (3) - I drilled for the bolt
- (4) - welded additional eye
- (5) - the bolt that holds the eyes is screwed into the Niva spar
After fitting the shovel to the machine, I added a few more jibs from a tube with a diameter of 20 mm, you can make them from the same profile pipe, I had the tube in stock. Blue arrows indicate the jibs, red arrows indicate where they are welded. It should be noted that I tried to attach them to the spring, because it is a shock absorber and shock absorber. Only the farthest one in the photo is attached to the rod itself, there was no possibility of attaching it to a spring, and the load is maximum there. without it, the right corner would have been turned over by a snowdrift.
Niva Club - Niva as a snowplow (snow removal)
Niva Chevrolet clears snow with a plow 2016
To strengthen the rear shelf, you can take a square profile - it is more rigid, but also more expensive.
Chevrolet Niva. Strengthening the trunk shelf. After just a few months of use, I noticed that the rear shelf...
We take the trunk shelf and measure the channels so that they can be installed in the depressions at the bottom of the shelf. I got these dimensions of the blade, I didn’t make any drawings before making the blade, I just did everything by eye, and then just measured it, maybe these dimensions will help someone imagine approximately what a do-it-yourself Niva blade should look like. The photo shows that there is a slight deformation left.
In order to install the blade on the Niva, it is necessary to provide a fastening. Let’s say I collected the design in my head, a collective image from all over the Internet. They are all approximately similar.
In order to give the blade a roundness, I sawed these blanks with a thick circle of an angle grinder, indicated the cuts in the photo with blue arrows, bent them as needed, and welded them.
The process of welding the blade In this photo the blade is still short, another section has not been added, I welded it later.
Snow shovel, blade for Niva. With your own hands, winter is coming.
I marked with green checkmarks where the spring is welded to the blade; each of them is attached to the blade frame in only two places. The arrows showed additional jibs, but they should not be done until everything is precisely adjusted directly on the Niva. Attaching the blade to the NIVA Now, in order to secure the blade to the car, and at the same time protect the Niva's side members from destruction, I used jet thrust from a penny, like this, sawed it in half, inserted it into a 40x40 mm pipe, bent it a little with a hammer and scalded it.
Like this It turned out like this, in the photo this is already a repair of the dump, so one pipe was replaced with a round one 2, and welded to the broken square pipe that was originally there.
Pipe 1 remained as it was originally. In the photo the blade is upside down. First fitting on the car. We are adjusting the blade directly in the field, there are no jibs yet, I found several photos of the manufacturing process, but the fastenings are already in place. You also need to maintain the parallelism of the blade relative to the hood so that the shovel does not become askew.
description of making a shovel with the size and attaching it to the car.
The blue arrow indicates the hole. I took them off for this purpose and painted them from a can for the occasion.
The Niva's eyes initially look like this, and are attached to one bolt, see the photo is not mine, someone changed them to a channel to secure the blade on it, I just welded another ear, the welding place is shown by blue arrows, red lines are a square metal in the photo above you can see it, then I drilled a through hole in them to insert a bolt.
Ears for attaching the blade to the car This is the eyelet for attaching the blade to the Niva in the end; I was able to bend it, so I left it as is. Blue arrows indicate the jibs, red arrows indicate where they are welded. For this, a metal profile measuring 60x40mm is used.
Tools and materials
You can install a snow blade on the frame of any motorized cultivator that has a power of more than 4 hp. and weight not less than 50 kg. The heavier the unit, the better it will cope with the consequences of a snow storm. It is best to equip the domestic Neva walk-behind tractor with a shovel. This equipment has high performance characteristics and is adapted to work in the most severe weather conditions with maximum load.
A shovel for a walk-behind tractor is made with your own hands using the following devices:
- roulette;
- welding machine;
- grinder with discs for cutting and grinding metal;
- electric drill;
- set of wrenches;
- screwdriver;
- paint, paint brush.
After preparing the tool for work, it is necessary to decide on the material from which the shovel blade for the Neva walk-behind tractor will be made. You can make a shovel from various metal products that have a sufficient margin of safety.
The blade for the Neva walk-behind tractor can be assembled from the following materials:
An old gas cylinder. The thick walls of the cylinder are resistant to high mechanical loads. Having received such a blade, the walk-behind tractor will be able to cope with compacted snow, level roads, and move sand and crushed stone.
Barrels with a volume of 200 l. It should be taken into account that the walls of the barrel are made of thin steel. This shovel for the Neva walk-behind tractor can only be used for removing fresh snow that has not yet compacted and become covered with crust.
Metal strips. Bumpers from trucks or corrugated steel, which covers the floors of hangars and warehouses, are well suited for making a blade for a walk-behind tractor.
In order to make a rotating mechanism, you will need steel with a thickness of at least 10 mm. You can find such material at scrap metal collection points. The manufacture of fastenings involves the use of profile steel pipes 20x40 mm.
When working on loose and deep snow, homemade snow removal equipment can get stuck. This problem can be solved with the help of tracks installed on the axle shaft of the unit. A homemade tracked snow blower can work in any conditions, being as productive as special equipment.
Blade manufacturing rules
The main rule that must be taken into account when drawing up homemade drawings is the correspondence between the scope of work and the power of the unit. Overload can lead to increased wear of components and mechanisms, their breakdown and failure of the machine.
When planning to make a blade for a walk-behind tractor with your own hands, you must adhere to the following criteria:
- Strength. The knife must have a sufficient resource to serve for at least 5 years. All its parts and mechanisms must be made based on the maximum permissible load and strong impacts.
- Dimensions. A homemade shovel should not be excessively wide or high. The optimal dimensions are considered to be width - 80-130 cm and height - 30-50 cm.
- Availability of a lifting mechanism. The blade for the walk-behind tractor can be raised hydraulically or using levers. This option allows you to remove snow from the yard or use the unit as a loader in the summer.
- Possibility of mounting a swivel joint. Using such devices, you can control the knives by tilting them up or down, right or left. Selecting the angle of attack allows you to better shovel snow and debris away from the path.
- Mandatory installation of a shock-absorbing strip made of dense rubber on the bottom of the bucket. This device is necessary to protect the walk-behind tractor from impacts, the bucket from deformation or breakage, and the road surface from mechanical damage.
- Quick installation and removal. Since the walk-behind tractor is a multifunctional device, all manipulations on its equipment must be carried out quickly and without the use of complex equipment.
The layout of the blade involves installing it on the front bracket, under the body or at the rear of the unit. The most optimal is the front location of the blade. This position provides the best quality cleaning.
The made bucket can have a horizontal or vertical orientation. The second option is chosen in cases where you have to work in cramped conditions.
Self-production
to find ready-made drawings and descriptions for making one or another home-made mounted snow blower for a specific machine. After all, the unit is installed in some special way for each type of vehicle.
The mounting methods and location also differ .
Therefore, in most cases you have to:
- take drawings and methods for manufacturing a device for one machine and adapt it to another;
- draw up a drawing yourself, using a unit installed on another car as a sample.
In addition, the parts for which the drawing is drawn up are not always available.
- draw up a new drawing;
- do it the old way, making changes as you go.
You should know the three main conditions for making good mounted snow removal devices yourself: these are:
- availability of skilled and experienced craftsmen ;
- access to the necessary equipment ;
- good lawyers who can obtain the necessary documents and legalize the units.
If you decide to make some kind of snow removal equipment yourself, then make sure that all three conditions are met.
You can make the necessary equipment:
- from a not very suitable drawing;
- no drawing at all;
- looking at the finished unit.
But only such specialists as:
- welders;
- turners;
- locksmiths;
- hydraulics.
Also make sure they have all the necessary equipment .
Then talk to:
- traffic police officers;
- lawyers or companies involved in automotive technical expertise and legalization of various changes made to the design of the vehicle.
Perhaps, after calculating all the costs, including payments to these companies or lawyers, you will decide that you will purchase a ready-made unit with all the permits:
- easier;
- cheaper.
Nobody clears the streets of snow? Find out who is responsible for snow removal and who to complain to. Do you want to buy a snow blower, but don’t understand anything about it? Read all the necessary information here. Should I repair the snow blower myself or take it to a workshop? Find the answer to this question here: https://rcycle.net/sneg-i-led/snegouborochnaya-tehnika/obsluzhivanie-snegouborshhika-chinit-samomu-ili-obratitsya-v-masterskuyu
Making a blade for Niva
The device consists of 5 main elements. First
— factory-made “kenguryatnik”, the only purchased part.
We install it on the “nose” of the car. In principle, you can weld your own if you find pipes of the required cross-section. The second element
is a cross member with mounting axles
(Fig. 1)
.
Cross member assembly. We press the axles into the pipe (ST-3;5) with a hammer to a length of 100 mm. On the axle, close to the pipe, we put washers on both sides, which we then weld to it. The axles must have 6 2.5 mm holes for pinning the nuts after they are installed.
We weld the finished crossbar to the “kenguryatnik”, additionally strengthening it with 4 corners 30×30 mm, 40 mm long.
DIY blade drawings
Rice. 1
. Cross member 1 - pipe, 2 - axle (2 pcs.), 3,4 - washer (4 pcs.), 5 - hex nut (2 pcs.)
Rice. 2
. Thrust reaction rods 1,2 - horizontal and vertical pipes, 3 - washer (5 pcs.), 4 - bushing (2 pcs.), 5,6 - mounting plates to the blade (thickness 6 mm).
Rice. 2 a
. Horizontal pipe
Third element
— two thrust reaction rods
(Fig. 2)
.
The diameter of the horizontal pipe (Fig. 2 a)
is the same as that of the cross member. The dimensions of the bushings and washers of the left and right rods are the same. We weld the sleeve and washer to a horizontal pipe on an axis transversely, observing the axial seating size of the washers. We cut the opposite end of the pipe at an angle of 30 degrees, and weld the support plate for fastening 5 to the blade to the end. In the center we drill a hole d 10-12 mm for an M8 bolt. It is advisable that the hole be directed towards the outer edge of the blade for ease of removal and installation. We weld the lower end of the vertical pipe to the horizontal one. To the upper end, cut at an angle of 45 degrees, we weld the mounting plate 6 to the blade with two holes d 8 mm. When fixing a rod with a short horizontal pipe, we additionally install another washer 3 on the right axis of the cross member. Tighten the nut (key 36) until it stops and cotter it. We attach the long rod in the same way to the left side of the cross member.
Fourth element
— blade
(Fig. 3)
. Made of steel sheet. It has an inward bend to a depth of 100 mm. On the left side at the end we weld an amplifier (made of the same steel), on the inside - two amplifiers from a 30x30 mm square profile.
In the lower part we drill holes for attaching the transport rubber band (shock absorber) using bolts and washers. The protrusions of the tape beyond the blade are 50 mm.
Rice. 3
. Blade 1 - steel sheet 2000x800x4 mm, 2 - side reinforcement, 3 - internal reinforcements, 4 - transport tape (thickness 6 mm), 5 - holes for bolts (9 pcs.)
Fifth Element
— lifting and lowering device
(Fig. 4)
. We use a used jack, for example, from a VAZ-2108 (09). Remove the lower heel and the upper rubber pad. At the top we weld the lower split head of the connecting rod of the GAZ-24 engine.
In this article I want to share another homemade product, we will talk about a dump on the Niva for removing snow from the local area and clearing roads in the country, or rather in a cottage village under construction.
A Niva was bought for the dacha instead of an ATV (picking mushrooms for berries and going to the forest for brooms), having compared the prices of used ATVs and old Nivas, taking into account the fact that a quadric is not an all-weather vehicle and its price is twice the cost of a used Niva, not to mention already about the cost of spare parts. In general, Niva has all the advantages.
There are no detailed process of making a homemade blade in the photographs, since I cooked it in the winter in the evenings, and the photos did not turn out, so I will post what I already have, with the dimensions of the blade itself at the end of the article.
Blade welding process
In this photo the blade is still short; another section has not been added; I welded it later.
Photo is clickable (click to enlarge)
The next step was to weld the springs (see photo below), in the hope that they would partially dampen the impacts of the blade on hard pieces, stones and ice, so as not to break the side members on the Niva; for this we will also have jet thrusts (more on them later ). I marked with green checkmarks where the spring is welded to the blade; each of them is attached to the blade frame in only two places.
Why might a blade be useful?
An all-wheel drive vehicle can be used for more than just cross-country travel. Its performance characteristics are on par with those of tractors used by public utilities.
The snow blade on the UAZ is used for the following purposes:
- Planning of the local area, construction site, field and vegetable garden. The wheeled all-terrain vehicle generates enough torque to cut off the top layer of dense soil and move it over long distances. A machine equipped with a knife levels out bumps, fills holes, and makes the area even and smooth.
- Landscape design. Equipment equipped with a blade is used to dig out pools and ponds. The depth of the reservoir can reach several meters depending on its area. A homemade bulldozer is used to build alpine slides, embankments and artificial hills.
- Clearing the area of snowdrifts. A car with a shovel effectively clears snow up to 50 cm high. In a short time, passable equipment with a blade can tidy up a garden plot and driveways to a house. The entire area is cleared, or work is limited to areas, paths and paths. Snow moves to the fence or is removed from the site.
- Construction and repair of roads. In holiday villages this problem arises constantly. A UAZ with all-wheel drive can level the road surface, fill potholes, and clear ditches of debris. When moving forward, most of the work is done. When shifting to reverse gear, the final leveling occurs.
The mounted knife is also useful for field work. It is used to move cut trees and bushes, fertilizers and tops.
DIY blade drawings
Rice. 1
. Cross member 1 - pipe, 2 - axle (2 pcs.), 3,4 - washer (4 pcs.), 5 - hex nut (2 pcs.)
Rice. 2
. Thrust reaction rods 1,2 - horizontal and vertical pipes, 3 - washer (5 pcs.), 4 - bushing (2 pcs.), 5,6 - mounting plates to the blade (thickness 6 mm).
Rice. 2 a
. Horizontal pipe
Third element
— two thrust reaction rods
(Fig. 2)
.
The diameter of the horizontal pipe (Fig. 2 a)
is the same as that of the cross member. The dimensions of the bushings and washers of the left and right rods are the same. We weld the sleeve and washer to a horizontal pipe on an axis transversely, observing the axial seating size of the washers. We cut the opposite end of the pipe at an angle of 30 degrees, and weld the support plate for fastening 5 to the blade to the end. In the center we drill a hole d 10-12 mm for an M8 bolt. It is advisable that the hole be directed towards the outer edge of the blade for ease of removal and installation. We weld the lower end of the vertical pipe to the horizontal one. To the upper end, cut at an angle of 45 degrees, we weld the mounting plate 6 to the blade with two holes d 8 mm. When fixing a rod with a short horizontal pipe, we additionally install another washer 3 on the right axis of the cross member. Tighten the nut (key 36) until it stops and cotter it. We attach the long rod in the same way to the left side of the cross member.
Fourth element
— blade
(Fig. 3)
. Made of steel sheet. It has an inward bend to a depth of 100 mm. On the left side at the end we weld an amplifier (made of the same steel), on the inside - two amplifiers from a 30x30 mm square profile.
In the lower part we drill holes for attaching the transport rubber band (shock absorber) using bolts and washers. The protrusions of the tape beyond the blade are 50 mm.
Rice. 3
. Blade 1 - steel sheet 2000x800x4 mm, 2 - side reinforcement, 3 - internal reinforcements, 4 - transport tape (thickness 6 mm), 5 - holes for bolts (9 pcs.)
Fifth Element
— lifting and lowering device
(Fig. 4)
. We use a used jack, for example, from a VAZ-2108 (09). Remove the lower heel and the upper rubber pad. At the top we weld the lower split head of the connecting rod of the GAZ-24 engine.
With modern technology, manual snow removal over a large area is becoming a rare occurrence.
Indeed, why spend long hours and effort clearing snowdrifts from your estate, yard or street when there is a powerful SUV, ATV or walk-behind tractor in the garage?
A snow blade, which can be easily attached to these types of equipment, significantly speeds up and facilitates the cleaning process.
In addition to dozens of ready-made structures that can be purchased on the attachment market, such a “grader” can be made with your own hands with minimal costs of materials.
All snow plows, depending on the type of equipment with which they are aggregated, are divided into several groups. Let's take a closer look at these devices in order to better understand the design features and correctly evaluate their performance and price parameters.
How to secure
The fastening device is the most complex and critical part of the entire blade design. The shovel is mounted on the frame using brackets made from straightened springs or profile pipes. It should be borne in mind that such a factory-made mechanism can cost 10,000 rubles or more. Therefore, it is advisable to do it yourself and spend the saved money on purchasing components.
A simple option is the central holder, which is assembled in the following sequence:
- Welding a profile pipe to the back of the shovel.
- Fastening a semicircle made of steel sheet to a stiffener rib.
- Drilling holes in a semicircle.
- Making an L-shaped holder.
- Attaching the holder to the semicircular base with a central swivel bolt.
- Attaching the device to the car frame.
Adjusting the angle of the bucket is done by removing the locking bolt, turning the blade in the desired direction until the holes line up, and re-tightening the bolt and nut. To reduce the impact force on hard objects and bumps on the ground, an adapter with a short and stiff spring is inserted into the holder.
ATV plows
High maneuverability, combined with high traction force and powerful lugs, make a regular ATV an excellent base for installing a snow shovel.
The blade selection process includes four stages. First you need to decide on the installation kit - a structure that is attached to the frame and depends on the ATV model. Then a subframe is selected, after which all that remains is to select a suitable blade for it and a mechanism for lifting it.
There are two types of installation kits - front and central. The first ones are designed to be connected to the front base of an ATV and are intended for vehicles with low ground clearance. The advantage of the second type is to increase the rigidity of the tractor frame and improve the stability of its movement when clearing snow.
The blade mount is designed in such a way that it does not reduce ground clearance or reduce the vehicle's maneuverability.
The width of a snow shovel for an ATV depends on the engine power, the weight of the machine and ranges from 125 to 150 cm.
Inexpensive snow shovels that do not have a lifting mechanism are equipped with “skis” - a special sliding device that maintains a safe gap between the shovel blade and the surface of the coating.
The highest quality, but also the most expensive, blade systems for mounting on ATVs are produced by the American company Warn. A set consisting of a straight shovel, an installation kit and a frontal base along with lifting and turning mechanisms will cost the buyer 59,000 rubles. For comparison, prices for similar equipment from the Russian company Atvstar, but not equipped with a shovel drive, range from 15 to 20 thousand rubles.
An ATV with a mounted shovel can only be used effectively on loose snow no more than 50 cm high and not compacted into dense layers.
Blade painting
The dump was restored in three hours and partially painted. We're not expecting any more snow this year, so we didn't put it back on the car.
Dimensions of the Niva blade for snow removal
I took the dimensions of the blade after the fact, perhaps it will be useful to someone, the width of the blade is 2 meters, taking into account the fact that it is placed at an angle to the car in order to shovel the snow to the right, but if you do it straight, you simply push the snow forward (for example, push it out of yard), then do it according to the width of the Niva
Side view of the plow with dimensions, it pushes snow off the road to the right
View, if you look to the right of the car, the nearest curved tube, 60 cm in size, became like this as a result of a breakdown, it was bent like that, there is no need to bend it specifically.
The dimensions are given in the direction of travel, in a straight line.
I got these dimensions of the blade, I didn’t make any drawings before making the blade, I just did everything by eye, and then just measured it, maybe these dimensions will help someone imagine approximately what a do-it-yourself Niva blade should look like.