There are such winters in Russia that very often owners of private households are faced with the problem of removing large amounts of snow. Traditionally, this problem was solved with the help of ordinary shovels and various devices. Now, when many farms have at least walk-behind tractors that can be equipped with various types of attachments, removing snow, debris and performing other work has become much easier.
You can, of course, purchase such equipment in specialized stores, but often owners of small agricultural machinery prefer to make it themselves. Moreover, there is a lot of different information and drawings on this topic on the Internet. This allows not only to make equipment with the necessary parameters, but also to significantly save money.
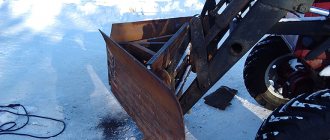
Homemade dump
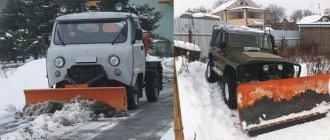
Snow plows, which can be installed on almost any type of equipment (tractors, ATVs, cars or walk-behind tractors), make life and the process of removing snow deposits much easier. Any snow plow consists directly of a working element, a mechanism for adjusting the angle of rotation and a fastening unit that secures the shovel to the chassis of the power unit.
Do-it-yourself snow plow for walk-behind tractor
Despite the fact that there are various modifications of factory devices for removing fallen snow, however, according to the presented drawings, you can easily and independently make a snow shovel. Thanks to this attachment for the Neva walk-behind tractor, you can clear your site of snow drifts in winter, and the rest of the time you can use it for garbage collection, leveling earthen areas and much more. Despite various modifications, all dumps are characterized by one general design and operating principle. The snow shovel has three main positions:
- forward;
- to the right with a slope of 30˚;
- to the left with a slope of 30˚.
Before snow clearing work, a homemade blade made from a gas cylinder or steel barrel must be turned 30˚ to the left or right. Having set the required angle, the walk-behind tractor shovel is fixed in the required position using metal cotter pins.
The principle of working with a snow plow for a walk-behind tractor
The mouldboard shovel of a walk-behind tractor must be installed correctly before performing its functions. She turns with her hands to the right or to the left at an angle of up to 30°. The process of adjusting the position ends with setting a suitable angle and fixing the shovel in the chosen location using cotter pins. The gripping area of a snow plow for a mobile power unit is usually one meter (individual modifications may have other values) with a shovel material thickness of 2 to 3 mm. In industrial conditions, these devices are made from high quality steel.
Read also: Report on the profession of turner
Homemade snow shovel
Barrel for making a blade
To make your own snow shovel for the Neva walk-behind tractor, first, you will need to collect the necessary tools and materials. So, we need:
- old steel barrel 200 l;
- an iron strip with dimensions of approximately 850x100x3 mm;
- 1 m of square pipe with a cross section of 40x40 mm;
- bolts M10, M12 and M8, as well as washers and nuts;
- set of metal drills;
- pliers;
- set of wrenches;
- a sheet of thick durable rubber;
- small but thick steel sheet;
- grinder with metal discs;
- welding machine;
- hand electric drill.
After all the tools, materials and drawings have been collected, you can begin to make a blade for the walk-behind tractor with your own hands. The simplest solution would be to make a ladle from an old 200 liter barrel, since it initially has optimal roundness. In this case, there is no need to heat the metal sheets and bend them, giving them the desired shape. So, you will need an old barrel, the lid and bottom of which must be cut off with a grinder. The resulting pipe should be cut lengthwise into three identical segments. These two thirds need to be joined together along the contour using a welding machine, and the remaining third should be cut with a grinder into strips that will be used to ensure sufficient rigidity. Attach one strip to the sides of the shovel, and distribute several pieces evenly along the entire length of the blade.
Design of a homemade snow plow
Now, to further strengthen the entire structure of the blade, you need to make a knife at the bottom of the bucket. To do this you will need an iron strip with dimensions 850x100x3 mm. Using an electric drill, drill three holes in the knife with a diameter of 5-6 mm and a distance between them of 100-120 mm. This is necessary to strengthen the rubber gasket, which will prevent the bucket from damaging the road surface. The knife is attached to the working edge of the bucket using a bolted connection.
Model rating
Modern industry offers a large selection of running models of dumps, which differ in some technical and operational features and cost. Let's look at the most popular types of products.
- The Grunfeld DB360 is a shovel-style snow plow made in China. The weight of the device is 30 kg, the permissible angle of rotation is 30 degrees. The working width is 900 mm.
- “Neva” is a small-sized blade weighing only 13 kg and a working width of 100 cm. It is used only for walk-behind tractors of the “Salyut” and “Neva” types.
- Bertolini 80 cm is a universal shovel, mounted on the VT 401 and VT 403 units. The working width is 80 cm.
- LP-1 – universal shovel blade. The weight of the installation is 16 kg, the width and height of the grip are 100 and 40 cm, respectively.
- ZIRKA DB360 – unit weighing 16 kg. Length – 85 cm, width – 28 cm, height – 37 cm. The permissible offset angle is 30 degrees, the working width is 80 cm.
- “Centaur” is a blade-shovel weighing 28 kg. The height of the device is 45 cm, while the offset angle does not exceed 30 degrees, the working width is 100 cm.
- Texas 92000160100 is a snow plow made in Denmark. It is attached to the walk-behind tractor from the front, and is optimal for clearing snow on the narrowest paths and small home areas, since the working width is only 75 cm. The kit includes a mount.
Features of manufacturing a snow plow
Let's consider another option for making a shovel, which is not too different from the previous one. For the blade itself you will need a 3 mm steel sheet, and for the racks that provide additional rigidity, you need to take thicker steel. It is necessary to make holes in the racks for attaching the shovel to the rods. It is very important to ensure vertical placement of homemade attachments in relation to the front of the power unit.
- shovel;
- rods;
- bracket for attaching the rods to the walk-behind tractor;
- craving.
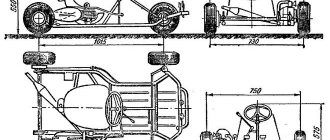
Scheme of a walk-behind tractor with a blade
How to design a trencher?
A homemade trencher is a mounted attachment to a walk-behind tractor that allows you to quickly and effortlessly dig trenches and holes.
It is a kind of compact excavator that is maneuverable and economical. Moves on wheels or tracks. The digging attachment allows you to dig trenches and holes even in frozen ground. The walls of the trenches are smooth, without crumbling. The developed soil is light and crumbly and can be used for backfilling.
Two cutters are attached to the front suspension, and a shovel is attached to the rear suspension to remove soil from the trench. Safety guards must be secured to the cutting discs and chain drive. Using the same principle, a drill attachment is made from a metal rod and plates.
Tools and materials
To create your own snow plow you will need:
- steel sheet 850x700x3 mm;
- 4 steel plates 450x230x3-4 mm;
- iron strip 850x100x3 mm;
- two eyes for attaching rods;
- 1 m of square pipe with a cross section of 40x40 mm;
- bolts M10, M12 and M8, as well as washers and nuts;
- two rods 520 mm long;
- set of metal drills;
- pliers;
- set of wrenches;
- a sheet of thick durable rubber;
- small but thick steel sheet;
- grinder with metal discs;
- electric welding machine;
- hand electric drill.
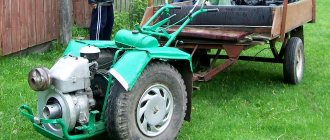
Trailers for MTZ
Since the characteristics of the MTZ walk-behind tractor allow you to transfer up to 300-500 kg of cargo, it is simply impossible not to use this opportunity. It is very convenient to transfer not only the harvested crop, but also various materials, tools and other cargo.
Relatives from the manufacturer
For walk-behind tractors, Belarus Smorgon Mechanical Plant presents its branded trailer PM-00.000. Externally, the cart is a classic version, which uses a hitch as an attachment to the walk-behind tractor. The advantage of the model is that there is a seat made in the form of a tank into which you can put the tool. The seat is very comfortable and it is easy to reach the steering wheel of the walk-behind tractor.
The PM trailer can transport up to 300 kg, despite the fact that its weight is 200 kg. Stability is achieved through the installation of pneumatic wheels with a ground clearance of 27 m. Durable steel was used in the manufacture of the body. The body volume is 0.705 cubic meters. The disadvantages include the design features, which do not provide for a tipper unloading option, since the body is welded to the frame.
Third-party analogues for MTZ
An analogue is the improved MP-480 model, which has a number of advantages: the ability to transport cargo weighing up to 500 kg and a folding body type. The reinforced design prevents the trailer from tipping over during cargo transportation. The cart comes with additional shields that can be used to increase the height of the side using special fastenings. The seat is made in the form of a convenient box in which you can store the necessary tools.
From different manufacturers you can find a large number of trailers, not only of different shapes, but also of carrying capacity. Belarusmash presents models TM-360 and 350, Akimov Metallurgical Plant - TM 500-700. The design principle is the same, but there are differences in some nuances, for example, the presence of wings above the wheels or the ability to fold down the side of the body.
Homemade version for MTZ
Just like many other equipment, you can make a cart with your own hands. Moreover, the homemade version will in no way be inferior to the branded one.
It is only important to carefully study the diagram presented below
Trailer manufacturing technique:
- Make a frame from a square pipe.
- The best option is a dump body with folding sides, so we will do that. Weld the body from sheets of iron or aluminum, depending on what is at hand.
- Attach the frame to the body, providing for the possibility of tilting the body independently.
- Install the seat at the front of the body. It is necessary for comfortable movement on a walk-behind tractor. It is necessary to calculate the distance from the steering wheel to the seat so that it is convenient to control.
Video review
The video review demonstrates how to assemble a trailer for Belarus yourself
Review of the dump trailer for the MTZ walk-behind tractor
Reviews from owners confirm that using a walk-behind tractor for transporting goods is quite realistic and very common. In fact, a walk-behind tractor can replace a tractor.
Alexander:
I didn’t intend to make a trailer myself for the simple reason that my hands were in the wrong place. That's why I bought the TS-350 and didn't regret it. I have to work almost every day, and with a trailer it has become easier not only to move around, but also to transport crops. It's easy to handle. My Belarusian can handle uphill and downhill very well.
Valentin:
Of course, it’s good to use a trailer, but it matters on what road. If the soil is washed out and there is dirt everywhere, then Belarus may stall
And on a good road, speeds of up to 10 km/h can be achieved. If it slips, then you need to reduce the amount of cargo. But this is better than nothing.
An adapter for a walk-behind tractor is a device that can be aggregated with single-axle tractor equipment and is equipped with mechanisms for installing and securing various types of attachments.
Externally resembling a single-axle trailer, the walk-behind tractor adapter can significantly expand the capabilities of the walk-behind tractor and increase its productivity.
By turning a single-axle walk-behind tractor into a mini-tractor, it allows you to quickly and effortlessly carry out pre-sowing tillage, sowing crops, hilling and cultivating crops, and can also be used as a vehicle and a device for removing snow and debris.
Blade installation
To install the grader you will have to resort to using brackets mounted on the frame of the power unit used. Additionally, the blade is attached to the walk-behind tractor using two rods, which, when inoperative, make it possible to unload the walk-behind tractor brackets. The knife, made of a steel plate 850x100x3 mm, is mounted on the lower horizontal edge of the grader using a bolted connection.
Now, after the dump is ready, you need to install it and you can start clearing snow drifts, removing debris or leveling the earthen area on your site. A do-it-yourself walk-behind tractor blade is a universal piece of equipment that can be used to perform various jobs. And making it yourself will give you the opportunity to get a multifunctional device tailored specifically to your needs.
In order for the walk-behind tractor to last as long as possible and resist corrosion, it should be treated with a special primer or protective paint.
The rubber strip attached to the working edge of the shovel should protrude beyond the steel plate.
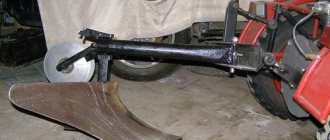
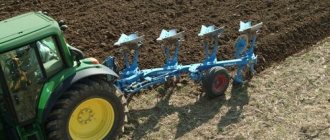
DIY plow
Reality is a homemade plow for a walk-behind tractor
Only in this case it is important to find accurate and correct drawings. The quality of tillage will depend on this
The plow blade itself is usually made of 3 mm thick steel
It is important to bend it correctly. A template made from an ordinary metal pipe will help you do this correctly.
For the stand, take a metal plate whose thickness is at least 10 mm. The degree of depth is regulated by the location of the stand on the bracket. The plowing angle is selected by tilting the walk-behind tractor. An adjusting screw can be used for this purpose.
The soil is cut and formed into a layer by the ploughshare. The traditional version is a double-sided design. But you can also choose a more modern version of a self-sharpening plowshare. In the first case, it is necessary to periodically sharpen the equipment. This will allow you to evenly loosen the soil and cut the roots of weeds.
Digging equipment
Potato diggers of various types are very popular among farmers. These devices save people from hard manual labor, speeding up the harvesting process several times. The walk-behind tractor has a very simple design. It can be made from metal that remains after the construction and renovation of a house.
To work you will need:
- Bulgarian;
- welding machine;
- electric drill;
- heavy hammer;
- anvil;
- profile steel pipe 20x40 mm;
- reinforcement 12 mm;
- tin (preferably stainless);
- bayonet shovel without handle.
The attachment to the walk-behind tractor is made in a suspended or trailed (modular) design. The hanging tool only digs up the tubers, leaving them lying on the surface for subsequent manual harvesting. A modular potato digger not only extracts the crop from the ground, but also collects it in a mobile container on a chassis.
The manufacture of a digger is carried out in the following sequence:
- Drawing up a drawing. The width of the digger should be within 25-30 cm. The angle of attack of the tip is taken perpendicular to the coulter so that the tool does not bury itself in the ground.
- The reinforcement is cut into fragments of a given length. Using a hammer and anvil, they are given the required bend.
- A container for tubers is assembled from a profile pipe and tin. The chassis or skids are welded to the container frame. The runners are made from pipes, and the chassis is taken from an old stroller, cart or lawn mower.
- The holder and reinforcement bars are welded to the shovel. A drawbar is welded to the holder, which is fixed to the assembly container. Connections are made movable using bolts or hinges.
- Rust and weld marks are removed. The finished product is treated with an anti-corrosion agent and coated with paint.
Adjustment and adjustment of the digger is carried out using racks and steel ties.
Included with the digger, you can immediately make a disk hiller. This tool will be needed when planting tubers after they have been buried in a trench made by a plow. Hillers are made from old pot lids, profile pipes and bolts. A trolley is assembled from pipes and small wheels, onto which holders for lids are welded at a certain angle. After sharpening on a stone, the discs are mounted on holders.
Sources:
https://stroy-dvorik.ru/motobloki/frontalnyj-pogruzchik-iz-motobloka.html
Reviews from forums
Here's what we managed to find on thematic forums:
Stepan writes:
“The main thing when working with a blade is not to load it straight into the snow. The engine must initially warm up and prepare for operation. Otherwise, the motor may not be able to withstand the high voltage and problems may occur."
Andrey writes:
“Be sure to check that the blade is securely installed. Because I once went out and forgot to check if all the bolts were tightened, hoping that everything worked fine yesterday and nothing had changed today. As a result, as soon as it started working, it was pulled out of the clutch. Luckily I didn’t get hurt myself, but the science lasts for life.”