content .. 51 52 59 ..
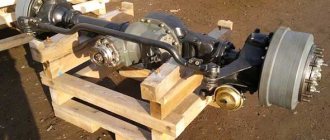
REPLACING THE REAR AXLE GEARBOX OF KAMAZ VEHICLES
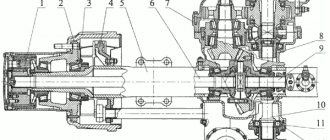
To remove the gearbox, unscrew the magnetic drain plug of the rear axle housing and drain the oil, then screw in the plug. Unscrew the nuts of the bolts securing the flange of the rear axle propeller shaft to the flange of the drive bevel gear of the main gear, remove the bolts from the holes in the flange and turn the propeller shaft to the side. Unscrew the nuts of the upper rear reaction rod bracket, remove the spring washers, expansion bushings and move the rod upward. Unscrew the nuts of the gearbox mounting studs, remove the spring washers, the elbow of the tees for air distribution to the brake chambers of the rear axle and the bracket for fastening the horizontal rod of the brake force regulator assembled with the rod.
Unscrew the nuts of the studs securing the right axle shaft of the rear axle and remove the spring washers, screw in the release bolts and separate the axle shaft flange from the hub, remove the expansion bushings and unscrew the release bolts, remove the axle shaft from the axle housing and remove the axle shaft gasket. Do the same for the left axle shaft.
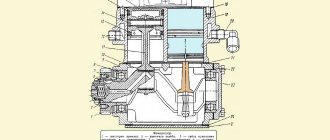
Unscrew the 1/4″ plug KG of the rear axle filler hole and screw the eye bolt into its place. Remove the section of the body platform located above the gearbox. Move the crane beam, put the grip on the eye bolt, lift the gearbox and place it on the trolley, remove the grip and move the crane beam to the side. Remove the eye bolt and replace the plug.
To install the gearbox, unscrew the plug and screw the eye bolt in its place. Move the crane beam and put the grip on the eye bolt, lift the gearbox from the trolley and lower it onto the rear axle to the level of the connector. Apply a thin layer of sealant (UN-25 paste) to the gearbox housing gasket and place the gasket on the gearbox mounting studs. Align the gearbox holes with the studs
rear axle housing and install the gearbox, remove the crane beam grip from the eye bolt and move it to the side. Place spring washers on the gearbox mounting studs, the horizontal rod mounting bracket of the brake force regulator assembled with the rod, the air outlet elbow to the brake chambers of the rear axle, screw on the nuts and tighten them. Lift the rear axle driveshaft and attach it to the final drive bevel gear flange, aligning the holes in the flanges; insert bolts into the holes; put spring washers on them, screw on the nuts and tighten them. Align the rear upper reaction rod bracket holes with the studs and install the bracket; put the expansion bushings on the studs and spring washers; Screw on the nuts and tighten them.
Apply a thin layer of sealant to the right axle shaft gasket and slide it onto the axle shaft studs. Insert the right axle shaft into the rear axle housing; align the splined end of the axle gear with the differential and insert it into the gear, putting the axle flange on the hub studs, place expansion bushings and spring washers on the axle studs, screw on the nuts and tighten them, ensuring a tightening torque of 118... 137 N.m (12... 14 kgf.m). Repeat the same for the left axle shaft.
Unscrew the eye bolt from the filler hole of the gearbox housing and fill the crankcase with oil, screw in the plug. Install the body platform deck section.
Check the operation of the rear axle final drive with mileage. A slight uniform noise of gears without metallic knocking is allowed. Oil leakage is not allowed.
To make troubleshooting easier, perform a series of tests:
1. When driving a car on a highway at a speed of about 20 km/h, determine the presence of noise. Then gradually increase the speed to 80 km/h, listening and noticing the speed at which the noises appear and disappear. Without braking with the fuel pedal, reduce the crankshaft speed and, while decelerating, watch for changes in noise, as well as for intervals at which the noise is felt stronger. Typically, noise occurs at the same speeds, both during acceleration and deceleration.
2. Accelerate the vehicle to a speed of approximately 80 km/h, place the gear shift in neutral, turn off the engine and let the vehicle roll freely until it stops, while observing the noise pattern at various deceleration speeds. The noise observed during this test and consistent with that observed during Test 1 does not come from the gearboxes, since these unloaded components cannot cause noise other than noise caused by the bearings. In contrast, noise noted in test 1 and not repeated in test 2 may be coming from gearboxes or bearings. Determine the source of these noises by subsequent testing.
3. With the vehicle stationary and braked, turn on the engine and, gradually increasing engine speed, compare the noises noticed with the noises of the two previous tests. The noises observed during this test, which correspond to the noise of test 1, do not relate to the gearboxes. They may be caused by other assemblies such as the air cleaner, muffler, engine, compressor, power steering pump, transmission.
4. Noises detected during test 1 and not repeated during subsequent tests come from the gearbox.
To confirm that the source of the noise has been correctly identified, raise the wheels of the rear and intermediate axles, start the engine and engage fifth gear. In this case, you can make sure that the noise caused by the gearboxes actually comes from them, and not from other assembly units.
Table 35 Possible malfunctions of drive axles and ways to eliminate them
content .. 51 52 59 ..
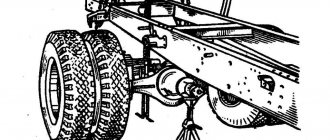
REPLACING THE FRONT AXLE GEARBOX
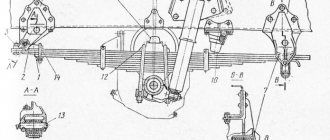
Removing the gearbox - the main drive of the front axle
To remove the front axle final drive, you must:
— unscrew the drain plug and drain the oil from the front axle final drive housing. Clean the plug magnet from metal particles and screw in the plug;
— close the air shut-off valves of the centralized system for regulating tire pressure on all wheels;
— unscrew the nuts and remove the bolt securing the protective casing of the flexible air supply hose, remove the spring washers and the protective casing;
- Unscrew the bolts securing the valve to the axle shaft, remove the valve with the gasket and move it to the side;
— unscrew the nuts securing the axle shaft flanges, remove the spring washers and expansion bushings; using technological bolts, press out the axle shaft flange and remove the gasket;
— loosen the wheel nuts;
— use the parking brake system to brake the wheels of the rear and intermediate axles, raise the front of the car and place stands under the frame;
- Unscrew the wheel nuts and remove the wheels;
— unscrew the lock nut, remove the lock washer, unscrew the hub bearing nut;
— install the puller and press the wheel hub from the axle;
— disconnect the hoses of the tire pressure regulation system;
— unpin the brake pad axles, remove the brake pad springs and pads;
— unscrew the nuts of the studs securing the caliper and the axle to the steering knuckle body, remove the spring washers, the caliper, the axle with the outer knuckle and the constant velocity joint disk assembly;
— remove the axle shaft with the inner knuckle assembly;
— disconnect the front axle drive driveshaft from the main gear input shaft flange by unscrewing the nuts and removing the bolts;
— disconnect the transverse steering rod by unscrewing and unscrewing the left ball pin nut;
— Unscrew the nuts of the studs securing the main gear housing to the axle housing;
— roll the cart under the car (on the left side). Remove the main gear from the axle housing, lower it onto the trolley and roll it out from under the car.
Installation of the gearbox - the main drive of the front axle
- Lubricate the gasket with sealing paste on both sides. Install the gasket and the main gear on the front axle housing, put spring washers on the studs, screw and tighten the nuts with a torque of 137-157 N. m (14-16 kgf • m);
— install the front axle axle shafts with internal cams;
— install the axle, caliper, outer knuckle, hinge disk and attach to the steering knuckle body;
— install brake pads on the axles and brake pad springs;
— connect the hoses of the tire pressure regulation system;
— unscrew the plug and fill the cavity of the steering knuckle with lubricant;
— adjust the wheel hub bearings;
— install and secure the drive flange of the axle shaft;
— install the transverse steering rod by inserting a finger into the hole of the left swing arm, screw the nut with a torque of 245-314 N • m (25-32 kgf • m) and secure it with a cotter pin;
— connect the driveshaft of the front axle drive to the flange of the main gear input shaft, insert the bolts and tighten the nuts with a torque of 78-88 N • m (8-9 kgf • m);
— install the front axle wheels, tighten the nuts;
— raise the front of the car, remove the stand and lower the car onto the wheels;
— tighten the wheel nuts with a torque of 392-490 N • m (40-50 kgf - m);
— lubricate the gasket on both sides with sealing paste and place it on the body of the air shut-off valve. Install the valve body onto the axle shaft flange and secure with four bolts;
— install and secure the protective cover of the tire inflation hose;
— open the air shut-off valves of the centralized system for regulating tire pressure on all wheels;
— unscrew the filler and control plugs, add oil, screw in the plugs.
REPLACING THE REAR AXLE GEARBOX
Removing the rear axle gearbox
To remove the gearbox, unscrew the magnetic drain plug of the rear axle housing and drain the oil, then screw in the plug. Unscrew the nuts of the bolts securing the rear axle driveshaft flange to the drive bevel gear flange of the main gear, remove the bolts from the flange holes and turn the driveshaft to the side. Unscrew the nuts of the upper rear reaction rod bracket, remove the spring washers, expansion bushings and move the rod upward. Unscrew the nuts of the gearbox mounting studs, remove the spring washers, the elbow of the tees for air distribution to the brake chambers of the rear axle and the bracket for fastening the horizontal rod of the brake force regulator assembled with the rod.
Unscrew the nuts of the studs securing the right axle shaft of the rear axle and remove the spring washers, screw in the release bolts and separate the axle shaft flange from the hub, remove the expansion bushings and unscrew the release bolts, remove the axle shaft from the axle housing and remove the axle shaft gasket. Do the same for the left axle shaft.
Unscrew the 1/4″ plug KG of the rear axle filler hole and screw the eye bolt into its place. Remove the section of the body platform located above the gearbox. Move the crane beam, put the grip on the eye bolt, lift the gearbox and place it on the trolley, remove the grip and move the crane beam to the side. Remove the eye bolt and replace the plug.
Rear axle gearbox installation
To install the gearbox, unscrew the plug and screw the eye bolt in its place. Move the crane beam and put the grip on the eye bolt, lift the gearbox from the trolley and lower it onto the rear axle to the level of the connector. Apply a thin layer of sealant (UN-25 paste) to the gearbox housing gasket and place the gasket on the gearbox mounting studs. Align the gearbox holes with the rear axle housing studs and install the gearbox, remove the crane beam grip from the eyebolt and move it to the side. Place spring washers on the gearbox mounting studs, the horizontal rod mounting bracket of the brake force regulator assembled with the rod, the air outlet elbow to the brake chambers of the rear axle, screw on the nuts and tighten them. Lift the rear axle driveshaft and attach it to the final drive bevel gear flange, aligning the holes in the flanges; insert bolts into the holes; put spring washers on them, screw on the nuts and tighten them. Align the rear upper reaction rod bracket holes with the studs and install the bracket; put the expansion bushings on the studs and spring washers; Screw on the nuts and tighten them.
Apply a thin layer of sealant to the right axle shaft gasket and slide it onto the axle shaft studs. Insert the right axle shaft into the rear axle housing; align the splined end of the axle gear with the differential and insert it into the gear, putting the axle flange on the hub studs, place expansion bushings and spring washers on the axle studs, screw on the nuts and tighten them, ensuring a tightening torque of 118... 137 N m (12... 14 kgf .m). Repeat the same for the left axle shaft.
Unscrew the eye bolt from the filler hole of the gearbox housing and fill the crankcase with oil, screw in the plug. Install the body platform deck section.
Check the operation of the rear axle final drive with mileage. A slight uniform noise of gears without metallic knocking is allowed. Oil leakage is not allowed.
To find a fault, perform a series of tests:
1. When driving a car on a highway at a speed of about 20 km/h, determine the presence of noise. Then gradually increase the speed to 80 km/h, listening and noticing the speed at which the noises appear and disappear. Without braking with the fuel pedal, reduce the crankshaft speed and, while decelerating, watch for changes in noise, as well as for intervals at which the noise is felt stronger. Typically, noise occurs at the same speeds, both during acceleration and deceleration.
2. Accelerate the vehicle to a speed of approximately 80 km/h, place the gear shift in neutral, turn off the engine and let the vehicle roll freely until it stops, while observing the noise pattern at various deceleration speeds. The noise observed during this test and consistent with that observed during Test 1 does not come from the gearboxes, since these unloaded components cannot cause noise other than noise caused by the bearings. In contrast, noise noted in test 1 and not repeated in test 2 may be coming from gearboxes or bearings. Determine the source of these noises by subsequent testing.
3. With the vehicle stationary and braked, turn on the engine and, gradually increasing engine speed, compare the noises noticed with the noises of the two previous tests. The noises observed during this test, which correspond to the noise of test 1, do not relate to the gearboxes. They may be caused by other assemblies such as the air cleaner, muffler, engine, compressor, power steering pump, transmission.
4. Noises detected during test 1 and not repeated during subsequent tests come from the gearbox.
To confirm that the source of the noise has been correctly identified, raise the wheels of the rear and intermediate axles, start the engine and engage fifth gear. In this case, you can make sure that the noise caused by the gearboxes actually comes from them, and not from other assembly units.
Possible malfunctions of drive axles and ways to eliminate them
| Cause of malfunction | Elimination method |
| Increased circumferential clearance in the meshing of bevel gears | |
| Wear of bevel gear teeth | Should not be adjusted |
| Wear of tapered roller bearings (there is significant axial play in the mesh) | since the bevel gears must be operated until they are worn out without further adjustment, restore the preload of the drive bevel gear bearings. Then remove an appropriate number of shims from under the bearing cup flange to compensate for bearing wear. Check the correct contact pattern in the mesh of the bevel gears |
| Increased noise when driving a car at a speed of 30... 40 km/h | |
| The contact patch is shifted towards the wide part of the driven gear teeth | Adjust the engagement according to the contact patch |
| Increased noise when braking a car | |
| The contact patch is shifted towards the narrow part of the teeth of the driven bevel gear | Adjust the engagement according to the contact patch |
| Pulsating noise when disengaging the clutch and changing gears | |
| The contact patch is located closer to the tops of the teeth | Adjust the engagement according to the contact patch |
| Continuous sharp noise when driving | |
| Severe wear or damage to gears | Replace the gears as a whole |
| Loose bearings | Tighten the nut securing the bearings to the shafts |
| Severe bearing wear | Replace the bearings by installing new ones with preload |
| Insufficient oil level in the axle housing | Check the level and add oil |
| Lubricant leakage through seals and cover connectors | Replace the seals and tighten the cover bolts |
— Construction of bridges — Maintenance of bridges — Repair of KamAZ bridges — Removal and installation of KamAZ bridges
Spare parts for KAMAZ-4310 KamAZ-5490 gearbox ZF gearbox Transfer cases Gearboxes
Buy spare parts from us:
| We complete applications of any complexity, competitive prices, and a system of volume discounts. |
| We provide a clear guarantee of the quality of spare parts from manufacturers |
| Prompt delivery throughout Russia |
| Call or write to [email protected] Information will be required: car model, year of manufacture, unit model, Euro class. |