The rear wheels on a Kamaz truck do not release the brakes
The front wheels do not release the brakes - this problem occurs for many drivers, which is not surprising.
If you don’t know anything about the technical part, then it’s better to contact the service. Everything will be done there very quickly and without problems. You just need to pay the required amount and that’s it. But if you understand a little about technology, then you can fix everything yourself. The main thing is to determine the cause of the disease so as not to dig through the entire car. Experts note that this process can require a lot of time and effort, which is not surprising. The main reason may be a problem in the brake system, which is logical. And this is very bad, especially in an urban environment. At the right moment, the wheels simply will not release the brakes, which will lead to a traffic accident. It is necessary to eliminate the cause immediately so that problems do not arise. The problem can arise in different ways:
- The front wheels simply jam;
- Scrolling occurs;
- It is very difficult to spin, with some creaking;
- The wheel jams at the right moment.
All these problems must be addressed immediately to prevent consequences.
This problem can arise for several reasons. The most common ones include jamming of the piston, caliper, and hose malfunctions.
The caliper is jammed. This problem occurs very often, especially on domestic cars. To eliminate it, some knowledge is required. It is worth knowing that you will have to change not only the caliper, but also the brake pads themselves, which is very sad. And this is an additional injection of cash, which hits your pocket very hard. Of course, you can save a little money if you do everything yourself. But it will take a lot of time and effort, and not everyone can afford it. You'll be very lucky if the caliper is simply warped. It is enough to level it and that’s it, the wheels will continue to release the brakes. Otherwise you will have to spend extra money.
There may also be simple clogging of the holes that are designed to supply liquid. To fix the problem, just clean them and that's it.
The brake pistons are stuck. To determine this problem, you need to contact the service. Only there is special equipment that will allow you to determine the cause. It is worth noting that the problem can be corrected by simple lubrication and cleaning.
Checking the hose is very important for the brake system. The fact is that if there is a breakdown, then the fluid simply does not enter the brake system, and there is no disinhibition.
With such a problem, there can be a lot of symptoms. The most common problem is the heating of the wheel rim. Here are other reasons:
- The tension spring, which is located on the brake pad, is not functioning properly. To eliminate the cause, you just need to change the spring so that problems do not arise in the future. Over time, any metal gets tired, which is logical, it weakens. The result is destruction;
- The friction lining is damaged. Because of this, the front wheels are not able to function properly. To fix the problem, you just need to replace the gasket with a new one. You should carefully ensure that it fits into place without distortion. Otherwise, the vehicle may be driven off the trajectory;
- The brake piston is stuck. To eliminate the cause, it is necessary to check it, clean and lubricate it. If everything is very bad, then you can simply change it to a new one;
- The cuff is swollen or deformed. The problem can be corrected by a simple replacement. Nothing needs to be lubricated or cleaned;
- There is no gap between the drum and the lining;
- Oxidation of the guide. To solve the problem, you need to buy a special cleaner and lubricant.
How to improve your brakes
Repairing the KamAZ brake system and tuning will help improve the performance of this mechanism:
- Replacing standard discs with larger diameter ones. To install them, you need to drill special holes that must coincide with the mounting bolts of the tuning part. In some cases, plates may be required to support calipers over larger disc mechanisms. You should also purchase wheels that are larger in size and width.
- Replacing the standard mechanism with a ventilated disc or device with notches of the same size. Calipers must be installed on each disc using reliable fasteners. This method will help increase the efficiency of the brake chamber by 2 times.
When carrying out work to improve brake performance, the following recommendations must be observed:
- The brake design itself is prohibited from changing at the legislative level. Any changes will be detected during regular technical inspection.
- All parts should be selected only from reliable manufacturers who have passed the certification procedure.
- Tuning can only be done if all elements of the system are in good condition.
There are many videos on the Internet on how to improve the brakes on KamAZ. Typically, model 5511 is used as an example. Improving the brakes is best left to professionals, since if you adjust it yourself, there is a chance of completely ruining the system.
If the brake in a car does not work well, then you should first check whether all the auxiliary systems are working properly, and only then understand the brake mechanism.
KamAZ is a fairly large vehicle, which means its brakes must work at 100%. We advise you not to try to improve the car yourself.
How to remove a brake drum
Before performing this procedure, you should wear protection, such as a mask or goggles.
To remove the brake drum, do the following:
- Place the vehicle on a special platform.
- Stop the engine and raise the handbrake.
- Loosen the bolt tension.
- Using a wheel wrench, turn each nut 1 turn counterclockwise.
- Raise KamAZ using a special device.
- Unscrew the bolts and remove the wheel.
- Using a wheel wrench, remove any loose wheel nuts.
- Remove the cap and put all unscrewed fasteners into it.
- Remove the wheel from the guides.
- Loosen the pads by unscrewing the adjuster screw, which is located on the outside of the drum part.
- Turn the drum so that the hole aligns with the adjuster screw.
- Turn the regulator screw clockwise until it stops.
- Remove the drum.
- Using a screwdriver, remove the screws that hold this mechanism to the wheel.
- Pull the drum towards you using a special puller.
- Insert a screwdriver under the flange of the drum mechanism.
- Lightly tap the lever, screwdriver, or the drum itself.
How to adjust
To adjust the brakes on KamAZ you need:
- Check the movement of the brake lever. It should move freely and return to its original position.
- Align the holes in the handle body and the mechanism rod fork by rotating the worm.
- Press the control unit all the way in the direction of its rotation.
- Using bolts and nuts, connect the fixing type bracket to the control unit of the handle. The position of the block should remain the same.
- Rotating the worm, open the brakes until the pads touch the drum mechanism.
- Turn the worm in the opposite direction ¾ of a turn. The gear coupling must work, and the turning torque of the worm must be at least 42 Nm.
- Check the functionality of the handle. To do this, you need to release the brakes of the vehicle in place by pressing the pedal all the way.
- Check the serviceability of the rod. It should move without binding.
- Adjust the stroke of the rod according to the required clearance by rotating the worm.
- Check the uniform rotation of the drum mechanism.
After 2-6 km, inspect the mechanism for heating of the drum device. The temperature should not exceed +60…+80°C.
Why are the brakes bad?
Malfunctions of the KamAZ brake system can lead to malfunctions of the vehicle.
Breakdowns and ways to fix them:
- Air in the parking brake system. Because of this, the brake pedal does not release. Air flow can enter the system during depressurization, a drop in fuel level, or due to damaged pipes and hoses. To eliminate the breakdown, it is recommended to bleed the brake mechanism.
- Damaged vacuum. This mechanism directly affects the operation of the brakes. To check its serviceability, you need to press the pedal 5-7 times in a row with the engine turned off. This will help remove the vacuum in the amplifier device. After this, you need to start the unit while holding the pedal. If after starting it drops a little, it means the vacuum is working, if not, then you need to replace the damaged element.
- Extraneous noise while driving may be due to damaged brake pads. In this case, it is recommended to install the KamAZ on a platform and lift it using special equipment, remove the front wheels and inspect the disc elements. The thickness of the disk must be at least 10.8 mm. You also need to check the movement of the pads. Using a screwdriver, they are removed from the disk element; if this cannot be done, then the problem lies in the jamming of the piston mechanism.
How to adjust the parking brake on a KamAZ?
Adjusting the gap between the friction linings and the parking brake
brake system (Ural-4320) is done by moving the adjusting lever on the expansion cam shaft clockwise by one or two teeth. The gap between the linings and the drum should be within 0.30.6 mm.
Interesting materials:
How to germinate cedar seeds? How to dry laminate flooring after flooding without disassembling it? How to drill through concrete without a hammer drill? How to drill into concrete with a regular drill? How to drill a concrete wall without a hammer drill? How to drill a concrete wall with a hammer drill? How to drill through a concrete wall? How to drill a large hole in wood? How to drill a hole in tile? How to drill a hole in a tile?
Malfunctions of the service brake system
Ineffective braking of the car when you press the brake pedal occurs if the brake valve drive is out of alignment or the two-section brake valve is faulty. If, during braking, the pressure in the brake chambers is nominal, then the wheel brake mechanisms are misaligned or faulty.
If, when braking with the service brake, the pressure is below normal only in the brake chambers of the front axle, then either the lower section of the brake valve or the pressure limiter is faulty. If the pressure in the brake chambers is normal, but braking is not effective, then the stroke of the brake chamber rods is greater than normal, or, for example, the brake linings are oily.
When you press the brake pedal, the braking of the wheels of the rear cart is ineffective or does not occur at all (the front wheels brake normally). In the pneumatic part of the drive, the upper section of the brake valve or the brake force regulator may be faulty. In the mechanical part, the brake mechanisms or the drive of the brake force regulator lever are faulty or misaligned.
If, after releasing the brake pedal, all the wheels of the car do not release the brakes, then the two-section brake valve is faulty (the pusher or the upper piston is jammed). It is possible that the brake valve drive is out of adjustment (there is no free play of the brake pedal).
If air does not come out of the rear brake chambers after releasing the brake pedal, the brake force regulator or the upper section of the brake valve is faulty. These malfunctions lead to a delay in the release of air from the front brake chambers. If, when releasing the brakes, air is not released only from the front brake chambers, then the pressure limiter or the lower section of the brake valve is faulty.
Air leaks from the atmospheric outlet of the pressure limiter or brake force regulator during braking indicate malfunctions of these devices.
The cause of air leaks from the atmospheric outlet of a two-section brake valve can be not only the sealing rings and valves in the valve itself, but also other devices of the brake system. If air leakage from the atmospheric outlet of the brake valve is observed when the pedal is released and the parking brake is applied, then the brake valve is faulty. When the engine is not running, using the standard two-pointer pressure gauge, you can accurately determine which section of the valve is leaking: if the upper arrow of the pressure gauge falls, the lower section of the valve is leaking; the lower arrow falls - the upper section is leaking.
If air leakage from the atmospheric outlet of the brake valve is observed only when the parking brake is released, and stops when applied, then the trailer brake control valve with a two-wire drive or one of the energy accumulators is faulty. A faulty device can be determined by supplying air to the energy accumulators from the emergency brake release circuit: if, when you press the emergency brake release valve button, the leakage from the brake valve continues, then the pusher seal in the energy accumulator body is leaking, and if there is no leak, then the diaphragm in the trailer brake control valve is faulty.
How much does a KAMAZ handbrake valve cost?
Brake valve KAMAZ
| Name | Price |
| Brake handbrake valve Article: 6029-3537310-91 | RUB 2,261 To order |
| valve K064763N00 Article number: K064763N00 | 17,000 rub. In stock |
| valve MAN (an. 4613150890) Article number: 35140240050 | RUR 6,642 To order |
| valve Article: 8299.3514100-20 | RUB 4,786 To order |
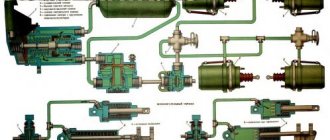
Malfunctions of the pneumatic drive of the parking brake system and the emergency brake release circuit
If, when the parking brake is turned off, the wheels of the rear trolley do not release the brakes , then the cause of this may be a malfunction in the parking brake valve, in the accelerator or dual-line valves, or in energy accumulators.
It is possible that one of the pipes in the parking brake circuit is clogged, frozen or pinched.
In the parking brake valve, a breakdown of the guide plastic plate or unreliable attachment of the rod to this plate leads to the parking brake not braking.
In an accelerator valve in winter, the most likely cause of non-release is the freezing of condensate in the cavity above the piston.
If, when moving the parking brake valve handle, one of the energy accumulators does not work, then mechanical damage to this device is possible: dents in the body or sticking of the pusher.
It is also possible that the pipeline through which air is supplied to an inoperative energy accumulator may become clogged.
If the brake chamber rods come out when the energy accumulators are turned on, and the car does not brake effectively enough, then it is necessary to check the stroke of the rods (it should not exceed 40 mm) and the serviceability of the wheel brake mechanisms.
The brake pad linings must not be worn or oily.
The most common malfunctions in the parking brake circuit, as in the entire pneumatic drive, are compressed air leaks due to malfunction of the sealing rings and cuffs.
It is important to determine the cause of the leak and find the faulty device.
Air leakage from under the parking brake valve handle when the brake is released is caused by a leaky rod seal in the guide.
This seal fails the fastest because the rod reciprocates and rotates, and the diameter of the o-ring is small.
The cause of air leakage from the atmospheric outlet of the parking brake valve is not always a leak in the seals in the valve itself. The two-wire trailer brake control valve may be faulty.
How to identify a faulty device? Fill the pneumatic drive with compressed air, turn on the parking brake, disconnect the control line tube from the valve; if air leakage from the atmospheric outlet continues, then the parking brake valve is faulty; If a leak is observed from the disconnected control line, the trailer brake control valve is faulty.
If air leaks from the atmospheric outlet of the accelerator valve both during braking and when releasing the parking brake, the sealing ring of the atmospheric outlet of the valve is leaking.
Air leakage through the atmospheric outlet of the device when braking with the parking brake is caused by loss of tightness of the intake valve, and when releasing the brake, loss of tightness of the exhaust valve. In the latter case, the rear wheels are not released.
Sometimes air leakage through the accelerator valve is observed when the parking brake is applied and the brake pedal is pressed at the same time.
In this case, one of the energy accumulators is faulty - air from the brake chamber goes through the seal of the pusher pipe into the energy accumulator and then through the accelerator valve into the atmosphere.
During operation, the piston seals in the cylinder and the pusher pipes in the housing wear out and fail in energy accumulators.
When the parking brake is released, compressed air from under the piston flows through a leaky seal into the cavity above the piston and through the connecting hose on the side of the device under the brake chamber diaphragm, and from there into the atmosphere through the drain hole.
When the parking brake is applied, the leakage stops.
If the seal of the pusher pipe in the accumulator body fails, then when the parking brake is turned off, compressed air from under the piston enters the cavity above the diaphragm and escapes into the atmosphere through the brake force regulator.
If the regulator lever is “tied” in the upper position or the car is fully loaded, then the air escapes into the atmosphere through the atmospheric outlet of the brake valve.
To detect a faulty energy accumulator, you need to release the parking brake and one by one disconnect the pipelines supplying compressed air to the rear brake chambers: for a faulty device, compressed air will come out of the cavity of the brake chamber.
The springs in energy accumulators can be compressed mechanically using screws located on top.
When the screw is unscrewed, the force is transmitted through the thrust bearing to the piston, and the spring is compressed.
If the threaded connection of the screw and the boss are not lubricated, and the screw is not screwed tightly into the boss, and moisture gets into the threaded connection, the threads rust, and it becomes difficult, and sometimes impossible, to remove such a screw.
Energy accumulators can be released using the emergency brake release circuit.
When you press the emergency brake release valve button, compressed air from the service brake cylinders is supplied through a two-line valve to the energy accumulators.
If, when the tap button is pressed, the energy accumulators are not released, and after releasing it, a small portion of compressed air comes out of the atmospheric outlet, then the cross-section of the pipeline between the tap and the two-line valve is blocked.
If after releasing the valve button there is no air coming out of the atmospheric outlet, then the valve itself is faulty.
If, when you press the tap button, air escapes into the atmosphere through the accelerator valve, the dual-line valve is faulty; its sealing washer is leaking.
Air leakage from the atmospheric outlet of the emergency brake release valve may be due to a malfunction of both the valve itself and the two-line valve.
If an air leak is observed regardless of the position of the parking brake valve handle, then the valve itself is faulty.
And if the leak occurs only when the parking brake is released, and stops when braking, it means that the two-line valve is leaking.
In both cases, it is forbidden to plug the atmospheric outlet in the emergency brake release valve with a plug, since in this case spontaneous release of the vehicle’s parking brake is observed and the spare brake does not work satisfactorily. This is explained by the fact that when you turn on the emergency or parking brake by turning the parking brake valve handle, air is not always released from the energy accumulators.
A dual-line valve prevents the release of air, and a faulty emergency brake release valve creates air pressure in the energy accumulators sufficient to release the parking brake.
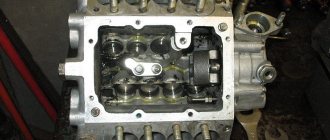
Repair of the handbrake valve for KamAZ, ZIL, KrAZ, MAZ vehicles (30 photos)
The content of the article:
Reverse-acting pneumatic hand brake valve
Such a crane is used as a parking brake on vehicles of the KamAZ, ZIL, KrAZ, MAZ and Ural brands.
If there is a malfunction, the valve may leak air or the vehicle will slowly release the brakes. In this case, it will be necessary to replace the worn rubber o-rings and cuffs. This set is included in the RTI repair kit for the hand brake valve, has a catalog number 100-3537009-30 and the name “set of spare parts for the manual reverse-action brake valve”. The catalog number of the tap itself is 100-3537010.
Repair of the parking brake valve (replacement of rubber sealing rings and cuffs)
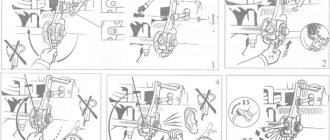
To repair the handbrake valve, you will need to remove it from the bracket on which it is installed. On KamAZ and ZIL vehicles the tap is located to the right of the driver's seat. On MAZ cars - on the left.
1. The faucet is attached to the bracket with two bolts and three pneumatic tubes are connected to it, which must be unscrewed first.
2. Now carefully remove the tap cover so as not to lose the spring and rollers. To do this, pressing it against the valve body, unscrew two screws, which are also the axes of the rollers.
3. If the rollers are stuck, pry them off with a screwdriver.
4. The distortion of the cover should be removed using adjusting shims. The cover should move relative to the body without jamming. If the end of the cover is worn, the number of shims should be increased.
5. Knock out the notched part of the pin.
8. Using side cutters, pull out the valve exhaust seat rod and remove the pin.
9. Slide the guide cap and washer off the rod.
10. While pressing on the rod guide, remove the retaining ring.
11. Remove the valve outlet seat, spring and stem guide.
12. Take out the balancing spring with the plate.
In some taps, there may be washers between the plate and the balancing spring that regulate its stiffness. Their reverse installation is required.
13. Using a 19mm wrench, unscrew the atmospheric outlet fitting.
14. Using a 10-11 mm rod, squeeze the follower piston out of the body.
15. Pressing the valve body, remove the retaining ring.
16. Remove the valve and spring from the follower piston.
17. When the valve sealing ring wears out, air from the pneumatic system will escape through the atmospheric outlet in any position of the handle. The same thing will happen with a torn valve cuff.
18. To replace it, remove the support washer.
19. Carefully remove the edge of the cuff from the annular groove of the valve and remove it from the seating collar.
The edges of the groove and seat collar may be sharp. They must be smoothed before installing a new cuff. If the old cuff was removed without damage, it can be used again by turning it 180 degrees.
20. Leakage of the ring sealing the stem of the exhaust valve seat causes air leakage from the side of the valve cover during the parking brake release mode.
With a properly fitted O-ring, the valve seat stem should move in the guide with little force. If this cannot be achieved, replace the rod guide with a new one.
21. Sometimes there are taps with an additional valve section. If the tightness of its valve or seals is broken, air hisses from the side of the boot or from the atmospheric outlet.
To replace the valve, use a 19 mm wrench to unscrew the valve spring support fitting. We remove the valve assembly and replace it if necessary.
Connecting a tap with an additional valve section.
- Output to the air cylinder.
- Atmospheric output.
- Additional valve control line output.
- Stub.
22. To get to the seals, remove the rubber boot.
23. Remove the retaining ring.
24. Remove the inner valve seat with the spring and sealing collar.
25. If it hisses from the boot side, change the sealing collar. To do this, use a 9 key to hold the inner seat by the edge, and use a 11 key to turn out the adjusting bolt head.
26. We install cuffs with a corrugated surface on both sides between two thrust washers.
27. If the atmospheric outlet of the faucet hisses, you need to replace the sealing ring in it.
Since the additional section is not involved in controlling the parking and reserve systems, instead of replacing the seals, you can remove the inner valve seat assembly (the valve itself remains), and plug the upper hole of the section with a standard sealing collar, replacing the upper thrust washer with a disk of the same dimensions.
28. The roller located on the guide handle of the crane facilitates its movement when braking with the spare system.
When assembling the tap, it must be perfectly clean, and all sliding surfaces must be lubricated with any low-temperature lubricant.
razvar.ru
When to adjust wheel toe
Before adjusting the toe-in of KamAZ 5320 wheels, you need to clearly determine the feasibility of the procedure. The adjustment is made to increase the clarity in driving, as well as to improve the stability of the vehicle. In addition, proper adjustments will better preserve your tires and eliminate uneven wear.
The following signs indicate the need for work:
- The car pulls to the side when driving straight;
- Mechanisms affecting vehicle control have been replaced;
- Frequent driving on poor road surfaces;
- The vehicle's service mileage has been exceeded.
KAMAZ steering knuckle:
Only the owner of the vehicle knows about the need to perform a wheel alignment on KamAZ. Because he alone knows about the nature and types of manipulations on the machine. As a rule, service workers perform the procedure once every six months, based on average mileage. But, if the car does not pass these standards, frequent adjustments are no longer advisable.
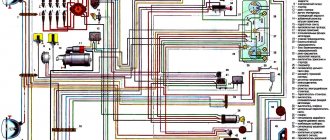
Why does the handbrake on a Kamaz truck not release?
In most KamAZ models, the additional braking system is combined with the main one. They have the same braking elements, as well as the same pneumatic drive. On the one hand, this significantly increases the efficiency of the mechanism, on the other hand, it reduces the level of safety. For example, if a separate unit of the main brake system fails, the parking brake system will also suffer. They are also characterized by similar types of breakdowns.
In these cars, this system is controlled using a corresponding mechanism - this is a pneumatic reverse-action handbrake valve. The device has a relatively simple design, which has a positive effect on its reliability and durability. The driver changes the position of the crane, as a result of which corresponding manipulations occur within the system aimed at connecting or disabling the parking brake.
Handbrake KamAZ connection diagram:
- When turned off, the valve lever is in the lower (lowered) position. Compressed air supplied from a suitable cylinder circulates freely throughout the system. The energy storage springs are compressed. Such a car is considered to be disengaged;
- When the brake is applied, the lever is moved to the uppermost position, in which it is fixed using a special latch. Such driver actions lead to the fact that compressed air from the line quickly escapes through the opening valves (this is accompanied by a characteristic noise and whistle). The springs of the energy accumulators expand, acting on the rear wheels of the vehicle;
In order to release the brakes, the driver should lift the lever slightly to remove it from the lock, and then lower it down until it reaches the extreme point. At this time, the valves close and compressed air from the cylinder is supplied to the line. All this leads to a sharp increase in pressure and forces the springs of energy accumulators to return to a compressed state.
Read more: Cost of state duty on a car
Possible breakdowns
If the system has some damage, it may bleed air slowly or even quickly. This causes the brakes to start to fail. If you set the parking brake on a problematic car, it will release the brakes, which can lead to serious trouble.
If the handbrake on a KamAZ truck does not work, the reasons may be different:
- wear of seals - for example, o-rings and seals. In this case, the system releases air slowly, which can sometimes be accompanied by a slight whistle;
- damage to the line circuits is a very serious problem, which can result in the rapid release of air from the system and automatic braking of the car even while driving;
- freezing – in the cold season, the handbrake tends to freeze. If KamAZ is not removed from the handbrake, the reason may lie precisely in the fact that the temperature inside the line has dropped below zero. The essence of the problem is that moisture forms in the system, which should not be there.
There can be much more probable breakdowns - for example, the handbrake on a KamAZ truck does not hold, which indicates wear and tear on the mechanical parts of the system. But only those faults that occur most often are considered here. You can also read about How to knock out a kingpin on a KamAZ.
Problem solving
Troubleshooting the handbrake on KamAZ must be approached in a comprehensive manner. Initially, you need to check the tightness of the system. To do this, the lever is first dismantled (it is attached to the bracket, it is easy to remove). Next, the pneumatic tubes are carefully disconnected, after which the valve cover is removed.
The caps, plate, stem and other elements are also removed until the O-rings and cuff appear.
Since these components are low cost, there is no need to check them for wear (if this is not noticeable visually) - simply install new ones, after which they are reassembled in the reverse order.
Problems with line depressurization require professional repair. It is strictly not recommended to resolve this issue on your own. If the air quickly escapes outward, this causes the springs of the energy accumulators to automatically fire, causing the machine to stop abruptly. In this case, it is necessary to use the emergency brake release system. New KamAZ models are equipped with an improved pneumatic brake drive, which allows the parking brake to be released immediately after starting the engine.
It is problematic to visually ensure that water or even condensation does not accumulate in the brake system. To avoid this problem, it is recommended to install a special dehumidifier that will remove moisture, preventing the risk of freezing during the cold season.
If a trailer is attached to the truck, it is necessary to first install an air distribution system, that is, expand the brake line. Otherwise, the parking brake will not apply to the towed equipment.
How to connect the handbrake on a KamAZ if for some reason there is not enough air in the line or the system mechanisms wear out? This is not only problematic, but also dangerous. Any malfunctions associated with the braking system, including the parking one, must be repaired immediately. This will increase the comfort of movement and its safety. You can work with brake mechanisms either independently or with the assistance of specialized specialists.
Malfunctions of pneumatic drive power supplies
When servicing the pneumatic drive of the car brakes, you must first make sure that the system is tight.
Particular attention should be paid to the tightness of connections of pipelines and flexible hoses, since this is where air leaks most often occur.
Places of strong air leakage are determined by ear, and weak ones - using a soap emulsion.
Brake system malfunctions and ways to eliminate them
There are four main breakdowns that are associated with a malfunction of the KamAZ brake systems:
- interference with the safety valve;
- clogging in the receiver system or the formation of holes in the hoses;
- hole and loss of compressed air;
- The piston rings are out of order, the sensors are not functioning properly.
In order to timely identify and correct problems with the brakes of KamaAz, regular diagnostics of the operation of its systems, including electronics, are needed. It is recommended to perform it once every two years.
On the Internet you can find a detailed video with an analysis of all the errors. Below we will analyze them briefly, and also consider ways to eliminate them.
Excess oil inside the pneumatic system
The cause of the excess could be wear on the piston rings. It is necessary to urgently replace this part and signal all other work related to them. In models such as KamAZ 5320 and 6520, this problem can lead to serious problems within a short time after it occurs.
There is no air flowing into the receivers
The cause of the breakdown is most often that the pipes through which the air passes are clogged. To fix the problem, simply clean the pipes. On the KamAZ 5511 model, this problem often occurs due to a broken safety valve. In this case, it needs to be replaced.
Receivers in the pneumatic system are not filled quickly enough
There may be several reasons for this failure:
- the connecting elements are not secured well enough;
- the receiver is not secured tightly;
- the hoses through which air passes are damaged;
- The compressor is not operating at full capacity.
Repair methods:
- tighten the connecting parts together more tightly; if necessary, they should be replaced;
- replace the receiver;
- repair or change hoses;
- diagnose the compressor if you need to replace it.
Incorrect pressure in receivers
This malfunction is typical for KamAZ 65115 and 43118. It is necessary to stabilize the regulator; if the breakdown occurs a second time, it should be replaced.
KamAZ does not brake when the brake pedal is pressed
The cause of this problem may be a compressed air leak; it must be found and repaired.
The car brakes poorly or does not brake at all
There may be several reasons:
- circuit 3 hose clogged
- batteries operating on energy spring mechanisms are out of order;
- accelerator valve is broken;
- The brake chamber has failed.
Troubleshooting methods:
- clean the hose using compressed air or replace it;
- replace the brake chamber and energy battery;
- replace all faulty parts;
- inside the brake chamber, repair the stroke of the rods.
The car swerves when braking
There may be two reasons: too much oil has accumulated on the brake pad linings or the brake mechanism requires better adjustment.
The following actions can be a solution to these problems:
- change or clean the linings;
- additionally adjust the brake mechanism.
Both wheels won't release
The caliper is stuck. The diagnosis is sad, because this did not just happen, but had been accumulating for some time. So, most likely, you will have to change not only it, but also the pads - during the abnormal operation they have probably been worn down to zero. The costs will be significant, but you can save money if you can change it yourself. However, everything may not be so sad: the caliper may be intact, but skewed. In this case, the position is leveled out and the wheels begin to release the brakes again.
The compensation hole on the brake master cylinder is clogged. There is a lot of fuss, the work is dirty, you will have to disassemble almost the entire assembly, but there are no expenses for spare parts. Read the article “How to check and bleed the master brake cylinder” for more details.
Recovery
In this situation, what can we do. There is no point in going to the store, they are just as raw there. Let's try to restore it ourselves somehow. Let's take a roller, and we will weld the wear on it, then we will straighten the weld with a grinder so that it becomes round.
We weld by welding
Next, heat the roller with a cutter until red and quench it in water or oil. After this, we assemble the entire mechanism without installing the wheels and hub. We try the mechanism by pressing the brake pedal. The mechanism must work properly; under the action of the springs, the pads must be returned to their original position without jamming.
Heat with a cutter and harden
Both wheels won't release
The caliper is stuck. The diagnosis is sad, because this did not just happen, but had been accumulating for some time. So, most likely, you will have to change not only it, but also the pads - during the abnormal operation they have probably been worn down to zero. The costs will be significant, but you can save money if you can change it yourself. However, everything may not be so sad: the caliper may be intact, but skewed. In this case, the position is leveled out and the wheels begin to release the brakes again.
The compensation hole on the brake master cylinder is clogged. There is a lot of fuss, the work is dirty, you will have to disassemble almost the entire assembly, but there are no expenses for spare parts. Read the article “How to check and bleed the master brake cylinder” for more details.
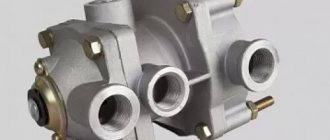
Pistons and wheel brakes are jammed
, and the master cylinder. Only those who regularly delve into their cars will be able to find out the reason on their own. Sound advice is to go to a service center and only after finding out the cause decide whether you can fix it or let the experts repair it. Often the problem is solved by cleaning and lubrication.
Solution
In all manuals for repairing the pneumatic brake system, if a malfunction is detected, it is recommended to replace the non-functioning unit with a new one. But this is not always the best solution to the problem. Often, a newly installed part will briefly eliminate brake release because parts of the assembly wear out after very long use. Most often, grease is required to be applied, even to the lowest layers of the assembly.
Disassembly and lubrication of a two-wire tap
This part has two pistons. Malfunction most often occurs as a result of oxidation, lack of or poor lubrication of the first or second piston.
Usually it is enough to remove the two-wire tap, disassemble it, apply grease, assemble the unit and install it back. In the vast majority of cases, nothing more needs to be done. Rarely does a piston defect (deviation in size) occur, then replacement of a part with non-standard parameters is required.
Dismantling and lubrication of the main brake valve
If there is a fitting, diagnosing brake system problems is easier. If you “pull” the fitting and the brakes “release”, then most likely you need to work on the main brake valve.
All activities come down to disassembling the unit and applying grease.
Piston check
In rare cases, lubrication does not guarantee normal operation of components. If, after installing the part, problems with brake release do not disappear, it is necessary to check the size and integrity of the pistons.
If possible, it is necessary to take measurements of similar parts of a suitable assembly and compare the results. There are known cases (confirmed by videos on the Internet) when the increased height of a spare part interferes with the efficiency of the mechanism. Moreover, in the new unit this is compensated by the thickness of the gasket. Over time, the material shrinks and the system begins to “fail.”
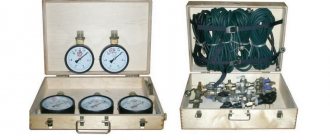
Pressure check
Control consists of establishing air pressure using measuring instruments.
Before testing, all air leaks from the pneumatic system are eliminated. Check procedure:
- Load the pneumatic system with air until the sensor warning lights turn on. The value on the pressure gauge at this moment is 620–750 kPa. The control lights ideally go out when the readings reach 450–550 kPa.
- Release the brake (the vehicle must be stationary). The pressure decreases by 50 kPa. At the same time, the pressure gauge in the line shows a pressure of 620–750 MPa, and in the air ducts connecting the tractor and the PP – 0 kPa.
- Set the parking brake parallel to the ground. The pressure gauge readings correspond to the values of the previous paragraph, only the pressure in the connection head is expected to be 480–520 kPa.
- Then move the parking brake handle perpendicular to the floor. Then the pressure in the receiver should be 670–750 kPa; in the connecting head of the two-wire drive, the pressure gauge shows the same values.
- After pressing the auxiliary brake connection button, a pressure of 60–70 kPa is established in the brake valves.
When monitoring the functionality of the pneumatic system, when the indicators drop to 450–550 kPa, warning lights and an audible buzzer in the tractor cab turn on.