Benefits of the product
The benefit of a homemade walk-behind tractor from Druzhba is that purchasing a factory-made device is quite expensive.
Having a small plot or using a walk-behind tractor infrequently, purchasing it is not always advisable. And you can assemble a generally productive homemade device from what you have lying around at home. Parts can be assembled absolutely free if desired. And it would not be a pity to spoil them under unfavorable circumstances. The chainsaw engine itself is quite economical and unpretentious. You can use inexpensive fuels and lubricants, which also affects the overall benefit.
A walk-behind tractor is not the only thing that can be made from a Druzhba chainsaw; using this tool you can make many other useful devices; read about how and what is needed for this in the article at this link.
What else can you do
There are many options for possible homemade products. It all depends on the imagination and skills of the craftsman. In addition to what is described, you can make from a chainsaw:
- a generator that will provide electricity to a cottage far from communications, a comfortable outdoor recreation;
- a grinder capable of cutting metal, stone, concrete, and polishing surfaces;
- a winch that makes life easier for motorists who like to drive off-road;
- cultivator for processing the garden, harvesting.
The list includes motorized drills for making holes in the ground for poles and planting trees. Its winter variety is an ice drill for winter fishing.
How to make a mini-tractor with your own hands: making your dream come true
If you have a plot of land, and processing it manually causes a lot of trouble and takes too much effort, a mini-tractor will come to your aid. In order not to spend enormous sums on purchasing a ready-made factory model, you can save money and make such a unit yourself. Its production is not only less expensive, but also a very interesting and creative process.
How to choose a walk-behind tractor for your future tractor?
The first thing you need to do is choose a walk-behind tractor. This is one of the most important details of your future brainchild. In order not to make a mistake with the model, you need to take into account the following parameters:
- power;
- Type of fuel;
- weight;
- plow size;
- price and manufacturer.
Let's look at each of these characteristics in more detail.
Power
The power directly depends on the area of the territory that you are going to process. That is, the more space your site takes up, the stronger the walk-behind tractor should be.
Fuel
The gasoline engine runs less noisily, and thanks to the low level of compression, it starts from half a turn even in cold weather.
Diesel consumes fuel much more economically, creates stronger traction and ensures stable engine speed.
At the same time, the area of the site and the quality of its soil also play a role when choosing fuel: diesel copes better with large volumes of work on hard soil.
Weight
The weight of the walk-behind tractor also largely depends on what kind of soil you are going to cultivate. If you choose a lightweight plow for hard, dry soil, your future tractor is unlikely to cope with the tasks assigned to it.
The more difficult the soil to cultivate, the heavier the walk-behind tractor should be, and vice versa - for soft, loose soil, a lighter model will be sufficient.
To determine this parameter, you need to take into account 3 factors: the depth of processing you are counting on, your level of perseverance, and your readiness for physical activity.
If you want to process the maximum area in a minimum period of time, then it is better to take a cutter with a wide grip. In one pass, she will be able to capture a larger area.
It would be optimal to choose a model that can be disassembled while adjusting its width. In this case, you can independently configure it to the most suitable parameters for a particular situation.
Options for making a snow blower from engines from different chainsaws
Different chainsaws are equipped with different motors. In this regard, when assembling a snow blower, the manufacturer will need to make certain changes to its design. Let's look at them using the example of those chainsaws, the engines from which are most often used to make homemade equipment.
Chainsaw snow blower Druzhba
In order for the assembled homemade product to be reliable and balanced, you will need to study the diagrams before assembling it. The drawings should tell the manufacturer the correct procedure and methods for installing components into the overall structure of the snow blower.
The engine from the Druzhba chainsaw is distinguished by its high power, therefore, unlike imported saws, it vibrates and makes quite a lot of noise during operation. To make the operation of the snow blower from the Druzhba chainsaw more convenient, when installing the motor, you will need to install a thick piece of rubber between the frame and the engine. It will significantly reduce vibration on the frame and operator handle.
To reduce noise during constant operation of a homemade snow blower, the engine built into it will need to be equipped with a muffler. To do this, you need to take a solid metal pipe, which must be bolted or welded to the motor. A rubber gasket, also folded in the shape of a pipe, must be installed inside the metal pipe.
Chainsaw snow blower Ural
Like Druzhba saws, Ural brand garden chain tools have an increased reserve of torque and traction. Therefore, when assembling a snow blower from a Ural chainsaw, you can draw in advance a diagram of a large-sized machine with a wide volume bucket and a powerful auger mechanism.
The basis of the snow blower will be a frame consisting of three rather than two longitudinal pipes. An additional pipe is needed for higher stability of the machine in areas with rises and slopes. At the rear of the frame, you need to weld 3 transverse narrow steel plates, at least 5 mm thick. You need to install the engine on top of the pipes and secure it with 5-6 powerful bolts.
The motor must be connected to the wheels and auger via a chain drive. To install it you will need 2 large sprockets. During intensive snow blower work from the chainsaw you are using, they must be lubricated, otherwise the parts will quickly heat up and crack.
To operate a homemade machine, you will need a powerful auger consisting of a shaft with a diameter of 5 to 7 mm, as well as 4 screw plates. They should be located on the shaft parallel to each other, and directly look into the center of the bucket. To weld a bucket, you need 2 sidewalls and a semicircle made of galvanized steel.
Chainsaw snow blower Shtil
A machine made from a German brand chainsaw will be small-sized and quite maneuverable. Before you begin assembling it, you will need to carefully study the drawings, which will indicate the dimensions of the parts and their location in the overall structure of the snow blower.
The role of the base of the chainsaw snow blower will be played by a strong metal frame. A motor should be mounted in its rear part, under which it is necessary to first install and secure rubber 5 mm thick. Between the two longitudinal pipes of the frame you need to run a chain drive, under which you need to weld a galvanized steel plate to the pipes.
Next you need to weld the intake bucket. For a snow blower made from a Shtil household chainsaw, the dimensions of the bucket should not exceed 60x50 cm in width and height, respectively. An auger consisting of a 65-centimeter shaft and screw plates located on it is attached to the inside of the bucket.
snow blower
If in the previous design you replace the shaft with plowshares or harrow spokes with an auger mechanism, add a casing, an intake device and a pipe for throwing out snow, the cultivator will turn out to be quite a decent snow blower. Many home craftsmen design their homemade products with replaceable attachments for different seasons. Motor from a Shtil saw with a power of 3-5 hp. It will cope quite well with cultivating the garden in spring and autumn, and with removing loose snow from a summer cottage in winter. The most important unit is the screw mechanism.
Homemade snow blower
If you are not a professional designer, then it is better to download ready-made drawings from the Internet. The auger blades are made of thick rubber, for example, from a conveyor belt. The intake device is made of galvanized steel. A plastic sewer pipe is suitable for the snow disposal pipe.
Making a cultivator from a Ural chainsaw
Buying a motor cultivator for the purpose of cultivating small areas around the house is in most cases unjustified. After all, in addition to it, one way or another, you will have to purchase attachments. We should also not forget that some store-bought options are quite demanding on oils and fuel. In this case, you can make a motor cultivator from a chainsaw with your own hands. Homemade units, as well as their expensive counterparts, consist of the following elements:
- Engine;
- Fuel tank;
- Frames;
- Intermediate shaft.
Read also: How to use the motor from an automatic washing machine
All these components, except the frame, can be taken from an old chainsaw. Before you start making your homemade product, you need to prepare an approximate drawing.
It will serve as a kind of plan by which you can navigate the manufacturing process. The further creation algorithm is as follows:
- First, unwind the old chainsaw and remove the motor, gearbox and fuel tank;
- After that, start welding the frame. To make it, use metal corners with a cross-section of 32x32 mm. The design must be strong enough to easily withstand vibration and additional load;
- Attach the motor to the upper transverse corners of the frame;
- Install and secure the fuel tank under the engine on special brackets. Its lower part will need to be protected with a metal plate;
- The intermediate shaft supports should be secured to the vertical front frame struts;
- To secure the running shaft bearings, connect the supports with longitudinal angles;
- Next, proceed to create the control - a metal crossbar 30 cm long is suitable for this;
- If necessary, attach wheels to the lower cross member of the frame - you can “borrow” them from an old car or buy two small wheels for a utility wheelbarrow.
After assembly, the unit must be tested. To do this, start the engine and walk with the cultivator along the garden bed. Surely, you will notice that the structure needs to be heavier. To do this, you can take any weight and place it in the front of the frame. Be sure to secure the weight, otherwise vibration may cause it to become dislodged and damage the motor or intermediate shaft.
Cultivators made on the basis of the Ural saw will not have sufficient power to use large-sized attachments. They are intended for plowing, however, they can still be equipped with a coupling device. To do this, you need to buy a hitch at any agricultural equipment store and equip the structure with it. Cultivators designed in this way can be used in tandem with a small homemade harrow or plow. However, you need to remember that when working with this type of equipment you need to take short breaks.
Improvement of the chassis
The first thing users of a walk-behind tractor think about is how to make a cart with a seat for it. Using equipment in normal mode using levers requires the application of great physical effort. However, the use of a trailer reduces the stability of the vehicle. This problem can be eliminated by extending the wheelbase.
This is done using extensions that are attached to the axle shaft with pins or bolts. Having solved the stability problem, the operator is faced with another issue: the unit is poorly controlled. The differential for the walk-behind tractor helps to give it good maneuverability. This device is made by analogy with components of passenger cars. Homemade unlockers for walk-behind tractors are made using ordinary household tools - an angle grinder, welding and a sharpening machine.
The low weight of the walk-behind tractor causes poor traction between the wheels and the ground. Slipping is a common occurrence when lifting virgin soil, working on wet ground or driving in snow. To avoid slipping, weights are attached to walk-behind tractors.
These devices are divided into the following categories:
- Wheeled. They are discs that are mounted on wheels or hubs. Disks are made monolithic from metal, concrete or hollow, filled with sand. The weight of wheel weights can be 30-70 kg.
- External. Made from any heavy material (steel, lead, concrete). Attached to the body using hooks or bolts. Some craftsmen weld a frame from a corner to the body. Sandbags, bricks, scrap metal and other heavy objects are placed in it.
You can improve the transmission by installing a homemade variator on the engine. The system of belts and discs will allow you to smoothly change the speed of the unit, without jerking or vibration.
Features of the walk-behind tractor
Structurally, a homemade walk-behind tractor is a two-wheeled unit on a frame, producing up to 4 liters. s at an average speed of 2.5-2.7 km/h. Features, as well as operational tasks, are largely determined by the choice of power plant. If we are talking about a conversion from “Friendship”, the following parameters will distinguish it from a purchased walk-behind tractor:
- small size, lightness;
- savings on fuel and lubricants;
- the ability to assemble a unit tailored for specific work (required frame size, mounting unit).
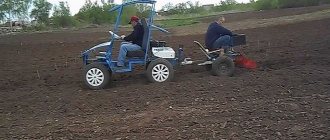
A homemade walk-behind tractor can plow, hill up crops, harrow, mow or remove tops, and apply fertilizer. Due to its small size, it can be used in hard-to-reach places (for rocky, poor soil, the power of a homemade product may not be enough). It will be especially useful for those in whose area the strength and power of a large purchased walk-behind tractor will be excessive.
A chainsaw can be used as the basis for a homemade walk-behind tractor
Step-by-step manufacturing instructions
Next, detailed instructions and recommendations will be presented on how to make a moped from various brands of chainsaws using accessories, as well as how to make a moped from a bicycle and a chainsaw motor.
How to make a moped from a Ural chainsaw
The moped will consist of a frame that follows the shape of a bicycle frame, an engine and a gearbox, which are assembled from a Ural brand chainsaw motor, a fuel tank, and a brake system.
To make the assembly algorithm clear, we will present it step by step using photographs.
Step 1. Take a Ural brand saw and clean it from contaminants, if any.
Step 2. The gearbox and engine are disconnected from the chainsaw, the saw chain and blade are dismantled. Additionally, the bicycle drive sprocket is selected. You can use a sprocket that is pressed onto the frame using bearings.
The photo shows the sprocket assembled with a frame fragment.
Step 3. Use a grinder to cut off the pedal, leaving only the attachment point.
This design should remain.
Figure 4. We will return to it below.
Step 4. We try on the sprocket to the chainsaw engine gearbox.
Step 5. We weld the bicycle drive sprocket to the side from which the pedal was removed with a grinder (Figure 4).
Step 6. We weld the sprocket structure on rods to the chainsaw gearbox, maintaining the alignment of the chainsaw gearbox drive sprocket and the bicycle drive sprocket.
The moving parts of the moped engine are covered with casings, and the structure itself is fixed on special brackets above the rear wheel of the moped.
Step 7. The polymer trim is removed from the bicycle handlebars, and holes are drilled in the tubes for mounting the accelerator (gas). The throttle is controlled through a tension cable to the accelerator spring on the engine.
Step 8. A starting system (start-stop button) is also mounted on the handle, which will limit the movement of the drive chain after the engine is started by the magneto.
The end result should be a vehicle like this.
Which is started by a magneto.
How to make a moped from a chainsaw Druzhba
The difference from assembling a moped using a Ural saw motor is that Druzhba has a heavier and more powerful engine, which can only be placed on the lower frame.
Ideally, you should get a similar design.
But a variety of variations are possible with engineering design and frame geometry, as well as different wheel diameters.
Otherwise, the assembly of the moped is similar, but only in this case the drive gear of the chainsaw engine is directly connected by a chain to the drive gear of the rear wheel.
By the way, for convenience and illumination of the road in the evening, you can hang a light on the moped, which will be “powered” by a small generator that converts the rotation of the wheel into electricity.
We recommend reading interesting articles on how to make a walk-behind tractor and a snowmobile from a Druzhba chainsaw; read what else useful things can be made from this saw here.
How to make a moped from a chainsaw and a bicycle
The algorithm for producing a moped with a chainsaw engine on a bicycle frame is already presented in the article as a standard manufacturing instruction.
But it is also necessary to take into account a number of nuances that relate to recommendations for the design of the bicycle, the power of the saw, and the use of additional accessories.
So, recommendations:
- It is necessary to select bicycle models with a “male” frame. This design is characterized by rigidity and better controllability when the engine is running. In addition, it allows ergonomic and reliable mounting of the engine to the frame.
- Saws of the Ural 2T and Druzhba M brands have proven themselves best; their power of 3 kW allows you to accelerate a moped to 40 km/h.
- A tank with a capacity of up to 2 liters is sufficient as a fuel tank. You can use a bottle as a tank.
Chainsaw moped Shtil
Making a moped from a Shtil brand chainsaw is also similar to making mopeds from other models of chainsaws.
But there is one very convenient nuance that is extremely convenient for use in mopeds. The gearbox and sprocket of the Shtil chainsaw engine are located on the side of the body, which makes it possible to significantly reduce the design of the assembled gearbox in mopeds.
When using a Stihl chainsaw, torque is transmitted using pulleys and a belt.
And after making the frame, “suspension” of the tank, brakes and lantern, and mounting the engine, you will get something like this design.
This is what a finished version of a homemade moped looks like using a Shtil 180 petrol saw
The rationality of making homemade products
Rationality is a relative concept. If a person is famous for his straight hands and understands that to make a truly convenient sawmill from a Ural chainsaw you will have to work hard, then this kind of construction process is quite reasonable. And if a person expects to plow huge areas using a walk-behind tractor assembled from improvised means with an engine power of 3 horsepower, then there can be no talk of any rationality.
Independently converting a Ural chainsaw into another useful household device or a full-fledged vehicle without basic knowledge of design and understanding the specifics of the operation of the main components is simply pointless. This should definitely be taken into account before embarking on the process of converting the Ural chainsaw into any other home-made device.
Description of a walk-behind tractor with a chainsaw engine
So, we have a chainsaw that is not used very often or is completely lying around. In this case, having made some calculations and prepared the necessary materials, our saw turns into an excellent walk-behind tractor. The principle of assembling homemade agricultural machinery, depending on the brand of the manufacturer, may vary, but the general principles are as follows:
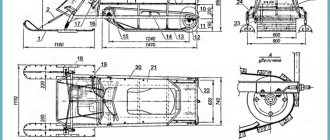
- The most important step is the preparation of a drawing, guided by which you will assemble the required structure. You can create drawings and diagrams of a walk-behind tractor using a chainsaw yourself, or by downloading ready-made calculations from the Internet. Finding them will not be difficult, just enter a query into a search engine and select the assembly option you like.
- The drawings have been found, which means it’s time to assemble the frame for our motor cultivator.
- Once the frame is ready, the saw motor and its gas tank are attached to it.
- Lastly, additional system elements are installed that are responsible for controllability and other functionality.
Note! Not only a chainsaw motor is suitable as a motor, but also an engine removed from a motorcycle or moped. In this video we’ll look at the friendship chainsaw motor cultivator:
In this video we’ll look at the friendship chainsaw motor cultivator:
To implement the idea, prepare the following materials:
- Motor from any existing chainsaw. The Druzhba and Ural saws are best suited for this.
- A handlebar removed from a moped or motorcycle.
- Welding machine.
- Pipes and sheets of metal, in the quantity necessary to assemble the walk-behind tractor frame.
- Wheels from non-working equipment.
- Transmission.
Having prepared all the structural elements and assembled them in accordance with the drawing, you will receive a device with the following characteristics:
- Powerful. Some homemade designs have a power of 9 horsepower.
- Lung.
- Small-sized.
- The motors used in chainsaws have a large margin of safety, which allows you to work on a homemade installation for a long time.
- Economical.
As an example for assembly, we will consider 2 engine options taken from Druzhba and Ural chainsaws. They are considered the most suitable for our venture, and here's why.
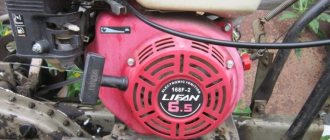
Friendship
Chainsaw Friendship has the following characteristics:
- Motor with a power of 3.5 horsepower.
- Weight – 7 kilograms.
- The volume of the gas tank is 0.55 liters.
- The volume of the oil tank is 0.26 liters.
For assembly, it is recommended to use the 4th generation Friendship model.
Products manufactured under the Ural brand have different characteristics from Druzhba. The differences are in the following details:
- The power of the Urals is higher than that of Friendship, and is 5 horsepower.
- The engine produces a lot of soot during operation.
- The gearbox installed on the saw tends to jam from time to time.
- Small specks, getting into the Ural saw engine, burn out without causing any special damage to it.
As you can see, each model has its pros and cons. It’s up to you to make a walk-behind tractor from a Ural chainsaw motor or construct a homemade walk-behind tractor from parts of a Friendship chainsaw.
Additional units
Before making a light motor cultivator, you will need to prepare drawings of this unit. The design of the manufactured machine is simple: the engine rotates the gears, transmitting increased traction force to the drive wheel.
To make a snow blower, it is recommended to decide on the design and loads that will be placed on the machine. If you need to clear a small area of snow, then a homemade snow blower can be equipped with a motor from Druzhba. To assemble a more powerful unit, you will need a Shtilev engine (power 3 kW). To create a simplified model, ordinary sled runners are used.
When carrying out the above work, special attention is paid to the screw unit. It begins to move due to a gear pair and chain
Thick cord rubber is used to make the blades. The intake device can be made of galvanized steel. For easy operation of the resulting machine, a sewer pipe is installed under the snow thrower.
Required tools and materials
To make a walk-behind tractor from a Druzhba chainsaw, you need to prepare the following parts and materials:
- from the Druzhba chainsaw - engine, fuel tank, gearbox;
- steel pipes, angles or profiles for assembling the base of the structure;
- iron sheets to strengthen and protect the structure;
- steering, suitable for a motorcycle or moped;
- wheels from a motorcycle or any other small diameter;
- transmission, can be used from a car or moped;
- fasteners - bolts, nuts, washers.
As a tool for work you will need:
- electric welding;
- angle grinder (“grinder”);
- spanners;
- drill, drill bits;
- marking tools (tape measure, square, etc.).
The steering can be used ready-made or, if necessary, made independently from steel pipes. Welding can be used as fasteners; if it is not available, parts can be secured using a bolted connection.
Pros and cons of homemade design
Having analyzed the results of this homemade product, based on reviews from owners and videos of operation, the conclusion suggests itself that the design is effective. With a competent approach to business, a walk-behind tractor with an engine from Druzhba is not much inferior in its characteristics to its factory counterparts.
The main advantage of homemade products, of course, is saving money. You can find the necessary parts and materials by simply rummaging around in your garage or shed, or you can purchase them for a small amount of money.
Also among the advantages of a homemade unit are:
- sufficient power of the resulting device – up to 4 hp;
- compactness, small dimensions of the walk-behind tractor;
- light weight, maneuverability, mobility;
- economical fuel consumption;
- the Druzhba engine is not whimsical in terms of the choice of fuels and lubricants;
- The walk-behind tractor is capable of performing various operations.
The engine used in chainsaws, especially in the Soviet “Druzhby” chainsaws, is durable and capable of withstanding long-term loads.
The main disadvantage of a homemade walk-behind tractor from a Druzhba chainsaw is that with any design you won’t be able to get a real walk-behind tractor. The power of the walk-behind tractor is enough to cultivate areas with good soil. There are also restrictions on operations. It will most likely not be possible to use the entire arsenal of attachments on a factory walk-behind tractor.
Walk-behind tractor from a chainsaw - manufacturing, drawing, instructions
The simplest and easiest option for creating a homemade walk-behind tractor is to remake it from a chainsaw. Any model you have at home can be suitable for these purposes. Thanks to the powerful motor, lightweight design and high performance, such homemade ones are well suited for effective cultivation of the land on the site.
How to make a walk-behind tractor from a chainsaw with your own hands?
To create such a homemade unit, it is recommended to use special drawings. You can draw these diagrams yourself if you have some knowledge and idea about the walk-behind tractor, or you can choose one of the proposed options
A homemade walk-behind tractor from a chainsaw is created in several stages, and it is important to follow all the nuances indicated in the diagram
- Making the frame. To do this, use a thick-walled pipe, from which you should create a cube with corners of 32x32mm.
- Installing the motor on the upper frame corners of the frame, which are transverse. You also need to attach the fuel tank using brackets (the tank must be placed below the engine).
- The frame on the front part is equipped with vertical posts, which serve as intermediate shaft supports.
- Special supports are attached to the longitudinal corners, which will then allow the installation of running shaft bearings.
- A metal weight is installed on the front element of the frame, which will ensure the stability of the walk-behind tractor.
- Handles for control are constructed from small metal pipes.
- The walk-behind tractor is equipped with old small wheels, and can also be made from metal plates.
As a result, you can get a good walk-behind tractor, whose center of gravity is located above the wheel support surface.
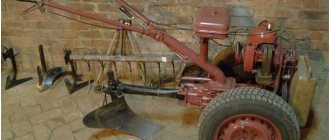
Creating a walk-behind tractor from a Druzhba chainsaw
The Druzhba chainsaw is considered the best choice for making a walk-behind tractor. This simple and very productive technique is probably in the arsenal of many owners. Using its structural elements, you can make a fairly powerful walk-behind tractor, as it has the following features:
- Due to its low weight, such equipment can be used for work of any complexity.
- Very productive engine.
- Compact and durable.
Based on this device, a high-quality walk-behind tractor is obtained, the speed of which is 2.5 km/h and the power is about 4 hp.
The process of creating a unit is similar to the method that is used for all other models, but it also has its own nuances:
- The main shaft of the future design is equipped with a special flange, which is of the collar type, RU-32, which will then make it possible to easily screw on bridge type gearboxes.
- Sprockets are taken from the UAZ and, together with a double-row chain, are installed on the future device and allow you to increase the distance from the gear axle to the ground. Timing sprockets allow you to increase the distance to the soil by 15 cm.
- The housing type bearings are screwed to the main axle and their diameter is 30 mm.
- The gearbox with gearbox can be constructed from the motor from the Karpaty motorcycle; it is necessary to provide a standard centrifugal clutch.
- To install the cutters and then install the wheels, you need to use steel pipe.
You need to install a load in front of the frame that can hold the center of gravity.
A pipe with a diameter of 30 mm is welded as handles.
As soon as the chainsaw walk-behind tractor is ready, it can be tested on the site. To do this, fill up with fuel and try to complete the work. Modify your device if necessary.
The advantages of such a unit are:
- the ability to use a variety of lubricants and combustible materials;
- work in completely autonomous mode;
- suitability for any type of work.
To create this type of technique from a chainsaw, you do not need specific knowledge. All it takes is a little ingenuity and the desire to get an effective technique. A homemade walk-behind tractor suitable for use on private plots and dachas. sadovaja-tehnika.com
Procedure
Once a suitable drawing (component layout diagram) has been selected, the necessary tools have been found and the Druzhba saw has been dismantled, you can begin assembly. You should start with the frame, since all the elements of the motor unit will be attached to it. The process is completed by assembling the chassis, as well as additional blocks: if desired, headlights, gearbox and clutch, if the drawing is more complex and requires them. For the first time, it is best to choose a simpler drawing.
Frame assembly
The first stage involves the following actions:
- bend the pipe so that it takes the shape of 2 spars with edges pointing upward;
- the steering wheel is welded at the back (the easiest way is to weld two handles, but if available, you can use a ready-made steering wheel from a motorcycle);
- It is recommended to strengthen the structure with cross members from the same pipe;
- We cut out a “shelf” from a metal sheet for the battery, which we weld to the rear bends of the side members.
It turns out to be a vague resemblance to a sleigh. For heavier structures with more powerful power units, the frame can be made in the shape of a cube or similar to a tractor for 4-wheeled homemade products.
Assembly of the motor block
The most difficult stage is assembling the components. Before you begin, you need to mark on the frame the places to which the parts will be attached. The principle is as follows:
- a motor with a gearbox is mounted on top of the crossbars;
- a fuel tank is installed under the engine (a separate support should be welded under it), the battery is mounted on a special platform;
- To prevent exhaust gases from entering the control unit, you can make an exhaust pipe from a 7 cm metal tube with a diameter of up to 25 cm.
This is the basic version without a gearbox, which can be installed upon request. The drawings will help you understand the assembly in more detail. By and large, the details of “Friendship” are simply rearranged. The hitch is connected to the output shaft of the chainsaw.
Chassis assembly
There are at least two options: you can use a ready-made axle shaft from a car, or you can make a homemade walk-behind tractor driven by physical force (the “chassis” of an old cart or wheelbarrow will come in handy, which will significantly reduce the weight and dimensions, because a car axle shaft will require the use of tires). In the first case, you will have to organize the drive from the motor to the axle shaft, which is not easy, so welding the “running” wheelbarrow to the frame is a more understandable option.
It is recommended to reinforce the wheels with lugs (for example, from a chain).
It is not difficult to figure out how to make a walk-behind tractor from a chainsaw if you understand the general operating principle of both units. In addition to “Friendship”, “Ural” and “Taiga” saws are also suitable for the walk-behind tractor. When deciding to experiment, you should understand that the homemade product will have limited functionality and low power, allowing you to process a maximum of 20 acres.
Making a walk-behind tractor from a chainsaw with your own hands
According to the owners of land plots, who have already experienced all the features of handicraft motor vehicles from a gasoline saw, assembled with their own hands, “Druzhba” demonstrates excellent results after modernization. With the right choice of power plant for a homemade unit, it works no worse than its industrial prototypes.
The absolute advantages of this device are:
- high power, reaching up to 4 horsepower in some samples;
- lightness - a small mass will not make the unit heavier and will increase its mobility;
- compact size - a small engine does not require reinforcement of the frame, which reduces the financial costs of its manufacture;
- economical consumption of fuel and lubricants;
- performance, which is determined by readiness for prolonged loads;
- possibility of using all kinds of fuels and lubricants;
- functioning in a completely autonomous mode;
- applicability for various types of work.
The assembly procedure depends on the drawing used and may vary, but the main points of assembly include the following activities. The frame is assembled in accordance with the drawing.
The work process is organized as follows:
- we take a metal pipe with a cross-section of at least 20 mm and bend it so that the overall appearance looks like 2 spars, the end of which is directed upward;
- a motorcycle handlebar is welded in the rear area of the spar;
- we strengthen the base with crossbars;
- We electric weld the support platform for the battery to the rear bends of the side members.
Further work continues on the following points.
- Now we mount a specialized flange, with the help of which the shaft will be fixed to the main structure of the unit from a gasoline saw.
- We buy sprockets from a UAZ car at the used parts market. Through them, ground clearance (ground clearance) will be formed between the ground plane and the connecting wheel beam.
- We take bearings with a 30 mm diameter. We fix them to the main bridge.
- The gearbox, equipped with a gearbox, is assembled from a motorcycle engine.
- The wheels and cutters of a handicraft cultivator are installed on a metal pipe of the required diameter.
- Due to the fact that the walk-behind tractor has a low speed, a forced-type cooling system is required. The simplest solution is to install a fan. And so that the air flow is directed towards the cylinder, a protective coating is used. It could be an old motorcycle gas tank.
After completing the assembly work, be sure to test the equipment, doing this with extreme caution.
Do not forget to install the weighting material in the front part of the unit, firmly securing it to the body. This will enable homemade agricultural machinery to maintain its center of inertia. If the element is fixed unsteadily, the walk-behind tractor will shake during operation, which will lead to failure of the motor.
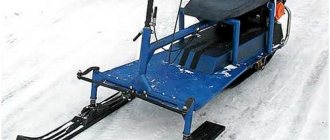
Engine
This unit is considered the most critical mechanism of a snowmobile. Compared to other structural elements, such as a tire or chain, the engine must work properly and without it the snowmobile will not even move. Therefore, the long-term performance of the device will depend on the reliable and trouble-free operation of the engine. If you want to install an engine from an imported chainsaw, you can purchase a used Shtil.
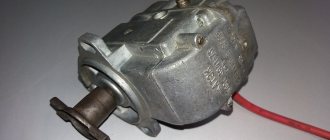
Another important design element on which the trouble-free operation of a snowmobile depends is the gearbox.
Asterisks
Immediately noticeable is the fact that the right tip has a keyway for installing and securing the chain sprocket. This is the track shaft sprocket, which is securely fastened with a nut. To make fastening possible, a corresponding thread is cut on the tip.
The tip of the tension shaft has the same overall dimensions, and the fastening of the structural elements is carried out similarly to the fastening of the track shaft sprocket.
The first gear stage should have a sprocket with the highest gear ratio (number of teeth). The Ural chainsaw engine has 38 teeth.
Steering
On a homemade device you can install a steering wheel of any design, even from a bicycle.
In this case, it is very important to put manual control of engine speed on the steering wheel. In order not to bother too much, it is better to use a steering wheel from a moped, scooter, etc., which already has a mechanism for controlling engine power
This will make the design more reliable and easier to manage.
Do-it-yourself walk-behind tractor from a chainsaw Friendship: instructions
Auto mechanic, specializes in agricultural equipment
Summer residents who own a walk-behind tractor do not have any problems with cultivating the land, doing it quickly and efficiently. But what to do if the plot of land is small and it is expensive to buy expensive agricultural equipment. The way out of the situation would be to upgrade the chainsaw into a homemade installation for cultivating the land.
This inexpensive and powerful tool can, if desired, be upgraded into a walk-behind tractor, which copes with the responsibilities assigned to it no worse than specialized equipment. Let's figure out how to assemble a walk-behind tractor from a chainsaw and what tools you will need for this.
How to make a unit from a scooter
Let's look at how to assemble a walk-behind tractor from a scooter. For this assembly we use:
- scooter motor (4 hp is quite enough);
- pre-shortened rear axle from a Zhiguli car;
- gearbox (from a combine or other machine).
Instead of a gearbox, you can install two chain sprockets that connect the engine to the gearbox, and the gearbox to the axle. The variator from a scooter can be installed on the engine. The battery is installed above the gearbox.
Since the scooter engine has its own exhaust system and starter, the machine will be quiet. You can install a headlight in the front of the walk-behind tractor using a switch. This will make it easier to work in the dark, especially if the device is adapted for transporting goods.
Moped
The procedure for converting a bicycle into a self-propelled unit is as follows:
- Remove the cover and remove the tire from the motor housing.
- A creeper is made in the form of a shaft, on which small and large sprockets from a bicycle are attached at different edges.
- Install a small sprocket on the engine output shaft, and a large one on the bicycle wheel, next to the existing one.
- The motor and creeper are mounted behind the seat on an additional frame.
- Put on the chains, connecting the smaller and larger sprockets of the engine with the speed reducer and the latter with the bicycle wheel.
- A lever is attached to the handle of the bicycle handlebar, which regulates the supply of gasoline in the power unit.
Features of creating a cultivator from a Druzhba chainsaw
A DIY chainsaw cultivator “Druzhba” will become an indispensable assistant when cultivating soil in small areas. The big advantage of this method will be the absence of the need to resort to turning work - you can limit yourself to spot metalwork modifications. Future homemade chainsaw motor cultivators will operate in only two gears, and the maximum speed of the units will reach 2.5 km/h. The engine power will be a little more than 4 liters. With. Such indicators will be quite sufficient for effective soil milling, hilling and digging up potatoes.
The creation of an aggregate is performed according to the following algorithm:
- To begin, place a metal collar flange RU-32 on the main shaft;
- After this, screw on the axle gear sprocket;
- Next, attach the shaft of the bridge gearbox - the part can be taken from a UAZ car and polished to a diameter of 3 cm;
- To increase the distance between the gearbox axle and the ground, use a double-row chain and two “VAZ” sprockets - they will increase the cultivator’s ground clearance to 150 mm;
- Next, install and secure the housing bearing on the main axle - its internal diameter should be no more than 3 cm;
- The engine from the Karpaty moped can serve as a gearbox and gearbox;
- To complete the configuration, take a centrifugal clutch from the same moped;
- To install the cutters and wheels, use a steel pipe 32 cm long.
Thanks to a completely sealed fuel supply system and a membrane-type carburetor, the owner will be able to work with the unit in any conditions, be it heavy rain or unbearable heat. The manufactured structure can be successfully used in areas with a total area of 10 to 20 acres.
Auto mechanic, specializes in agricultural equipment
Summer residents who own a walk-behind tractor do not have any problems with cultivating the land, doing it quickly and efficiently. But what to do if the plot of land is small and it is expensive to buy expensive agricultural equipment. The way out of the situation would be to upgrade the chainsaw into a homemade installation for cultivating the land.
This inexpensive and powerful tool can, if desired, be upgraded into a walk-behind tractor, which copes with the responsibilities assigned to it no worse than specialized equipment. Let's figure out how to assemble a walk-behind tractor from a chainsaw and what tools you will need for this.
Homemade cultivators - advantages of assembly
Many enthusiasts are starting to build their own motor cultivators not only because of the significant savings in money. Among other important advantages of making an agricultural implement yourself are:
- the ability to equip the motor cultivator with a set of functions that will be really important when using it on the site;
- no need for frequent maintenance and regular repairs - provided that reliable parts are used during the assembly of the motor cultivator, homemade equipment will be many times more durable and durable, especially when compared with some Chinese models;
- the ability to configure the working units of the agricultural unit as needed for operation under specific operating conditions.
At the same time, it is important to remember that a chainsaw cultivator will be truly reliable and effective only when the operator carefully prepares for assembly and acts strictly according to the algorithm. Otherwise, the manufacturer will receive an agricultural unit that will often break down and not show proper productivity in the garden.
Selecting a power plant
You can make a homemade walk-behind tractor with your own hands from almost anything that could be lying around in the garage, but the homemade products will be structurally different. Most often the following are used as power plants:
- automobile engine (mainly a four-wheeled, powerful design on a frame, which can also be used for transporting goods);
- a chainsaw of the “Friendship” type, which, despite its small dimensions, has good performance (a two-wheeled small-sized design that copes well with ordinary agricultural tasks);
- the power unit of a moped (often “Karpaty”), especially a motorcycle (“Minsk”, “Voskhod”) will make it possible to make a more powerful two-wheeled homemade product up to 13.5 liters. With;
- electrical installations (motoblock from a washing machine, for example) are also used, but are not very popular.
The most successful basis is a chainsaw and a motorcycle (moped), which allows you to make a non-bulky simple unit. The difference is in power and size. However, from the point of view of the feasibility of a homemade walk-behind tractor and its economy, the power plant of a chainsaw is undoubtedly better.