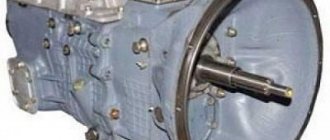
Disassembling and reassembling gearbox 152 is a common thing. For truck drivers. This gearbox model is practical and quite durable, but during operation, due to violations associated with its maintenance, it fails.
The first thing you have to face during repairs is the lack of the required level of transmission oil in the gearbox housing, instead of the required 12 liters. It's hard to find 3 liters of oil. And there is no need to talk about the fact that this oil was changed on time.
Some people find nigrol somewhere. And if you add the quality of the spare parts sold, you don’t have to think long about the cause of breakdowns. All this leads to the destruction of the bearings, the fragments and rollers of which fall between the teeth of the gear. They break, or due to the lack of a properly functioning clutch, the gears themselves are destroyed.
You have decided to repair the gearbox without resorting to the services of a repair plant. If the gearbox failure does not result in mechanical damage to the housing or the wear of the bearing seats does not exceed the standard value. Then you can replace the synchronizer bearings and gears yourself. In an ordinary workshop.
This is not very difficult and does not require the use of special technologies. The only thing I want to warn you about is replacing the intermediate shaft gears. The gears are seated and to dismantle them it is necessary to use a hydraulic press and appropriate devices. In their absence, this may either not produce any results or lead to injury.
KAMAZ gearbox device
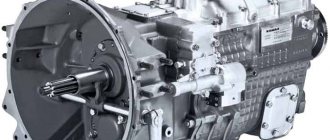
The gearboxes that KAMAZ vehicles are equipped with are fundamentally no different from similar units of other tractors. However, they are not interchangeable and have certain design features.
The most common two variants of the KAMAZ gearbox are the 14th (141, 142, 144) and 15th (152, 154) models.
Three shafts are installed in the crankcase of both boxes:
Like any modern manual transmission, they are equipped with synchronizers and have a gear transmission. Reverse gears are installed in a separate block. The speed change mechanism is located in a separate block, which is located in the upper part of the box.
Possible malfunctions of the speed box
With long-term operation of KamAZ, its performance capabilities are noticeably reduced. In particular, power deteriorates. The causes and signs of these manifestations should be identified.
Article on the topic: All about the YaMZ 238 gearbox
The main signs of a malfunction with gearbox 154:
- spontaneous switching off of speed modes;
- transmission oil leak;
- difficulty changing gears;
- extraneous noises and knocks.
The correct solution in this case is to check the integrity of the components of the transmission. It is dangerous to continue to operate KamAZ; the gearbox needs to be repaired.
If, while moving, gears change spontaneously, then it seems possible to eliminate this cause by tightening the fastening. In some cases, adjustment of the control drive is required.
The use of oil of the appropriate class helps to extend the service life of gearbox 154 on KamAZ. New oil is added to the gearbox through the neck, which is located on the right wall of the crankcase. It should be noted that there is an oil dipstick and a magnet in the drain plug.
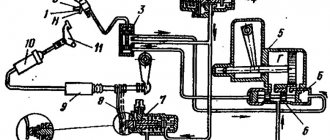
KAMAZ gearbox divider device
A divider is a mechanism that reduces the gear ratio of a gearbox.
Its design includes the following components:
- synchronizer blocking rings installed on both sides;
- a clutch with teeth that synchronizes the rotation of elements;
- two gears;
- two shafts;
- frame;
- gear shift fork;
- lever arm;
- fork roller.
To reduce wear and increase service life, parts operate in an oil environment.
If you are planning to independently repair a KAMAZ gearbox with a divider, the device diagram should be well studied and be at hand.
Switching rules under different conditions
The driver must know how to change gears to control the vehicle:
- on the rise;
- moving on a descent;
- moving on ice and icy areas of the road surface;
- when skidding.
On the rise
Features of KamAZ gearbox control on a hill:
- Driving uphill should be done in high gear;
- To switch from first speed to second, you need to press the clutch pedal twice;
- when performing a maneuver, you must simultaneously depress the gas pedal and the fuel pedal;
- when driving on a hill, you cannot reduce the engine speed to less than 2 thousand per minute (otherwise the engine will stall).
On the descent
Rules for controlling the KamAZ transmission when driving on a descent:
- When driving downhill, do not turn off the engine, since stopping the power unit will cause the power steering to lock.
- When driving downhill, the additional braking system must not be turned off. Also, do not press the clutch pedal all the way.
Modern KamAZ vehicles are equipped with a double-force braking system; accordingly, in addition to engine braking, an additional power unit stopping unit is used. If driving downhill is carried out with the auxiliary braking engaged, then disengaging the clutch and changing gears is not allowed.
Icy areas
Features of driving a KamAZ vehicle on ice and icy road surfaces:
- Driving on ice in a vehicle must be carried out with the maximum allowable speed and travel. Compliance with this nuance will allow you to avoid a traffic accident in an emergency.
- When braking, it is necessary to use the active additional stopping system of the power unit.
- If an emergency occurs while driving, you need to stop the trailer wheels. Otherwise, the car may skid.
- Engine braking is allowed in exceptional cases, as this causes rapid wear of the motor elements. But in emergency situations, such a maneuver will reduce the length of the braking distance.
- When braking, do not allow the wheel to slip. To do this, it is recommended to activate a lower gear in time, since it will reduce the engine crankshaft speed.
During a skid
Rules for using the gearbox during a skid:
- In such a situation, it is not allowed to depress the clutch pedal, as this will lead to a stronger spin.
- During a skid, you need to turn the steering wheel in his direction. In particular, if the body of the car moves to the right, then the steering wheel, accordingly, also scrolls to the right.
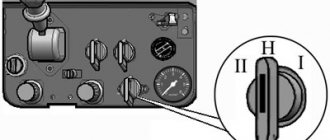
- If the car slips during a skid, you must stop moving and turn off the differential axle. The regulator itself for performing this task is located on the instrument cluster. After the device is turned off, the corresponding icon will appear on the dashboard. Then you need to start moving in high gear from second speed.
- After the driver copes with the skid, it is necessary to engage the differential.
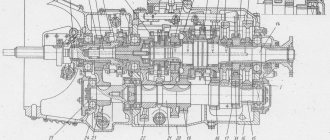
KAMAZ gearbox diagram with divider
| 1 | Nut M12×1.25-6N | 28 | Spring washer 8 |
| 2 | Lock washer 12.3 | 29 | Gear divider housing hatch cover |
| 3 | Front intermediate shaft bearing cover | 30 | Crankcase stud M16×1.5×22x45 |
| 4 | Lock washer 10 | 31 | Spring washer 16 |
| 5 | Bolt M10×1.25-6gx30 | 32 | Nut M16×1.5-6N |
| 6 | Input shaft bearing cover assembly | 33 | Gear divider synchronizer assembly |
| 7 | Input shaft cover gasket | 34 | Gear divider housing gasket |
| 8 | Adjusting gasket | 35 | Gear divider intermediate shaft assembly |
| 9 | Adjusting gasket | 36 | Intermediate shaft rear bearing seat |
| 10 | Gear divider primary shaft assembly | 37 | Screw M6-6gx16 |
| 11 | Special nut M52×2-L-6N | 38 | Roller bearing |
| 12 | Primary shaft oil injection ring | 39 | Upper clutch housing cover |
| 13 | Pin 4×12 | 40 | Gear divider intermediate shaft |
| 14 | Radial roller bearing with long cylindrical rollers, double row, without rings | 41 | Intermediate shaft gear |
| 15 | Retaining ring | 42 | Gear divider with control assembly |
| 16 | Single row radial ball bearing GOST 520-89 | 43 | Pin 12×35 |
| 17 | Gear divider primary shaft | 44 | Hairpin M16×1.5×22x35 |
| 18 | Prismatic key 6×8x13 | 45 | Single row radial ball bearing with a groove on the outer ring |
| 19 | Primary shaft rear bearing bushing | 46 | Front bearing thrust ring |
| 20 | Gear divider input shaft gear assembly | 47 | Thrust washer |
| 21 | Drain plug with magnet assembly | 48 | Hairpin M12×1.25×18x30 |
| 22 | Gear divider housing with bushings assembly | 49 | Locking bar |
| 23 | Oiler KG/8″ 45 (45916751064) | 50 | Bolt М12×1.25-6gх30 |
| 24 | Eye bolt | 51 | Front intermediate shaft bearing cover gasket |
| 25 | Plug 28 | 52 | Bearing cap sealing ring |
| 26 | Pad | 53 | Lower clutch inspection hatch cover |
| 27 | Bolt M8-6gх16 | 54 | Clutch housing cover |
Determining the causes of gearbox malfunctions on KamAZ
In most cases, problems with the transmission system on any vehicle arise as a result of natural wear and tear of its component parts.
Contributes to premature failure of gearbox 154 mechanisms - neglect of maintenance, use of low-quality gear oil. It is worth checking the fuel level in the box yourself from time to time.
To determine exactly the nature of the failure, disassembling the gearbox is necessary. This procedure should be entrusted to specialists who know the structural features of the gearbox and have the necessary experience and knowledge. To remove the gearbox from its normal location, it is necessary to drain the oil from the crankcase, clean the magnets, then all mechanisms and components that secure the gearbox must be dismantled.
The control of a vehicle with a 154 gearbox may deteriorate as a result of a clogged filter or spark plugs that have lost their properties. These are the main consumable items present in the engine compartment, which are checked at each maintenance; if they are deformed, they must be replaced with similar options.
During diagnostics, you should pay attention to the existing seals (oil seals). If they have softened, this may cause an oil leak from the gearbox side. However, the presence of smudges may be due to the fact that increased pressure has arisen in the crankcase (the breather must be cleaned).
Repair of KAMAZ gearbox divider
Repair work includes four stages:
- disassembling the unit;
- defective parts;
- replacement of worn elements;
- gearbox assembly.
To repair a gearbox with a divider, you need to perform the following operations:
- remove the air switch;
- unfasten and unscrew the fastening bolts;
- remove the roller;
- remove the gear shift fork;
- remove the synchronizer;
- dismantle the shaft and fork of the release mechanism;
- unscrew the fasteners holding the rear bearing cover on the input shaft;
- remove the cover;
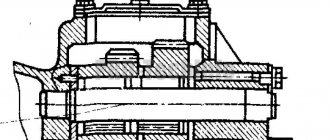
- dismantle the rear bearing and shaft (to do this you will have to align the teeth on the drive gear and shaft);
- remove the bearing cover using the threaded holes made in the intermediate shaft;
- unscrew and unlock the fastening elements;
- remove the support roller washer;
- unscrew the bolts of the cup covering the roller bearing;
- remove the roller bearing and cup from the driven shaft;
- Using a wooden block, knock out the shaft and remove the bearing from the divider housing.
Important: Do not knock out the shaft with a hammer. This will damage the part and will have to be replaced.
- clamp the splined part of the input shaft in a vice;
- unscrew the coupling nut;
- remove the oil injection nut from the shaft;
- Remove the roller bearing, bushing and drive gear.
Next, you need to check and replace worn parts, and then assemble the divider. To assemble, you need to do the operations in reverse order.
Before installing the divider on the machine, you need to make sure that it is assembled correctly and the shafts rotate freely.
Defects of gearbox parts
We have completely disassembled the gearbox, now we can troubleshoot the parts and, if necessary, replace them with new ones. What you need to pay attention to:
- All spline connections must be free of visible wear and chips.
- It is advisable to replace the roller bearings of the gears. Having carefully examined the places where they roll, there is no wear or places pressed through by the rollers
- It is also advisable to replace the shaft bearings. Since due to breakdown and metal shavings and fragments getting into the oil, the rolling areas of the bearings. Most likely they have damage that will subsequently lead to repeated breakdown of the gearbox.
- Carefully inspect all gears for chips, cavities, unacceptable contact patterns and wear on gear teeth. I want to repeat that it is not advisable to change the intermediate shaft gears yourself; you most likely will not succeed; at best, you will ruin the shaft; at worst, you will injure yourself.
- The conical races of the synchronizers should not be burned or worn out. The guide shafts should not be loose and the splines should not show signs of wear or chips.