Payment for goods and downloading of the book in electronic form (PDF format) is made on the website.
To do this, you need to find the book you are interested in and click on the “Buy” button. The price of the book is indicated on the button.
For convenience, the price on the website for residents of Russia, Belarus and Kazakhstan is presented in rubles.
For residents of Ukraine in hryvnias, and for all other countries - dollars.
After clicking on the “BUY” button, a payment window will open where you can select a payment system with which you can pay for the selected book using any bank card (Visa, MasterCard, MIR, etc.)
When you click on the “Pay by bank card” button, the Portmone payment system will open, which is the easiest way to make a payment.
In addition, the website offers four payment systems for payment:
- Yandex (payment from any bank cards, Yandex Money account, QIWI Wallet, terminals, etc.);
- Portmone (payment from any bank cards, Portmone account);
- PayPal (payment from any bank cards, PayPal account);
- WebMoney (payment from any bank cards, payment from WebMoney wallets).
Payment via Yandex Cashier
After selecting payment via Yandex, the Yandex Cashier payment system will launch, where you need to select a convenient payment method (bank card, QIWI, Yandex Money account, etc.)
After specifying payment details and confirming payment, payment for the goods will occur.
If you have a bank card in a currency other than the ruble, then the money will be debited from the card at the rate of the Central Bank of Russia at the time of the purchase.
This payment method is optimal for residents of Russia, Kazakhstan and Belarus.
Official website of the Yandex Kassa payment system https://kassa.yandex.ru
Box modifications
The type of box installed depends on the loads the vehicle experiences and the conditions in which it is operated:
- KPP-14;
- KPP-15;
- KPP-16;
- KamAZ ZF gearbox.
The fourteenth transmission is a five-speed device, which includes a gearbox. The fifteenth modification of the product with ten stages, unlike KamAZ-14, is equipped with a divider with two stages, the device is located in the front part of the box.
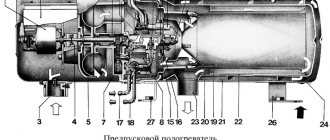
Gearbox KamAZ-14:
Transmissions are controlled mechanically, remotely, using a swing lever located on the power plant. The mechanical gearbox is controlled by pneumatics and mechanics, through a selector. The driver directly acts on the rocker.
The sixteenth gearbox, with eight shift stages, is of mechanical type. The design includes a four-stage gearbox and a reduction box mounted behind the structure.
The base of the rod that switches the stages is installed on the gearbox plug; the lever itself is made in an original design solution. The product contains a rod that controls the gearbox, a lever, a safety net that prevents erroneous start of reverse, and valves controlled by pneumatics and switching a mechanism that increases torque.
Gearbox KamAZ - 15:
The ZF gearbox on KamAZ with nine stages is equipped with an auxiliary reduction gear, unlike the 16 model.
The KamAZ 5320 gearbox is equipped with five stages. Since the equipment is operated in harsh conditions, it is equipped with large gear ratios for operation at low speeds. Switching occurs in stages, the transmission easily adapts to road conditions.
KamAZ ZF gearbox:
Gear controls on modern cars are different. A mechanism with fewer gears is used on vehicles with a smaller load capacity and dimensions. Modifications of 10 stages are installed on road trains. KamAZ is in demand in 40 countries because the control mechanisms are reliable and durable.
Payment via Portmone
After selecting payment through Portmone, the payment system will launch, where you need to select the payment method: bank card or Portmone account.
The price in the Portmone payment system is converted into dollars at the exchange rate of the Central Bank of the country where you are located.
If you have a bank card in a currency other than the dollar, then the money will be debited from the card at the rate of the Central Bank of your country at the time of the purchase.
After specifying payment details and confirming payment, payment for the goods will occur.
Official website of the Portmone payment system https://www.portmone.com
We analyze the gear shift diagram on KamAZ
In this article we will explain in detail how the gearbox works and what its structure is. Advice: the clutch pedal must be moved sharply and depressed only to the end. You need to choose the moment when it is best to switch the required gears based on the tachometer readings.
Some tips for using the Kamaz box. By following these tips, your engine will always run in economical mode. Advantages of boxes equipped with a divider:
Mechanical gearbox
- Switching frequency decreases.
- Easier control.
- Increasing vehicle traction.
For Kamaz vehicles with heavy load capacity, the previous boxes were modernized.
Payment via PayPal
After selecting payment via PayPal, the PayPal payment system will launch, where you need to select the payment method: bank card or PayPal account.
If you already have a PayPal account, then you need to log into it and make a payment.
If you do not have a PayPal account and you want to pay using a bank card via PayPal, you need to click on the “Create an Account” button - shown with an arrow in the picture.
PayPal will then prompt you to select your country and provide your credit card information.
After specifying the information required to make the payment, you must click on the “Pay Now” button.
Official website of the PayPal payment system https://www.paypal.com
Basic faults
| Cause of malfunction | Remedy |
| The engine does not start | |
| Lack of fuel in the tank | Fill the fuel tank, bleed the fuel supply system |
| Presence of air in the fuel supply system | Bleed the system |
| Freezing of water that gets into the fuel pipes or onto the fuel tank intake screen | Carefully warm up the fuel filters, pipes and tank with a rag moistened with hot water or steam; do not use an open flame for heating |
| The engine does not develop the required power, runs unstable, increased smoke | |
| Clogged air filter element or air intake hood | Perform air purifier maintenance |
| Fuel thickening (during cold periods) | Replace fuel with the appropriate fuel for the season. Turn on the electric heating of the fuel, bleed the fuel supply system |
| Clogged fuel filter elements in FGOT, FTOT | Replace filter elements |
| Increased oil consumption | |
| Prolonged engine operation at idle speed | Do not operate the engine at idle speed unless necessary. |
| Oil leaks through leaks in the lubrication system | Check the condition of process plugs, plugs, tightness of fasteners at joints, condition of O-rings and gaskets |
| Air cleaner or air intake hood clogged | Service the air cleaner or clean the hood mesh |
| Reduced pressure in the lubrication system | |
| Oil pressure sensor malfunction | Check the serviceability of the oil pressure sensor |
| Oil pump intake clogged | Wash the intake |
| Low oil level in the oil sump | Check and, if necessary, add oil to about |
| Increased fluid temperature in the cooling system | |
| Radiator core contamination | Clean the radiator core from dirt |
Payment via WebMoney
After selecting payment via WebMoney, the payment system will launch, where you need to select the payment method: bank card or WebMoney wallet.
If you already have a WebMoney wallet, then you need to log into it and make a payment.
If you do not have a WebMoney wallet and you want to pay in another way, you need to select any of the methods that WebMoney offers and make the payment
After specifying payment details and confirming payment, payment for the goods will occur.
Official website of the WebMoney payment system https://www.webmoney.ru/
Downloading a book
After successfully completing the payment (by any method) and returning to the KrutilVertel store from the payment system website, you will be taken to the successful payment page:
On this page you need to indicate your e-mail, where access to download the book will be sent.
If you are already registered on our website, then simply follow the link to your personal account.
The book you purchased will be in your personal account, from where you can always download it.
Please note that after making the payment, you need to return back from the payment system website to the KrutilVertel website.
If for some reason you did not return back to the site and closed the payment system tab with a message about the successful completion of the payment, please let us know - we will send you a letter indicating access to download the book.
Problems when paying with bank cards
Sometimes difficulties may arise when paying with Visa/MasterCard bank cards. The most common of them:
- There is a restriction on the card for paying for online purchases
- A plastic card is not intended for making payments online.
- The plastic card is not activated for making payments online.
- There are not enough funds on the plastic card.
In order to solve these problems, you need to call or write to the technical support of the bank where you are served. Bank specialists will help you resolve them and make payments.
That's basically it. The entire process of paying for a book in PDF format on car repair on our website takes 1-2 minutes.
If you still have any questions, you can ask them using the feedback form, or write us an email at [email protected]
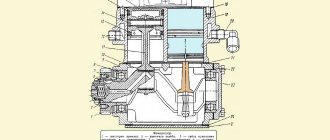
Maintenance of KamAZ vehicle gearbox
During the operation of the car, gearbox parts, especially gears and the shift mechanism, wear out intensively. As a result, malfunctions such as spontaneous gear shifting, difficulty turning on and off, and increased noise when the vehicle is moving may occur.
Gearbox maintenance consists of monitoring the oil level in the gearbox housing, monitoring the fastening of the gearbox to the body or frame, monitoring the presence of oil leaks and the integrity of seals and oil seals, and monitoring the presence of cracks in the crankcase.
The oil change in the gearbox of trucks is carried out at a mileage of 6000-15000 km, depending on the requirements established by the manufacturer.
Change of oil. Drain the oil from the crankcase when it is still warm from heating during operation by removing three plugs 1, 3, 4 on a car with a divider (1 and 4 without a divider). Clean the magnetic plugs from dirt and, after draining the used oil, install them in place.
To flush the gearbox housings and divider before adding fresh oil, use 12 liters of engine oil. Spin the gearbox gears with the engine in neutral for 10 minutes, then drain the engine oil and fill the box to the level with transmission oil, run the engine for 3...5 minutes and then add oil if the level drops.
Malfunctions of the KamAZ vehicle gearbox
The main malfunctions of gearboxes and methods for eliminating them are given in Table 1
Table 1. Main gearbox malfunctions and ways to eliminate them
| Malfunction | Causes of malfunction | Methods of arrangement or prevention |
| Difficulty shifting gears | The gearshift forks are loose | Fasten the forks securely |
| Bent forks and jamming sliders | Straighten or replace bent forks. Eliminate jamming of sliders | |
| Burrs on the inner surface of the teeth of synchronizer couplings or gear teeth | Remove burrs | |
| Simultaneous inclusion of two gears | Wear of rod locks or lock pusher | Replace worn parts |
| Loosening the clamp springs | Replace springs | |
| Incomplete gear engagement | Check the size of the rod and fork. In case of excessive wear, replace | |
| Increased clearance between reverse gear and hub | Replace worn mating parts | |
| Significant wear of the reverse fork | Replace the fork assembly with cracker | |
| Noise in the gearbox | Shaft bearing wear | Replace |
| Wear or chipping of the working surface of gear teeth | Replace | |
| Lack of oil in the gearbox or low oil level | Check the oil level and add if necessary | |
| Incomplete clutch engagement | Carry out adjustment | |
| The nuts securing the bearing caps and cardan flanges are loose | Tighten the nuts | |
| Oil leak from gearbox | Increased oil level in the gearbox housing | Check oil level |
| Wear of gearbox seals | Replace damaged oil seals | |
| Rupture of cover gaskets or nicks and damage to mating surfaces | Replace damaged gaskets or clean out nicks and grind the mating surfaces | |
| Loosening the crankcase plugs and extension cord, cover bolts | Tighten the plugs, tighten the bolts |
Repair, sequence of assembly (disassembly) of the KamAZ vehicle gearbox
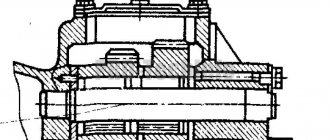
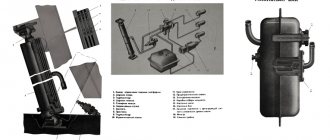
Figure 2. Disassembling the secondary shaft
1. Clamp the output shaft in a vice on the output shaft side. Use aluminum jaws.
Recommendation when assembling and disassembling: position and rotate the shaft only using a special
Tool. Push out the oil tube first.
2. Remove the thrust ring (1) and the split ring (2).
3. Insert the gripping tool into the inner ring of the bearing (3) and secure it until it fits tightly on the bearing rollers using a grooved ring. Now screw on the main tool and remove the inner race of the bearing.
4. Remove the axle washer (4).
5. Clamp the secondary shaft in a vice in the bearing journals on the side of the primary shaft. Use aluminum cheeks.
6. Remove the pressure washer (5).
Note: For straight-tooth versions there is no pressure washer (5).
7. Remove the thrust ring (6) from the annular groove.
8. Pick up the helical gear for reverse gear (7) with a two- or three-jaw puller and remove it together with the inner ring of the roller bearing (8); use a spacer.
9. Remove the needle roller set (9).
10. Pick up the 1st gear helical gear (10) with a two- or three-jaw puller and remove it together with the bushing (11) and toothed coupling (12) (use a spacer).
11. Remove the needle roller bearing (13).
12. Remove the disc gear coupling (14) of the 1st or 5th gear twin bevel synchronizer.
13. Remove the inner ring (15).
14. Remove the intermediate ring (16).
15. Remove the outer ring (17).
16. Remove the sliding coupling (18), be careful - the clamps and pressure springs will fall out, keep a napkin at the bottom.
17. Remove the connecting parts (19).
18. Place a two- or three-jaw puller on the 2nd gear helical gear (21). Remove the helical gear with bushing (22), gear disc (23), inner ring (24), intermediate ring (25), outer ring (26) and synchronizer hub (20), (use spacer).
19. Remove the needle roller bearings (27).
20. Clamp the output shaft from the output shaft side.
21. Grab the sliding sleeve (28) with a two- or three-jaw puller and remove the synchronizer ring (29), gear clutch (30), roller bearing (31) and helical gear (32) (use a spacer).
Note: when removing the sliding sleeve, be careful as the retainers (33) and pressure springs (34) may fall out; use a napkin.
22. Remove the retainers and springs. Grab the 3rd gear helical gear (35) with a two- or three-jaw puller and remove it along with the roller bearing (36), synchronizer hub (37), synchronizer ring (38) and gear coupling (39). (Use spacer)
23. Remove the needle roller bearings (40).
Figure 3. Assembly of the secondary shaft of the gearbox
1. Clamp the secondary shaft (1) from the input shaft side.
2. Lightly lubricate the needle roller bearing (2) and place it on the output shaft.
3. Place the helical gear (3), 2nd gear, on the output shaft so that the splines for the synchronizer gear coupling face toward the output shaft.
4. Check the wear limit of the synchronizer parts (see Chapter 6).
5. Place the disc gear coupling (4) onto the splines of the helical gear (3). The slightly convex internal gear of the disc gear coupling points towards the output shaft.
6. Place the inner ring (5) onto the disc gear coupling. The tabs should face the sides of the output shaft.
7. Place the intermediate ring (6) so that the tongues fit into the grooves of the disc gear coupling.
8. Install the outer ring (7). The tabs should face the output shaft.
9. Using the three coupling inserts (8), align the outer ring tabs and the inner ring tabs. Position the tongues of the inner and outer rings overlapping so that the connecting inserts then fit into the grooves of the synchronizer hub (9) and are above the tongues. Once everything is consistent, remove the inserts.
10. Heat the synchronizer hub (9) to approximately 120 degrees. Celsius and place on the splines of the secondary shaft. The positioned tongues must be in the grooves of the synchronizer hub. The protrusions of the outer ring must fit into the grooves of the synchronizer hub. The synchronizer can be rotated using a plastic mandrel.
11. The axial clearance of the helical gear (3) must be at least 0.20 mm.
12. Insert the connecting inserts (8) into the synchronizer hub (9).
13. Guide the sliding clutch (10) over the synchronizer hub and outer ring and bring it to the disc gear coupling.
14. Insert new connecting springs (11) and existing clamps (12), position them correctly in the synchronizer hub.
Note: "SYNCHRONIZATION WITH DOUBLE CONE".
Correctly insert the clips into the synchronizer housing.
15. Using a suitable tool, adjust the position of the clips in the synchronizer hub and in the sliding clutch.
16. Install the outer ring (13). The tongues must engage in the connecting ring, and the protrusions must engage in the grooves of the synchronizer hub.
17. Insert the intermediate ring (14). The tabs should face the output shaft. Insert the inner ring (15) and engage the tabs with the connecting disc.
18. Place the disc gear coupling (16) with a convex internal gear so that it faces the input shaft and engages with the intermediate ring (14).
Engage the sliding clutch in the neutral position and press it against the disc gear clutch. You will clearly hear the click of the latches as the car gearbox shifts into place.
19. Heat the bushing (17) to 120 degrees. Celsius and place it on the output shaft to achieve a good axial position. If necessary, adjust with a plastic mandrel.
20. Lightly lubricate the needle roller bearing (18) and slide it onto the bushing (17).
21. Place the helical gear (19) for 1st or 5th gear on the needle roller bearing (18) so that the splines engage with the disc gear coupling.
22. Heat the gear coupling (20) to a temperature of 120 degrees. Celsius and place it on the secondary shaft. Achieve good axial position.
Note: The collar of the gear coupling must face towards the output shaft.
23. The axial clearance of the first or fifth gear helical gear should be at least 0.20mm.
24. Heat the bushing (21) to a temperature of 120 degrees. Celsius, place on the output shaft, ensure good axial position.
25. Lightly oil the needle roller bearing (22) and slide it onto the bushing (21).
26. Place the helical gear (23) for reverse onto the output shaft over the needle roller bearing.
The splines should “look” towards the input shaft.
27. Heat the roller bearing (24) to a temperature of approximately 100 degrees. Celsius, place on the output shaft, achieve a good axial position. If necessary, use a plastic mandrel.
28. Thread the thrust ring (25) into the annular groove of the secondary shaft.
Note: The axial play of the thrust ring must be between 0 and 0.05 mm. Select the appropriate thrust ring from the spare parts catalogue.
29. Place the pressure ring (26) on the secondary shaft.
Note: The pressure ring (26) is no longer available in the previous design.
30. Clamp the output shaft from the output shaft side.
31. Lightly oil the needle bearing (27) and place it on the output shaft.
32. Place the helical gear (28).3rd or 7th gear on the needle roller bearing; The splines of the helical gear should “look” towards the input shaft.
33. Place the gear coupling (29) onto the splines of the helical gear.
34. Place the synchronizer ring (30) onto the gear coupling.
35. Heat the synchronizer hub (31) to a temperature of 120 degrees. Celsius, place on the splines of the secondary shaft, ensuring the correct axial position. If necessary, adjust using a plastic mandrel.
Note: The projections of the synchronizer ring must fit into the grooves of the synchronizer hub.
36. Install the sliding sleeve (32).
Note: The milled grooves on the inside of the sliding coupling must overlap with those places in the synchronizer hub where the pressure springs (33) and clamps (34) will be located.
37. Press new springs and existing clips into the holes in the synchronizer housing and insert into the sliding sleeve.
38. Position the synchronizer ring so that the protrusions fit into the grooves of the synchronizer hub. Check wear limit, see chapter 6.
39. Place the gear coupling (36) onto the synchronizer ring.
40. Pull the sliding clutch to the neutral position while pressing the synchronizer ring (35) and the gear clutch together. (36). You will hear the latches coming into place and clicking.
41. Insert both roller bearings (37) into helical gear (38), 4th gear.
Note: The lubrication holes of the roller bearings must face outwards (see arrow direction).
42. Heat the roller bearing together with the helical gear to a temperature of 100 degrees. Celsius, place it on the secondary shaft, make sure that the entire bearing package lies coaxially.
Note: the splines of the helical gear must face towards the output shaft.
43. The axial clearance of the helical gear should be at least 0.05 mm.
NOTE: Assembly suggestion: Install the axle ring (39), roller bearing (40), split ring (41), thrust ring (42) and ring (43) only after reading the chapter “Adjusting the shafts”.