Dimensions
The dimensions of different types of plows may vary. You can consider the parameters of parts using the example of a rotary specimen. It is taken into account that the rotary type of such a device is assembled from the following bases:
- side vertical part of the runner;
- horizontal plane below the skid;
- front dump part.
The most productive is considered to be a plow in which the cutting edge at the bottom of the fixed share is 20 mm below the bottom of the horizontal skid. Another correctly aligned part of the plow is the matching of the cutting edge on the side of the fixed share with the cutting edge on the side of the moldboard. The share and blade should not protrude more than 10 mm beyond the boundaries of the vertical plane on the side of the skid.
There is one more important nuance - fastening the front plane of the blade share without visible cracks and gaps, and in the same plane. If we look at these parts in more detail, they should be well polished and, like a mirror, reflect any surface. There should be no protruding fasteners under any circumstances. As soon as the plow returns from earthworks, it is advisable to clean it of settled soil and foreign particles. Elements that have been polished should be poured with oil or coated with grease. Next, the mechanisms need to be rubbed using a rag. In this way, it will be possible to protect the structure from aggressive external influences, which can lead to the formation of corrosion on the surface of the plow.
As for the 4th correctly constructed structure, it includes the flat front surface of the ploughshare, which makes an angle of 20 degrees with the flat part of the plow structure. It will be equal to the angle located at the rear of the exposed share. The cutting sidewalls-edges of the plowshare and blade will also have 20-degree angles with their bases on the side of the furrow. Moreover, the edge located on the side of the blade may be slightly rounded.
Most common varieties
The plow can be of different types:
- 2-hull – characterized by maneuverability and ease of use (a double-hull plow can serve for a long time and provide large volumes of work);
- disk - will provide reliability and withstand heavy loads;
- single-hull – very light, ideal for seasonal work;
- reversible - “active” plow, the parts in which rotate - a little heavy, but convenient and efficient in operation;
- horse (or equestrian) – produced for working with “human” force, that is, with horses, but it is also easy to make yourself (for example, from a bicycle frame);
- changeover plows provide not only stable operation, but also save fuel.
As you can see, the design thought does not dry out, and the variety of plows makes it possible to cover any needs of both the area and the workers. In addition, if you ask yourself how to properly adjust and how to set it up, devote some time to them, then you can get the ideal option for a particular case. Let us add that sometimes it is advisable to use a rotary option.
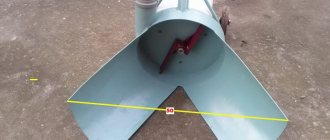
Plow dimensions
The rotary type rotary plow consists of three main planes:
- Lateral vertical plane of the skid.
- The lower horizontal plane of the skid.
- Front dump plane.
If, after dismantling the moldboard and ploughshare, the plow is placed on top of the table, pressed tightly against the wall, and its side plane is moved towards the vertical wall, then the table cover will coincide with the horizontal lower plane of the skid, and the vertical wall with the vertical side plane of the skid.
A plow is considered good if the lower cutting edge of the installed share is 20 millimeters below the horizontal lower plane of the skid.
The second correct plow design is to match the side cutting edge of the installed share in a straight line with the cutting side edge of your moldboard. Also, the blade and ploughshare do not protrude more than 10 millimeters beyond the vertical side plane of the skid.
The third correct condition is the connection of the working front plane of the plowshare to the blade without gap and in the same plane. They should ideally shine like a mirror, be well polished and should not have any protruding fasteners sticking out.
After the plow has returned from work on the site, it is recommended to clean it of soil and foreign objects, pour oil on the polished parts or grease them with grease, then rub them with a rag. This will protect the surface from environmental influences and corrosion.
The fourth correct design is the back flat surface of the share, making an angle of 20 degrees with the flat side of your plow installation, which is equal to the rear angle of the mounted share.
The cutting side edges of the blade and share also have a 20-degree clearance angle with the side of the furrow, and your blade's cutting side edge may be rounded.
How to properly set up a plow on a walk-behind tractor? We plow simply, quickly and easily.
Having become the proud owner of a walk-behind tractor of one brand or another, we are faced with the problem of choosing a plow and related elements for plowing our gardens and fields. Spring is a hot time for all people who are not indifferent to the earth, the topic of environmentally friendly nutrition, summer residents and gardeners. How to make work easier, more enjoyable and more useful? This article will discuss how to properly set up a plow, select a hitch, and work on your mistakes. Everything in order:
As a person living in a rural area, I have watched tractors work in the fields since childhood. Plow - what’s so surprising, I thought when I went to buy this attachment for my Agat walk-behind tractor with a 6.5 hp engine. In a specialized store it turned out that not everything is so simple. There are many options for plows, depending on the power of the walk-behind tractor. The choice was made on the advice of the seller, I did not argue, because... there was no point in it. This was followed by the accompanying purchase of a hitch (at that time I imagined it as one whole)
Having installed this attachment on the walk-behind tractor, I rushed on the road with wrenches in my hands for adjustments. We are plowing the land for the first time in our lives—an experimental run. Of course, I consulted with neighbors and acquaintances. Tips in the style: “place the walk-behind tractor on a brick, two fingers under the heel, angle of attack. “All this advice seemed simple, and that’s what frightened me. I had to watch the work of walk-behind tractors when plowing - everyone was sweating, either pushing the walk-behind tractor or running after it - without strength, arms or legs. At first it seemed to me that this is exactly what plowing on a walk-behind tractor looks like. But all this was the result of incorrect plow settings.
I will try to tell you in simple terms and share my experience on the correct setup of the hitch and plow, in which you can easily cope with any volume of plowing on a walk-behind tractor of any brand. The understanding of this came after one season - there is no need to rush anywhere.
First: The plow plows in a position strictly perpendicular to the plane of the ground; we carry out this adjustment after the first and subsequent passes, since the wheel goes into the rut. Everything is simple - as in the photo:
Second: What is the angle of attack? This is how deep the plow will go into the ground before its heel - bottom part takes a position parallel to the line of movement. The greater the angle of attack, the deeper the rut, the larger the blade, the higher the bed))) This is the most common mistake - too large an angle of attack on a light and weak walk-behind tractor - the result is sore hands and back for the one who controlled it. Additionally, you can use weights, but this increases the load on the axle and engine - don’t overdo it, everything is within reasonable limits. In the photo I schematically indicated with lines:
Thirdly: An error in which the walk-behind tractor tends to run either to the left or to the right. If you look at the walk-behind tractor from the top point, the hitch should be in a position strictly perpendicular to the axis of the walk-behind tractor. It’s easy to understand - imagine you are sailing on a boat - how do you steer? You guessed it - everything here follows the same principle. Schematically marked with lines in the photo:
If you follow all these rules for adjusting the plow, then the work will be a joy, the walk-behind tractor will help you, and not be a burden.
But all these adjustments are meaningless if the hitch is of poor quality. And this is the most important mistake! We choose a high-quality, reliable - strong coupling in order to quickly and easily make adjustments, while the reliability of the fastenings should not be questioned while working with the plow.
In the photo, the hitch is black - it has proven itself reliably - the metal is a decent thickness, does not move around in the fastening areas, does not break threaded connections
In the photo, the red hitch is of satisfactory quality - it bends, moves, and the thread on the adjusting pin gets knocked out.
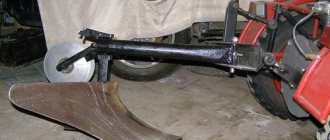
Plow hitch
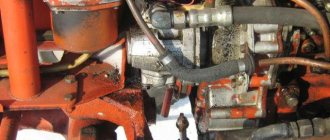
Motoblock hitch disassembled
The hitch is an important design element that ensures reliable fastening of attachments to the Neva walk-behind tractor. The most popular option is a U-shaped mount made from a channel, which is installed under the steering wheel of a walk-behind tractor.
When creating the hitch, you will need to drill holes for attaching the bracket and mounting pin. The bracket for attaching to the walk-behind tractor is either at the top or bottom, so as not to interfere with hanging.
Equipment manufacturing methods
A homemade unit can be made in two ways.
- In the first case, a steel pipe is used to make the dump, the diameter of which is 55-60 centimeters and the wall thickness is 0.4-0.5 centimeters. Initially, you need to make a template from thick cardboard. For this purpose, appropriate drawings are used. If you have sheet-bending rollers at hand, then the workpiece can be given the required shape as simply as possible. The blade blank is cut out using scissors. When feeding it to the rollers, an angle of 20 degrees is maintained. After bending it, modification is done using a hammer.
- The second option is a rather labor-intensive way to make the unit yourself. To make it, you need to heat the workpiece in a forge or in any other convenient way. Next, it is bent along the matrix. For this purpose, the blade from the attachments of the T 25 tractor is most often used. Sheet steel is used as a raw material for the production of the body. The next stage involves placing the template on the pipe while maintaining an angle of 20 degrees. The outline of the dump can be drawn using chalk. Next it needs to be cut off. For this purpose, gas welding is most often used. The contour is processed using sandpaper. If the need arises, the blade contour is modified using a hammer.
Manufacturing technology
Initially, the elements of the unit are manufactured from thick cardboard. For this you must also use drawings. In order to make a homemade plow as correctly as possible, it is necessary to maintain the appropriate angles. If the parameters of the unit suit you, then you need to make it out of metal.
After manufacturing the metal elements of the plow, it is necessary to use a steel sheet to assemble them, the thickness of which will be from 2 to 3 millimeters. You need to step back from the edges of the sheet and put a corner on it. In order to make a plow with your own hands, you need to install the plowshare on a metal sheet.
- Correct manufacturing of attachments for the T 25 tractor requires the use of welding to fasten the ploughshare to a metal sheet. Next, you need to place the side shield of the rack under the plowshare. This is done in such a way that it is located in a vertical position and extends beyond the edge of the ploughshare by about 7 centimeters. It also needs to be attached to the metal sheet and plowshare. Welding is most often used for this purpose.
- In order to correctly make a plow for the T 25, it is necessary to fit the moldboard to the ploughshare. It requires maximum tight joining with the canvas. The plowshare blade and the top edge must be at the correct angle. Otherwise, they will need to be finished with a hammer.
- In order to properly manufacture a homemade unit for the T 25, it is necessary to attach the spacer bar to the side shield by welding. If you don't know how to do this, you can watch the video on our website. The shield, plowshare and side sheet must be connected to each other by welding.
The work of a homemade plow
In order for the T 25 plow to independently hold the furrow, a two-wheeled block is fitted to it. The width of the furrow wheel should be 4-5 centimeters, and the diameter should be 32 centimeters. The diameter of the field wheel should be 20 centimeters. The axle for the plow wheels on the T 25 tractor is made from a pipe whose size is ¾ inches.
On one side, the pipe must be bent 90 degrees and a bushing must be welded to it, on which the furrow wheel will later be installed. The field wheel is mounted on the other side of the pipe. The wheel axle is manufactured as a composite one. The pipe itself is attached to the attachment beam by welding.
Setting up the plow
In the video you can see the plow in action (second option)
The depth of soil plowing with a tractor plow ranges from 20 to 24 centimeters. The same distance should be between the field wheel and the toe of the ploughshare. If you provide the ability to move the field wheel vertically, the plow can be adjusted according to the depth of plowing and the width of the soil during work. If you don’t know how to enable wheel movement, then you can watch a video on this on our website.
Making attachments yourself is not very easy, but it is still possible. The main thing is to choose the right material and adhere to the production technology as accurately as possible.
Hillers
Hillers allow you to cut furrows for planting crops, but their main use is hilling up potatoes to get a larger yield.
There are several types of hillers:
- Negotiable. This is the simplest type of hiller, which works using two plows.
- Disk. This option is more effective. It works using two rotating disks. Which rotate and loosen the soil.
- Active. This is a special type of hiller that works using propellers. If disk and revolving hillers simply turn over the top layer of soil onto the potatoes, then this one first chops it up and only then discards it.
From the manufacturer
The official manufacturer offers one version of the hiller - the universal reversible hiller OU-00.000-01.
It looks like two connected plows. It is possible to adjust the width of the rows by rearranging the plows at different distances from 45 to 70 cm. The plow is immersed in the ground to a depth of 10 cm. The average speed of movement of Belarus with a reversible hiller is 4 km/h. The structure weighs 20 kg.
Analogs
The best analogue for any factory-made attachments for MTZ is Lida products. Including hillers.
The OK-2 hiller is presented by a Lida company and has similar parameters to the universal hiller, except for the immersion depth. The maximum immersion of this unit is 12 cm. Accordingly, the speed in this case drops to 3 km/h.
You can always choose a universal option for a walk-behind tractor that will work successfully on it. The main thing is to choose a hitch.
Ukrainian offers a large amount of universal equipment, including disc hillers. Disc sizes can vary from 18 to 36 cm. Their maximum immersion level can be half the diameter. The disadvantage is that they are designed to process only 1 row, while reversible hillers work with two rows at once.
Homemade option
Making a disk hiller is problematic; a reversible hiller is much simpler in its design. To make it, it is enough to have two plows on hand, which are connected with bolts not to the Belarus, but to the frame. And the frame itself is already connected to MTZ.
The frame should be made from a square tube in the shape of the letter “T”. This design is simple but effective and has been known since Soviet times.
Video reviews
Review of the universal hiller OU-00.000-01 for the MTZ walk-behind tractor
Setting up hiller discs on a MTZ walk-behind tractor
An example of hilling with a Belarus MTZ-09 walk-behind tractor
Here are some reviews from people who have already used this unit:
Gennady:
“When choosing between a disk and a reversible hiller, it is better to take a disk one. It is a little more expensive, but it works more stably and does not cut potato tubers. Based on practice, the rows are not always planted equally, and sooner or later you will hit some bush. But if you plant through a potato planter, I think there shouldn’t be any problems.”
Dmitriy:
“If you look at which hiller is better, then there is no definite answer, each is good in its own way. It is better to use the disk one until the potatoes have sprouted, or in the early stages of growth. It makes small lumps of soil, thereby saturating it with oxygen. After this, active growth of tubers occurs, and usually the next day sprouts are already visible from the ground. And with the current climate: plus 30 °C and no rain, this is what is needed. And the return one can already be used when the potatoes have grown and gained strength, without fear of damaging them.”
Plowing with a horse plow
Plowing is a process that requires the plow to cut away soil, rhizomes, vegetation, and gently turn side soil.
Basic requirements for plowing:
- It is better to carry out plowing immediately after harvesting crops, while the soil retains enough moisture;
- the turf layer is thoroughly wrapped and crumbled as finely as possible;
- the surface is desirable to be continuous and dense, without the formation of voids or irregularities;
- mineral fertilizers, manure and turf are completely plowed;
- The furrows should be straight, or with a slight deviation from the norm, with a minimum gap between them.
The fundamental thing when plowing is to loosen the fertile layer, remove the turf and turn it around completely for further reheating to a state of humus.
Sometimes you have to deal with stones and other natural barriers that are too strong for one horse, so for increased resistance, two-horse and multi-horse teams are used. Medium and heavy-duty walk-behind tractors cope with this task quite simply.
Plowing with a walk-behind tractor
Plowing with a single horse
Plowing with one horse is quite a comfortable process, provided that the plow depth and width are adjusted properly. Only in this case, it goes exactly along the furrow, smoothly without additional resistance other than the rise of the ground. The horse moves at an even pace.
As a rule, the draft power of one horse is used on previously plowed areas, or on turfy, weed-free soil.
Cultivating the land with a horse-drawn plow with one horse
Plowing with steam horse harness
Heavy loamy soils, as well as virgin soil and areas where greater traction force is needed, use two-horse and multi-horse harnesses.
What does the harness consist of?
When harnessing horses together, the defining moments are:
- competent selection of animals and crowding;
- character and endurance;
- haste at work and the strength of the animal.
For the plow to work smoothly, it is necessary to determine the amount of traction force in order to calculate the number of animals for work. This takes into account not only the width and depth of the layer, but also the qualitative composition of the soil.
Plowing with a horse plow using a walk-behind tractor
Today, the walk-behind tractor is an indispensable “iron friend” for many farmers and summer residents. The plow is attached to the walk-behind tractor with a hooking device. After which it is necessary to balance its work. To do this, make a control pass in first gear and look at the depth of the furrow (15-20 cm), and whether the tiller is correctly secured and adjusted.
- For heavy walk-behind tractors, a plow with a 23 cm grip is suitable.
- For medium walk-behind tractors, a plow with a grip of 18 cm is suitable.
Plowing with a walk-behind tractor is not difficult, the main thing to remember is that the plow always pulls to the left, so the first row must be marked with markings. In the second aisle you will be able to navigate along the first row. The distance between the ridges should not exceed 10 cm.
Universal horse-drawn plow for walk-behind tractor and horse-drawn carriage
When adjusted correctly, the unit moves smoothly, without jerking or deviation to the side. Only after the furrows begin to turn out smooth can the speed be increased.
Setting up a plow on a walk-behind tractor
If the area to be plowed is large, carry out this process in several stages to avoid overheating the engine.
Drawings of a plow for a walk-behind tractor
Using the experience of craftsmen who made a plow for a walk-behind tractor with their own hands and left drawings, the ploughshare should be made in such a way that it can be removed, this will make it easier to sharpen it before plowing.
Alloy steel 9ХС, from which I make blades for hand saws, is considered an ideal material for the cutting part of a plow.
Suitable steel grade 45, when hardened, brought to a hardness of HRC 50-55. If you only have ordinary steel on hand, say carbon St5ps, which is not subject to heat treatment, then by beating the cutting edge on an anvil and sharpening it, it is quite suitable for cultivating the soil.
Plow blade for walk-behind tractor
The moldboard of the plow is the part that takes the earth to the side.
The first method of making a blade:
The working surface of the blade must be given a curved shape. If you have a metal bending machine or sheet bending rollers, then giving the workpiece the desired shape will not be difficult.
A metal blank with a thickness of 3-5 mm is required, the rollers are directed at an angle of 20-22 degrees, as shown in the drawing, and the desired bend is given.
Second way:
Here, prepared. A pipe with a diameter of 600-650 mm can serve (this is the diameter that will require less labor, since the bend of the pipe will maximally repeat the desired bend of the future dump) and a thickness of 3-5 mm. We make a template from cardboard and apply it to the pipe, not forgetting the angle of 20-22 degrees, as shown in the drawing below.
We outline the template with a pencil or chalk and cut it out using gas. welding, if necessary, grind the workpiece and bring it to the desired condition.
Third way:
Probably the most difficult method of making a moldboard is when the workpiece is heated and, using a matrix, given the desired shape, which can be a moldboard from another plow.
The material of the plow body is steel sheet grade St3 - St10 with a thickness of 3 mm.
Drawing of plow parts for walk-behind tractor
a – ploughshare made of alloy steel;
b – side shield of the rack, St3;
c – spacer plate, St3;
d – plow base plate, St3;
d – field board, corner 30x30 mm;
e – stand, pipe with a diameter of 42 mm
We advise you to first make the plow parts from cardboard and attach them to each other at the required angles. Thus, the values of the angle α on different parts of the plow body will be from 25° to 130°, the values of the angle γ - from 42° to 50°. If the homemade model of a cardboard plow suits you in all respects, you can move on to working with metal.
When the metal parts of the plow are ready, you need to find an additional sheet of steel 3 mm thick, 600x600 mm in size, it will be needed to assemble the plow, and a welding machine (preferably an inverter). On this sheet we retreat 40 mm from the edges and measure the angle γ0.
Plow assembly
1 – ploughshare;
2 – side shield of the rack;
3 – additional sheet 2-3 mm
Using wedges with an angle α0=25 degrees and an angle γ0=42 degrees, a ploughshare is installed on the additional sheet and tacked to the sheet by welding, pointwise on both sides.
The side shield of the rack is connected to the ploughshare vertically so that its edge extends beyond the ploughshare by 4-7 mm, while the raised shield should be higher than the blade of the ploughshare (that is, higher than the additional sheet) by 6-8 mm, so as not to interfere with the ploughshare, cut the ground. The shield is also attached to the ploughshare and to the additional sheet.
Next, the blade is attached to the ploughshare very tightly, without leaving a gap, so that their surfaces are one whole. The angle between the upper edge of the blade and the ploughshare blade is equal to (γmax − γ0) = 6-8°.
Mounting the plow share
– ploughshare;
– countersunk head screw M8;
– dump;
– base plate;
– corner 30x30x90 mm;
– M8 nut
If it is found that the corners and/or surfaces do not correspond, the blade is adjusted using a hammer. After fitting the blade to the ploughshare, it is welded from the back to the ploughshare and to the side shield. Then the side shield is welded to the spacer bar and the base plate; the thrust corners for the ploughshare are attached to the latter by welding.
Followed by. Inspect the finished plow again, and if everything is clearly welded completely. Add. the sheet is separated from the body with a chisel or LNA. All welds are ground.
Preparing and setting up the plow for work
Assembly work is carried out in the following stages:
- Open the packaging and select spare parts; they should be put aside. We lay out the main components in a convenient order.
- We bring the frame into locking mode and install it on the prepared stand.
- The housing is hung and inserted into the stiffening beam and the rack with a bolt. The housing stand is mounted to the frame using locknuts.
- On the left, the skimmers are screwed to the body in front of the body holders using brackets. There is no need to tighten the staples at this stage.
- We secure the support wheels using brackets and spring washers. They are attached to the outside of the structure.
- The support wheels are lowered all the way; to do this, turn the screw nut at the end counterclockwise).
- We tighten all the brackets until they stop and remove the plow from the stand.
- The scraper is mounted to the wheel bracket using washers and nuts.
- The hitch is mounted on the plow frame using bolts, which must be tightened until they stop.
- We screw red reflectors to the back of the main beam.
The plow is assembled and ready to be set up. The tincture is carried out in the following steps:
- Before using for the first time, inspect the equipment. Lubricate the wheel bearings and all rubbing parts with grease.
- Set the skimmer to the required plowing depth. The gap between the coulter shares and the body must be at least 250 mm. Using the protrusion on the holder, we adjust the depth of tillage.
- Tighten the skimmer clamps completely. In this case, the field edge of the skimmer covers the edge of the body.
- The PLN plow has a soil grip of 105 cm, so the track should be 1560 mm. To prevent shortfalls when plowing, the right wheel of the machine is placed in the furrow.
- The slanting rods of the mounted part are adjusted after the plow is installed on the ground.
- The braces are placed in the front holes of the rod.
- Before work, it is necessary to adjust the limit chain. The longitudinal rods should swing freely horizontally by 120-130 mm in different directions. To do this, the chain is built with a slight slack.
- Before plowing, it is necessary to adjust the depth by adjusting the traction of the mounted part and the support wheel. Initially, according to the timing of the front wheel, the average depth value is set and the first row is passed. Next, the flash depth is adjusted for each type of soil individually.
- When working, the right side of the frame should always be slightly higher than the left. As the furrow passes, it will break out and be strictly parallel to the soil.
- After passing the furrow, make sure that the plowing is uniform and completely covers the plant residues. There is an adjustment on the left side of the plow that will help make the plow for the MTZ 80 tractor more stable. If the plow moves to the side, then the canopy is moved back.
- If the frame warps, then you need to lengthen the brace.
- You can adjust the plowing depth of the front part of the body using the right link slants from the mounted unit, the rear part using the top one. In this case, the support wheel is placed at the required plowing depth and the position is fixed using a support bolt in the holder.
High-quality plowing can be determined by several criteria:
- The plowing depth of all plow bodies is uniform, the furrows are the same.
- When plowing forever, the adjusted units remain in the same position.
After moving to new fields, with a different type of soil, the plow must be adjusted in a new way.
Rules for plowing with an adjusted plow
After passing the first row, you need to adjust the plow to the desired depth.
For uniform and correct plowing, a number of rules must be followed:
- When moving from one furrow to another, the plow rises to the transport position.
- Circular plowing can only be done with a reversible plow.
- The plow turns smoothly.
- When transporting the working body, it is necessary to control the ground clearance. The distance from the road to the plow must be constant.
- When using a power deepener, the support wheel is removed from the plow. The depth is adjusted automatically.
- When plowing with power control, remove the support wheel from the plow. In this case, the specified plowing depth is maintained automatically using a power regulator.
The price of a new plow for the MTZ 80 tractor is presented in the table:
How to do it?
Modern models of walk-behind tractors can be equipped with a reliable plow made by yourself. Varieties of this element: double-turn, reversible, two-body, rotary or Zykov’s product. There are quite a lot of design options. There are even options in which the body is made of a gas cylinder. It’s not difficult to make a high-quality plow for motorcycles yourself if you follow certain rules.
Rotary
The manufacturing of the structure can be divided into several main stages.
Prepare a good dump in the shape of a cylinder. This must be done exclusively in accordance with the drawing. The part is made of alloy metal
It is important to follow the drawing when making the structure yourself. They put out the ploughshare. The wedges are inserted into the iron sheet (3 mm) at an angle of 45 degrees. Connect the ploughshare to the shield on the side
Be sure to ensure that the blade of the ploughshare is located just below the shield itself (1 cm, no more). Attach the blade to the ploughshare. The working half with the ploughshare is welded to the metal tube, which serves as the base, using a welding machine. On the opposite side - fasteners for motorcycles. When the plow is ready, you can weld an axle with wheels in its lower half.
Turning
The rotating type of plow is rightfully recognized as one of the most functional and practical. This design is an excellent assistant for plowing land on a site, because it can cover a fairly large area. The plow is also good because you don’t have to waste time with it after each approach. You will only need to turn the plow and move in the opposite direction. The productivity of equipment will increase significantly. The main actions are performed in the same way as in the case of a rotary mechanism, but in this case the cutting elements must be below the skid (at least 2 cm).
Disk
It is possible to assemble a disc plow for machinery with your own hands. A similar model is assembled from the following parts:
- disks;
- fist;
- axles;
- bracket;
- scraper;
- drive beam;
- pens;
- screeds.
The disks for the device can be taken from an old “seeder”, if you have one in your arsenal. These elements are installed at an angle to increase work productivity. The hiller is hung on the equipment through the coupling bracket. The T-shaped leash from the plow is screwed to it using bolts and a stopper. At impressive speeds, the hiller may begin to slip, so you will have to work exclusively at low speeds or with twin wheels.
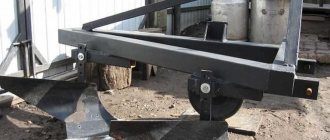
Description of frame assembly work
The frame is taken as the base - the guild, the drawing can be viewed below. You can make it from a piece of metal rectangular pipe with thick walls 52x40x7 mm. A fork is made for the support wheel. To do this, two wider walls are cut off on opposite sides.
The middle of the frame is marked; this is where the cross beam will be welded. In the same place, the rack-springs are attached using welding. The drawbar will be attached to them. There is a hole left on the front of the frame, the beginning of the fork. It should be welded tightly, otherwise during operation soil and debris will get into the hole and clog it. This will make it rust quickly.
There is also a hole at the back of the frame, which is welded with a rivet. A round hole of 11 m is drilled in the rivet. An M10 nut is first welded onto the rivet.
Plow shank attachment
Next, the plow stand is attached. To do this, a hole is drilled in the wide walls at the end of the pipe on both sides. It is made rectangular and has dimensions of 31x16 mm. The plow stand is attached here. The side walls (narrow) are also drilled through to a diameter of 10.2 mm. The handles will be attached here using M10 bolts.
Handles are made separately. To do this you will need a half-inch metal pipe. You can take it from an old plumbing system. The size and bend of the handles depends on the height of the person who will work with the plow.
The handles need to be made as follows. The pipe is flattened at both ends with a hammer. 10.2 mm holes are drilled into them and attached to the frame using bolts. For convenience, a waterproofing tape or rubber strip is wound on top. This will make it easier to hold the element with your hand when working.
It is necessary to give the structure additional rigidity. To do this, take the same half-inch pipe. It is welded as a cross member.
Making a drawbar and fastening a wheel
In order to make the drawbar, they also take an iron pipe.
To do this, take a piece and cut a thread on both sides. Using hinges, the pipe is attached to the springs of the frame strut. The connection is made through a special plug on the axle with welded nuts. The fork is also made from the same rectangular pipe, but they take a small piece and cut a channel out of it. A half-inch coupling should be secured to the channel walls. A long M10 bolt is used as an axis for the hinge. A tee with a hole through ? is mounted at the end of the drawbar. The thread in the tee is ground off and a piece of pipe is inserted, which is selected according to diameter and length. The wheel can be used from an old bicycle, but it will not withstand the load, so they only take rubber from it. The disc according to the diameter of the wheel is cut from a sheet of getinax with a thickness of 25 mm. A hole is drilled in the center of the wheel where a nylon hub-bearing will be inserted. A groove is machined along the edge for the tire. For the wheel axle, a long bolt with a diameter of M10 is also used.
Plow design
If we talk about the Neva walk-behind tractor, several types of plows are installed on it, each of which has its own design features.
Nowadays the land on personal plots is cultivated with plows of the following designs:
- single-hull;
- negotiable;
- rotary.
The most popular are single-hull guns. In addition, such a plow is considered the most optimal for plowmen without skills.
At the top of the reversible plow there is a curved feather, which allows you to immediately turn over the layer of earth during the plowing process. This feature makes the design an excellent option for cultivating hard soils. Since the design of such a plow is quite complex, only an experienced person can make it.
The rotary plow is the most difficult to manufacture. In design, it is more reminiscent of a cultivator, since there are several shares on one axis. When cultivating the soil, the axis rotates, causing the soil layer to turn over. The advantage of the design is that the soil can be cultivated to a depth of up to 30 cm with little effort. With the help of a rotary plow, plowing of the site can be done along different trajectories.
So, the single-hull plow is the most widely used, and anyone can work with it, even those not familiar with mechanized plowing. The advantage is that this tool is quite easy to make with your own hands.
What are they?
The working elements of a single-body plow are divided into:
- plowshare (divided into screw, cylindrical and semi-cylindrical shape);
- dumpless;
- disk;
- rotary;
- combined or universal, designed for maximum crushing of the cultivated area of land.
Depending on the number of working parts, the devices are:
- single-body (the easiest to use, lightest weight, simple design);
- double-hulled;
- multi-body (used in extremely complex soil plowing tasks).
Reversible models are used when processing difficult and heavy soils. The design is a feather bent upward, which turns it over while cultivating the land. Reversible plows come in reversible and rotary forms. Rotary ones are presented in two-body and three-body types. These models have a complex design; the number of shares depends on the shape of the plow.
Disc ones are used when plowing wet soils. The processing depth is the smallest when compared with other types. A two-blade plow is a standard model, represented by two blades located opposite each other. Each working element dumps soil to the right and left depending on the chosen direction; the plowshares are reset by manually turning the mechanism 180 degrees. These plows have the greatest popularity and increased productivity. Suitable for plowing on inclined surfaces and slopes.
A double-revolution plow is used to plow neglected and stagnant layers of soil. In this model, unlike others, there are no idle runs on the soil, which improves the performance of the tool several times. The design of the double-turn plow allows you to change the direction of movement of the plowshares by 90 degrees.