For owners of personal plots, a mini-tractor is an indispensable assistant. Using various mounted and trailed equipment, it can be used for soil cultivation, crop care, harvesting, transport and earth-moving work, snow removal and other work.
The question - how to make a mini-tractor with your own hands - is often asked by owners of walk-behind tractors, the use of which is limited.
There is a large assortment of factory mini-tractors on sale, both domestically produced and Chinese. However, factory equipment is not affordable for everyone and is designed to perform a relatively narrow list of jobs.
If it breaks down, it may be difficult to find spare parts and repairs. Therefore, many enthusiasts assemble a mini-tractor for the household with their own hands.
Engine for a homemade tractor
Depending on the engine power, there are light (up to 5 kW), medium (up to 15 kW) and heavy (up to 50 kW) mini-tractors. When choosing an engine for your tractor, you should clearly understand what functions it will perform for you.
Since there is no point in making powerful equipment for working in small areas. Photos of various DIY mini-tractor designs are shown below.
For light and medium-sized mini-tractors, engines from walk-behind tractors, which have now become popular, are best suited.
Often, walk-behind tractors are converted into mini-tractors using ready-made kits, or from self-made components and separate mechanisms from other equipment.
For a homemade heavy mini-tractor, made with your own hands, an engine from passenger cars, or from T-25, T-30 tractors and their modern analogues, is suitable. Such engines can be purchased inexpensively on the secondary market along with a clutch and gearbox.
Features of work
When performing various works on a homemade mini tractor, it is important to understand the fact that this is an amateur-level unit, so you should not set very difficult tasks for it.
The engine you use in the design matters a lot. Often, this is no longer a new engine, taken from an old car, or purchased secondhand. Such engines generally do not have internal speed control at different loads.
Features of operation
Therefore, you sometimes have to release the gas pedal so that the engine does not overheat from the effort.
In addition, there is a certain recommendation for starting the engine at consistently low temperatures (down to -250C):
- release the clutch;
- press the gas pedal all the way;
- Turn the starter for 7-10 seconds, after which the engine should start.
By doing such simple manipulations, you can ensure that the engine starts without any problems throughout the day. It is also worth remembering that in winter, fuel consumption increases by almost 30%. This fact must be kept in mind when planning long-term work in the cold, for example, when transporting firewood from the forest.
It’s better to stock up on an extra canister than to get stuck among the snowdrifts, away from people.
Frame Design Selection
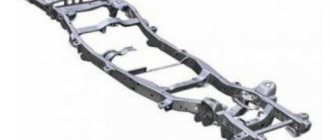
Frames are either solid or articulated. Solid frames are simple and lighter, however, they require an axle with steering wheels. Articulated frames consist of two half-frames, joined in the middle by a pivot joint.
This frame design allows for high maneuverability, simplified axle designs, and the use of simple all-wheel drive.
The frame for a homemade mini-tractor is made from channels, angles and pipes of various sizes, taking into account the engine power and the nature of the work. It must be strong and reliable, which can be achieved by choosing the correct profile size and using gussets.
Before starting to manufacture the frame, you need to decide on the layout of the components, the place of their attachment to the frame and the wheel track, select ready-made drawings of the mini-tractor or make them yourself.
HOW TO MAKE A TRACTOR
Many experienced motorists accumulate a lot of unnecessary parts and assemblies in their garages over time. You won’t get much money out of selling them, you’ll just suffer, and it’s a pity to throw them away, so they collect dust, waiting in the wings... So, in addition to the old Moskvich-412, I have collected a whole bunch of all sorts of components from several other cars. Why not try to assemble a tractor from them? A very necessary thing for a personal plot!
I’ll say right away that I didn’t make any drawings during construction.
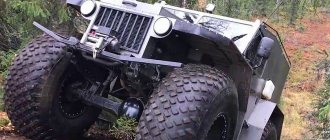
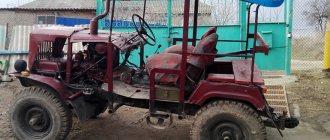
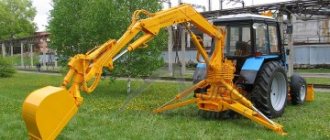
Perhaps in vain, but in the process of work a lot had to be built locally, and then “redrawn”, since the parts used were quite heterogeneous and not all of them immediately took their places. Even the concept changed: it was planned to build a simple tractor, but gradually it turned into a mini-loader with a set of attachments. To work effectively on the farm, you need not just a tractor, but a “jack of all trades” - a multifunctional loader, with various attachments. After testing, “Krepysh” was painted bright red and now it looks very elegant!
The design of this homemade product uses components and assemblies from a wide variety of vehicles.
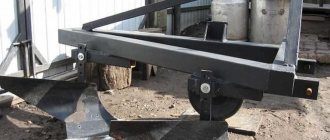
For the tractor called “Krepysh”, I chose a design with two frames. Such vehicles have good cross-country ability and maneuverability; moreover, in a small garage it is easier to assemble a structure consisting of two separate blocks than one large one.
The frames were welded from profile pipes with a cross-section of 40×40 mm and a wall thickness of 2 mm.
Front frame dimensions 450x900 mm, rear frame 450x450 mm, height 120 mm. For optimal weight distribution, ease of control and maintenance, the engine was mounted on the rear frame. The driver's seat is located on the front frame, but is shifted back. The fracture unit is made from the front hub from a VAZ-2107. The modified rear axle from Moskvich copes well with loads.
I used axles from Moskvich-412.
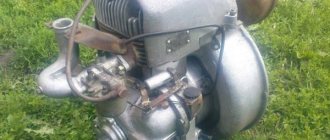
The axle shafts had to be shortened and the splines recut. The gearbox is also “Moskvich”, but independently modified: with a shortened secondary shaft, on which splines are cut for a 21-tooth star. The engine was purchased from a Chinese manufacturer with a power of 7 hp, intended for motorcycles - it is inexpensive, unpretentious and economical. In order for the gearbox to fit into the dimensions of the frame, the secondary shaft had to be shortened.
The clutch was originally a belt one, but it turned out to be unreliable, and when I got tired of changing belts, I decided to install a full-fledged automobile clutch.
The flywheel and clutch assembly were taken from a VAZ-2106; they are easier to find on sale than the Moskvich ones, and they are similar in size. A subframe was made to place them on the frame. The upper and lower fastenings are made of solid-cast square profile with a cross-section of 20×20 mm. To install the flywheel bearing, a plate measuring 200x200x10mm was used, secured with M10 bolts. For ease of maintenance, the gearbox is mounted on brackets on the frame.
I also had to suffer with the clutch drive. Like most amateur designers, at first I used a cable from an UAZ, but it frayed and broke at the most inopportune moment. I decided to experiment and replaced the cable drive with a hydraulic release kit from an old Toyota. Starting off became smooth, but with a delay of about three seconds, which is inconvenient. I installed an additional spring, moved the mounting of the working cylinder to the hydraulic tank - the clutch began to work as expected.
Rack and pinion steering mechanism from VAZ-2109, steering column from VAZ-2106
Rack and pinion steering mechanism from VAZ-2109, steering column from VAZ-2106. Disc brake, transmission. The brake system uses a caliper from a VAZ-2106 and a clutch cylinder from a UAZ. The caliper is installed on the shank of the main gear housing of the front axle; for this purpose, a fastening from a profile pipe is welded. The brake pedal is converted from a VAZ one, the brake cylinder brackets are homemade. Due to the fact that the brake system parts are from different cars, they had to be modified. Next to the drive cylinder, I cut off a piece of the UAZ tube and drilled it to match the diameter of the VAZ tube, then inserted one tube into the other and crimped it - it turned out airtight.
At first I drove without an accelerator pedal, but since the engine is located on the rear frame, manually adjusting the speed turned out to be extremely inconvenient - I made a simple pedal with a cable drive.
Now about electrical equipment. Here, too, everything is done by trial and error. I installed the electrical circuit from the moped, modified the flywheel for this, and made brackets for the ignition coils. But such electrics turned out to be too weak for a tractor. I had to look for a car generator. Got it from an old Toyota. I went through it and replaced the bearings. I secured it in the back of the frame - I couldn’t figure out a better place for it, no matter where I tried it on, something got in the way everywhere. The drive pulley was taken from the power steering pump, and the belt was from the same. A car generator works very efficiently, providing a stable voltage of 14.5 V in the on-board network.
The starter also came from Toyota.
Bendix did a little modification. At the same time, the ability to manually start is preserved in case the battery fails. Ignition switch from Gazelle. The tractor is equipped with standard lighting devices; the “tidy” was taken from an Izh motorcycle, installing a separate fuel level indicator. For safety reasons, I installed an audible alarm that goes off when reverse gear is engaged - now the tractor is not only visible, but also audible. Moskvichevsky rims, used winter tires
As already mentioned, I did not intend to make a multifunctional tractor.
But as they say, appetite comes with eating! Having run the car in the minimal version, I decided to equip it with a set of attachments. I made my own forks and bucket. The forks are made from a profile pipe with a cross-section of 40×40 mm, the “horns” are made from a pipe 30×30 mm. The ladle was welded from steel 3 mm thick. reinforced it on the bottom and sides with 6 mm thick metal strips. Then I assembled the hydraulic equipment. I purchased an NSh-10 hydraulic pump and high-pressure hoses, and picked up a P-80 hydraulic distributor from a decommissioned excavator. Homemade hydraulic tank with a capacity of 4 liters. To drain the oil from the distributor into the tank, I installed a regular reinforced hose. Installation of automotive electrical equipment guarantees reliable engine starting in any weather
Installation of automotive electrical equipment guarantees reliable engine starting in any weather
. The lifting height of the bucket is approximately 1.5 m. The load capacity was not specifically measured, but somehow lifted 175 kg - the loader can cope with such a load, but its rear part is lifted off the ground, so that it's better not to take risks.
After testing, “Krepysh” was painted bright red and now it looks very elegant. My future plans include expanding the set of attachments.
Well, the last information that is usually of interest to everyone who sees my homemade tractor. In total, from idea to implementation, its construction took me two months. And about 60,000 rubles were spent on materials, components and assemblies.
Dmitry YURIEV, Kuibyshev city (Novosibirsk region)
We recommend reading
- RAIL FOR STRENGTH Widely used in home-made construction and furniture making, chipboards (chipboards), for all their positive qualities, have a serious drawback - they do not hold well...
- BORISENKOV CRANE and Vulcan Original During the construction of a country house, one cannot do without a large amount of rigging work. Already at the stage of laying the foundation, you will be faced with the fact that you need to drag bags of…
Features of the mini-tractor chassis
Automotive components are usually used to assemble the chassis.
To reduce the speed of rotation of the drive wheels and increase the torque on them, several ways are used:
- A belt drive is used between the engine and gearbox. On light mini-tractors it can replace the clutch;
- install a reduction or transfer gearbox behind the gearbox. By installing a transfer gearbox, you can solve the issue of using all-wheel drive;
- install final drives on the drive axle beam.
Developments of simple tractor models for children's creativity
Children who are not yet able to assemble a tractor out of paper using complex patterns with a large number of parts can make a toy with their own hands from a ready-made development.
The process of creating a craft consists of several simple steps:
- print out the picture you like;
- carefully cut out all the details along the contours;
- press all the folds along the ruler to obtain neat angles;
- coat the valves with glue and assemble a model of the tractor, checking the image of the finished model.
Blue paper tractor
In order for a cheerful educational cartoon character, a blue tractor, to “settle” in the house, the layout must be printed on a color printer on thick paper and assembled according to the step-by-step plan given above.
The toy will turn out more beautiful and more durable if you print the blank on glossy photo paper.
A simple tractor layout with a step-by-step assembly master class
It’s not difficult to make a model of a tractor with a trailer and rotating wheels if you carefully look at the photo and consistently carry out all stages of the work.
Reamers for printing
Master class on creating crafts
The process of assembling a toy consists of simple steps that even a junior schoolchild can complete independently:
- The patterns are printed and carefully cut out along the contours.
- To get a colored tractor model, you can color the templates with felt-tip pens or markers before starting assembly.
- Wheel blanks are glued to cardboard using an adhesive stick.
- After the glue has dried, the wheels are cut out, making sure that the cardboard base is not visible. To create a toy, you will additionally need 4 toothpicks and small beads.
- Mark the folds on the paper body of the car and make holes for the wheel axles in the marked places.
- The front flaps are sealed.
- Punch holes in the center of the cardboard wheels.
- Using toothpicks as axles, attach the large and middle pairs of wheels to the body.
- Cut out the trailer layout and cut the valves according to the drawing.
- Use nail scissors or a stationery knife to make holes for the axles.
- Bend the cart, first drawing along the dotted lines with the back of the scissors to obtain neat creases.
- Glue the valves to create a box shape.
- Insert toothpicks into the holes and put small wheels on them.
- The ends of all axes are secured with beads.
- The tractor and cart are connected, the paper transport is ready for agricultural work.
Instead of beads, you can fix the ends of the axes with pieces of plasticine.
Development using cubecraft technique
A stylized cube tractor for little ones is an original toy that develops imagination and creative thinking.
Origami tractor with a simple diagram
A simple tractor model that even children or novice origamists can handle. To create a craft, you need 1 square sheet of 20 x 20 cm and 5 sheets of 10 x 10 cm. To make the toy more similar to a real car, you can take paper of different colors or even foil.
Video master class on creating an origami tractor.
Instead of store-bought foil paper, you can use paper-based chocolate foil.
Applications for children
Little car enthusiasts can start their journey as an engineer and creator of agricultural machinery with a simple application. A tractor made of colored paper, created with your own hands, will be a reason for pride for a child and, perhaps, the first step in paper modeling. And children who are not yet able to apply applique can simply color a picture that they like.
Cutting templates
To create an applique, the templates are printed, cut into pieces, applied to colored paper of the selected color on the front side, traced with a simple pencil and cut out along the contour. Then all that remains is to assemble the desired picture from the colored pieces.
If it is not possible to print the workpiece, then you can attach colored paper of the desired color to the monitor (if it is thin) and trace the contours of the parts, or copy the lines from the monitor onto transparent tracing paper, and transfer from it to colored sheets.
Paper art does not lose its popularity because it allows you to create real masterpieces of modeling from such a simple and affordable material. And family evenings spent assembling toys using ready-made designs will become one of the warmest and most pleasant childhood memories for children.
Accessories for hydraulic installation
Usually the hydraulic system is installed on heavy mini-tractors, but there are also walk-behind tractors equipped with it.
To install a hydraulic system on a homemade mini-tractor you will need:
- a gear pump, NSh-10 will be sufficient;
- hydraulic distributor, suitable with MTZ-80/82;
- power hydraulic cylinders;
- oil tank;
- filter.
To drive the working parts of attached equipment, it is convenient to use a hydraulic motor instead of a PTO.
General conclusions
Homemade mini tractors, photos of which can be seen on the websites of designers of amateur agricultural equipment, are functional and fairly well-thought-out models. Assembly can be quite difficult and time-consuming, and the best way to imagine exactly how to make and assemble a homemade mini tractor with your own hands is a video that clearly shows each stage. As a result, it is possible to create a device that will become an indispensable assistant in cultivating agricultural land and will be inexpensive.
To use or not to use PTO?
The power take-off shaft is necessary to drive the active working parts of mowers, milling tillage machines, potato diggers, snow blowers, pumping units and other machines.
In addition, the use of a PTO allows maximum use of engine power, since all the power cannot be used “on the wheels” due to the low weight of the unit.
Cabin structure
A homemade cabin for a mini tractor creates comfort and convenience for workers - with minimal labor and materials, working conditions change dramatically, allowing you to work according to the planned schedule in almost any weather. This applies to any models of mini equipment, including the popular DTZ, T-25 (Russia), Xingtai, Jimna, Dong Feng (China) and others. Largely repeating the design used on production vehicles, homemade cabins are practically no different from them in quality if they are made by professionals under appropriate conditions.
The main components of the future cabin are:
- Durable steel frame made of bent and welded corners No. 45-22;
- Roof made of sheet steel or composite materials;
- Windows and doors mounted on steel curtains, with locks, gas shock absorbers for the rear window;
- Glazing, thermal insulation, seals;
- Sheathing made of foam rubber and insulation (leatherette);
- Electrical wiring and electrical appliances;
- Front and rear lights;
- Windshield wipers;
- Rear view mirrors;
- Lights (front, rear), fan, car heater.
Composter for a summer residence: the principle of its operation, varieties.
Brake installation
Homemade mini-tractors can be equipped with both drum and disc brakes. The choice depends on the design of the vehicle’s drive axle, which in a shortened version is installed on a homemade vehicle along with the brakes.
The drive mechanism for drum brake shoes can be either mechanical or hydraulic. For light and medium-sized homemade products, a mechanical drive is sufficient. Disc brakes use a hydraulic pad drive.
To visualize how to create a mini-tractor with your own hands, you can use the video.
Thus, using common components, mechanisms and materials, you can relatively cheaply make your own reliable assistant that will make your work easier when solving various problems.
Drawings for assembling realistic tractors of medium complexity
The developments presented below are suitable for self-assembly for middle-aged children, or adults who have just begun their journey as a paper modeler. The diagrams are not particularly detailed, but will require less time to assemble than accurate collectible models.
MTZ-50 Belarus.
T-150K.
New Holland 8870.