Choosing an engine for a homemade tractor
If you decide to assemble a mini tractor with your own hands, then first of all you need to select a power unit for it. The ZID engine is often used as the latter. This is a four-stroke unit with a volume of 0.52 liters. and a power of 4.5 l/s, which is quite suitable for cultivating 2-3 hectares of land. The engine is easy to maintain, so it is often installed on various home-made equipment; moreover, it is easy to buy on the Internet.
Another option for homemade products is the UD-25 engine. This is a two-cylinder unit with a power of about 12 l/s and a volume of 0.42 l. Although this type of motor has long been discontinued, there are a large number of offers on the Internet for the sale of this unit. It can be bought for approximately 5,000 – 8,000 rubles.
Often, when making homemade tractors, craftsmen use motors from cars. For example, you can find mini tractors with an Oka engine.
This engine has a power of 29.3 l/s and a volume of 0.649 l. In fact, this is a VAZ engine (VAZ 21083), only in a lightweight version, since it weighs 2 times less. A distinctive feature of the Oka engine is its low gasoline consumption and high efficiency.
A more expensive option is a Zhiguli engine. The engines of the VAZ car line have an engine power of 59 l/s (VAZ 2101) and higher. A tractor with a VAZ engine is a fairly powerful unit that can cope with almost any agricultural work.
It is easiest for owners of walk-behind tractors to make a mini tractor for the household, since this unit already has all the necessary control units. All that remains is to make a suitable frame, and the tractor is ready.
Advantages and disadvantages
What are the pros and cons of such a product? Firstly, you can operate a mini-tractor even in very limited space - it will fit perfectly into a small garage in the backyard. However, despite the fact that the size of a homemade tractor is relatively small, this will not in any way affect the functionality and volume of work performed.
In addition, it will help cope with plowing heavy rocky soil, since in this case digging with a shovel will give almost no results.
In addition, you can independently make your own unique drawing of a tractor that will meet all your needs.
You can also modify the designs to help reduce the weight and stress on the ground being plowed. This will greatly increase the productivity of the process.
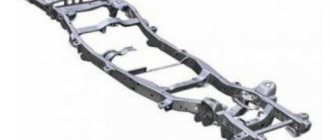
What to make a frame from
Assembling a mini tractor always begins with making the frame. The frame of the mini tractor acts as a base on which all components and parts of this unit are fixed. The frame should be strong enough and at the same time not very heavy. It is usually made from a metal angle, a profile pipe or a channel. The parts are connected by welding. The frame can be solid or consist of two parts.
A solid frame is the easiest to make. It is enough to weld a rectangle from a channel or corner. Frame dimensions are calculated based on the dimensions of the engine, gearbox and other components.
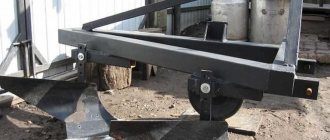
Also among owners of personal plots, 4x4 mini tractors are very popular. These are all-wheel drive mini tractors with a breakable frame. The word “all-wheel drive” means that the unit has both drive axles, front and rear. An example of such a frame, made from channel No. 10, is shown in the following photo.
The frame fracture unit is most often made from the driveshaft of a car, for example, from a GAZ-52.
The main advantage of a homemade tractor with a breakable frame is the small turning radius of the unit. Thanks to its high maneuverability, the fracture minitractor is successfully used in small areas where turning a minitractor with a solid frame would be difficult.
Below are drawings of a frame connected by a hinge.
Nuances of the mini tractor project
As a rule, a photo of a homemade tractor, in addition to the main components, also shows other parts, which means they should also be on the sketch. The optimal frame size must be calculated and indicated.
For a good output circuit, it is imperative to indicate the materials from which one or another component is supposed to be created.
All elements through which the components will be attached must be clear. But the frame sketch should remain the basic one, since it will be permanent, while the remaining details can be finalized as the equipment is manufactured.
What to make a chassis from
To assemble a mini tractor, you need to prepare its chassis. It includes wheels, front and rear axles, and transmission elements.
When choosing wheels for a mini tractor, you should take into account the purpose of using the latter. If the unit is being built for transporting and pulling loads, then a disc diameter of 16 inches will be sufficient. When using a tractor in field conditions, it is better to use more massive wheels with discs with a diameter of 18 to 24 inches.
If the drive axle in your tractor is only the rear one, then the front beam is made quite simply.
- It is necessary to prepare 2 steering knuckles from a VAZ Classic car.
- A piece of the required length is cut from a profile pipe (40x40 mm square). The width of the track will depend on the length of this beam.
- Next, racks of 35x35 mm corners are welded to this pipe. The steering knuckles will be attached to them. There is no need to disconnect the steering bipod - it will be useful when installing the steering mechanism.
- Brackets are welded to the corners into which ball joints are installed.
- The front beam of the mini tractor also has a swinging mechanism in the center. In this case, it, together with the cross, was removed from a UAZ vehicle.
To make a homemade front axle, as well as its rear analogue for an all-wheel drive unit, you will need to take 2 identical chassis units, for example, from a VAZ or Moskvich car, and shorten them. You can learn how to shorten the bridge from a VAZ car from this video.
Important! Axles must have the same gearboxes, with the same gear ratio. Otherwise, the front and rear wheels will rotate at different speeds when the tractor moves.
Since the bridges already have a built-in mechanism for transmitting rotational motion to the wheel axle, there is no need to make a homemade gearbox.
Start of work on creating a mini tractor
- The design of the frame will be key, so production begins with it. It is necessary to weld the nodes that will be fastening and the metal frame according to pre-specified parameters.
- Installation of bridges. At this stage, both the rear and the front are installed simultaneously.
- The transmission elements, as well as the engine, must be secured to the structure.
- Next, they begin to assemble all the control components.
- Fastening of the tank where the fuel will be located.
- At this stage, a chair is installed where the person who will subsequently operate this equipment is expected to be located. At this stage, the homemade mini-tractor Perelomka is already beginning to look similar to those shown in the photo in various sources.
- It is important not to forget about the casings, which should perform a protective function.
- Next, welding is carried out for attachments.
- One of the very important stages, namely electrics, on which the entire functionality of the equipment depends.
- Such a vehicle must also have lighting.
Pros of installing hydraulics
Hydraulics are installed on a minitractor in order to ensure the operation of some of its mechanisms and facilitate the control of this unit. A unit with installed hydraulics has its advantages.
- The car becomes easy to control. The steering wheel can be turned with virtually no effort, with one hand.
- Hydraulics makes it possible to use various attachments.
- The use of hydraulics allows you to modernize the brake system. Thanks to the hydraulic cylinders installed on the unit, the unit brakes instantly.
You can make hydraulics on a mini tractor if you purchase a ready-made system in advance in a store or use parts from old agricultural machinery.
Important! When installing hydraulics on a mini tractor, it should be taken into account that some of the engine power will be spent on servicing this unit. Therefore, for tractors with low-power engines, installing hydraulics will not bring any benefit.
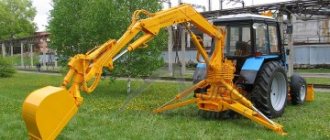
Why do you need a PTO?
The power take-off shaft (PTO) is designed to drive various agricultural machinery connected to a mini tractor, for example, various tillers for tillage, potato diggers, mowers, snow blowers, etc.
PTO can be either dependent or independent. In the first case, the shaft is driven by a transmission that transmits rotational motion to the wheels. As soon as the wheels stop, the PTO stops rotating. The independent PTO receives rotation from the engine crankshaft. Therefore, the higher the engine speed, the faster the shaft rotates.
In addition, there are tractors with a synchronous PTO. The rotation speed of the synchronous shaft directly depends on the transmission ratio of the moving tractor. Synchronization of movement and rotation is required when the unit operates with sowing equipment.
Breaking a mini tractor with your own hands. Application area
A self-made all-wheel drive mini tractor has quite good off-road characteristics, which gives it the ability to perform virtually the same scope of work as store-bought counterparts, such as Uralets, Kubota, Bulat 120, Yanmar, Belarus 132n, Scout.
Of course, the power of a homemade unit may be somewhat weaker, but at the level of domestic use this fact is almost unnoticeable.
Application area
The main area of application of this DIY unit is agricultural work. This term covers a fairly wide spectrum, including many related works. In other words, a homemade mini tractor is needed for the following purposes:
- plowing of land holdings for the purpose of their further use;
- cultivating the soil and getting rid of weeds;
- harrowing the soil;
- carrying out sowing work on treated soil;
- planting and digging potatoes.
In principle, this is the main purpose of a mini tractor, for which it is made. But, its application can be significantly expanded if a special connection for additional equipment, mounted and trailed, is provided in its design.
If everything is done correctly, then your homemade product can additionally perform the following work:
- transportation of various goods (transportation of firewood, construction waste, etc.);
- mowing lawns and lawns, as well as making hay for livestock.
snow removal in winter;
As we can see, a mini tractor breaking a classic 4x4 with your own hands can significantly make the life of any rural resident easier, because with the help of this equipment it becomes possible to perform all types of work that are required for proper management of a subsidiary farm.
The indispensability of a home-made unit is also due to the fact that its production uses a minimum of investments and funds, which is very important for rural areas.
Manufacturing a three-point hitch
The hitch is used to connect additional equipment, such as a plow, to the tractor.
The hitch must be movable both in the horizontal and vertical planes . In the first case, mobility helps to reduce the overhang of the nozzle when taxiing. Vertical movement of the suspension is required to lower the equipment into a working position or raise it into a transport position.
The hitch on a mini tractor is made from various parts removed from old agricultural machinery. It is quite difficult to describe how to make a three-point hitch at home. Therefore, it would be more correct to use the following video, which shows the dimensions of all parts of the device.
Manufacturing instructions
How to make a mini-tractor with your own hands? First, start planning. You should have drawings of the product, all parts and assemblies on hand.
Basics: power plant, transmission unit for synchronizing the operation of the engine and wheels, frame as a base for the entire structure, driver's seat.
The missing parts can be found in car repair shops or a broken car can be disassembled into parts.
Changing the engine oil with your own hands - step-by-step instructions on how to correctly, quickly and easily change the oil in the engine and transmission (125 photos and videos)Do-it-yourself speed controller - how to make a simple adjustment device or smooth descent (120 photos)
- Can a non-owner apply for compulsory motor liability insurance?
Selection and installation of brakes and clutch
Brakes must be installed on the rear wheelset. The easiest way is to take ready-made blocks from a UAZ car. The brake pads must be installed on the wheel disks, and the control must be placed on a pedal or lever installed inside the cabin.
To install a clutch on a homemade mini tractor, you can also use a ready-made version from a car. For example, you can use a belt clutch from a Moskvich or UAZ.
The clutch unit is attached to the gearbox, also taken from a car. You can see how the clutch is installed in this video.
Reviews and comments
Vitaly, 52 years old:
“I recently built myself a tractor from used car parts. It took a little over two months to assemble. Basically, it took a long time to match all the parts - they were taken from more than one car. After painstaking and persistent work, I made myself an iron “helper” in the garden plot, which has been working for 3 years without failure.”
Evgeniy, 64 years old:
“At my age, it’s hard to maintain a farm without auxiliary equipment, but the prices for factory mini tractors are too high. Having ordered a conversion from old Lada cars from local craftsmen, I did not regret it. The machine turned out to be unpretentious in maintenance and repair, and the traction allows me to plow the land, prepare feed for livestock, plant plants and harvest crops.”
Land owners have a need to facilitate and optimize labor, to spend less effort/time on cultivating the soil and harvesting. A mini tractor assembled from a used car can help solve this problem.
Steering installation
Making a steering mechanism yourself is quite difficult, and in principle there is no point, since all the parts can be taken from any passenger car.
The following is a diagram that shows how the standard steering control installed on most self-propelled vehicles works.
When installing the steering mechanism, the steering shaft with gear is connected to the steering bipods, which are located on the steering knuckles mounted on the front beam (the manufacture of the beam was discussed above).
Electrical installation features
The key factor is the match between the voltage directly in the generator of the device and those places where it should be consumed.
The battery itself, which is called a rechargeable battery, is a certain container of liquid, so it is important to firmly form its mount.
The most convenient way to do this is, for example, in the place where the driver is supposed to sit.
How to make a cabin for a mini tractor
If in the summer you can work on a mini tractor without a cab, then with the onset of the autumn-winter period, using the unit becomes quite uncomfortable or even impossible. Therefore, craftsmen are trying to assemble tractors with cabins in order to use this equipment all year round.
The cabin for homemade equipment is made of sheet steel according to a pre-prepared drawing. You can take the cabin from the MTZ tractor as the basis for the calculations. The following photo shows a drawing, based on which you can make a cabin yourself.
Advice! If the cabin dimensions shown in the drawing do not fit the dimensions of your mini tractor, then they must be changed. But the main thing that needs to be taken into account when adjusting the dimensions is the size of the windshield and the height of the cabin. Its ceiling should be 25 cm higher than the head of the person sitting in the cabin.
The cabin is manufactured as follows.
- First of all, you need to assemble a frame from wooden blocks according to the dimensions of the drawing.
- Next, a metal profile pipe is cut to the size of the wooden frame parts. All parts are connected by welding.
- The welded structure is placed with the roof on the ground and glass holders are welded inside the cabin.
- The roof is made of 1 mm sheet steel. The fragment can be cut out with a grinder and welded to the top of the cabin.
- The floor and side parts of the cabin are made of 2 mm thick sheet steel.
- The door frame is also welded from a profile pipe. To automatically close the doors, gas elevators can be installed on the frame.
- After installing the glass, the inside of the cabin can be lined with foam rubber and covered with leatherette.
- The cabin is installed on the frame, in a place prepared in advance for it.
In general, to better understand how to make a mini tractor with your own hands, you can watch this video, a kind of guide for beginners.
DIY mini tractor from a walk-behind tractor. Do-it-yourself mini tractor from a walk-behind tractor
For cultivating small plots of land, there is no better solution than a mini tractor made from a walk-behind tractor, made by yourself. Not every site owner can purchase a factory-made model, so they have to look for other solutions. It’s easier, for example, to buy a regular walk-behind tractor and remake it yourself.
Required tools and materials
The first stage of work consists of drawing up the drawing and preparing the equipment. If you have the appropriate skills, you can develop a diagram of components and mechanisms yourself or use those presented below.
As for components, ready-made factory kits for conversion are suitable - in any case, they are cheaper than the mini tractor itself. But this option is only suitable for those who do not want to save on absolutely everything.
Creating a homemade tractor will become impossible without:
- Grinders and discs.
- Fasteners and hardware (bolts and nuts).
- Channels and pipes with a metal base.
- Drills that come with drill bit sets.
- Welding equipment.
- Set with tools.
You can’t do without two suitable wheels along with a hitch and a driver’s seat, a steering mechanism, pedals, and the walk-behind tractor itself. It must have a sufficient level of power.
A heavy class walk-behind tractor with diesel fuel is an ideal option for a homemade mini tractor.
Examples of mini tractor drawings
Overall dimensions of the mini tractor
Layout drawing of the Ant mini-tractor
Kinematic diagram of a mini tractor
Choosing a walk-behind tractor
Among the important parameters for these devices it is worth highlighting:
- Cost and manufacturer.
- Plow size (if the mini tractor will be used to plow the land).
- Type of engine used.
- Weight.
- Power level.
Power. One of the most important parameters, since the performance and strength of a mini tractor directly depends on engine power. The more aggressive and heavier the load on the vehicle, the more powerful the walk-behind tractor needs to be.
Weight. If a homemade mini tractor will be used to plow the land, then the weight of the walk-behind tractor will be a critical parameter. The determining point is the type of land being cultivated: for hard soil varieties, you should not choose too light walk-behind tractors, otherwise the mini tractor will not cope with its purpose.
Although gasoline walk-behind tractors are much quieter, diesel wins in terms of the efficiency of its use: it has stable speeds and increased traction. A diesel engine will cope better with heavy soils and large areas.
In any case, for any purpose, the heavier the walk-behind tractor, the better the performance data of the future mini tractor.
Price and manufacturer. If possible, it is better to choose products from companies that have been on the market for a long time. If financial possibilities are limited, you can get by with cheaper analogues. Russian products will also be the best option for the majority.
Chinese walk-behind tractors
These are mostly copies of Russian models. Their cost is lower due to reduced production resources and savings on materials. This has a somewhat negative impact on the final quality of the product.
At the same time, the functionality does not differ from Russian walk-behind tractors. Recently, products of acceptable quality have appeared, although they are still far from comparable to their analogues from Russia. Popular Chinese walk-behind tractors include the Bison, Farmer, Centaur, Forte, Aurora, Zirka and others.
Russian products
The optimal solution with an affordable price. Motoblocks with a belt drive or with a transmission with the ability to transmit torque to, or. In any case, the process cannot be completed without the participation of a special belt.
A special feature of our developments is the simple design of the clutch system. The only maintenance procedure left is belt replacement. Soviet engineers also designed a gearbox that is recognized as one of the most successful on the market. Professional engines from foreign manufacturers are used. The units are functional and reliable.
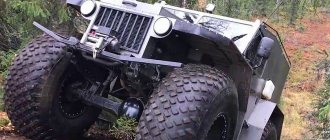
The nuances of making a caterpillar tractor
Homemade tracked mini tractors are a technique whose main feature is high maneuverability and good cross-country ability. Also, a tractor on tracks creates minimal pressure on the soil, which cannot be said about its wheeled counterpart.
To make a mini tractor on caterpillar tracks, you will need the following structural elements.
- Frame. It is made from a profile pipe or channel.
- Engine. For a caterpillar mini tractor, it is better to use a diesel engine.
- Main bridge. As in the manufacture of a wheeled tractor, for a tracked unit you can also use a ready-made axle from an old car, which should be shortened.
- Transmission. The ideal option would be a box from GAZ-53.
- Clutch. A clutch block from a GAZ-52 will do.
- Caterpillars. They are made from tires from the wheels of large equipment, for example, from a tractor.
To make tracks, you need to take 2 tractor tires and cut off the side parts of them. These tires are then put on the wheels mounted on the frame, as shown in the following photo.
In order for the tractor to turn, a differential must be installed on the rear axle, which will disconnect the right or left wheel from the drive. Also, each wheel must be equipped with a brake that can be controlled separately. When you press the brake pedal and shift the differential, one wheel of the drive axle stops, while the opposite wheel continues to rotate. Due to this, the tractor turns in the desired direction.