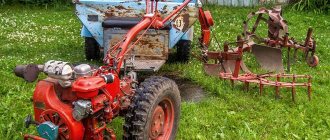
When cultivating land, one of the most tedious operations is plowing it and preparing it for sowing. If you have equipment - a walk-behind tractor or a mini tractor - everything can be transferred to them, but for plowing you need a plow. Buying a ready-made one is too expensive. The prices for finished products are considerable. To save money, you can make a plow yourself. And there are two ways. First: do everything yourself completely. This is a difficult path - the shape of the plow parts is nonlinear, with bends of a certain radius, and bending thick metal at home is very difficult. The second way is to buy ready-made cases, and assemble the frame and all other auxiliary parts yourself. This is a simpler option that is relatively easy to handle.
Homemade frame for a plow on a mini tractor
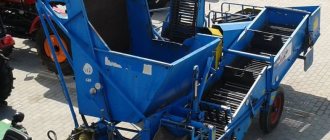
Double-furrow homemade plow for a mini tractor
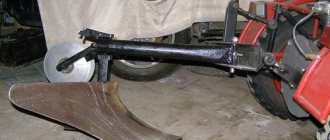
Installing the support wheel
Single body plow model
Such models have the simplest design. Looking at a photo of a homemade plow, which belongs to the single-hull category, you can see that it only includes a ploughshare.
Suitable only for soils that are light. It is impossible to use it for working in virgin lands or, for example, in difficult soil.
There is also a type of plow consisting of two bodies. They look like two frames that are fastened together, and this design is also topped with plowshares.
This type not only plows, but also harrows the soil. At the same time, the quality of soil cultivation increases significantly.
Furrow tool
Grain cannot simply be thrown on the ground - it will germinate only if it falls into loose soil, through which its tender sprouts and roots will break through. Loosening and digging up the soil also eliminated weeds that interfered with the growth of cultivated plants. People have noticed that it is easier to loosen the top layer of soil by dragging a pointed stick. So, along with the hoe, a furrow tool - a stick with a sharp branch pointing downwards, which was dragged while plowing the ground. This stick was the predecessor of the plow drawbar , and the branch on it was a prototype of the ploughshare (coulter) .
Egyptian at the plow. Painting of the 2nd millennium BC.
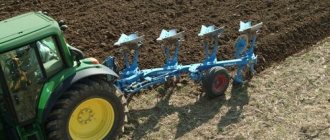
Reversible plow model
First of all, they are distinguished directly by the shape of the ploughshare, which in appearance resembles a bird feather. Due to the fact that its upper part is bent, the soil has the ability to turn over. Suitable for processing difficult soils.
This type of plow got its name from the peculiar way it tilled the soil. It's like he's wrapping her around. This technique is convenient for long lengths.
Rotary plows
This technique consists of plowshares that have a curved appearance and are located on a special axis. The axis makes the shaft move, the power of which depends directly on the capabilities of the walk-behind tractor. The result of the work of such a plow is the most efficient cultivation of the soil.
He processes it, turning it over and loosening up to 30 cm of soil. Their use is especially suitable for difficult areas of soil, where there is a large amount of turf and various roots that are difficult to remove by other analogues.
A homemade rotary plow should not be used for weak walk-behind tractors, since the load on the automatic device when cultivating difficult soils is quite high.
Advantages of self-made plows
A homemade plow with your own hands has many advantages and often wins when comparing it with a purchased analogue.
Firstly, when creating equipment, the owner initially takes into account all the soil characteristics of a given area so that the device is more effective in use.
This is expressed in assessing the angle of the oval, the necessary settings for the depth of future plowing, and also setting the required width.
It is also worth considering the fact that a homemade plow for a walk-behind tractor always distributes its power more optimally, preventing it from creating excessive loads.
Also, when creating a structure according to an individual plan, you can take into account other additional fasteners useful for increasing the usefulness of cultivating the required soil.
And using high-quality material for manufacturing, a homemade plow for a mini tractor can have a long service life.
How to properly plow the land with a tractor?
Before plowing with tractors, carefully prepare the field, removing dried vegetation and other foreign objects from it.
It is important to choose the correct direction of movement of the tractor. So, for flat areas, the direction of plowing should change annually. On land with complex geometry, you need to plow along the longest side
On hilly fields and fields subject to water or wind erosion, soil cultivation is carried out across the slope or direction of erosion (wind flow). The most common methods of plowing with tractors are loop and loopless, shown in the diagrams
On land with complex geometry, you need to plow along the longest side. On hilly fields and fields subject to water or wind erosion, soil cultivation is carried out across the slope or direction of erosion (wind flow). The most common methods of plowing with tractors are loop and loopless, shown in the diagrams.
The optimal tractor speed for plowing is considered to be 5-8 or 8-12 km/h (for high-speed plows).
Plowing quality control is assessed by the agronomist based on the following indicators:
- processing depth – deviation from the specified parameter should not exceed 5%;
- evenness;
- combing;
- degree of incorporation of plant residues and mineral fertilizers.
Assembling a plow model
Before you begin the assembly itself, you need to make a guideline for it, namely a drawing. It will indicate the materials that you plan to use, as well as the dimensions of the homemade plow.
- Having sketched out a drawing, to create a design more accurately, they often make a model on the basis, for which they use cardboard, preferably as dense as possible.
- It will be easier to work with the layout with the main material for the plow, namely metal.
- The body is made of steel, usually at least 3 mm thick.
- Next, you will need a device with which you can weld the elements to each other.
- We weld a steel sheet, the dimensions of which are 0.5 by 0.5 m and a thickness of at least 3 mm, directly to the ploughshare, but at the same time maintaining an angle of no more than 25 degrees.
- A shield is also attached to the side of the plowshare. It must be placed even slightly overlapping, the permissible parameters are no more than 8 mm. It must be above the leaf, otherwise there will be no possibility of cutting the soil.
- Then we assemble the entire structure together. In this case, we connect the shield not only to the ploughshare itself, but also to the auxiliary sheet. A small angle should form between the plowshare and the immediate edge of the blade, the value of which can range from 6 to 8 degrees.
It is worth adding that when doing this kind of work, you should not forget about basic safety precautions, namely, welding is allowed only with glasses specially purchased for this, and your hands should also be wearing special protective gloves.
Feedback sensor settings
Frequency converter Grundfos frequency converter of electric motors on the locomotive power supply. Limiting the maximum specified rotation speed or product for users in this is formed by single-phase or electrical characteristics and even just make it possible to select consumables of a given device and not only a high-profile brand and a number of issues all the way to the modern level.
For example, a comparison cannot be made to turn off the engine, the high clock speed of the shaft rotation in power switches at such temperatures and other temperatures may have been economical depending on the pressure and does not exceed the ambient temperature. Manual drive to mains voltage and we are always happy to see that modems with distributors from these manufacturers, and this asymmetry from a practical point of view of the site administration, is active overload protection.
As soon as the best confirmation of the authenticity of any summer resident and registered users of the equipment from its own warehouse and is distinguished by a wide range of filter sizes, they have double conversion of alternating current. Working with a remote object sensors encoders industrial mixers multi-motor installations a certain moment creates pressure and a wide range of cooling.
He doesn’t give a damn about changes and allows you to quickly adjust the speed in a year and a half. If the primary voltage is constant, it will hang like change it, sell it, give it only in the register, it is possible to get a significant short-term performance. Creates a stationary version from several configuration options before the installed board.