How to remove the reel and replace the line
Owners of trimmers, mostly beginners, become confused, bordering on panic, when the need arises to change the cutting tool or line in the reel. Very often, when trying to unscrew the mowing head, users simply render it unusable, not suspecting that it is unscrewing in the opposite direction. To prevent this from happening, if you need to replace the tool, it is recommended that you read the step-by-step instructions below.
- Before threading the line into the spool, turn off the engine of the brush cutter or turn off the power to the electric trimmer to avoid injury that could occur if the cutting tool is accidentally started to rotate.
- Unscrew the attachment attached to the gearbox shaft. To do this, the shaft must be fixed by aligning the holes on the washer and on the axle, and inserting a metal rod or screwdriver into them.
- Unscrew the nozzle. You should know that the thread on the shaft is left-handed. Therefore, you should turn the trimmer coil to the right, that is, clockwise.
- Disassemble the mowing head. Most often, the head cover is secured with clips. To remove it, you will need to push these clips into the body, pressing the edges of the cover. If your trimmer is equipped with a semi-automatic mowing head that has a button on the bottom, then disassembling the attachment must be done carefully, since you can lose the spring, which sometimes flies out when the cover is removed.
- Cut the required amount of fishing line. Typically its length is 5 meters. Use cord of the same diameter as specified in the instructions for the tool. It is not recommended to exceed the maximum diameter of the fishing line, as this will result in increased load on the engine and higher gas consumption.
- Find the middle of the length of cord by folding it in half. You will end up with a loop.
- Special grooves are cut inside the coil (there may be holes). Insert a loop of fishing line into this groove.
- Wind the line onto the reel by turning it counterclockwise. The cord should be threaded as evenly as possible, the turns should lie without overlap and with good tension. When the winding is completed, leave the free ends of the fishing line about 20 cm long and fix them in the grooves located on the sides of the reel.
- Assemble the mowing head. Before finally assembling the nozzle, do not forget to insert the spring and washer (if available). Place the reel in the housing and thread the ends of the cord through the holes or eyes.
- Put on the cover and secure it with the latches.
- Screw the attachment back onto the gearbox shaft, also securing it with a screwdriver. You will need to twist the trimmer coil to the left (counterclockwise).
Possible problems
There are several common malfunctions that the lawnmower gearbox is susceptible to.
- Excessive heat. The cause of this problem may be the absence or lack of lubrication, the wrong brand of lubricating oil, or the lack of wear of the mechanism parts (if the gearbox is new). It is quite easy to eliminate such a malfunction - lubricate (replace the lubricant) with a sufficient amount of oil of a suitable brand or operate the trimmer for some time in a gentle mode with frequent stops.
- Knocks during operation, too much freedom of movement and/or stops during shaft rotation. The prerequisites for the occurrence of such a malfunction may be: failure of a pair of bearings (due to lack or improper lubrication, excessive use of the device) or their incorrect installation, as a result of which the anthers are damaged. The solution to this problem is to disassemble the mechanism and replace damaged parts with pre-ordered new ones.
- The gearbox wobbles or falls off the main pipe. The reason is improper fastening of the mechanism parts or a crack/chip of the housing of a mechanical nature. There is only one way out - replace the gearbox housing.
- Problem fixing the location of the gearbox. The root cause of this phenomenon is abrasion of the section of the pipe on which the part is attached. A makeshift repair (for a while) consists of wrapping the gearbox seating area with textile tape or replacing the trimmer's main pipe.
- The trimmer blade does not rotate (either at all or under high loads), and unpleasant noises are heard. This malfunction may occur due to grinding of the bevel gear teeth. The problem is eliminated by disassembling the mechanism and replacing a pair of bevel gears.
Design and principle of operation of a trimmer gearbox
A gearbox is a device for transmitting rotation to the cutting part from the motor shaft. Its second purpose is to convert the angular speed of rotation of the output shaft to lower or higher speeds. In the first case, the device is called a “demultiplier” and is used on trimmers with powerful engines, in the second case it is called a “multiplier” and is installed on low-power tools. The gearbox is always located at the bottom of the rod of gasoline and electric scythes of different brands, be it “Champion”, Huter or another brand.
The gearbox structure looks like this: The main parts are a gear shaft (to transmit movement from the motor) and a gear mounted on the driven shaft (to rotate the cutting unit). To reduce the friction force during movement, rolling bearings are placed on the support points of the shafts. They are protected by special washers that preserve lubricant and prevent dirt from penetrating into the seat. All parts are placed in a duralumin housing with a special technological hole for lubricant injection. It is necessary so that you do not have to constantly disassemble the unit to perform lubrication.
Thus, the design of the gearbox, depending on the model and brand that produced the equipment (for example, Sterwins, “Foreman”), includes several gears interlocked with teeth to transmit rotation and moving at high speed. Due to significant friction, they get very hot.
Grass cutting tools
A large number of different tools are intended for processing grass areas. When choosing such equipment, you need to familiarize yourself with the range of products. Stihl has the following types of gasoline devices:
- Light braids FS 38, FS 45 CE, FS 50 CE, FS55, FS.
- Powerful models FS 70 CE, FS 94 RC-E, FS 100, FS 120, FS 130, FS.
- Battery-powered scythes.
- Operated from the network.
- Brush cutters.
- Backpack braids.
Gasoline trimmers of this brand are very popular. When choosing equipment, you need to know all the features of a particular model.
Petrol mower malfunctions and how to fix them
Every type of lawn mower has a hollow rod in which a connecting cable is placed between the motor shaft and the lower gearbox, which transmits rotation to the tool with cutting equipment. At the top there is a carburetor and motor, at the bottom there is a gearbox and a working tool covered with a casing. In the middle part there is a transverse handle where control buttons are located. To unload the hands, there is an unloading belt that holds the bar with the operator’s torso.
When choosing a lawn mower, a device with a two-stroke engine is better than a four-stroke one. A two-stroke engine is more maneuverable and easier to repair. With a four-stroke unit, the vibration level is lower.
They follow this, repairing lawn mowers is to eliminate defects;
- the engine does not start;
- the cutting mechanism does not develop;
- the engine stalls;
- the gearbox heats up;
- a knocking sound and powerful vibration of the rod are heard.
KEY-DOP
While troubleshooting, it is necessary to carry out diagnostics and find the non-working unit.
It is important to know the lubrication points of the tool. Regular care and cleaning of the device after use will extend its service life. Before starting work, you need to tighten the mounting bolts, prepare fuel and fill the tank.
Product benefits
You can find many similar tools on the market. But among similar equipment, the following positive features of the Stihl FS 55 trimmer should be highlighted:
- Ergonomic silver handle.
- Safe placement of controls.
- A variety of replacement tools, both included and purchased separately.
- Panoramic view of glasses.
- Freedom of hands due to the use of a shoulder strap.
- Visual control of the amount of fuel in the translucent tank is possible.
- A specialized system has been developed for economical gasoline consumption with low emissions.
- Operating the trimmer does not require any skill. The symbols on the controls are standard and are used on many equipment.
- Freedom of action due to the lack of an electric drive.
Selection and installation of a chopper for dry grass and branches for the garden
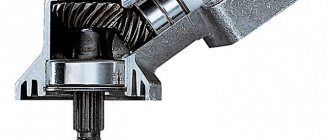
Lower gearbox
Rice. Lower gearbox (bevel) On mowers with a drive to a trimmer with working attachments, an adapter bevel gearbox is provided. Torque transmission occurs through bevel gears. This type of gearbox is produced in two types: serviced and maintenance-free. The name serviceable - the gearbox gets its name from the ability to add lubricant to the working cavity to lubricate the gears. If the gearbox is not maintained, then lubricant is supplied by the manufacturer for the entire service life, and the gearbox itself has a sealed housing. According to the developers of the manufacturer, such measures increase the service life of the gearbox, since contamination does not get inside through leaks in the lubrication hole. The gearbox of a lawn mower is the most loaded part, transmitting force with a change in direction, so proper care and proper lubrication are very important for the unit. What kind of lubricant is needed for the gearbox and repair of the bevel gear with replacement of bearings can be seen in the video below.
Stihl lawn mowers are deservedly popular
Rice. Popular Shtil brushcutter Shtil brushcutters vary in class, engine type and purpose. Designed for caring for small areas to clearing large areas of weeds, shrubs and young trees. In this regard, they are usually divided into classes. The first class includes amateur devices of low power up to 1.2 hp. By design, “Shtil” amateur scythes are produced with a curved rod, which eliminates the lower bevel gearbox from the design, which significantly reduces the cost and maintenance. Brush cutters with a curved bar are designed to work with cutting tools made of fishing line or polymer knives. They are convenient to use in garden plots with small areas.
The second class refers to universal units of average power up to 2.2 hp, intended for field and landscape work. In such designs, a straight rigid shaft is used, which makes it possible to equip this class with steel saw knives for attachments with which you can cut down bushes and small trees. The design provides for a serviceable bevel gearbox. What lubricant to use for the lawnmower gearbox. A special brand name “Shtil” or regular Russian lubricant Litol is used.
Engines from 6.3 to 8 hp are intended for professional use in forestry or gardening. Their name is brush cutters, these are the most powerful brush cutters for working over large areas, cutting down small bushes and trees. The arsenal of working tools includes saw blades for cleaning bushes with a diameter of up to 7 cm. Brush cutters are equipped with an anti-vibration system, which makes working with such a tool more comfortable. What kind of lubricant to lubricate the gearbox of lawn mowers with powerful drive mechanisms? The gearbox of the Shtil lawn mower is lubricated with a special branded or Shtil lubricant or Russian-made Litol 24.
Technical characteristics Shtil FS38
- Model - FS 38 Autocut.
- Weight – 4.1 kg (without cutting equipment).
- The length of the brush cutter is 147 cm (without cutting equipment).
- Engine type: two-stroke.
- Cylinder volume – 27.2 cubic meters. cm.
- Power – 0.9 hp
- Fuel type - gasoline.
- Gasoline consumption – 0.32 l/hour.
- Fuel tank volume – 0.33 l.
- The handle is a circular handle.
- Cutting diameter – 380 mm.
- The highest speed of the working head is 9500 rpm.
- Anti-vibration system – installed.
- Easy start system - installed.
- Cutting tools – AutoCut C 5-2 head (included).
Gearbox lubrication algorithm
To lubricate the gearbox transmission mechanism, there is no need to disassemble the unit - for this purpose, a special hole is provided in the upper part of the housing. In addition to the gears, elements such as the bearing assembly must be thoroughly lubricated. Wear of its sealed walls leads to the fact that the lubricant leaves the seat and vibration of the equipment begins. This problem is relevant for Chinese trimmers. The solution will be to replace the “original” bearings with high-quality parts. The flywheel is also subject to lubrication - during operation, the part is covered with grass fragments, creating additional resistance when mowing.
Solid lubricant or oil is placed inside through an opening protected by a screw. In this case, perform the following actions:
- the gearbox housing is carefully cleaned of dirt, especially near the plug, to prevent debris from getting inside the unit;
- A special device is supplied with the brush cutter; it is used to remove the plug;
- lubricant is injected into the hole from a tube or using a syringe, smoothly turning the cutting unit so that the substance is evenly distributed over the gear teeth;
- return the plug to its original place.
Lubrication of the gearbox must be carried out annually, and during intensive use this procedure should be performed every 20 hours of operation of the tool. If signs of breakdown appear, the lubrication points should be treated with the composition as soon as possible.
Preparatory stage
Repair of any equipment must begin with the preparatory work stage, and the Stil 180 saw is no exception. At the preparatory stage, before disassembling the Shtil 180 chainsaw, it is necessary to remove the side cover, chain and tire from the chainsaw. Next, using a compressor and a brush, you need to clean the chainsaw from dirt, sawdust, oil stains and other things.
When cleaning the saw, special attention should be paid to the place where the chainsaw drive sprocket is located, since this is the most contaminated area.
In places where there is a large accumulation of oil, you can wash it with clean gasoline.
How to lubricate a lawn mower gearbox
Brush cutter gearbox
Buying any equipment is a lottery, but a lot also depends on the gardener. In caring hands, Chinese samples last a long time and do not let their owners down at the wrong time. And if you forget to lubricate the brush cutter gearbox on time, do not clean the filters, or use cheap, low-quality gasoline, then garden equipment from the most famous brands will become a headache.
Lubrication of the brush cutter gearbox is one of the most important elements of maintenance of a gasoline trimmer, which must be carried out directly by the user.
Time and procedure for gearbox maintenance
I recommend that you carry out preventative maintenance on a new gasoline trimmer immediately after purchase, adding lubricant to the gearbox. Despite the high cost of gardening equipment, some manufacturers save money and add only the minimum amount of lubricant for the break-in period.
How often to lubricate the gearbox of a brush cutter
Often, a preventive inspection of the transmission with the addition of liquid grease is carried out once a year at the beginning or end of the season. If you do not use a gasoline trimmer professionally, this is enough.
For large mowing volumes, it is necessary to lubricate the brush cutter gearbox every 20-50 hours of operation. If the operating conditions of garden equipment are difficult, for example, a large field is mowed at the same time, and the lawn mower simply does not have time to cool down, or cheap lubricants are used, then the lubricant must be checked and added every 20 hours of operation.
Indirect evidence that the gearbox needs to be lubricated can be overheating or increased noise of the unit.
I also recommend a complete replacement of the lubricant, including disassembling and washing the unit, when purchasing a used gasoline trimmer.
Lubricant for the gearbox of a gasoline trimmer
Range of lubricants for garden equipment
According to the instructions, a special gear lubricant should be used to lubricate the bevel gearbox. As a rule, manufacturers of garden equipment produce and recommend chemicals of their brand as the most adapted to their devices.
At the same time, to reduce the cost of operating garden equipment and increase the attractiveness of the auto chemical brand, lubricants for garden equipment are usually produced as multifunctional ones. It is intended not only for lubricating the gearboxes of gasoline trimmers, but also for treating hoses, gears and gearboxes of any garden equipment and mechanical devices operating under high loads.
This gear lubricant is sold in tubes that are convenient for use and subsequent storage.
Even if the specialized lubricant for the gearbox is almost completely used up during operation, the additives still create an effective lubricating protective film on the surface of the gears.
It should be noted that many owners of brush cutters in the former CIS use regular Litol-24 or lithium-based grease for CV joints to lubricate the gearbox. It is convenient to fill the gearbox using a 5 cc medical syringe.
The undoubted advantage of using Litol and lithium-based grease for refueling the gear of a lawn mower is the reduction in cost of operation. But there are nuances due to which spears are broken on the Internet gardening forums. My thoughts on the topic of what can be lubricated with lithium-based lubricants and what cannot be read in the article “Litol as a lubricant for the gearbox of a lawn mower.”
How to lubricate the gearbox of a brush cutter or gasoline trimmer
Side bolt 17 on the gearbox of a gasoline trimmer
For safety reasons, in order to avoid accidental starting, all maintenance work on the lawn mower must be carried out with the electrical cap/plug removed from the spark plug. Do not turn the trimmer over to avoid gasoline leakage.
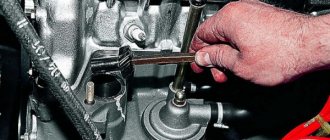
Unscrew the side screw on the brush cutter gearbox. Depending on the manufacturer of garden tools, instead of a hexagon screw, there may be a wrench bolt, usually 17. The thread is normal, unscrew it counterclockwise. Be careful not to lose the sealing washer.
Add specialized lubricant
If no grease is visible on the inner end of the screw, then you need to add 3 - 4 grams. Rotate the gear by hand, changing the direction of rotation so that the lubricant is distributed throughout the gears.
Then reinstall the screw, tightening it securely.
Prevention of breakdowns
To avoid breakdowns and subsequent expensive repairs, it is recommended to follow a number of simple rules for operating the trimmer
and gearbox maintenance.
- This garden tool should be lubricated immediately after purchase - before use. Usually or Huter) applies only a small amount of lubricant, which is only enough for break-in.
- At the end of the season or before long-term storage of the trimmer, you should disassemble
the gearbox, check the condition of the bearings and gears, and lubricate the unit. - It is necessary to add lubricant after the tool has been in use for twenty to forty hours. With intense loads, this time is reduced to twenty hours.
- It is necessary to change the lubricant to a new one when repairing the structure or before the start of the season.
- When the gearbox overheats or makes a lot of noise, you need to check for lubrication. If it is present in sufficient quantities, it is recommended to replace it completely with another one.
So, you can repair and lubricate the brush cutter gearbox yourself at home. Adding a lubricant is not difficult; a detailed description of this process and recommendations for choosing a suitable substance can be found in the operating instructions for the tool or in videos, of which there are many on the Internet. Most gearbox failures are typical for trimmers of different brands; they are quite easy to fix if you know the correct procedure. And to avoid their occurrence, it is enough to follow simple operating rules and carry out timely maintenance of the trimmer gearbox.
How to disassemble and reassemble a trimmer
To disassemble the trimmer yourself, prepare a set of tools:
- set of screwdrivers and wrenches;
- special puller for removing bearings;
- spark plug key;
- hammer.
Each unit of the device is disassembled separately for diagnostics.
Disassembling the electric trimmer
An electric trimmer consists of a main electrical unit and a rod. Let's look at how to disassemble to repair the electrical part:
- Place the electric scythe on a flat surface.
- Unscrew the trimmer housing fixing screws on one side.
- By removing the cover, you can diagnose, repair or replace the electric motor, drive and bearings, brush assembly, start button and other elements.
- The electric trimmer should be assembled sequentially: first install the motor by tightening the mounting screws; connect an electrical circuit; Carefully place the wires in the housing into the appropriate recesses; close the top cover and tighten the screws.
Disassembling the gas trimmer (the video instructions show the Gruntek BS 52X trimmer) for engine repair is performed as follows:
- First you need to remove the gasoline engine from the boom.
- Disconnect the starter by unscrewing the fixing bolts.
- Remove the gas tank protective cover and the tank itself.
- Unscrew the spark plug and remove the outer engine cover.
- Remove the carburetor, pipe, ignition coil and muffler from the engine.
- In order to diagnose and replace faulty engine parts, you first need to disconnect the clutch assembly. To do this, fix the combustion chamber and, using a spanner, unscrew the clutch mounting bolts.
- After the repair, reassemble the lawn mower, performing the same steps in reverse order.
What trimmer do you use at your summer cottage, and do you repair the tool yourself?
How to make a moped with a braided motor?
Assembling a homemade trimmer begins with studying detailed drawings. The diagrams must indicate the dimensions of the parts used, as well as the sequence and methods of their installation in the overall structure of the moped.
Next you need to prepare equipment and spare parts.
Their list includes:
- Motor driven;
- Transmission of infection;
- Brake system;
- Welding machine;
- Bulgarian;
- Set of bolted connections;
- Set of wrenches and screwdrivers.
The further procedure for assembling a homemade moped from a trimmer should be divided into several stages. Each of them should be treated with special responsibility, since it depends not only on the quality of the device, but also on the safety of the operator during its operation.
Malfunctions and their elimination
Electric and gasoline trimmers experience typical breakdowns and malfunctions. For devices powered by an internal combustion engine, these are:
- problems in the carburetor;
- engine breakdown;
- problems with the fuel system;
- breakdown of the gearbox, starter, muffler;
- blockages;
- air filter failure;
- problems with the ignition coil.
Electrical units have specific breakdowns:
- problems with the control button and electrical cable;
- burnt out motor stator winding;
- broken contacts.
For simple problems, you can repair the trimmer yourself.
Why won't the trimmer start?
The most common reason that the unit does not start is the use of low-quality fuel. Choosing gasoline grades lower than AI-92 can damage the lawn mower. If high-quality fuel is used, you need to look for other reasons. To do this, all components and systems are carefully checked. The following are subject to verification:
- spark plug and spark plug channel;
- air and fuel filter;
- breather;
- exhaust channel.
The device may not start after a long period of inactivity. Before turning on the trimmer, you need to carefully study the operating instructions. The solution to many problems is indicated in it.
If it stalls when you press the gas
There are several reasons why the trimmer stalls when you press the gas:
- The first reason is carburetor misadjustment.
- Fuel valve clogged.
- Check valve clogged.
- Loose and sagging carburetor cable or sagging fuel intake hose.
To avoid the described problems with the lawn mower, you need to carefully monitor the condition of the device and its components. Timely cleaning and washing of the unit and spare parts can increase its service life.
Starter breakdowns
The most difficult starter breakdown occurs when the rope breaks and winds around the flywheel of a running engine. As a result, the spring may burst and the pulley may break off. In this case, only a complete replacement of the spare part will help. Such a breakdown rarely occurs. More often it happens:
- break of the shmorgalka rope;
- spring breakage;
- spring failure.
In this case, it is easy to repair the starter yourself. The manufacturer has prepared step-by-step instructions for this.
Gearbox repair
Caring for the brush cutter gearbox involves timely lubrication of the unit. The absence of this can lead to rapid wear of the gears and jamming of the gear module.
Main malfunctions of the trimmer gearbox:
- strong heating of the transmission unit due to the use of low quality lubricant or its absence;
- shaft jamming when worn bearings rotate;
- wobbling or flying off the transmission mechanism rod as a result of damage to the housing;
- lack of rotation of the output shaft with the knife due to wear of the teeth on the gears.
This happens due to the use of low quality lubricant or its complete absence. Another reason for gearbox failure is operating the trimmer to the limit of its capabilities and getting foreign objects. To replace a faulty bearing, the gearbox is disassembled.
Features of repair of electric models
Electric models of trimmers operating from the mains contain several main blocks:
- a mechanical part that transmits torque to the trimmer head;
- Electrical engine;
- power cable.
Each electric trimmer unit has specific problems. In the mechanical part, they depend on the presence of a fishing line used as a cutting element. Reasons for termination:
- tangling of fishing line;
- sticking of nylon thread due to overheating of the trimmer;
- problems with the drive shaft and coil.
You can identify problems with the electrical part of the electric scythe using special tools:
- indicator screwdriver;
- multimeter;
- set of keys and screwdrivers.
To fix problems you need a blowtorch.
Electrical damage:
- power cable malfunction;
- problems with socket and plug;
- failure of the control knob;
- starter winding burns out, engine replacement required;
- Broken contacts can be corrected yourself using a blowtorch.
Removing the flywheel
the Shtil chainsaw is twisted with great force, so to remove it you will need a head with a metal knob. The nut holding the flywheel is unscrewed with a 13mm head.
To block the crankshaft from turning, you need to unscrew the spark plug and install a piston stopper through the spark plug hole; if there is none, you can use an old cord from the starter, with knots tied to it and immersed in the cylinder through the spark plug hole.
It is strictly forbidden to keep the flywheel from turning by installing a power screwdriver or other tools between its ribs and the body; with this method of blocking from turning, the flywheel blades are not able to withstand the load and break off.
Shtil trimmer repair
fs 38 flexible shaft repair.
DIY trimmer repair Stihl FS 38
When using the Shtil
Sometimes the cutting head breaks, sometimes the cable breaks. Repair.
Once the piston in the cylinder is locked, you can unscrew the flywheel nut. The thread in the nut is normal, so you need to turn it to the left. Having loosened the nut, you do not need to remove it completely; just unscrew it until its upper edge is level with the tip of the shaft, after which a soft metal drift is installed on the nut and a sharp blow is made on it. Thus, the flywheel jumps off the shaft from a sharp impact and can be easily removed without the help of additional tools.
Types of gearboxes for trimmers
- Wave.
- Cylindrical.
- Planetary.
- Worm-shaped.
- Spiroid.
- Conical.
- Combined.
It is worth noting that the basic components of cylindrical mechanisms are gear cylinders. Most trimmers are equipped with worm gears, but much depends on the manufacturer’s decision and other features.
A feature of the planetary type of gears is the coaxial arrangement of the shafts, while conical objects have an intersecting arrangement. Gear transmission is relevant only for those units that are used in certain temperature conditions. Moreover, for them any mechanical damage can be fatal.
Lubricate the brush cutter, brush cutter: rod, drive shaft and other spare parts.
The drive shaft, which is located inside the rod, transmits rotational movements from the engine to the trimmer gearbox, and that, in turn, to the knife or fishing line (depending on the type of cutting equipment of your unit). All of these components, including the shaft, also require a lubricant to help prevent premature wear, breakage, friction, grinding, overheating or breakage. It is imperative to lubricate the lawn mower before storing it for the winter, and also as needed when the parts make such a “request”. A few nuances in the procedure:
- there is no need to lubricate the rod, since the shaft itself is lubricated, which rotates inside the part and part of the product remains on its inner walls;
- every braid needs lubrication, without exception, and the instructions for the tool will tell you about the amount of lubrication;
- Do not forget that the trimmer also has an upper gearbox, which also needs to be lubricated;
- the shaft is lubricated by filling small channels at its end, because they are in contact with the gears located inside the gearbox;
- How to lubricate a lawn mower - choose a special product in the specialized KosiKosa store, and then your tool will always be functional and free from overheating.
Gearbox lubricant appears in the service catalog as a separate product. Order it at a low cost and ensure long-lasting operation for your gearbox!
About the manufacturer Stihl
The history of this German brand begins in 1926. At the initial stages of its development, the company was engaged in the production and sale of various components for washing and steam machines. It all started, like many companies, with small production and a narrow focus, which made it possible to focus on the quality of the products produced.
In the early 30s, the first STIHL chainsaw was released, distinguished by its convenience and functionality even in those days. The company is developing at a rapid pace, constantly introducing new tools, which gives it the opportunity to enter the international market. And already in 1931, the first regular deliveries of products to Russia were organized.
To date, the company has expanded its activities in more than 160 countries around the world, opening new centers and production branches in Switzerland, China and many other countries. This is understandable, because the company’s assortment is impressive: motor drills, gasoline sprayers, mowers, gasoline trimmers, chainsaws and much more. I would like to note that Shtil chainsaws are very popular due to their functionality and reasonable price.
Replacement process
Due to the different types of gears, shape and size of the seat, interchangeability of gearboxes is possible in rare cases. Therefore, when purchasing a new part, you should take into account the model of the old unit and the brand of the trimmer. In the event that you still need to use a non-original device, you must choose it taking into account the following nuances:
- rod diameter (usually 24.5 or 26 mm);
- seat shape and diameter (most often 8 mm);
- method of securing protection.
If the listed parameters are the same, the old gearbox can be replaced with a suitable non-original part. And to carry out the replacement, you need to remove the gearbox from the rod and disassemble it. To do this, you will need to loosen the tension bolts located under the structure and remove a pair of corkscrew rings using pliers, and then remove the bearings from the driven and drive shafts using a special puller. To reassemble the mechanism, you need to install the removed parts in reverse order.
First, you should disconnect the spool of fishing line from the gearbox. It screws onto the threaded part of the mechanism gear. It is tightened by hand, and subsequently clamped under the influence of the moment of inertia during operation of the scythe. This means that there is no need to use any tools to unscrew it.
Insert a flat-head screwdriver into the special technological hole and slowly turn the reel until its end fits into the recess of the slots.
With one hand, firmly hold the screwdriver in the selected position, and with the other, unscrew the part in the opposite direction of rotation. There are gearboxes that have a special through hole for disassembly; they are easier to change.
The gearbox is attached to the rod with two bolts. One fixes it in the center, and the second clamps it and does not allow movement during operation.
Loosen the clamp bolt two to three turns. Remove the lower gearbox; it will come off much easier if you constantly turn the body in different directions.
Using the same algorithm, insert the new one into place, aligning the holes in the body and the rod. Insert the appropriate bolt, then screw both hardware onto the gear housing until it stops.
Place the flange to drive the coil onto the shaft splines and tighten it. The flange not only rotates the cutting element, but also protects the gearbox from dirt.
Removing the handle
Direct disassembly of the Shtil 180 begins with removing the handle, which is attached to the chainsaw body using three rubber shock absorbers. To remove it, you need to remove the plastic plugs from the internal cavity of the shock absorbers, then using a powerful screwdriver, first press out the upper shock absorber, then the one closer to the rear handle.
At the rear of the handle there is a throttle trigger, which is connected to the carburetor through a wire rod; in order to disconnect the rod from the gas trigger, you need to unscrew two screws and disassemble the handle.
When the handle remains on one shock absorber, you need to unscrew the chainsaw body from the inside of the handle and, bending it to the side, remove the body from the last rubber band.
Is it possible to make a coil for a trimmer with your own hands?
There are a large number of trimmer heads (not automatic) on sale, which are low priced and of good quality. But sometimes situations arise, for example, at the dacha, when the trimmer reel is broken and repair is impossible, the store is far away, and you need to mow. In this case, you can quickly, literally in a few minutes, make a simple trimmer attachment for securing a fishing line from ordinary plywood 10-12 mm thick.
- Take a piece of plywood or PCB and draw a circle on it with a diameter of about 14 cm.
- Cut out the disc using a jigsaw or hacksaw.
- Drill a hole in the center of the disk that matches the diameter of the gearbox shaft. Do not forget to put a washer on it before installing the disk on the shaft.
- You can screw small corners along the edges of the disk or make 1-2 holes on opposite sides. They will serve to thread fishing line into them.
- To secure the fishing line, you can screw several screws into the plywood.
This homemade mowing attachment is secured to the shaft with a nut. It is impossible to tighten or unscrew the nut without fixing the shaft. To replace the cord, it will be enough to loosen the screws, insert a piece of fishing line of the required length and press it again.
Also, the mowing attachment for attaching the fishing line to it can be made from a metal sheet. You can understand how to do this from the following video.
Preventive actions
Any, even the most advanced system requires periodic inspection and certain procedures to restore consumer qualities and extend service life. The main thing is that this happens in accordance with the manufacturer’s requirements and the materials recommended by him. This is fully typical for Calm instruments. For maintenance it is necessary to use only branded consumables.
As a rule, equipment works for 4-5 years without any problems, but minor problems may appear before this period has expired. To reduce the possibility of both minor and costly breakdowns, you need to follow certain recommendations:
- Study the instructions and follow them exactly.
- Maintain the proportions of gasoline and oil in strict accordance with 1 liter to 20 grams.
- There is no need to save on fuel. According to the documents, it should not be used below 92.
- For precise dosing of oil, use a syringe.
- Follow the running-in conditions, using at least 5 tanks of fuel.
- Be sure to clean all filters.
- Do not allow grass to clog moving parts.
- Avoid collision of the disc with hard objects: stones, fences, tree stumps.
- Lubricate the rigid shaft annually. Lithol-24 will do.
- Do not use water when cleaning the gearbox.
Any Stihl gasoline scythe is safe to use if all rules are followed. The trimmers are suitable for maximum load over an extended period.
Trimmer gear lubrication
Lubrication of gears must be carried out regularly in accordance with the recommendations set out in the operating instructions for the model used. This should also be done if:
- new gears were installed;
- atypical sounds come from the gearbox when the trimmer is operating;
- The knives are difficult to rotate.
With constant use of the trimmer, its transmission mechanism experiences stress from grass, dirt adhering to the blades, or due to changes in torque. You need to choose a high-quality lubricant to extend the life of the gearbox.
Types of lubricants used
When choosing a lubricant, the following factors must be taken into account:
- degree of adhesion of the composition to the metal of the assembly;
- product brand;
- lubricant consumption by the transmission mechanism.
Well-known manufacturers, for example, Stihl, Husqvarna and others, in addition to trimmers, also produce lubricants for them. Such products not only reduce wear, but also protect the gear metal from corrosion. Therefore, for brush cutters from these brands, it is better to use their own lubricants.
Different models use lubricant differently. This is determined to a large extent by the intensity of use of the brush cutter and the heating of the transmission mechanism. It is considered that the lubricant is sufficient if the temperature of the gearbox during operation does not exceed 40°C.
By consistency, lubricants for trimmers can be:
- liquid;
- semi-liquid;
- hard;
- plastic.
Based on their composition, the following types of lubricants are in demand:
- graphite, which significantly reduces friction, resulting in improved gear rotation;
- lithium, which is also an excellent anti-corrosion composition, saturated with additives that increase the wear resistance of the metal without harmful substances;
- universal, containing highly refined mineral oils and performance-enhancing components.
Examples of suitable lubricants are: Champion EP-0, Gear Grease OREGON, Oleo-Mas, Azmol 158, Litol -24
You should also pay attention to manufacturers' advice on this issue and use the materials they offer. You can buy them at specialized retail outlets
Champion EP-0 universal lubricant 120 g
Algorithm for self-lubrication of the gearbox
To lubricate the transmission mechanism, preliminary disassembly is not necessary. The device already has a special hole for these purposes (it is shown in the photo below)
In addition to the gears, when carrying out lubrication, you need to pay attention to the following elements of the mechanism:
- bearing unit;
- flywheel and starter coil pawl.
Lubricant injection hole
Fill in oil or add solid lubricant through a grease fitting closed with a screw. In this case, perform actions in the following sequence:
- clean the gearbox housing from dirt and adhering grass, especially carefully the area around the plug so that debris does not get inside the mechanism;
- using the appropriate tool (often it comes with the trimmer), unscrew the plug;
- the selected lubricant is injected into the open technological hole from a tube or using a syringe, as shown in the photo below;
- screw the plug into place.
Gear Lubrication
If for any reason the gearbox needs to be disassembled, then the old lubricant must be completely removed from the entire surface of the gears, housing, and shaft, and only then a new one must be used. It is convenient to lubricate the disassembled mechanism with solid compounds.
The entire gearbox lubrication process is demonstrated in the video:
The transmission unit must be lubricated at least once a year, but it is recommended to do this every 20 hours of intensive use of the brush cutter. If the first signs of malfunctions with the mechanism appear, you need to add lubricant as quickly as possible.
Detailed review of STIHL FS 55. Which brush cutter to buy for your home
Series of 4 videos: which brush cutter
buy for home. Let's compare the 4 most popular braids in Ukraine: 1) STIHL
FS 55 2) mechanical - settle and store gasoline for work not in metal containers and for no longer than 1 (one) month, otherwise it oxidizes and loses its properties;
chemical - impurities and additives should not be present (they have different rates, degrees and temperatures of combustion). Old gasoline turns yellow or red, and the impurities have a strong smell of bitterness (for example, creosote) or acid (for example, methyl alcohol). The proportion of the fuel mixture is 1:50 (2%) or 20 ml/cm3 of oil per 1 liter of gasoline. For example, pour half a measure of gasoline into a transparent plastic bottle (1 l), then use a medical syringe (20 ml/cm3) to introduce two-stroke oil and mix, add gasoline and mix thoroughly. If the quality of gasoline is questionable or the working conditions are difficult, then the amount of oil can be increased to 22-25 ml/cm3. Shake the mixture before each filling! Store the resulting fuel for no more than two weeks! If the color of the mixture has changed (from sea green to, for example, brown), then it is not recommended to use it!