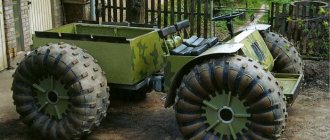
Homemade 4x4 all-terrain vehicle, equipped with a motorcycle or car? engine or a motor from agricultural machinery, is able to overcome deep snow and swampy areas of the forest. The articulated connection of the frame sections provides increased maneuverability and maneuverability on soft soils. The design uses parts from cars, which further reduces the cost of building an all-terrain vehicle.
Volgograd all-terrain vehicle Okhotnik M for adventure lovers
Often a situation arises in which a person is forced to face difficult terrain due to duty or the call of adventure. A personal car cannot withstand the load, and there is no money to purchase a large multi-functional all-terrain vehicle. The solution could be the Okhotnik swamp and all-terrain vehicle, which in its basic configuration will not require large expenses.
Specifications
The all-terrain vehicle is available in two variations: M and M 01. The unit is produced in the city of Vologda. The first option is easier and cheaper. Characteristics:
- engine volume - 15-30 liters. With.;
- speed - up to 30 km/h;
- load capacity on water is 300 kg and 500 kg on land;
- number of passengers - 1;
- 5-speed gearbox;
- Fuel tank volume - 7 liters.
The M 01 version is distinguished by increased flexibility, increased gas tank capacity and payload capacity, and a closed cabin.
Thanks to the ability to choose the configuration of the Okhotnik M all-terrain vehicle, the buyer can customize the configuration. It is proposed to choose an engine, wheel type, axles and improvements for the body, a list of which is presented in the “Modifications” section. List of available engines for example:
- Standard 15 l. With.;
- Sports;
- Pro version;
- Diesel;
- Improved by 17-30 hp. With.;
The ability to choose the configuration appears as a positive side of the Okhotnik M swamp vehicle. If a person needs an inexpensive all-terrain vehicle without additional functions, he will not indicate them in the list, and will not overpay for them. If someone needs a vehicle with all the body kits for complex purposes, he will not be forced to look for additional improvements, but will order them upon purchase from the manufacturer with a 100% guarantee of compatibility.
Dimensions
The dimensions of the Okhotnik M all-terrain vehicle allow it to easily fit on a standard road. The permissible limit for vehicle width in the Russian Federation is 2550 mm. Body dimensions:
- length 2500 mm;
- width 1800 mm;
- height 1900 mm.
Weight without modifications does not exceed 600 kg. The load capacity of the M 01 version is 500 kg. The cost starts from 200,000 rubles.
Engine
The power indicator on a homemade unit determines the performance of the selected walk-behind tractor.
The higher this parameter, the more efficiently the equipment will function. On the other hand, high power causes increased fuel consumption. If the owner lives in the outback, far from a gas station, this aspect will play a significant role. Those users who plan to use the equipment only in the warm season are advised to opt for a budget modification with a two-stroke engine. It is simpler and launches quickly. For fishing and hunting in winter, the best option would be a four-stroke power unit. Such variations warm up more slowly, providing longer engine life.
Modifications
As already described above, the manufacturer provided buyers with the opportunity to equip the purchased unit in accordance with personal preferences. The Vologda swamp vehicle and all-terrain vehicle Okhotnik is equipped with the following additional elements:
- body protection;
- cabin seal and glass windows;
- kung on the swamp vehicle Okhotnik M;
- glass cleaner;
- rear towbar in the form of a ball;
- platforms for winches on both sides;
- cigarette lighter in the cabin;
- awnings for cabins and kungs;
- PVC parking awning;
- generators, new or used;
- set of winch, platform, generator and sockets;
- self-blocks - VAZ, UAZ or Volga bridges;
- power steering;
- steering gear;
- breathers;
- improving the quality of spare parts;
- dampers;
- spare belts;
- windshield with frame;
- beadlock wheels;
- spare wheel and inner tube;
- soft seat with shock absorber, new or used;
- soft backrests in the body;
- box for spare parts;
- seat cover;
- rigid coupling.
Thanks to the listed functions, you can equip your swamp vehicle to the highest standard, or choose a model without improvements.
The range of additional services is the same for variations M and M 01.
There are homemade ones with other bridges, increasing the power, which are done by craftsmen with their own hands, but to overcome obstacles, the stock equipment of the transport produced in Vologda is enough.
Let's make some refreshments
To make your own low-pressure tires you will need:
- used truck tires (for example, from Gaz-66 or VI-3 tires installed on Kraz 255). If you buy tires specifically for tires, then choose rubber that is not “chewed” inside. Otherwise, after removing the top layer, you will get a weak spot or even a hole that will have to be vulcanized;
- a construction knife and a set of replacement blades, since the construction of the tire uses fairly strong threads that quickly dull the blades;
- a template that can be made from thick cardboard or sheet steel. In order for the tires to be not only effective, but also to look good, the tread must be cut as evenly and symmetrically as possible. You will also need a chalk or marker with which you will outline the template;
- durable clamps. These are often used by straighteners to clamp body panels when restoring damaged cars. An ordinary clamp will do, but in this case you need to act more carefully;
- a manual or mechanical winch, as well as a cable that pulls the cut piece of the tread layer. You can use a manual gearbox or a winch mounted on a vehicle. You won’t be able to manually create force to make the rims, since the layers of rubber are very tightly bonded.
Self-production
To make rims, the first step is to pull out the side metal cord. To do this, make a cut, departing approximately 10 mm from the inside of the tire. Hook the cord with a screwdriver, and then, hooking it with a hook, pull out the metal rim using a winch.
Using a template, apply the future outline of the tread along the entire perimeter of the wheel. Some obradyshas can be seen with the protector left in the center. It is along the contour of the outline that it is necessary to make cuts in the rubber. For this, it is best to use a construction knife, as you can control the depth of the cut by setting the required blade length. If you are confident in your abilities, you can use a grinder. To avoid cutting through the tire, use the sound as a guide. As soon as you cut through the rubber layer and reach the metal cord of the tire, the sound will acquire the appropriate color.
Cut the tire profile along the inner perimeter (where the metal wire ring used to be). It is the cut section that must be grasped with the clamp. Use a winch to create tension, and then use a utility knife to gradually trim off the peeling piece. After stripping the entire tire, you will get strips. Please note that when tension is created, the tire will tend to lean in, so it is necessary to implement a stop.
Particular attention should be paid to this point if you do the lifting using a winch installed on the car. It is not necessary to create a lot of force for peeling.
For extra safety, place an old jacket on the cable, which will serve as a kind of damper if the clamp does break.
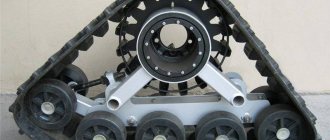
Discs
The video clearly shows the process of making discs with your own hands. Since the tire becomes elastic after stripping, it is necessary to ensure good side support. To ensure that when the pressure decreases, the rims do not deflate and do not tend to be dismantled, a special sealant is used during installation. If all recommendations are followed, self-made low-pressure tires are practically not inferior to factory-made analogues.
Source autolirika.ru
Many residents have seen cars on the roads with huge wheels mounted on homemade rims for low-pressure tires. These discs are not available for sale. They are made only to order. Low pressure wheels are in demand among such categories of people as:
- military personnel of various branches;
- hunters and fishermen, especially in winter;
- farmers;
- geologists;
- travelers.
Image 1. Homemade wheels for low pressure tires.
Maintenance, repairs and modifications
Maintenance of the Karakat Hunter requires minimal effort and time, especially if the “Lite” version is used. This option is cheaper than the basic one, as it is a lightweight package with the same functions as the original. Fracture Hunter Light allows you to go through uneven terrain without losing traction. Maintenance consists of timely lubrication and preparation of removable parts, provision of fuel, and replacement of damaged parts.
Repairing caracats yourself is allowed only if you have skills in this area. For repairs at home, you will need tools, a garage with a lower level, and supplies. Since the breaking system is used when passing through difficult terrain, the rotary assembly that ensures its operation may fail with frequent use. If the adjustment is carried out by specialists or people with extensive experience in the field of mechanical engineering, the result will be positive.
Modifications to the Hunter allow you to fine-tune the vehicle to suit your needs. For example, make a caracat based on the Hunter “Lite” with a gearbox from a VAZ 2108. Modification of the gearbox ensures ease of operation. Craftsmen are refinishing the frame and body - drawings of craftsmen appear on forums to support beginners.
The Hunter all-terrain vehicle will help meet the needs of those who deal with impassable terrain at a low price. The unit is suitable for mechanics with high demands and unpretentious drivers.
The weakest UAZ: The installation of an 18-horsepower Lifan engine on the Hunter scared car enthusiasts
A garden engine crossed with an SUV.
UAZ-469 with a Chinese engine. Collage: Driver-News portal
The native engine of the UAZ-469 “eats excessively,” so the owner of the car installed a single-cylinder four-stroke engine from China on it. They showed the work of the car on the YouTube channel “Anton about everything”.
The owner converted the UAZ Hunter to an 18-horsepower engine from “nothing to do” to go fishing. The modification cannot be called convenient - you have to start the Lifan engine manually, because it is intended for garden tools, but not SUVs.
Engine operation on a UAZ and its starting from a standstill. Fragment: YouTube channel “Anton about everything”
Car enthusiasts on the Internet did not appreciate the improvement; it even scared them. No, not by the method of execution, but by the fact that “Ulyanovsk residents” can observe this.
It is worth noting that the installation of an 18-horsepower engine on the Hunter is not the first. So, on the YouTube channel “Igor Konstantinov” a man is building an all-terrain vehicle based on the UAZ-469 and a similar Lifan garden motor. His “Hunter” is a chair on top of a frame, but due to this lightness, the weak engine copes with crossing fords and ruts.
The lightweight “rogue” can handle it with a Lifan engine. Screenshot: YouTube channel “Igor Konstantinov”
As a result, such a modernization of the UAZ Hunter was considered a waste of time. The car will have to be greatly lightened, ideally even the body parts will have to be cut off. In this case, the savings disappear, which means the 18-horsepower engine from Lifan can only be considered if you have an old and “unnecessary” UAZ.
Source
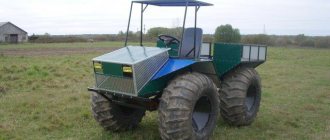
Karakat swamp all-terrain vehicle price Vologda
Request for consultation
The Vologda all-terrain vehicle Karakat is the most inexpensive all-terrain vehicle with great capabilities for crossing hard-to-reach places. The swamp vehicle is capable of swimming due to large wheels, so this technique can be called an amphibian.
The company in Vologda specializes in the production of all-terrain vehicles. An all-wheel drive (floating) all-terrain vehicle is an indispensable assistant for fishing, hunting, and also for household needs. The price and excellent driving characteristics in the forest, swamps, and water make it competitive among other similar all-terrain vehicles. The company carries out a conveyor assembly process, which allows it to reduce costs and become a leader in this segment.
Specifications
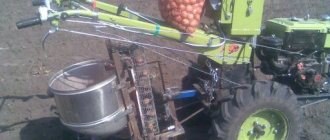
Our production brings to your attention a universal all-terrain vehicle - a swamp vehicle, created on the basis of domestic spare parts, a frame with a fracture unit based on the front hub of a UAZ car. The all-terrain vehicle is equipped with a LIFAN 17 hp engine. with electric starter and lighting coil. A 4-speed gearbox from a VAZ car was installed, VAZ axles were installed (restored, all seals and axle bearings were replaced, including the gearbox seal), hydraulic brakes, all cylinders are completely new, including brake pads. Pulleys are installed on two belts, which reduces belt wear by evenly distributing the load (two spare belts are included in the price of the all-terrain vehicle). The chain was installed from agricultural machinery and was supplemented with a chain tensioner, thereby increasing its service life. All frame parts bearing the main load are manufactured in the factory using plasma cutting. The carrying capacity of the all-terrain vehicle is 300 kg (including the driver). Dimensions of the all-terrain vehicle: length - 320 cm, width - 185 cm, weight 470 kg. The maximum configuration includes 27-watt LED headlights, a battery, a choke cable routed to the steering wheel, an electric starter, seats for transporting 4+ people over the rear wheels, the rear frame is additionally reinforced, and a tow bar is installed. This caracat has high cross-country ability due to its low weight and low-pressure wheels assembled on sealed discs of our own production. At the customer's request, it is possible to install a self-locking differential to prevent wheel slipping and provide better maneuverability in difficult marshy areas and snow. It is possible to install an engine with a power of 18.5 hp, 24 hp, 27 hp, as well as a diesel engine with a power of 13 hp. and 15 hp The all-terrain vehicle is easy to operate and repair. There is an opportunity to take a test drive. From November 13, 2022 Our all-terrain vehicles will be available for purchase in the Penza region in the city of Serdobsk. We invite regional representatives to cooperate. WhatsApp and Viber are connected to the number +79210642909.
Instructions for stripping rubber
You can start peeling immediately after all the preparatory stages and collecting tools. After marking the tread, go along the chalk lines with a utility knife. It must be kept at an angle, otherwise the tread will not look like a trapezoid. The depth of the cut should reach the braided cord. The knife blade should not be pulled out too much, as it will quickly break under force. Only the tip should be visible from the plastic base.
After manipulating the future tread, you can proceed to removing the wire from the base of the tire.
To do this, cut the wheel along the entire circumference, stepping back about one centimeter from the edge. The depth of the cut should be the same as on the tread. To pry the wire, you will need to cut a small square with a knife and tear it off. After this, it will become visible and can be easily pryed off. This can be done with a screwdriver, gradually pulling the wire towards you. Then the screwdriver can be replaced with a mounting tool to pull out more wire for hooking with a winch.
To make the wire turn faster, you need to cut it on both sides with a knife. When you have managed to pull out a sufficient loop, you can move on to the stage of fixing the tire. The cable with the hook clings to the loop and the winch starts. The tire must be stationary, otherwise the wire will not be pulled out. There is no need to rush, as you will need to make cuts near the wire to ensure it comes out well. You can also help the winch a little with mounting. When this stage of work is completed, you can move on to the next one.
Important!
All tools must be used with extreme care, especially a utility knife.
Fixing the tire
After removing the wire, use a utility knife to cut above the tire seat in a circle. You need to insert pliers into the incision site and clamp tightly. Hook the winch hook onto the pliers and pull little by little. This will remove the rubber ring. After this, you need to rinse the side of the wheel with transverse cuts. But it’s better to make markings in advance to make it easier to see.
There is no need to make wide stripes, as they will be difficult to tear off.
When the cutting is completed, you need to attach the pliers to the edge of the strip and clamp it. And use a winch to rip off the marked layer. For convenience, you need to trim the edges with a knife, but do it carefully so as not to touch the cord. After stripping all the stripes, you can start working on the tread. You will need to cut it with a chainsaw. But you also need to do everything carefully, otherwise all the work will come to nothing. If you do everything correctly, you will get very high-quality peel-off wheels for an all-terrain vehicle.
You might be interested in this About tires for Toyota Rav 4
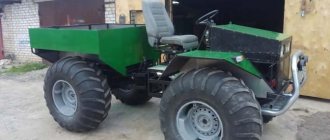
All-wheel drive all-terrain vehicle with a breakable frame - “Bobik”
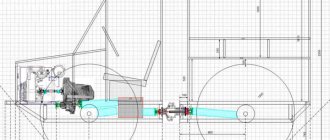
In my spare time I enjoy building all-terrain vehicles. I built the first such car in the summer of 2011. And now I present, in my opinion, one of my most successful developments - an all-wheel drive all-terrain vehicle with a “breakable” frame - “Bobik”.
The frame is articulated (“breakable”), consists of two box-type semi-frames, welded from profile pipes with sections 40x40x2 mm, 40x20x1.5 mm and 40x25x2 mm. The places where bridges are attached to them are reinforced with linings made of a rectangular pipe 40x25*2 mm.
The frames of the cabin, hood, wings and body are made of square pipes 20x20x1.5 mm and 15x15*1.5 mm.
Dimensions of the front half-frame (length x width x height) - 1650x800x260 mm. The engine compartment occupies 750 mm (in length), the rest of the space is reserved for the driver's seat. This half-frame was conceived as universal - for several types of engines. Therefore, the dimensions of the engine compartment were made for the VAZ-1111 Oka engine. Most of the other suitable engines are smaller in size. For example, for an engine like the Lifan 182FD, the length of the engine compartment can be reduced by 100-150 mm.
Transmission
A drive pulley with a diameter of 95 mm is installed on the output shaft of the engine (Lifan 182FD or similar). The pulley has five grooves of profile “A”. Four of them are intended for clutch drive belts and one (outmost) is for driving a generator or hydraulic pump. The shafts on different engines are not the same size and have different keyway widths, so you have to be careful here.
The length of the “A” profile belts (generator from the D-240 diesel engine) is 1250 mm. The belts are tensioned by a roller with two springs. The roller rotates in two bearings 180203. Its axis, for convenience, fits into the bearings using a “sliding” fit, that is, quite freely (by hand). When the axle nut is tightened, the inner races of the bearings are clamped between the spacers and do not rotate.
A driven pulley with a diameter of 260 mm is mounted on a support shaft, which rotates in a double-row bearing from the front wheel of a VAZ-2108 car. A splined bushing from the Zhiguli clutch disc is welded to the end of the support shaft. This bushing includes the input shaft of the gearbox (gearbox) from the VAZ-2106.
The holes in the pulley for attaching it to the shaft are drilled for the flange of the “Zhiguli” propeller shaft. This was done for the versatility of using this pulley. It is not necessary to repeat this at all; you can place the holes on the pulley and shaft flange at an angle of 90°.
The gearbox output shaft is cut to the beginning of the splines. The flange of the Zhiguli driveshaft is mounted on the splines. The shaft pipe is cut to the required length. The second cardan flange is screwed to the input shaft of the chain gearbox, to which the sprocket is welded (z=13, pitch 19.05 mm). The input shaft itself rotates in tapered bearings from the front hub of the Zhiguli, which, in turn, is screwed to a movable plate. By changing the position of the plate, you can adjust the chain tension.
Steering:
1 - fracture site; 2 - bipod; 3 - hinge; 4 - traction; (the chain on the driven sprocket and behind them the transmission brake caliper are clearly visible)
A driven sprocket with a number of teeth z=41 is installed on the transfer shaft of the rotary unit. The transfer shaft drives the main axle gears (from the VAZ-2106) through cardan shafts (shortened from the VAZ-2121 Niva). Drive axles (both front and rear) are from VAZ-2106. The tires on the wheels were both homemade (“torn off”) and industrially produced. I didn't notice much difference in driving performance.
How to make a fracture with your own hands
A 4x4 all-terrain vehicle of the utilitarian type can be manufactured independently. Assembly will require drawings (developed from scratch or using documentation from magazines), as well as a place for installation work.
It is necessary to prepare a set of metalworking tools, a welding machine, measuring devices and a drilling machine (it is possible to use an electric drill).
During the assembly process, the design will need to be refined, since the drawing documentation cannot take into account all the design features of the parts and assemblies used.
Required materials and parts
Minimum set of components for assembly:
- power unit with attachments and exhaust system;
- drive axles with installed differentials and identical main pairs;
- gearbox and transfer gearbox;
- cardan shafts;
- cooling system radiator;
- steering knuckle for connecting sections;
- steel profile of closed section;
- tires (of the “flap” type);
- additional materials for the manufacture of steering and body elements.
Frame making
For the manufacture of space frame sections, pieces of steel profiles are used, held together by resistance welding. During manufacturing, the dimensions of the engine and transmission units are taken into account, and the installation of attachment points for the units is provided. The frame design must withstand the weight of the installed equipment and additional loads that arise when moving through a swamp or deep snow. If cracks and breaks appear during operation, the load-bearing frame will need to be reworked.
The frame is provided with end plates with holes for attaching the movable fist. There is a hole inside the knuckle through which the driveshaft is passed. This solution reduces the risk of damage to the drive when driving over rough terrain. The semi-frames have points for installing bridges, equipped with reinforcements. To determine the correctness of the construction, a trial installation of the units is carried out. It is recommended to clean the frame from traces of corrosion and cover it with a layer of acidic primer to prevent corrosion.
Installation of box and bridges
The box is attached to the power unit or installed separately (for example, in designs with a Lifan engine from agricultural machinery). The gearbox and transfer case are installed on cushions with rubber inserts that reduce the level of vibrations. The bridges are placed on brackets and then secured with stepladders and nuts. It is not recommended to weld the parts, since the bridge stockings warp, which causes bending and damage to the axle shafts. The cardan shafts must be trimmed, and then the pipe must be connected to the hinges by resistance welding.
Painting
For painting, a special paint for metal structures is used, which has increased resistance to impacts. The enamel is applied with a spray gun; Points and parts that cannot be painted are first covered with tape. External body panels can be painted with automotive paint; some owners use sheets of corrugated aluminum that do not rot under the influence of natural precipitation.
Installation of the power unit
The power unit is installed in the front of the all-terrain vehicle; When using liquid cooling, space is provided for mounting a radiator. The direction of the antifreeze supply and intake pipes, which must be connected with rubber hoses, should be taken into account. The motor is mounted on standard points on cushions with elastic elements that reduce vibrations and prevent the motor from moving to the sides. Since homemade structures use an electrical circuit, a relay and fuse box is installed.
A fuel tank is mounted on the frame, which is connected by lines to a mechanical pump. If you plan to use a motor with distributed gasoline injection, then consider a place to install the control controller. The Check Engine indicator is displayed on the instrument panel, allowing timely detection of malfunctions in the power unit systems. Regardless of the type of fuel supplied to the engine, a coolant temperature gauge or indicator is provided.
Driver's cabin
The driver's seat is located behind the engine compartment and is separated from it by a partition made of duralumin sheet on a frame made of pipes with a cross-section of 20x20 mm. The driver's cabin is semi-closed (without doors or rear wall). The seat is from a passenger Gazelle. There is a 60 Ah battery under the seat. The steering column is converted from a Zhiguli one (VAZ-2106), and the upper part of the steering propeller shaft is taken from there. Its lower part is made of a 20x20x2 mm profile pipe, the crosspiece of the steering cardan is 2141 “Moskvich”. The steering mechanism (“rack”) was also borrowed from the M-2141.
Pedal units are from Zhiguli. Their location is the same as on a car. The clutch pedal is connected to the tension roller of the clutch belt via a cable. The brakes are transmission brakes, the disc is mounted on the driven sprocket shaft. The pedal is connected by a rod to the main brake cylinder (from the UAZ clutch), which drives the brake caliper cylinders (from the VAZ-2108). The gas pedal is homemade, connected to the carburetor with a Bowden cable.
Under the steering wheel there is a panel on which there is a toggle switch for turning on the headlights, a cable handle for the carburetor air damper, a horn button and a ground switch.
The all-terrain vehicle "Bobik" has been modernized several times, and even has several similar copies, which were distributed to different owners. Therefore, some drawings may differ in some ways from the images in the photographs.
Some conclusions
As a kind of conclusion, the following can be said about breakaway all-terrain vehicles:
- The technique is popular. Those who know how to work with their hands make their own versions. Those who do not know how to work with their hands order special equipment from craftsmen;
- You can create such an all-terrain vehicle from any spare parts at hand. As a last resort, you can inexpensively buy several cars from the USSR era: VAZ-2106, UAZ and Moskvich, and assemble them into good pieces;
- An all-terrain vehicle can become a truly reliable assistant in overcoming off-road conditions.
Basic data of the Bobik all-terrain vehicle
Engine - Lifan 182FD, 11 hp, four-stroke, forced air cooling, made in China. The gearbox is from a VAZ-2106, four-speed. Bridges are from VAZ-2106, gear ratio 3.9. Tires - VI-3 (from KRAZ-255B), lightweight (“torn”), actual size 1250×520-533 mm. The wheels are non-separable (for beading), with the tires secured with bolts. Overall dimensions (length x width * height) - 3300x1950x2300 mm. Loading capacity on land/water -300/200 kg. Curb weight - 780 kg. Maximum speed - 25 km/h