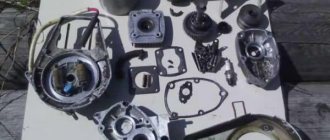
Description of the mole cultivator
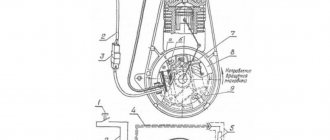
Motor cultivator MK-1 “Mole”:
1 — working body (rotor); 2 - gearbox; 3 — knife of the working body; 4 — gas tank; 5 — “stop” button to stop the engine; 6 — clutch control lever; 7 — carburetor throttle control lever; 8 — engine; 9 - opener; 10 — support; 11 - frame; 12 — transport wheel
The main components of the MK-1 (see figure) are an engine with a built-in gearbox (described below), transmission, control system, working parts, opener, wheels.
The transmission ensures the transmission of torque from a single-stage engine gearbox to the working parts and consists of a V-belt drive and a lower two-stage gearbox. The V-belt drive also serves as a clutch. Working elements are installed on the output shaft of the gearbox chain drive.
The control system consists of two handles adjustable in length and width. On the left of them there is a carburetor throttle control lever, on the right there is a clutch control lever. To stop the engine, the control system has a “Stop” button.
The working bodies are made in the form of rotors, each of which has four specially shaped knives. A milling drum with a diameter of 320 mm is assembled from two or four rotors. In the first case, the width of the processed strip is 330 mm, in the second - 580 mm.
If you additionally install two more rotors, which the design of the walk-behind tractor allows, then the width of the processed strip will be 830 mm. The milling drum rotates at a frequency of 85 rpm and processes the soil to a depth of up to 20 cm (depending on the setting).
The forward movement of the walk-behind tractor is carried out due to the rotation of the working parts - the rotors, which simultaneously carry out the technological process.
The coulter is installed behind the working bodies and serves as a soil tillage depth regulator. The height of the coulter is adjusted in stages.
A pair of wheels in the form of discs with a rubber rim have no drive and serve only to move the cultivator, and during operation the wheels are lifted up.
The productivity of MK-1 when milling soil to a depth of 20 cm is 0.017 ha/h, and when cultivating to a depth of 10-12 cm - 0.05 ha/h, that is, its use in the most labor-intensive soil processing operations increases labor productivity compared with manual more than 5 times.
The MK-1 motor cultivator is supplied with additional devices: weeders with L-shaped knives with a wedge-shaped blade; discs that protect against damage during rotary tillage; hiller. Using these devices, it is possible to assemble a unit, for example, for combined processing of potato rows: weeders are installed instead of rotor working bodies, and protective discs are installed on the shafts of weeder sections; The hiller is mounted instead of the doshnik on the back of the frame.
When the unit is operating, the weeding knives loosen the soil, trim weeds and at the same time facilitate the movement of the motor cultivator, and the hiller hills two adjacent beds on one side of each in one pass on the loosened soil. Such a unit processes 0.14 ha/h, which is 18 times more productive than performing similar work manually.
Overall dimensions of MK-1 are 1300 X 800 X 810 mm, weight 50 kg, it can be easily placed in the trunk or on the roof of a car.
In general, for modifications of all motor cultivators of the “Mole” type, they produce, in addition to the working parts already mentioned for MK-1, a small plow, a mower, a semi-trailer with a load capacity of 200 kg, and a water pump. A front attachment has been developed that forms a motorized trolley when the attachment is connected to the power unit of a motorized cultivator. A sprayer, a home sawmill and other devices are designed to be used with this power unit.
Modifications MK-2 and MK-3 have a wheel diameter of 320 mm, ground clearance of 90 mm, track of 285 or 600 mm, overall dimensions 1960X800X1170 mm. The MK-2 model has one forward gear, providing a speed of up to 7 km/h, and a weight of 50 kg. The MK-3 model has two forward gears, providing travel speeds of 4.7 and 7.1 km/h and two reverse gears (2.8 and 4 km/h), weight 60 kg.
This model has an optional pulley mounting option and is equipped with rear and front linkages. Using a pulley, you can drive various small-sized machines, including those used in homestead livestock farming. Implements associated with the use of traction force (plow, hiller, semi-trailer, etc.) are hung on the rear linkage or attached to it.
User manual
The gasoline and electric cultivator Mole is a reliable and functional device, but its service life directly depends on compliance with the operating instructions.
There are a number of rules that must be followed when using a walk-behind tractor.
Maintenance
Since gasoline models operate by burning a fuel mixture and engine oil, it is necessary to adhere to the factory proportions of the components when creating the mixture. Otherwise, the engine will soon fail.
Reviews from owners on thematic forums emphasize that it is impossible to use analogues of the M-8B oil recommended by the manufacturer, since they do not have the required parameters.
Before starting and starting work, you need to make sure that the fasteners are tightened and check the functionality of the V-belt drive, reverse gear and operating systems. You should familiarize yourself with the fuel and oil levels, and, if necessary, evaluate the condition of the air filters.
During the first 15-20 hours, the equipment with installed attachments is run-in. During this period, operation of the unit at light loads is allowed, and plowing of the ground is carried out in 2-3 passes to a depth of no more than 10 cm.
The oil change in the power unit gearbox is carried out after 5 hours of operation, in the chassis gearbox - after 25 operating hours.
Further technical inspection includes basic maintenance including cleaning the machine from dirt and lubricating the working units on the Krot cultivator with special oils.
Variations of working with mole walk-behind tractor
Another of the main functions of the Mole is weeding, for which ordinary knives are replaced with L-shaped ones. To plow the soil, plant and dig potatoes, rubber-coated wheels are attached to the gear shafts instead of cutters, and a plow is installed in place of the coulter, three varieties of which are included in the kit: regular, for hilling and for digging potatoes.
To make it easier to mow the area, and indeed any desired area, the included serial factory mower will help, the torque to which is transmitted from the engine auxiliary pulley using a timing transmission.
It is worth noting that the types of equipment listed above allow you to capture a strip of soil with a width of 350 to 600 mm during processing. For the transportation of small loads, the manufacturer provides a TM-200 trolley, the load capacity of which is 200 kg.
Another important feature of the Krot motor-cultivator is the ability to attach the MNU-2 pumping unit to the front brackets, which will make it easier to water the beds and help roll water out of the cellar during the spring melting of snow.
To operate the pump, you will have to disconnect the belt from the gearbox and attach it to the installation, after which you will have to move the Mole using your own force.
During its existence for decades, the Mole motor cultivator has established itself as a reliable and indispensable assistant in the garden.
And if you need to repair the engine, then it is better to purchase a piston for Krot in a company store or order it from us in the online store.
Step-by-step process for upgrading a walk-behind tractor into a mini tractor
- Step 1. We develop the design of the kinematic scheme. The main thing in this scheme is the balance of the structure so that additional loads do not destroy future equipment. This diagram is developed independently, or you can use a ready-made diagram with a kinematic image of a mini tractor.
- Step 2. We make a frame from corners and pipes. During the manufacture of the frame, it is important to consider the location of the fork and bushing, which ensure the rotation of the trailer.
- Step 3. We make the body. For the body, an excellent material for manufacturing would be steel sheet. The height of the body sides should not exceed 30 cm.
- Step 4. Install the driver's seat.
- Step 5. Install attachments.
- Step 6. We check the performance of the manufactured mini tractor.
- Step 7. Painting.
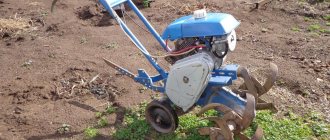
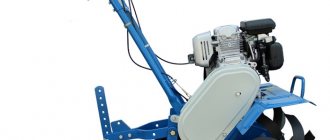
We will consider one of these options for creating a mini tractor using the example of the Neva MB-2s 7.0 PRO walk-behind tractor. This walk-behind tractor is equipped with a Subaru EX 21D engine.
If you plow your garden plot with such a walk-behind tractor, then within a week it will be difficult to straighten up. To avoid such consequences, we will convert the walk-behind tractor into a mini tractor.
Since the SUBARU engine does not have a 12V output, the headlights are installed for decoration. To use them you need to install a battery pack or battery.
When plowing the land, the imperfections and inconvenience of this technique are not noticed. This mini-tractor was tested on hard-to-plow land.
And although during the creation of the tractor its traction characteristics were questioned, the tests were very successful.
Installed levers: gas lever - on the right, axle release lever - on the left. To lift the hitch, a sprocket with a diameter of 150 mm is used.
It is brought out by a bicycle chain to a lever or a manual jack.
The installed Volga wheels were found in a landfill, pre-cleaned of rust and painted. The pedal arrangement is similar to that of a car: the right pedal is the brake, the left pedal is the clutch. Speeds are switched using a lever. Shoe brakes taken from the Riga-7 moped are installed.
The principle of operation of the clutch pedal is the same as that of a walk-behind tractor: when pressed, the minitractor moves, if you release it, it stops. There is a cable connected to the left armrest lever that unlocks the axles.
It is used when turning is necessary. There are no special nuances when turning right or left. The right armrest houses the throttle lever. The hitch lift lever is located under the seat.
The wear on the drive belt on the gearbox is the same as on a walk-behind tractor.
The sum of the weight of the driver and the front part of the tractor is 100-110 kg, which keeps the front of the mini tractor from lifting when the plow is deepened.
The size of the processed track remains the same as the walk-behind tractor - 630 mm. Stability problems arise if plowing goes deeper than 20 cm.
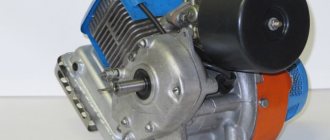
Refinement of the mole cultivator
For higher performance, I propose to install on the MK a 4-stroke engine made in China LIFAN - 160F, with a power of 4 l/s. At the same time, the power of the MK at low speeds increases. Now you don’t need to increase engine speed to cultivate a soil depth of 20 cm (according to the passport).
Another important advantage of this replacement is that the engine starts in a cold or hot state. The speed is automatically maintained at a given level. With more power, gasoline consumption remained approximately the same as that of a standard engine, and there is now no need to add oil to gasoline (4-stroke engine).
Installing a new engine does not require much effort or rework. The engine mounts fit in the original place. The pulley is taken from the old engine, slightly drilling out the internal hole and the groove for the key.
Having suffered quite a bit with the old engine, now with the new one there are completely different emotions when working with a motor cultivator!
Literature used: Small-scale mechanization in household plots and farms. Ed. I.P. Oil. 1996
Author of the article: Zotov V.A., Volgograd region.
Popularity: 74,333 views.
Technical features for different jobs
Each of the types of work performed by a motor-cultivator has its own technical features in the preparation and attachment of the corresponding mounted implements, and the technology of execution:
- Milling, loosening, weeding - with this type of work, the cutter is installed on the gearbox shaft, and the loosening depth is set using the coulter. After starting the engine, the unit goes deep and begins to move forward along the treated area with smooth pushes.
- Planting potatoes, hilling - the cutter is removed from the gearbox shaft, and metal wheels with lugs are installed. The rear support wheels are removed and a single-body hiller is installed on the cultivator. When planting, cut a furrow, manually place a potato seed in it, and then use the same hiller to fill up the row planted in this way. When hilling, instead of wheels with lugs, protective wheels are installed on the gearbox shaft. The formation of the ridge occurs when the hiller moves between two rows of crops.
- Harvesting potatoes - remove the cutter and support wheels from the motor cultivator, install metal wheels with lugs and a fan potato digger. They dig up potatoes, using such attachments, directing them exactly in the center of the row. At the same time, the body of the potato digger lifts the tubers, which, falling on the fan of twigs, are freed from the ground and, falling from them, remain lying on the soil.
- Mowing grass - for mowing, the front cutter is removed and rubber-coated iron wheels are installed in its place. The segmented walk-behind mower is connected to the front of the cultivator frame; it is driven by a belt installed on the pulleys of the unit and the cultivator engine.
- Water pumping - the pumping station is installed in front of the cultivator. The pump, like the mower, is driven using a V-belt drive. To pump out water, an intake hose with a filter and a discharge hose are put on the corresponding pipes of the pumping station (lowered into a container).
- Transportation of goods - rubber-coated metal or pneumatic wheels are installed on the gearbox shaft, the support wheels and the coulter are removed, in place of the latter a coupling device is installed, to which the cart with the body is attached using a finger. The trolley transports bulk and other cargo weighing no more than 200 kg.
Spare parts for mole walk-behind tractor and specifics of work
The motor cultivator comes with 4 cutters (the cultivator will move during soil cultivation due to them): two outer ones are attached to the left gearbox shaft, and two inner ones are attached to the right one.
The motor cultivator can also be used with six cutters, which will significantly increase its productivity. But it is not recommended to use a larger number of cutters to avoid damage caused by excessive loads on the engine and frame.
The depth of soil milling is adjusted by installing a coulter. During operation, the operator, by changing the load on the coulter, can adjust the depth of processing, as well as prevent the cultivator from burying in one place, because the engine has a Mole piston, the walls of which are tinned and therefore tightly ground into the cylinder.
Troubleshooting Tips
If the operation of the gearbox is accompanied by increased noise in the gearbox, then the reason for this may be a lack of oil in the gearbox device or a discrepancy between the quality of the lubricant and the required parameters. It is necessary to choose oils of the appropriate brand; they must have a certain purity. If there are any problems, you will need to change the oil or add it to the gearbox.
The occurrence of noise in the transmission units of a walk-behind tractor can be caused by loose fasteners, so it is necessary to inspect the fasteners, tightening them properly.
The cause of frequent noise is wear of the gears and bearings. This may lead to more serious damage to the walk-behind tractor's gearbox. It is not difficult to avoid their occurrence if you carry out timely inspection and repair of the walk-behind tractor. It consists of the usual replacement of worn components and parts.
If the transmission units of a walk-behind tractor heat up, the following are the main causes of this malfunction:
- Lack of transmission oil in the crankcases.
- Worn bearings.
- Oil condition does not meet the required parameters.
There can be two reasons for correcting deficiencies:
- bearings replaced;
- adding or replacing oil.
In order for a gearbox or homemade gearbox to last longer, it is necessary to periodically check the oil level in them, fearing a sudden change in load.
Signs of disturbances associated with difficulties in switching speeds, spontaneous shutdown, disruption of the process of turning on the unit, arise for the following reasons:
- Worn parts.
- Abrasion of shaft splines.
- Incorrect clutch adjustment.
Rolling (wear) of the ends of the engaged gears causes two problems, leading to self-shutdown or incomplete inclusion of speeds.
Mole cultivator repair and maintenance
During the break-in period of the Krot motor-cultivator, and this is the first 20 hours of its operation, to prepare the fuel mixture, you must use A-76 gasoline with M-12TP or MGD-14m oil in a ratio of 25 to 1. You can use imported Revoll Moto-2ST oil. After the motor-cultivator has run-in the engine, the fuel mixture is prepared in a ratio of 40 to 1.
It is correct to prepare the mixture in a separate container, and it is necessary to thoroughly mix and filter the resulting mixture. The use of automotive oils is strictly prohibited, which can dramatically reduce the service life of the Krot motor-cultivator engine.
To start the cultivator, set the clutch control lever to the disengaged position. Open the fuel valve under the fuel tank. Press down on the carburetor float until fuel appears. Set the carburetor choke control lever to the closed position.
Move the throttle control lever one-third of its travel clockwise. Smoothly pull the starter cord all the way and pull the cord with a sharp movement. By the way, experienced owners of the Mole motor-cultivator advise immediately replacing the cord with a soft metal cable with a diameter of 3 mm, which is both more convenient and reliable.
After the engine has warmed up, the carburetor choke must be opened; to do this, move the throttle control lever all the way clockwise and return it back to the idle position. To start moving, you need to smoothly engage the clutch and lock the lever in this position with a lock.
At the end of the work, before turning off the cultivator, you must simultaneously release the gas and disengage the clutch, let the engine idle for a while, press the engine stop button and close the fuel valve. To avoid overheating of the magneto, restart the engine no earlier than 15 minutes after stopping the engine.
Assembling an adapter for a walk-behind tractor
First they make the frame. It is made from pieces of metal of the required length. The metal is cut with a grinder and the parts are connected by welding or screws.
Then they do the chassis. When the cultivator motor is located at the front, then the track width is determined by the base wheels. The rear ones are attached to the frame using an axle. It must be made from a pipe of the required diameter. Bushings with bearings are attached to its ends.
Then wheels are mounted on them. When the cultivator motor is at the rear, the track width must be wider. Otherwise, the structure will not be able to maintain balance during operation. Then the base wheels of the cultivator need to be removed and fixed to a wide axle.
To make your own steering wheel, you do not need to remove the car handle. If you use a handle from a cultivator, you can control the entire structure using a motorcycle handlebar. But it will be difficult to go back. Therefore, it is best to mount a durable steering column.
Let's consider making a frame for a motor-cultivator trailer. If you take a frame made of solid metal, control will be directed to the front axle of the unit. You can make a frame on hinges, in which case the steering column will rotate completely onto the front frame. To achieve this, a gear should be mounted to the front frame.
The second gear is mounted on the steering column. Then a seat for the tractor driver is made. It can be taken from the car. The seat is placed on the frame by welding. It can be adjusted. This is especially necessary for the front type of device. The driver's seat is now attached.
To attach the trailer to a walk-behind tractor with a plow, you must install a bracket. To operate the mower, you need to make a hydraulic system. To work on the device, you need to weld the tow bar from the car to the rear part, where the metal frame is located. The pump can be borrowed from any unit for agricultural work.
The hitch for the cultivator is U-shaped. For this you need a channel profile. The hitch is installed under the steering column. In this case, you need to drill the holes that are marked on the drawing. The bracket and pin are mounted through them. The components are made of high quality steel. You can also make a caterpillar mechanism.
Thus, all the necessary parts and components of the adapter for the cultivator have been manufactured. Now you need to assemble the entire structure. After this, it needs to be checked and tested in operation. If all components operate normally, then you can begin operating the unit.
General structure and characteristics
The mechanism is characterized by a simple structure and the presence of a small number of components and assemblies. It includes:
- Gasoline internal combustion engine.
- Support frame.
- Gearbox.
- Bracket for mounting additional equipment.
- Engine speed increase handle.
- Starter.
The cultivator has the following characteristics:
- Engine. Two-stroke, single-cylinder. Engine power - 2.6 horsepower. Engine capacity - 60 cc.
- Oil: to add to fuel - M 12 (the proportion of oil to gasoline should be 1k15); for the walk-behind tractor gearbox - MG 8A; for the output gearbox - TAD 17.
- Dimensions: length -1.3 meters; width - 1.06 meters; height - 0.81 meters.
- The fuel tank capacity is 1.8 liters.
- The ignition system is electronic.
How to make a homemade gearbox for a walk-behind tractor
To independently assemble the converting device on a walk-behind tractor, you need to stock up on the following tools:
- calipers and metal ruler;
- a set of screwdrivers of different sizes, including an oblique one;
- pliers and wire cutters;
- metal saw;
- electric drill with a set of metal drills;
- vice;
- hammers - large and small;
- rubber gaskets.
If you decide to assemble the gearbox for your walk-behind tractor yourself, be sure to make an approximate calculation. This will help determine, at a minimum, the gear ratio and type of converter you need.
Also, using preliminary calculations, you can estimate the dimensions of the future transmission device.
To make the correct calculation, determine the parameters of your engine. For calculations it is necessary to clarify several data:
- Engine crankshaft speed. However, this value is not constant: if you “add the gas”, it will increase significantly. Therefore, calculations are based on the base - the number of idle speeds plus 10%.
- Estimated number of revolutions for the suspension axle. It is calculated taking into account the diameter of the wheels to determine the run-out per full revolution. Based on this, you can calculate at what speed the axis should rotate in order to ensure the most comfortable speed of movement of the walk-behind tractor. This is on average from 3 to 5 km/h.
Let's take a simple example: the engine power at idle, taking into account an increase of 10%, is 600 rpm, and to ensure a speed of 3 km/h, a rotation speed of 200 rpm is required.
Therefore, the design gear ratio is 3:1.
In other words, to reduce the rotation speed of the axle by a factor of three to ensure a travel speed of 3 km per hour, the torque increases three times.
Motor cultivator engine repair mole
To repair the connecting rod and piston group, it is necessary to completely disassemble the engine. To do this, you need to remove the hood, fuel tank along with the carburetor, unscrew the spark plug and remove the cylinder head. Next you need to move the piston to bottom dead center and remove the engine cylinder.
Knock out the piston pin and remove the piston. Remove the gearbox cover and drive gear, flywheel, unscrew the crankcase mounting screws and disconnect the right and left halves of the engine. Remove the crankshaft and inspect it, piston and rings. After replacing faulty parts, reassemble the engine in the reverse order.
Repair of the fuel system of the mole cultivator
If a malfunction occurs in the fuel system of the Krot motor cultivator engine, you need to begin the inspection by checking the presence of a fuel system in the tank, in the carburetor (by pressing the float stopper until fuel appears on the carburetor. After this, you need to clean the fuel nozzle.
If the result is negative, it is necessary to remove the carburetor and partially disassemble it. Check the presence of the rubber O-ring on the shut-off valve and clean and rinse the nozzle in gasoline. If these measures do not give a positive result, the carburetor will have to be replaced.
Front and rear adapters
There are several types of trailers depending on which wheels are driving:
- Front-wheel drive. The unit is fixed at the back of the walk-behind tractor. This is the simplest and most popular modification. It makes it possible to easily control the cultivator and perform a large amount of work.
- Rear drive. The unit is located in front of the cultivator. This design makes it possible to perform work when using a hitch located at the rear of the cultivator.
- Four-wheel drive. The trailer can be located either in front or behind the cultivator. This design differs from the previous ones in that not 2 wheels rotate, but all 4 at once. This device performs the functions of a mini-tractor. At the same time, the maneuverability of the structure, its maneuverability increases, and additional traction with the soil is provided. The 4x4 drive is considered the most efficient.
The rear adapter is the most common type of trailer for a walk-behind tractor. It can be used as a trolley (load capacity about 100 kg), for mounting with attachments for plowing, mowing, snow removal, etc.
A trailer with steering allows maneuvers on various terrain, making the operator's work easier. Operating the structure using the steering wheel of the cultivator itself can be inconvenient and dangerous. When working on a field with uneven terrain or in a vegetable garden, it is better to use a trailer with a steering wheel for a walk-behind tractor, as it is easier to control.
In order to make a rear adapter with your own hands, readily available materials are suitable. The basis of the trailer design is the frame; it can be made of metal profiles or metal pipes. The hitch assembly can be movable or rigid. In the second case, the cultivator itself will need to be modified, so creating a movable hitch is less complicated.
The rear adapter is used for work that requires constant supervision (hilling up beds), so the design necessarily includes a seat for the convenience of the operator. The work is also facilitated by the presence of a steering control, which is made from the steering mechanisms of any vehicles.
Troubleshooting the electrical system of the mole cultivator engine
If a malfunction occurs in the electrical system, it is necessary to begin inspecting the engine by checking the spark plug; to do this, you need to remove the hood (the engine must be cold) and unscrew the spark plug. Clean the spark plug from carbon deposits and oil, then rinse in gasoline and dry.
The gap between the spark plug electrodes should be 0.4-0.6 mm. After this, you need to check the spark plug for the presence of a spark and, if there is none, replace the spark plug with a new one. For normal operation of the Krot motor cultivator engine, it is recommended to use A-17V or SI-12RT spark plugs.
If the spark plug is in good condition, then it is necessary to replace the suppressive resistance with the screen (tip of the spark plug), inspect the insulation of the high-voltage wire, low-voltage wire and, if there are any violations, replace them. You can also inspect the state of the stop button for insulation violations.
If checking the above points does not yield results, replace the magneto, which requires removing the engine from the frame. After this, you need to remove the spiral casing with the starter installed on it. Unscrew the flywheel nut and remove the flywheel. Unscrew the screws securing the magneto and carefully remove the magneto along with the high-voltage wire, which can be unscrewed and kept as a spare if it is working.
Possible malfunctions, repairs
Despite the simplicity of their design, Krot motor cultivators are extremely sensitive to contamination of individual components, parts, mechanisms and other components of the unit. Many problems during operation arise due to untimely replacement of consumables and neglect of basic rules for caring for equipment. The ironic slogan “Tanks are not afraid of dirt” does not work in this case.
Let's look at the most common problems and breakdowns that occur in the main components of the cultivator.
Engine
The first samples of Mole cultivators had many complaints specifically from the motors, which were unreliable and had a short service life. Equipment owners modified agricultural machines at their own risk. Often, new engines were installed on the units to replace the ones that had fallen into disrepair from other garden equipment: Forza, Patriot, Sadko, Lifan.
Thanks to factory design developments, cultivator models with engines Honda GC 120, Honda GC 135, Greenfield, GeoTeck, Subaru Robin EY-15D, Hammerman, INNOMOTOR , Briggs & Stratton from well-known Japanese, German, American, Hungarian, and Italian brands appeared.
Thanks to modern engines and innovative developments, the Mole has turned from a once narrowly functional milling cultivator into a universal agricultural machine, which is capable of performing any agricultural work on tillage, cultivating crops, as well as transporting goods and clearing territory.
Therefore, if your Mole motor cultivator still has an old two-stroke engine, urgently replace it with a new model and feel free to expand the functionality of the unit. The most budget-friendly and fairly reliable option is Lifan; “Americans” and “Japanese” will be more expensive, but subsequently they will require much less attention.
If the engine does not start:
- empty fuel tank or poor quality fuel;
- difficulty with ignition;
- consequences of decompression in the form of deformation of the exhaust valve, breakdown of piston group elements - it is necessary to disassemble the engine and replace worn-out parts.
The mole won't start!
Ignition
The ignition may be completely absent or not fire in the following cases:
- If the magneto fails, it is replaced, since the device cannot be repaired.
- If there is no spark, the spark plug may have simply burned out; you should replace it with a new one.
- A sooty spark plug must be thoroughly cleaned and washed with gasoline.
- If there is a spark, but the equipment does not start, pay attention to the condition of the spark plug - if it is damp or wet, it means the insulation has been damaged. To eliminate the defect, it is enough to change the tip. In turn, a wet spark plug is most often caused by low-quality fuel.
- Due to excessive wetness of the spark plug and fuel leakage, there will also be no spark; you should bleed the engine using a manual starter, thereby drying the cylinder.
- Increased gap between the electrodes - it is necessary to set the optimal gap size.
- A dirty air filter is the most common cause of lack of spark, so it is necessary to systematically check its condition and change it in a timely manner.
- The integrity of the fuel line is damaged - the hoses should be replaced.
- Electrical system insulation failure.
- Check the position of the flywheel plates - they may be jamming the magnetic circuits.
Replacing the magneto in the Mole cultivator:
Operation of the Mole cultivator with a repaired ignition
Carburetor
The consistency of processes when starting the engine and its further operation depends on the correct adjustment of the carburetor. The main function of the carburetor is to create a fuel-air mixture, which, after ignition, powers the heart of the cultivator - the motor. Therefore, it is extremely important to adjust it in accordance with the recommendations of the factory instructions. The carburetor requires adjustment after the first season of operation.
Chain reducer
Low price
— Relatively low reliability and average service life. Structurally, the gearbox consists of 2 gears and a chain. The chain does not always withstand peak loads and tends to stretch over time, which leads to repairs (chain replacement).
— The main disadvantage is the excessive rotation speed of the gearbox output shaft in the range of 140 rpm and above. This speed is due to the design features of this gearbox, namely the presence of only 2 gears.
Conclusion: this type of gearbox is suitable for cultivators with a small cutter diameter, and accordingly for cultivators up to 40 kg and a power of 3-4 hp. The small diameter compensates for excess power and the cultivator moves at a comfortable speed.
A motor-cultivator with such a gearbox in the Mobile K line - motor-cultivator Mobile K MKM-MINI
Owner reviews
Andrey, St. Petersburg:
“I bought a Neva MK100 with a Subaru engine and decided to support the domestic manufacturer. The cultivator is good, light, to some extent this is a minus, I would like it to be heavier, but for small areas it’s just right. When I started digging up the area, I made a mistake - I didn’t mow the grass, and it got all wrapped up in the cutters.
Konstantin, Kyiv region:
“I bought the cultivator in the summer based on reviews. I read that Neva does not break and works well, I believed it and bought it. Of the minuses: the belt squeaks, but from the reviews I understand that many people have this problem while it is new. The vegetable garden, unfortunately, is located at an angle, but this did not affect the operation of the cultivator in any way. I liked the powerful engine, I didn’t turn it on at full power, so at 2/3 power I covered all 8 acres.”
Vlad, Irpen:
“I bought a cultivator only because I could get a hoe; working by hand will not be a joy for any harvest. In general, I took the Neva from the last, Mk-100-07, and was impressed by the extensive additional equipment. I have experimentally established that the cultivator drags the trolley normally only when the weight is at least 100 kg; if it is more, it slips and falls over.
Worm gear
This gearbox is the most affordable among other transmissions
It has a very high efficiency, which is achieved by transmitting torque directly from the worm to the shaft gear and there are no belt drives.
— Low reliability
— Short service life
— It is impossible to work with attachments. Since this gearbox has very high peak loads, which the worm cannot always withstand and simply cuts it off.
Conclusion: walk-behind tractors and cultivators with this type of gearbox are suitable for small areas and only for previously cultivated soil. It is advisable to work with a worm gearbox only on cutters, without using various attachments.
Sergey Kuchin | topic author: walk-behind tractors
Hello! Is it worth buying a Forza walk-behind tractor?
Grigoriev (Levar) I don’t know! I tried the Forza engine and didn’t like it! I consumed a lot of gasoline and the vibration was strong.
Nikolay (Ferris) he probably means the Forza walk-behind tractor
Grigoriev (Levar) Perhaps. But I told you about the engine. I’ve never seen a walk-behind tractor like this.
Evgeny (Coffey) There is no ideal walk-behind tractor, take the one that you like. It’s a walk-behind tractor and not a cultivator, so that there are at least two speeds, and a reverse speed, and the rest is that. Almost all of their engines are Chinese and they are made almost in the same place.
Vyacheslav (Yashawn) Normal device, everything is the same for everyone, ray Neva, virgin soil
Valentin (Demetres) I would advise you to pay attention to walk-behind tractors where the clutch and drive are beltless. They are more reliable, although perhaps a little more expensive.
Grigoriev (Levar) For example, Ugra! But I haven’t heard many reviews about it, and the sellers themselves say that it’s not very good. The box is very weak.
Valentin (Demetres) Alas, I won’t say anything for Ugra. I have a Centaur 2070. No complaints. What do the sellers say? Well, for example, if you compare a chain drive and a gear drive, then the choice is definitely in the direction of the latter. Or have you heard about cars with chain transmission?
Vitaly (Haoniyao) A successful comparison of cars and MB!
Sergey (Sedat) Hello guys, this year I took the Neva from a Subaru, so when buying, the seller explained how the Chinese differ from ours, the gears in the gearbox are rural and steel, respectively
Sergey (Sedat) Celumin and steel
max (Resa) I really liked the Ugra. 8 years old, he only changed the old engine and it started to eat up the oil. The engine was stuck in the Lifad engine since there was no Lifanov engine in the store. The champion installed it in the box. walks from the visna until the first snow.
Valentin (Demetres) I already mentioned that almost everyone in our area is Chinese. With a box. and in particular with gears, none of my friends had problems. There have been cases where the chains in the cutter drive of heavy milling machines broke. and as for the “explanations” of the sellers, then, as they say, every frog praises its own swamp. This is a biased expert, IMHO!
Alexey (Bautista) It’s not worth it, if you have money, take it, if there’s something better, take it, the choice always comes down to money, so we’ll take it for what we have.
Evgeniy (Coffey) Of course, the Prado Kruzak has a chain transfer case, and on many jeeps I changed the chain like that and that’s it, instead of an expensive transmission
Valentin (Demetres) Ford, EMNIP, used a chain drive in its first models.
Tags: How to make reverse speed on a walk-behind tractor video
Gear-chain two-stage reducer (1 speed forward, for motor cultivators)
Correct rotation speed of cutters. The design of this gearbox uses 2 chains and a number of gears, which allows you to select the optimal rotation of the output shaft in the range from 80 to 120 rpm. At such speeds, the most effective tillage is achieved.
Attachments can be used. Due to the low speed, you can work with a plow, hiller, potato digger, weeders, etc.
Increased service life and high reliability
- Most often 1 speed. Does not allow high-quality work with a mower, brush, or snow blower.
— The price is significantly higher than a chain gearbox
Conclusion: this type of gearbox should be chosen by users who want to not only cultivate the soil with cutters using a cultivator, but also work with additional attachments - plows, hillers, weeders, potato diggers, etc.
Why buy from us:
– You can shop at competitive prices without leaving your home.
– You do not risk losing your money, because... pay for the goods after making sure that this is the product you need.
– At your request, the equipment will be checked for functionality.
– You will receive complete and competent advice on the selected product, technical characteristics and advice on use.
– When ordering from 3000 rub. The cost of delivery in Moscow will be only 500 rubles. In the Moscow region an additional 30 rubles/km.
– Sending orders to other cities of Russia by transport companies. Delivery from 500 rub.
– Equipment warranty from 1 to 5 years.
– We work quickly and efficiently. Our tel. 7(963)723-00-43.
ATTENTION. Delivery is made for an order amount of 3000 rubles.
Motor-cultivators "Mole", produced by the Moscow MPO named after. V.V. Chernyshova, have become widespread among gardeners, who usually buy them complete with rotors, which is enough for cultivating the soil on individual plots.
In Fig. 7a shows part of a motor cultivator with rotors on the left side. Using this part as an example, we will analyze some of the shortcomings of the “Mole” design, or rather, the shortcomings of its rotors. First of all, we note that the rotor knives are very blunt, and the pins that secure the inner rotor to the gearbox shaft and the outer rotor to the inner rotor protrude too much from the rotor shafts.
As a result, roots and stems of plants are wound around the protruding parts of the pins, which, together with soil, clog the space between the internal rotor and the gearbox housing, as well as between both rotors. All this creates additional load on the gearbox shaft, and the rotors begin to rotate unevenly.
The spring clips that are inserted into the holes in the pins are also too long, which maximizes the possibility of roots and plants getting wrapped around them with the above consequences! Again, the bolts securing the knives to the square flanges of the corresponding rotors are longer than necessary.
I got rid of the first drawback - dull knives - immediately after purchasing the Mole, sharpening them with emery before attaching them to the flanges. I identified the remaining shortcomings after the first spring tillage in 1994 and, of course, eliminated them, which greatly facilitated the further operation of the Mole.
Now a little more about correcting other shortcomings. In Fig. 8, a and b show the diameters of the rotor pipes and the lengths of the pins inserted into the holes of these pipes. It can be seen that pin 1 protrudes from the corresponding pipe by 9 mm, pin 2 by 11 mm. To “recess” the heads of the pins, I made grooves with a diameter of 15.6 mm and a depth of 2 mm in the rotor pipes on one side, and reduced the cylindrical parts of the pins to a length of 44 and 36 mm, respectively, by drilling through holes in them at a distance of 2.5 mm from the ends with a diameter of 2 mm.
Instead of the previous long clamps from wire with a diameter of 2.5 mm, I made rings (like rings for carrying keys) from spring wire with a diameter of 1.5 mm. The ring is inserted at one end into the hole of the pin (Fig. 8, c), fixing it on the pipe. Over 3 years of work, there were no cases of loss of rings during soil cultivation, and the accumulation of roots and soil practically stopped.
I shortened bolts 7 (see Fig. 7) by 5 mm and screwed nuts 5 mm thick on them (2 mm thinner than they were).
I ground all the knives at the point of attachment to the flanges to 6 mm, as shown in Fig. 9, a and b, so that these edges are flush with the edges of the flanges. Then the edges of the knives, shaded with cross lines, were sharpened at an angle of 45° (if when sharpening a knife we remove metal from one side, then when forming a chamfer, from the other).
On the flanges of the left rotors (Fig. 9, b and c), I also ground off the edges at an angle of 45° on four sides at a length of 72 mm. On the rotor flanges on the right side of the gearbox shaft, the edges were ground off on the same sides, but the sharpening was shifted to the opposite edge of the ribs (in Fig. 9, d, the places of such sharpening are opposite the bold lines).
Such modification of the knives and flanges eliminated the sinuses, reduced the accumulation of soil in them and on the flat edges of the flanges and knives, and simplified the operation of the motor cultivator.
Gear-chain reducer (2 or more speeds, for walk-behind tractors)
Correct rotation speed of cutters. Due to several transmissions
You can use attachments for cultivating the land, as well as for utility work: mower, broom, snow blower, etc.
Long service life and high reliability
Smooth shifting and low noise
- High price
— There are gearboxes on the market that have 2 speeds or more, but the gear ratio is incorrect, the speed is too high to work with attachments, you need to study the characteristics.
Conclusion: this type of gearbox should be chosen by users who want to get the most from a walk-behind tractor or cultivator. With such a gearbox you can process areas of up to 50-60 acres easily and comfortably. The reliability and service life of such gearboxes allow you to work with different types of attachments. IMPORTANT to check the minimum speed of a walk-behind tractor with such a gearbox. The rule here is the slower the better!
Types of violations in checkpoints and ways to correct them
If the automatic transmission mechanism has stopped functioning normally, the following types of problems may occur:
- Violation of the kinematic connection inside the gearbox.
- Spontaneous gear shifting or lack of locking.
- Oil leak on the shift shaft.
- Dysfunction of the axle decoupling mechanism.
- No gear shift.
- Gearbox jamming.
If the kinematic connection inside the gearbox is broken or the sprocket in the block breaks, it is necessary to disassemble the gearbox to replace the problematic sprocket.
The cause of an oil leak on the shift shaft may be excess oil in the gearbox, so you need to check the oil level. If the welding connection of the gear breaks, disassemble the gearbox and replace the block shaft.
After draining the excess oil, you should check the degree of wear of the working edge of the cuff on the shift shaft, disassemble the gearbox and replace the part.
After this, engage first gear and tighten the screws securing the board.
For example, having made a mini tractor with your own hands, it is imperative to ensure that the drive is adjusted correctly by changing the tension of the axle axle separation control cable.
To correct the breakdown of any element of the axle decoupling drive inside the gearbox, you should disassemble the gearbox and replace the broken parts.
If a broken spring or worn shift mechanism board retainers are found, the damaged parts should be replaced by adjusting the gear shift.
If it is missing, the shift crayon may be destroyed or the threaded piece of the shift knob may be cut off. After disassembling the gearbox, it will be necessary to replace the defective parts.
If there is no gear shift, you should disassemble the gearbox and replace the worn gear shift fork. If the cause of the gearbox jamming is a broken chain, then it should be disassembled and the chain replaced.