The UAZ 469 car starter performs a very important mission. It takes on the charging current from the battery and starts the car engine. Before the appearance of the starter, the engine was started with a special steel handle. Through the radiator grille, it was inserted with two hooks into a ratchet connected to the crankshaft. By turning the handle clockwise, the driver spun the crankshaft. At this moment, the carburetor sucked in gasoline, the ignition coil supplied a spark to the spark plugs, and the engine started.
Starter UAZ 469: device and repair
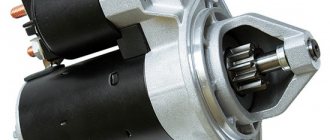
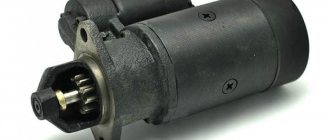
Photo 1: Starter UAZ 469 (Source: Yandex.Pictures)
Troubleshooting wires
Some drivers, in search of a malfunction, are in a hurry to remove the starter, but such hasty actions should not be taken, since often the problem of the engine not starting is due to wires, poor contacts or their absence. Here are the most typical defects:
- low weight of the engine and body;
- unreliable connection of the starter wires (plus of the rotor winding, main plus, power supply contact from the ignition switch to the solenoid relay (SR)).
If there is a bad ground on the engine, a sign of a defect will be a slight click on the first attempt to start, then all the instruments may go out, and with the next turns of the key any signs of “life” will disappear altogether (but not necessarily). Checking the presence of mass is quite simple, but the check needs to be done by two people:
- one of the participants closes the mass terminal of the battery with the engine housing with a metal object (for example, a wrench or a cigarette wire);
- the second person, sitting behind the wheel of the car, turns the key all the way to the right;
- If there really was a bad ground, the starter will immediately start turning at normal speed.
You should also ensure the reliability of all fasteners on the starter; to do this, perform the following steps:
- unscrew all the nuts on the starter, having previously removed the terminals from the battery;
- wipe the joints and fasteners with a dry, clean rag;
- treat contacts with WD-40;
- tighten the nuts with the necessary force; do not overtighten, otherwise you may break the thread.
If the BP wire is connected using a connector, bend the tongue of the “chip”; here the connection should be tight.
When, after cleaning all contact parts, the engine starts, it means that the malfunction has been eliminated, and there is no need to find out what caused the defect. If nothing has changed for the better, then you should definitely check the starter; to do this, the unit will have to be dismantled.
Malfunctions and repairs
In order to properly repair the starting mechanism of the power unit, it is necessary to determine the cause of the breakdown.
The main reasons for the failure of this mechanism include:
- slipping of the freewheel;
- failure of the mechanism shutdown lever;
- premature wear of the handles;
- malfunction of the buffer spring mechanism;
- drive ring wear;
- damage to teeth;
- weak tension of the fastening bolts of the gear mechanism;
- damage to the bearing bushings and journals on the armature;
- weak anchor fastening;
- damage to the traction relay;
- drive jamming on the shaft or drive frame.
Before you begin to repair the electric starter, you must install the vehicle on a special platform or inspection hole and turn off the power unit.
Trouble-shooting
We begin repairing the starter by replacing the front bushing. Auto stores sell repair kits for repairs, but consider which starter you have installed, large, small or with a gearbox. However, stores are already moving away from such sales and most often you can buy the entire part assembled, in this case a mask (nose). Replacement is carried out after complete disassembly of the starter and will not cause any difficulties, just remove the old one and install a new one.
Next, look at the bendix, if the bushing is missing or broken (large play), then it is better to replace it. You can also replace the bushing itself.
When buying a Bendix, pay attention to what kind of bushing it is, it should be bronze or, in extreme cases, copper, since bronze is harder and can withstand the load better, but under no circumstances should you buy one with copper-graphite. Also pay attention to the size of the overrunning clutch; if it is small, then you can assume that it will not last long.
The brushes must be sharpened smoothly, without damage, and pressed tightly against the commutator. Otherwise, replace them. The collector must have a smooth, shiny surface with no signs of sparking (black soot) on the contacts. The photographs below show what they look like.
There will be information about anchor repair in another article. It seems that you yourself understand that if the starter turns slowly, then you can get into a situation where, having turned off the car, you will have to push it to start it, or tow it. And in winter conditions this can be difficult. So don’t delay and repair the starter in a timely manner.
Causes
The front bushing and bendix gear bushing are the most susceptible to wear. The gear bushing plays an indirect role here, since during starter operation it does not rotate relative to the rotor, however, when worn, it removes the gear from the flywheel, which leads to increased pressure on the front bushing and its rapid wear. Therefore, when repairing a UAZ starter, it is better to do it comprehensively.
The front hub especially affects the rotation speed of the starter. If it is severely worn, the armature (rotor) can touch the stator, which has a catastrophic effect on its rotation and will ultimately lead to overheating of the armature and, accordingly, a breakdown in contact (soldering) between the armature winding and the brushes. This can greatly increase the cost of repairs, since the rotor will have to be repaired or even replaced. If contact with the windings is broken, power loss also occurs and it turns slowly.
The starter may also turn slowly due to faulty brushes. If they wear out significantly, they do not press well against the commutator, which leads to an arc and burnout or melting of the commutator. Since its power is quite high, it will continue to rotate the engine until it becomes completely unusable. In this case, you will have to change not only the brushes, but also the anchor.
The anchor itself does not fail, unless it is a manufacturing defect. Most often, the breakdowns described above lead to its breakdown.
UAZ 469 starter does not turn
A car starter is a functional part of the engine's electrical systems, which is necessary to ensure trouble-free starting of the power unit, regardless of operating conditions and external factors.
It happens that when trying to ignite the engine, the starter stops working properly - in this case it is necessary to disassemble the part and carry out repairs or replacement.
ATTENTION! A completely simple way to reduce fuel consumption has been found! Don't believe me? An auto mechanic with 15 years of experience also didn’t believe it until he tried it. And now he saves 35,000 rubles a year on gasoline! Read more"
A car starter is a complex mechanism, the contraction of which is designed for repeated starting without loss of functionality, however, if there are problems with engine ignition in a UAZ 469, the problem probably lies in:
- The starter is locked - in fact, “the device clicks, but does not spin.” In this case, the cause of the malfunction is ground off flywheel teeth due to prolonged use of the device. When the teeth are ground down, the starter spins at idle for a long time, after which the mechanism connects with the remaining teeth of the flywheel and starts the engine;
- Wear of the starter bendix - failure of the bendix in the design of the starting device also leads to problematic engine starts. For example, when turning the key to the ignition position, the relay pushes the bendix forward, but the part itself rotates without engaging the flywheel - in this case, the engine starts and immediately stalls, since the flywheel stands still or is wedged by the shaft;
- The starter speed does not correspond to the norm - this malfunction can only be diagnosed after disassembling the device. The problem occurs when the starter rotation speed is insufficient, as a result of which the device does not set the required intensity of shaft rotation - to eliminate the situation, it is necessary to replace the rotor or stator;
- Open circuit - if, when you try to start the engine, clicks of the solenoid relay are clearly heard, but the engine does not start, then you should look for the fault in the winding of the device or check the functionality of the rotor or stator;
- After starting the engine, the device continues to function - this is an emergency mode that can harm the engine. In this case, the car must be turned off immediately and evacuated to a service station to solve the problem.
Note! Even if minor malfunctions in the operation of the starter are observed, it is necessary to urgently submit the car for diagnostics and, if necessary, replace inoperative components - otherwise the situation may result in expensive engine repairs or a sudden breakdown on the highway
What models of starters are installed on Bukhanka
As standard, this car began to be equipped with a geared starter model, which ensures efficient rotation of the flywheel despite its small dimensions and weight.
1.8 kW is the minimum permissible power for this car. Equipment with less kW simply will not be able to provide the required level of operation or will quickly deteriorate. The most popular devices that are among the approved starters for the UAZ-452:
The price of these starters usually does not exceed 4-4.5 thousand rubles. It is not recommended to skimp on quality by purchasing Chinese analogues, even with the same power. A starter with unsuitable parameters can significantly reduce not only the life of the unit, but also the car engine!
Before purchasing, it is advisable to check the part for compatibility with the machine, just in case. For safe purchase purposes, the starter part number is compared with the UAZ VIN number on the manufacturer’s official website.
Tags: UAZ
Comments 54
Above it was suggested to unhook the wiring from the switch from terminal D from the distributor and connect it to ground (previously, instead of the explosive wire, insert a piece of wire into the coil and place it 5-7 mm from ground) with the ignition on - is there a spark? It always makes sense to have a _tested_ distributor cap, slider, distributor sensor, switch and coil with you.
We should try this
How are you doing, comrade? got out? what happened?
they dragged me)))) after that and I can’t get to it because work keeps me late
How are you doing, comrade? got out? what happened?
I'm blaming the switch, although it's new
Now I’ll say bullshit, but sometimes we don’t even notice the obvious... in the manner of a sudden death. Circuit breakers. Weight. HV wires. Filled it up.
I checked the fuses are intact
Don't you carry a spare switch with you? They sometimes get covered, especially if the mass is bad.
That’s what I don’t drive, now I’ll take half the garage with me for spare parts))))
I still have a Zhiguli, on December 31, when leaving the store, right at the turn the switch burns out, as a surprise. I've been driving ever since.
Do you have a sample? I'll tell you everything point by point
Pull out the central wire from the distributor, lean it against the engine 0.5 cm, turn it with the starter, if there is a spark, check the slider, if not, try to bridge the resistance
The first thing I did was try the central wire to ground and there was no wire. But to bridge the resistance, I’m not very good at electrics.
The box in the photo, the spiral inside, when you start the engine, power goes to the coil from the lock, you release the starter, power goes through the resistance, which reduces the load on the coil.
This happened recently. Cause 100%: the contacts on the contact group were burnt. Those. when you remove the distributor cover you will see contacts (2 pcs). So they got burnt. Cleaning cannot fix it, only replacement (tested).
Do you hear any popping noises when you turn the starter? Is there a spark? Does it catch on? Or completely deaf?
Insert the spark plug wire into the coil and check if there is a spark. If there is one, look at the distributor slider.
no spark, I tried that
Check the distributor. The wiring is attached to it on the side, sometimes unscrewed.
Stands in place and is screwed
He may be standing, but there is no contact. Hanging on one insulation.
Check the plus on the coil, if not, then the variator, whether there is a plus on it from the ignition, check the plus on the switch, if there is, then take terminal D and poke it to ground, while bringing the high-voltage one from the coil to ground, pulling it out of the distributor. If there is, then the sensor in the distributor has run out, if not, then the switch. PS in practice, when there are breakdowns, most often the variator, then the switch, less often the distributor, and even less often the coil.
+ there is both here and there
Check the plus on the coil, if not, then the variator, whether there is a plus on it from the ignition, check the plus on the switch, if there is, then take terminal D and poke it to ground, while bringing the high-voltage one from the coil to ground, pulling it out of the distributor. If there is, then the sensor in the distributor has run out, if not, then the switch. PS in practice, when there are breakdowns, most often the variator, then the switch, less often the distributor, and even less often the coil.
Which sensor is the sensor in the distributor running out?
a thin wire goes to the distributor, it is screwed on the side, unscrew it and poke it to ground, if there is a spark from the central coil, then the sensor has ended in the distributor.
Which sensor is the sensor in the distributor running out?
pull the central one out of the distributor and keep it at a distance of 1-2 mm from the mass
Which sensor is the sensor in the distributor running out?
If there is only one wire coming off the distributor, then it is a contact distributor. The pin on the contact has worn off and it won’t press out. See contact. It was so.
Starter UAZ 469
Power units for Russian UAZ 469 vehicles are produced by two enterprises. These are the Ulyanovsk and Zavolzhsky motor plants. The completion of engines with starters in both companies is carried out by Pramo-Electro LLC, Rzhev, Tver Region. From here, engine builders receive a UAZ 469 starter under the factory catalog number 42.3708.
The starter of the UAZ-469 car is an electric motor that consumes direct current. It contains a series excitation winding. An electromagnetic traction relay and a drive with a freewheel are installed. It is installed on the left side of the engine.
Now the Rzhev plant has mastered the production of a more modern device. The improved automobile starter received a new catalog number 4211.3708-01. The driver turns on the starter remotely using the ignition switch. By turning the key in the ignition, it closes the DC circuit.
Electrical energy from the battery begins to flow to its primary winding, exciting it. At the same time, the retractor relay pushes the working gear. It engages with the toothed flywheel of the engine, performing a rotational movement. The flywheel spins up, all the working parts begin to move, and the power unit starts up.
Device
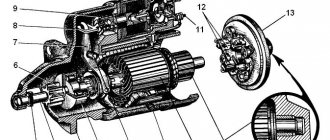
Photo 2: UAZ 469 starter circuit (Source: Yandex.Pictures)
The UAZ 469 starter, number 42.3708, consists of the following elements:
- drive side cover;
- driving ring;
- thrust ring;
- lock ring;
- drive unit;
- anchor;
- frame;
- brush;
- traverse;
- thrust washer;
- adjusting washer;
- lock washer;
- manifold side cover;
- contact bolt;
- contact plate;
- relay cover;
- return spring;
- stock;
- relay armature;
- compensating spring;
- buffer spring;
- gear;
- screw M5x14;
- tie rod nut;
- screw M6x16;
- M8 nut;
- relay coil input;
- screw M6x30;
- lever arm;
- M8 nut;
- lever axis.
UAZ 469 starter maintenance
UAZ 469 starter maintenance:
1. Periodically check the condition of the clamps on the contacts in order to prevent them from loosening, dust, dirt, corrosion, and oxidation.
2. Inspect the collector, remove the protection casing. Eliminate identified defects, clean contacts, lubricate with Litol lubricant.
3. Open cover 13 and check all elements. Clean the contacts and blow with compressed air.
4. Tighten the UAZ 469 starter mounting bolts.
5. When operating a vehicle in a forest, quarry, or rural area, it is necessary to periodically dismantle the UAZ 469 starter and clean it with a wire brush to remove dust, dirt, and deposits.
10000 km
Check the UAZ 469 starter, perform maintenance-1 with the following routine operations:
1.Check the wires.
2.If necessary, tighten loose connections.
3. It must be remembered that a violation of the tightness of the wire from the battery to the starter leads to an increase in the transition resistance in its circuit.
4. As a result, this reduces power and impairs starting.
30000 km
Check the UAZ 469 starter, perform maintenance-2 with the following operations:
1.Remove the protection tape.
2.Blow out the collector with compressed air.
3.Check the brushes and commutator.
4. Eliminate defects.
Once every year, but at least every 25,000-30,000 km of the vehicle, it is necessary to remove the UAZ 469 starter. It should be disassembled, thoroughly wiped and the parts blown with compressed air. If defective parts, assemblies, or mechanisms are identified, replace them with new ones or repair them. Assemble, adjust, perform control check.
Starter repair
Disassemble the starter in the following order:
- Unscrew nut 26 (see Fig. 261) and disconnect the terminal from contact bolt 14.
- Unscrew screws 28 securing the traction relay to the cover on the drive side and remove the relay.
- Unscrew nuts 24 on the tie rods.
- Unscrew two screws 25 and remove the cap.
- Remove the locking 12 and adjusting washers 11.
- Remove cover 13 from the manifold side.
- Remove the brushes 8 from the brush holders and remove the traverse 9.
- Remove housing 7.
- Unscrew the nut securing the lever axis, unscrew the lever axis 31 and remove the lever 29.
- Remove the armature 6 with the drive assembly from the cover on the drive side.
- Move thrust ring 3 to the left, remove lock ring 4 from the shaft, and then drive 5.
- To inspect the contacts of the traction relay, unscrew two screws 23, unsolder two inputs 27 and remove the relay cover 16.
Rice. 261. Starter 42.3708:
1-cover on the drive side; 2-lead ring; 3-thrust ring; 4-lock ring; 5-wheel drive; 6-anchor; 7-body; 8-brush; 9-traverse; 10-thrust washer; 11-adjusting washer; 12-lock washer; 13-cover from the collector side; 14-pin bolt; 15-pin plate; 16-relay cover; 17-return spring; 18-rod; 19-relay anchor; 20-compensating spring; 21-buffer spring; 22-gear; 23-screw M5x14; 24-nut tie rod; 25-screw M6x16; 26-nut M8; 27-relay coil input; 28-screw M6x30; 29-lever; 30-nut M8; 31-axis lever
Thoroughly clean the parts from dirt. Inspect and check the starter parts and assemblies. Replace damaged parts.
Frame
Using a special device or a test lamp connected to the AC network, check whether the field winding coils are shorted to the housing.
When checking with a test lamp, connect it to the housing and the terminal located on the housing (Fig. 288). If the lamp is on, this indicates damage to the insulation of the field winding coils. In this case, number the poles of the coils, unscrew the screws securing the poles and remove the field winding coils. Wrap damaged areas of insulation with insulating tape. After this, install the poles and coils in place. Tighten the pole screws.
Rice. 288. Checking the short circuit of the field winding coils to the housing
Collector side cover
Using a special device or a test lamp, check whether the insulated brush holders are shorted to the housing (Fig. 289). If shorted, replace the insulating gasket and brush holder rivet bushing. The brushes in the brush holders should move freely, without jamming. Check the condition of the bearing bushing in the cover and replace if worn. The hole diameter of the new bushing after pressing and reaming should be 12.5+0.035 mm with a surface roughness of class 8. If the height of the brushes is less than 6 -7 mm, replace them.
Rice. 289. Checking the short circuit of insulated brush holders to the body
Drive side cover
Check the condition of the bushing (bearing) in the cover and, if worn, replace the bushing. The hole diameter of the new bushing after pressing and reaming should be 12.5+0.035 mm with a surface roughness of class 8.
Rotor
Using a special device or a test lamp, check whether the rotor winding is shorted to the rotor iron cage. To do this, connect one end to any of the rotor lamellas, and the other to the rotor iron package. In this case, the lamp should not light (Fig. 290).
Rice. 290. Checking the short circuit of the rotor winding to the rotor iron package
Carefully inspect the rotor. The front part of the rotor winding should be smaller in diameter than the iron package. The increased diameter of the part of the winding in front of it indicates the “spacing” of the winding. Replace this rotor. The ends of the winding wires must be securely soldered to the collector terminals.
Part Specifications
This is how the starter works
The UAZ starter has a torque of no more than 1.6 kgf/m, and a rated power of 1.7 kW. The armature shaft has a clutch and a drive gear. The first element transmits torque in one direction - from the device in question to the motor.
The diagram allows you to find out whether the gear starter is working or not. As for the drive, its suitability is determined by external inspection after disassembling the main unit. The condition of the brushes and commutator is checked in the same way. The first parts are replaced with new ones, and the second ones are degreased with gasoline.
Auto mechanics recommend periodically inspecting the gear starter. Necessary:
- check the condition of the clamps (they should not be dirty, and the fastenings should not be loose);
- remove the casing and inspect the collector (if necessary, troubleshoot problems);
- open the cover, inspecting and cleaning the contacts;
- tighten the main unit housing fixing bolts;
- remove the device in question to remove dirt.
Every 32,000 km, it is recommended to carry out some maintenance work on the main unit. To do this you will need:
- remove the gear starter from the engine;
- check the commutator and brushes (if the height of the latter elements is less than 6 mm, then they are replaced);
- disassembling the starter (replacing worn parts);
- During the assembly process, bearings, bushings and other components are lubricated.
Every 32,000 km of the vehicle, perform the following maintenance work on the starter:
1. Remove the starter from the engine. 2. Check the condition of the commutator and brushes. Make sure that the brushes do not jam in the brush holders. If the brush height is less than 6 mm, replace them. 3. Disassemble the starter. Replace worn parts. 4. When assembling, lubricate the bearings and shaft journals with engine oil. Lightly lubricate the splined part of the shaft, drive outlet bushings, pins and lever axis with Litol-24 grease.
When I was looking for why the starter might not work, I found this picture from the instruction manual for UAZ vehicles.
Main faults of the UAZ-469 starter
What to do if the armature does not rotate when you turn on the starter.
| Probable cause of the malfunction | Remedy |
| Contact between brushes and commutator is broken | Remove the starter from the engine, disassemble it and eliminate the cause of the malfunction |
| There is no contact in the starter traction relay switch | Disconnect the wires from the starter, remove the switch cover with terminals. If the contacts are burnt, clean them. Rotate severely burnt contacts 180° around their axis |
| Broken connections inside the starter or in the traction relay | Repair the starter in a workshop |
| There is no reliable contact in the ignition switch at terminal “C” | Check the circuit using a test lamp connected to terminal C and ground. If there is no voltage at terminal “C” in the position corresponding to the starter turning on, replace the ignition switch |
| The winding is broken or the contacts in the additional relay are burnt | Check the circuit with a test lamp. The lamp connected to terminal “K” of the additional relay and ground should light up when the starter is turned on. If the lamp does not light, then disassemble the relay and clean the contacts |
| The armature is stuck in the sleeve of the electromagnet coil | Clean the armature, relay and bushing from dirt. If there is displacement of the traction relay relative to the starter lever, have it repaired in a workshop. |
What to do if, when the starter is turned on, the engine crankshaft does not rotate or rotates at a low speed.
| Probable cause of the malfunction | Remedy |
| Battery is discharged or faulty | Check the battery and replace if necessary |
| Short circuit of the armature or field coils or the armature touching the poles | Repair the short circuit or send the starter to a workshop for repair. |
| The engine crankshaft is difficult to turn | In winter, warm up the engine |
| The starter power supply circuit is broken due to loose wire ends | Inspect the entire starter power circuit, tighten all clamps |
| Severely worn bearings | Send the starter to a workshop for repair |
What to do if, when turned on, the starter shaft rotates at a high speed, but does not turn the engine crankshaft.
| Probable cause of the malfunction | Remedy |
| Broken flywheel teeth | Change the crown |
| Roller freewheel slips | Change the starter drive |
What should you do if, when you turn on the starter, you hear a repeated strong knock of the traction relay and the gear on the ring gear, but the engine crankshaft does not turn.
| Probable cause of the malfunction | Remedy |
| There is no reliable contact in the clamps, especially on the battery | Check and tighten clamp bolts |
| Battery is discharged or faulty | Check and charge the battery or replace it |
| The holding winding of the traction relay is faulty or its contact with ground is poor. | Replace the winding or ensure reliable winding contact |
What to do if the starter does not turn off after starting the engine.
| Probable cause of the malfunction | Remedy |
| The drive jams on the armature shaft | Disassemble the starter and eliminate the cause of the jamming |
| Sintering contacts of a traction relay switch or an additional relay | Fix the problem or replace the relays with new ones |
What to do if the starter switches on automatically when the car is moving.
| Probable cause of the malfunction | Remedy |
| The locking part of the ignition switch is stuck | Replace the ignition switch |
Lighting, light and sound alarm system UAZ-469
Purpose of the starter retractor relay
As you know, a starter is an electric motor that is powered by a battery. When starting the engine, the starter gear must quickly engage with the flywheel ring of the engine crankshaft. At the same time, the starter electric motor is turned on, which rotates the crankshaft - this process in action is clearly visible in the animation below.
The starter solenoid relay is responsible for quickly connecting two toothed parts: the flywheel and the overrunning clutch gear (Bendix). The retractor relay is installed on the starter housing, connecting to the clutch in the front using a lever. If the relay does not push the gear forward, then the starter rotates on its own.
However, the culprit of such a malfunction may be not only the retractor relay, but also the overrunning clutch (read more about Bendix repair). If the clutch is jammed, then the force of the retractor relay is not enough to extend it.
Checking the starter retractor relay
To determine the reason for the lack of connection between the gear elements of the starter and the engine, you should check the functionality of the solenoid relay. For ease of diagnosis, most often it is necessary to dismantle the entire starter.
Unit connection
Unit connection diagram
For convenience and understanding of the actions carried out with the generator, it is recommended to study the connection diagram. The figure shows a diagram of the wires that are used during the charging process.
Particular attention must be paid to the size of the belt, which is an important component in the operation of the generator. UAZ is usually equipped with a belt 6 РK 1275
Any work is carried out in stages. The success of the operations depends on compliance with the sequence of actions. To connect the generator to the car system, just follow 5 simple steps.
- The first step is to turn off the electricity supply.
- Turn on and warm up the gas generator.
- Connect the unit to the network.
- Disconnect the generator from the backup network and turn it off. If this is done incorrectly, the unit may be damaged and become unusable.
- Connect the power supply.
Unit connection process
The vehicle must be prepared for repairs. Before turning off the generator for replacement, you must place the vehicle on a level surface and secure it. A prerequisite is to clean all elements of the machine, including the bottom.
Work should only be carried out in the presence of a mechanic. Repairs in a workshop will cost more, but the quality of the work will be much better. You should consider the price of the generator itself. Since the market situation is unstable, the cost of the unit can change quickly
When purchasing new equipment, you should pay attention to the warranty period and workmanship. It is recommended to purchase products only from well-known manufacturers
When the generator fails, it is often necessary to change the belt. To do this, you need to do a few simple steps. The drive belt is removed from the car. The tightened bolt should be loosened slightly, but not completely unscrewed, this will reduce the belt tension. Next you need to install a new belt. In this case, it is necessary to comply with all standards, the main one of which is a weakening of no more than 15 mm with a load of 8 kgf. The load should be applied in the middle of the mechanism. After checking, tighten the adjusting bolt and install the drive belt in its original place.
Dismantling
In Bukhanka, the starter is located under the engine on the driver's side. For convenience, the machine is raised and the device is removed from under the bottom. The process will require the following tools and equipment:
The starter must be removed after de-energizing the system, dismantling the crankcase protective lining and the plastic dust cover. All wires that are routed to the starter must be unscrewed. The electric motor on the UAZ-452 is usually attached to the combustion engine compartment with two bolts - top and bottom.
Source
Period from 1965 to 1984
During this period, the automaker equipped its products with electrical components available to the domestic industry. Some of them were known for a long time, others were experimental, as evidenced by videos from previous years, and which had to prove their suitability.
Lighting control
In particular, the controls and a number of main units migrated from its predecessor, the GAZ-69. Thanks to this, the price of the car remained the same.
On models of the first years of production, a foot light switch was installed, which had several operating modes:
- The first position activated the circuit for switching the low beam headlights and side lights;
- In the second position, the low and high beam headlight circuit was activated.
The modernized light switch has a different operating algorithm:
- The first position supplies power to the side lights only;
- The second position is side lights and low (high) beam headlights.
The most correct option is to replace the old switch with a modern one, which uses only 3 contact groups.
Also, on older versions of the “452” there was no alarm, so in the electrical diagram:
- An RS-57 breaker relay was installed (mounted in the wiring gap from the “+” terminal of the battery to the direction indicator switch);
- The middle contact of the relay closed the indicator light on the instrument panel.
Ignition system
Also on the “452” contact ignition was installed:
- The “+” wire from the battery supplied power to the ignition coil;
- From the coil, the high-voltage wire transmitted the impulse to the breaker (distributor) and further to the spark plugs.
Period from 1985 to 2013
In later modifications, with the advent of injection, some changes were made to the ignition:
- An additional resistance was installed in the “battery-ignition coil” circuit;
- A separate wire from the starter was laid to the coil wire connection terminal (past the additional resistance)
- On later models, an additional starter relay was installed in the circuit.
Conclusions: along with the car, the electrical circuit also changed. This factor should be taken into account when carrying out scheduled repair work in order to eliminate emergency situations.
The UAZ starter can be presented in the form of various units. These models have almost the same design.
The gear starter has 4 poles and 4 brushes. It is attached to the crankcase using 2 studs.
Starter for UAZ 469: time-tested options
A car starter is a complex mechanism that is used quite intensively - failure of the starting device is not a rare case. For the UAZ 469 model range, starters with a supply power of at least 1.6 kW/h are suitable - purchasing a device with a lower power will not ensure uninterrupted engine starting in aggressive conditions and will quickly “burn out”.
| Manufacturer | vendor code | Mechanism type | Device power, kW/h | Approximate cost, rub. |
| PRAMO-ATE-1 | 5742.3708 | Geared | 1.7 | 3800 |
| PRAMO-ATE-1 | 5742.3767 | Geared | 1.7 | 3950 |
| KZATE | 42.3708000 | Geared | 1.6 | 3400 |
| KZATE | 42.3708000 | Geared | 1.6 | 3550 |
| BULSTART | 42.3703400 | Geared | 1.8 | 3900 |
| BULSTART | 2.3708000-11 | Geared | 1.8 | 4100 |
| BULSTART | 2.3708000-11 | Geared | 1.8 | 4140 |
Starter connection diagram
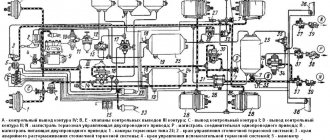
Photo 3: UAZ 469 starter connection diagram (Source: Yandex.Pictures)
Connection diagram of the UAZ 469 42.3708 starter in the vehicle’s on-board circuit:
- ground switch;
- rechargeable battery;
- additional starter relay;
- ignition switch (lock);
- voltmeter;
- contact disk;
- pull-in winding;
- holding winding;
- UAZ 469 starter traction relay;
- UAZ 469 starter.
How to remove
Algorithm for removing a node:
- Disconnect the battery from the vehicle's on-board network.
- Remove the rubber cap and unscrew the nut holding the power supply terminal on the traction relay.
- Remove the terminal from the bolt, and then unscrew the nut holding the positive power wire of the motor windings.
- Remove the terminal and then proceed to unscrew the connections holding the starter to the clutch housing.
- Unscrew the bottom bolt using a spanner or socket wrench, and then remove the nut screwed onto the stud located on top of the electric motor.
- Separate the starter from the crankcase for subsequent disassembly.
Removing and disassembling starter 42.3708 UAZ 31519
You will need: keys “8”, “13”, “19”.
1. Disconnect the wire from the negative terminal of the battery.
2. Disconnect the wires from the two starter traction relay terminals.
3. Unscrew the two nuts of the upper and lower fastenings and remove the starter.
4. Clean the starter from dirt. Unscrew two screws 1 and remove cover 2. Unscrew nut 4 and disconnect bus 3 from the traction relay terminal.
5. Remove the locking ring 1. Unscrew the two fastening nuts 2 and remove the cover 3 from the manifold side.
6. Unscrew the two screws 1 of the fastening and remove the traction relay 2. The armature should remain on the drive lever.
7. Using a screwdriver, remove the rubber seal of 1 lever. Remove the armature 2 traction relay by pressing the armature down and disconnect it from the lever.
8. Remove stator 1 with brush holder 2. In order to disconnect the brush holder from the stator, it is necessary to press the ends of springs 3 and remove two insulated brushes 4 from the holders (these brushes remain on the terminals of the stator winding).
9. Turn out the lever axis, having first unscrewed the lock nut on the other side.
10. Remove cover 1 from the drive side and remove lever 2.
11. Knock thrust ring 1 through the mandrel in the direction of the arrow and remove the retaining ring installed under the thrust ring. Remove the starter drive 2 assembly from the armature shaft.
Video about “Removing and disassembling starter 42.3708” for UAZ 31519
Repair of starter (Belarusian) GAZelle, Sobol, UAZ.
Source
Why doesn't the starter work?
A car starter is an electric motor that is powered by a battery and is designed to start a gasoline or diesel engine. For this reason, this device is prone to both mechanical failures and problems in electrical power circuits or problems in the contact area. If the car's starter does not respond to turning the key in the ignition and does not make sounds (for certain problems, the starter clicks or buzzes), then the check should begin with the following:
- determine the full charge of the battery;
- carry out diagnostics of the ignition switch contact group;
- check the traction relay (retractor)
- check the performance of the bendix and the starter itself;
The ignition switch contact group can be checked very quickly. To do this, just insert the key and turn on the ignition. The lighting of the lights on the dashboard will clearly indicate that the contact group is in working condition, that is, you should look for problems in the ignition switch only if the indicated lights on the dashboard do not light up after turning the key.
In the case of a suspected battery, it will be enough to turn on the headlights or headlights, and then evaluate the lighting of the light bulbs on the dashboard, etc. If these energy consumers light up very dimly or do not turn on at all, then there is a high probability of a deep discharge of the battery. You should also check the battery terminals and the ground connection to the body or engine. Insufficient or no contact at the terminals or ground wire will result in severe current leakage. In other words, the starter will not have enough power from the battery to start the engine.
To check the battery on a car with your own hands, you need to remove the negative terminal, after which the voltage at the battery outputs is measured with a multimeter. A reading below 9V will mean that the battery is low and needs to be charged.
The presence of characteristic clicks from the starter when trying to start the engine, which are also accompanied by a noticeable decrease in brightness or complete extinction of the lights on the dashboard, indicates that the solenoid relay is clicking. The specified relay can click both in the case of a discharged battery, and as a result of malfunctions of the retractor or starter itself.
UAZ Bukhanka starter: where is it located, how to remove, replacement
A faulty starter relay is often the reason why the car refuses to start when the key is turned in the ignition. Perhaps these are not the most pleasant moments in the life of any driver. Therefore, in such cases, it is important to know how to check the starter solenoid relay, and how to start the car if it does not work.
- We will tell you about the purpose of the starter solenoid relay and its structure, how you can check it and perform simple repairs yourself.
- At the end of this article, watch the video that shows how to start your car if the starter solenoid relay is not working.
- Also on our website you can find information about other common causes of starter malfunction with step-by-step instructions on what to do if the starter does not work.
When, when you turn the key in the ignition switch, you can clearly hear that the starter is idling, then the cause of this malfunction may be the solenoid relay. But before you start diagnosing it, you should know the purpose of this electrical unit.
Historical reference
Traditionally, the UAZ 469 was produced in two versions:
- Cargo-passenger version - 7 seats and 100 kg of luggage;
- Commander version - 2 seats for passengers and 600 kg of luggage.
Industry standard 1945
According to the old vehicle classification system, in force since 1945, the UAZ 469 was produced under this name, using an alphanumeric name:
- The letter abbreviation UAZ stood for Ulyanovsk Automobile Plant;
- 469 is a serial factory index assigned by the enterprise itself to its models and developments.
1966 Industry Standard
Although at the time of the release of the UAZ 469 (1972) a new industry classification system was adopted (industry standard OH 025270-66), the car plant continued to use the name according to the old standard.
However, in 1985, the automaker was forced to change its name in accordance with current requirements:
- the car was assigned a four-digit number - 3151;
- According to the new system, the car can be called in the documentation as UAZ 3151.
The car plant named all further modifications and new models in accordance with current standards. In particular, the UAZ Patriot, which appeared in 2005, according to the industry classification, received the “correct” designation - UAZ-3163. For greater identification, the factory instructions contained both names.