A mini tractor is an indispensable agricultural equipment for cultivating land, planting seeds and harvesting crops. This technique is especially in demand in the countryside, among owners of large personal plots. The cost of factory-made mini tractors is quite high. Even the latest Chinese-made technology is sometimes not affordable for everyone. Therefore, more and more home craftsmen are trying to make a mini tractor themselves, using available materials.
If you decide to assemble a mini tractor with your own hands, then first of all you need to select a power unit for it. The ZID engine is often used as the latter
. This is a four-stroke unit with a volume of 0.52 liters. and a power of 4.5 l/s, which is quite suitable for cultivating 2-3 hectares of land. The engine is easy to maintain, so it is often installed on various home-made equipment; moreover, it is easy to buy on the Internet.
Another option for homemade is. This is a two-cylinder unit with a power of about 12 l/s and a volume of 0.42 l. Although this type of motor has long been discontinued, there are a large number of offers on the Internet for the sale of this unit. It can be bought for approximately 5,000 – 8,000 rubles.
Often, when making homemade tractors, craftsmen use motors from cars. For example, you can find mini tractors with an Oka engine.
This engine has a power of 29.3 l/s and a volume of 0.649 l. In fact, this is a VAZ engine (VAZ 21083), only in a lightweight version, since it weighs 2 times less. A distinctive feature of the Oka engine is its low gasoline consumption and high efficiency.
A more expensive option is a Zhiguli engine.
. The engines of the VAZ car line have an engine power of 59 l/s (VAZ 2101) and higher. A tractor with a VAZ engine is a fairly powerful unit that can cope with almost any agricultural work.
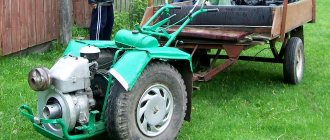
It is easiest for owners of walk-behind tractors to make a mini tractor for the household, since this unit already has all the necessary control units. All that remains is to make a suitable frame, and the tractor is ready.
Homemade equipment: how to make a mini tractor with your own hands
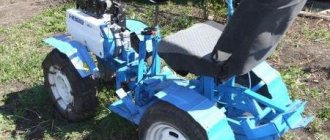
Agricultural walk-behind tractors have one serious drawback - the operator has to walk along the cultivated area with them. As a result, fatigue sets in quite quickly, and the time it takes to complete work increases, which leads to a sharp decrease in the efficiency of labor costs. Another thing is a mini-tractor, which has a full wheelbase and steering. But not everyone can afford to buy such equipment. Therefore, in the agricultural environment, you can increasingly find homemade mini tractors, which are designed on the basis of professional or semi-professional walk-behind tractors.
Converting a walk-behind tractor into a mini tractor: main points
Unlike amateur equipment, professional and semi-professional equipment has a greater service life and power. For example, from a walk-behind tractor with a 9 hp diesel engine. you can make a pretty decent mini-tractor for plowing and cultivating. Ultimately, it all depends on the goals that the owner of the modified equipment intends to achieve.
Designing and assembling a homemade mini tractor is not an easy task, but it is doable. And to solve it successfully, you need to focus on two points:
- Development of a body and frame, as well as a diagram of their connection with the base of a mini-tractor - a walk-behind tractor.
- Development of a kinematic scheme.
The frame and body of a homemade mini-tractor are made of metal corners or profiled pipes. When calculating the structure, it is necessary to take into account the ratio of its weight to the power of the motor, as well as the resistance that the machine will overcome when performing various types of work.
If you choose a powerful walk-behind tractor as the basis for a homemade mini tractor, this allows you to use ready-made car or motorcycle trailers. Moreover, leading manufacturers of walk-behind tractors have long provided for the design possibility of connecting such trailers to their manufactured equipment.
The kinematic diagram of a homemade mini-tractor is a set of design solutions that ensure the transmission of torque from the walk-behind tractor engine to the drive (mainly rear) wheels. When calculating, it is necessary to distribute the load on the drive axle evenly - both reliability and durability, as well as functionality, that is, the possibility of using the equipment, directly depend on this.
Application area
A self-made all-wheel drive mini tractor has quite good cross-country ability, which gives it the opportunity to perform virtually the same scope of work as store-bought counterparts, such as Uralets, Kubota, Bulat 120, Yanmar, Belarus 132n, Scout.
Of course, the power of a homemade unit may be somewhat weaker, but at the level of domestic use this fact is almost unnoticeable.
The main area of application of this DIY unit is agricultural work. This term covers a fairly wide spectrum, including many related works. In other words, a homemade mini tractor is needed for the following purposes:
- plowing of land holdings for the purpose of their further use;
- cultivating the soil and getting rid of weeds;
- harrowing the soil;
- carrying out sowing work on treated soil;
- planting and digging potatoes.
In principle, this is the main purpose of a mini tractor, for which it is made. But, its application can be significantly expanded if a special connection for additional equipment, mounted and trailed, is provided in its design.
If everything is done correctly, then your homemade product can additionally perform the following work:
- transportation of various goods (transportation of firewood, construction waste, etc.);
- snow removal in winter;
- mowing lawns and lawns, as well as making hay for livestock.
As we can see, a mini tractor breaking a classic 4x4 with your own hands can significantly make the life of any rural resident easier, because with the help of this equipment it becomes possible to perform all types of work that are required for proper management of a subsidiary farm.
The indispensability of a home-made unit is also due to the fact that its production uses a minimum of investments and funds, which is very important for rural areas.
For more information about the operation of an all-wheel drive mini tractor, watch the video:
DIY mini tractor: where to start?
In fact, there are many options for constructing a mini tractor yourself. However, the principles used are approximately the same everywhere:
- The gearbox rotates towards the operator and is fixed on the frame.
- Control is realized using steering rods.
- A hydraulic drum brake is used.
- The brake and clutch are pedal controlled.
- Manual control is used for the accelerator and attachments.
- The operator's seat is located above the rear drive axle.
One of the easiest ways to create a mini tractor with your own hands is to buy an adapter - a two-wheeled cart with a seat for the operator and an aggregate system (for installing attachments).
Obviously, to assemble a mini tractor you will need various spare parts. They can be easily found among automobile ones. For example, the drum brake for the drive wheels, steering rack and pedal control units can be taken from a VAZ passenger car. In the same way - by searching the auto parts market - manual controls, a seat, and other structural parts for a homemade mini-tractor are selected.
But in addition to spare parts, you need to have a whole arsenal of tools on hand - a welding machine, drill, circular saw, wrenches, etc. And it is very desirable that during the process of assembling a mini tractor you have access to a specially equipped workshop or, if necessary, you can use the services of specialists in welding, milling, plumbing and auto repair.
Additional tips and warnings about the mini tractor
If you have a sufficient amount of money, then you can buy some old Zhiguli, Oka, walk-behind tractor to use it as a “donor” for a future homemade mini tractor.
You can purchase it without documents, and it’s quite used, so its cost will be approximately 25-30 thousand rubles, which is relatively little compared to a ready-made mini tractor.
The essence of this advice is simple: in order not to look for spare parts and parts everywhere, you can take everything from one machine, i.e. gearbox, clutch, etc. By the way, the car body can then be sold.
Also important is the registration of a home-made unit with the traffic police. Of course, you don’t have to do it if you don’t plan to travel outside your garden, but for those who plan to use public roads, this action is necessary.
The fact is that a minitractor, even a homemade one, is classified as special equipment, and therefore requires mandatory registration with the inspectorate. If you do not comply with these rules, the employee may impose a fine on you, and the vehicle itself may be removed to the impound lot.
Mini tractor frame
The chassis is the basis of a mini tractor. Its main quality should be reliability, but you need to carefully monitor the total weight of the structure in order to ensure normal adhesion of the wheelbase to the soil when performing work and at the same time not to overload the engine.
To make the frame of a homemade mini tractor of medium power, a lightweight channel, profiled pipe or metal corner is suitable. The dimensions of the structure, the assembly of which is carried out by welding, must correspond to the dimensions of the machine. It is necessary to make holes along the contour of the frame for hanging and securing the structural elements of the mini tractor.
The ratio of the weight of the frame and its strength must be optimal. You should not overload the structure with additional stiffening ribs, nor should you skimp on metal, sacrificing overall reliability indicators.
Before you begin assembling the frame, you need to decide what trailers and attachments you are going to use when working with it. And in order not to lose your thoughts during the design process, before starting work you should make drawings of the future machine and its main components with the main dimensions. To do this, you can use ready-made documentation, which needs to be adapted to the specific parameters of your mini tractor.
The nuances of making a caterpillar tractor
Homemade tracked mini tractors are a technique whose main feature is high maneuverability and good cross-country ability.
. Also, a tractor on tracks creates minimal pressure on the soil, which cannot be said about its wheeled counterpart.
To make a mini tractor on caterpillar tracks, you will need the following structural elements.
- Frame. It is made from a profile pipe or channel.
- Engine. For a caterpillar mini tractor, it is better to use a diesel engine.
- Main bridge. As in the manufacture of a wheeled tractor, for a tracked unit you can also use a ready-made axle from an old car, which should be shortened.
- Transmission. The ideal option would be a box from GAZ-53.
- Clutch. A clutch block from a GAZ-52 will do.
- Caterpillars. They are made from tires from the wheels of large equipment, for example, from a tractor.
For making caterpillars
you need to take 2 tires from a tractor and cut off the side parts of them. These tires are then put on the wheels mounted on the frame, as shown in the following photo.
So that the tractor can turn
, on the rear axle you need to install a differential that will disconnect the right or left wheel from the drive. Also, each wheel must be equipped with a brake that can be controlled separately. When you press the brake pedal and shift the differential, one wheel of the drive axle stops, while the opposite wheel continues to rotate. Due to this, the tractor turns in the desired direction.
In rural conditions, the main assistant is a tractor. For small farms, compact models, characterized by economical consumption and versatility of use, will be relevant. Small motorized agricultural machinery is offered to users by popular manufacturers, but skilled craftsmen are able to independently assemble the optimal device for their needs, for example, a fractured mini tractor.
Front and rear axles
These units are created from individual spare parts and units removed from cars or even trucks or other agricultural equipment. However, you will have to do some details, as well as the assembly itself, yourself.
To make a front axle, you will need:
- cross beam;
- bushings for supporting rotary axles;
- axle bushings;
- the axles of the wheels;
- bearings (ball and roller);
- bolted connections.
A piece of profiled pipe or metal corner will do the job perfectly as a cross beam. For the manufacture of axle shaft bushings, structural steel 45 is suitable. The rotating support bushings are made of profiled pipe, modified for the installation of bearings, and are closed with steel covers made of steel grade St3. The front axle assembly, consisting of a cylindrical race and roller bearings, is welded in the center of the cross member. Using large bolts, the bridge must be secured to the bushings in the cross member of the frame.
The tightening force of bolt connections is responsible for the amount of play of the front axle relative to the design of the mini tractor. Too tight, as well as too loose fastening has a negative impact on driving comfort, so the play must be optimal.
The rear axle is assembled in the same way. The finished design can be borrowed, say, from a UAZ car. The long stocking of such a bridge will need to be shortened so that standard short axle shafts can be used. It wouldn’t hurt to protect the rear axle, or rather its welded joints, from possible impacts during operation. For this purpose, a support is used - a metal corner placed along the welds of the prefabricated bridge structure.
Wheelbase and kinematic diagram
The choice of wheels for a homemade mini tractor deserves special attention. It is quite possible to use wheels from a passenger car, but the dimensions must be observed here. The optimal dimensions of wheel rims for the front axle are 12-14 inches. When choosing a smaller diameter, there is a risk that the machine will bury its nose into the ground during operation. On the other hand, if the front wheels are too large, the operator will have to exert considerable effort to perform maneuvers. However, to facilitate the process of driving a car, you can always use the power steering from a passenger car or other agricultural equipment.
Mini tractor wheel tires must have developed lugs. This will increase the maneuverability of the machine, reduce the load on the chassis and facilitate the control process.
As for the kinematic scheme, it is better to use ready-made options, the search for which currently will not take much effort. The diagram must be adapted to the parameters of the components that you are going to use to create a mini tractor. It would be useful to consider the possibility of connecting attachments, which will greatly increase the functionality of a homemade machine.
Pros of installing hydraulics
Hydraulics are installed on a minitractor in order to ensure the operation of some of its mechanisms and facilitate the control of this unit. A unit with installed hydraulics has its advantages.
- The car becomes easy to control. The steering wheel can be turned with virtually no effort, with one hand.
- Hydraulics makes it possible to use various attachments.
- The use of hydraulics allows you to modernize the brake system. Thanks to the hydraulic cylinders installed on the unit, the unit brakes instantly.
You can make hydraulics on a mini tractor if you purchase a ready-made system in advance in a store or use parts from old agricultural machinery.
Important! When installing hydraulics on a mini tractor, it should be taken into account that some of the engine power will be spent on servicing this unit. Therefore, for tractors with low-power engines, installing hydraulics will not bring any benefit.
Control system and operator seat
After manufacturing and installing the chassis, you can begin to implement the kinematic diagram and install the control system. The most important thing in this matter is to place the operator's seat correctly. The front seat of a passenger car, which is easy to find at car services and in workshops that dismantle vehicles, will do an excellent job of this role.
The steering wheel should be set at the optimal height for the operator. The steering wheel should not interfere with the free placement of the knees - it must be mounted so that working with it in a sitting position does not cause discomfort.
All the necessary parts for pedal, manual and lever control of the machine and its functional units can be found in the same place as the seat and all other spare parts - in workshops or on the market.
Manufacturing a three-point hitch
The hitch is used to connect additional equipment to the tractor
, for example, a plow.
The hitch must be movable both in the horizontal plane and in the vertical
. In the first case, mobility helps to reduce the overhang of the nozzle when taxiing. Vertical movement of the suspension is required to lower the equipment into a working position or raise it into a transport position.
The hitch on a mini tractor is made from various parts removed from old agricultural machinery. It is quite difficult to describe how to make a three-point hitch at home. Therefore, it would be more correct to use the following video, which shows the dimensions of all parts of the device.
Engine installation and body arrangement
After assembling the chassis, implementing the kinematic diagram and installing the operator's seat with the control system, you can begin installing the main unit of the minitractor - the engine. To securely fix it on the frame, you should use a special plate with grooves - it will also give the chassis additional rigidity. Next, you need to lay out the electrical and mechanical circuits of the control system, connect the instrument panel and configure the operation of the control system.
The body trim is carried out at the user's request, however, it is still better to cover some components and structural elements. This will prevent their contamination and failure in case of contact with foreign objects and soil.
At this point, the assembly of the mini tractor can be considered complete. Next, all that remains is to check the quality of your creation in work.
Technology capabilities
In the agricultural sector, these machines are capable of doing a huge amount of work. Thanks to its maneuverability and the ability to attach additional attachments, the assembled classic 4x4 mini tractor can cope with the following operations with its own hands:
- deep plowing of the soil;
- cultivation to remove weeds;
- harrowing of certain areas;
- implementation of sowing spring field operations of cereal crops;
- planting/harvesting potatoes.
In winter, the fracture mini tractor can also not be parked in the garage, but can be used to clear roads of snow. A trailer is attached to the tow bar, which helps in transporting loads of up to several hundred kg. Owners can even use mini tractors at home to mow lawns.
VIDEO: All-wheel drive tractor capabilities
Technical characteristics of the fracture mini tractor
A mini tractor assembled with your own hands has a number of positive characteristics, including certain savings on purchase costs. The advantages of homemade products include:
- the compact dimensions of the transport ensure its convenient operation even in small areas, and since most farms include small cultivated areas, a DIY assembled mini-tractor will be very appropriate;
- homemade devices with a single-axis drive or with a full drive in the vast majority of cases pay for themselves in one or two seasons, and subsequently allow you to save on components;
- agricultural new products have decent performance indicators that can compete with factory models, since a master can make a mini tractor independently using selected units and components that have a large margin of safety.
It is worth considering that a homemade 4x4 mini tractor may also have disadvantages. The disadvantages lie in the following factors:
- sometimes the process of searching for the necessary components or individual parts is delayed;
- in the case of using non-standard structural elements, repairs are difficult;
- It will be possible to assemble a homemade 4x4 mini tractor if you have the appropriate set of tools and have the skills to work with them;
- Frequent breakdowns can occur due to the use of old used technical components.
Frame assembly
The frame design is optimal for homemade products assembled in the garage. The key parts for it are the longitudinal spars and a pair of transverse crossmembers. It is preferable to make the spar beams in a three-stage form from a tenth channel, and for traverses a sixteenth square profile at the front and a twelfth at the rear are suitable.
Dimensions of a machine with a breaking frame
During the assembly process, it is important to ensure that the front half-frame can be rotated relative to the rear half-frame at a certain angle. Car hinges from trucks are suitable for this. In most cases, cut driveshafts are used. When folded at an angle, they continue to transmit rotation.
After assembling the frame, they begin to install the power unit. It is recommended for cars with a single-axle drive to take engines in the range of 15-30 hp, and for all-wheel drive, the optimal solution would be an engine with a power of 30-40 hp. Preference should be given to water-cooled diesel units. They are quieter in operation than analogues with air removal of excess heat.
Kinematic diagram
As a ready-made solution, engines from walk-behind tractors or old cars can be mounted on the frame. There are drawings where the central place is occupied by power plants from the following models:
- walk-behind tractor "Neva";
- model with walk-behind tractor “Bison”;
- homemade from the Centaur walk-behind tractor, etc.
A minimal exhaust system may involve an empty metal fire extinguisher with metal shavings from a lathe stuffed inside it. If an air-cooled motor is used in the design, then some of the partitions can be eliminated in the lower docking area. It is also important to ensure the presence of mounting holes for fixing the power unit.
The next step after installing the engine is installing the transfer case and gearbox. An acceptable option is to choose them from GAZ-53. To ensure a good connection between the clutch and the engine, the flywheel will have to be rebuilt. In such a situation, turning work will be needed.
The back part is cut off, the excess with tides. A hole is bored in the center for a new shaft. The clutch basket cover is optimized in terms of dimensions to the required dimensions.
Assembly of axles and wheels
Global bridge reconstruction is not performed at home. It can only be adjusted according to the lengths of the axle shafts so that the wheels are located in the same axis and do not protrude significantly beyond the dimensions established according to the drawings.
The bridge is fixed using 4 strong stepladders. Threads for the nuts are cut into them in advance, and then the rods are heated with autogen or propane to a U-shaped state. They need to be welded with a fixed bridge relative to the entire power transmission chain.
Most craftsmen make the front axle of a mini tractor themselves, since in rear-wheel drive models it is used only for driving the vehicle. It can be strengthened with high-quality disks from ZIL-130.
Wheel pairs should be given special attention. It is hardly worth using ordinary car tires in serious construction. Often this step is taken at the initial stage. The preferred tire size should be above 14 inches. Otherwise, the new product’s cross-country ability on loose soil will objectively decrease.
The correct wheels are models with lugs. This solution will ensure high maneuverability in any area without sinking into the soil. You can imitate lugs by wrapping chains around the wheels. This method will achieve many advantages:
- operation will be simplified;
- cross-country ability and maneuverability will increase.
It is customary to use power steering for a break. Such a unit can be found on decommissioned equipment. An oil pump will be installed in the design, used to maintain the required pressure value. A mandatory gearbox is used for the main rotation shaft. It is involved in steering the wheels.
Steering diagram
The driver's seat is mounted opposite the steering wheel, from which control occurs. It is taken from old cars. Installation must be ensured in such a way that the knees do not rest against the control system.
Old Zhiguli cars are equipped with drum hydraulic brakes on the front wheels. Several metal rods are used to connect it to the pedals.
Don't forget about the summer canopy, which can replace the cabin. It is usually mounted on 2 or 4 racks welded to the frame. An alternative can be a protective metal arc. Light optics are mounted for work at night. It is attached to the generator and battery.
VIDEO: Transmission of a machine with an articulated frame
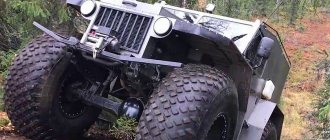
It has all-wheel drive and a fracture-type frame design. The author produced the work in his free time, using forum materials and his own skills. The all-terrain vehicle was assembled based on the reliability of the structures, but without forgetting about the comfort of the driver and passengers. The main purpose of use is traveling along forest trails for hunting, fishing or collecting supplies, so the all-terrain vehicle has a large capacity and carrying capacity.
Materials and parts required to create this all-terrain vehicle:
1) Internal combustion engine from the Oka car 2) Safari CVT 3) gearbox from the Oka car. 4) dispenser pump 5) Oi-25 lightweight tires. 6) profile pipe
Let's take a closer look at the stages of building an all-terrain vehicle, as well as its main structural components.
The frame of the all-terrain vehicle was reinforced with structures made of profile pipes.
The rear part of the all-terrain vehicle was created:
wheels were made and tires were put on oi-256. Then the author began to manufacture the axles of the all-terrain vehicle: Other work on the transmission of the all-terrain vehicle:
The body of the car was taken for the cabin of the all-terrain vehicle:
Unloading wheels and main parts for assembly:
This is how the steering is done:
Work on installing the all-terrain vehicle cabin:
And connections with a trailer: The all-terrain vehicle is capable of reaching a speed of about 35 kilometers per hour and this is not the limit, there is enough power, but control at such a speed becomes very inconvenient. But as you know, maximum speed is not so important for an all-terrain vehicle, since it will travel the main routes in first and second gears at speeds of up to 15 kilometers per hour.
The length of the car turned out to be about four meters and twenty centimeters. The height of the all-terrain vehicle is two and a half meters. The total weight of the vehicle is about 700-800 kilograms, but it will continue to increase, since the author has provided several mandatory upgrades for this all-terrain vehicle.
The speed was measured at about 35 km/h using GPS, beyond that it was scary. The differential was welded on the gearbox before installation on the all-terrain vehicle, since a differential is not required in this transmission design. A few more photos of work on the structural elements of the all-terrain vehicle:
As you can see from the photographs, the front axle on the all-terrain vehicle is not slightly overloaded, in particular due to the massive cabin and the absence of a kung as such, in the future, instead of a trailer, the author plans to make a kung, or rather, finish it directly on it using a frame made of a profile pipe and sheets of metal or plywood .
It is also planned to complete the boats so that the all-terrain vehicle can cross water obstacles.
Initially, the author planned to install Krazov wheels, since they would be better suited for an all-terrain vehicle of such mass. However, the OI-25 is too small for such a weight; moreover, a larger wheel width is required, since the center of gravity of the all-terrain vehicle is quite high and there is a possibility of capsizing. That is why in the future the author intends to install Kraz tires and make a roll bar. when he starts work on the frame of the kung.
But with the replacement of tires, you will also have to change the wheels, since they were made specifically for OI-25 and have a width of 450 mm.
Tools and materials
A small tractor greatly helps farmers in their work. They can cultivate the land of household plots and summer cottages, and harvest crops. The big advantage of the unit is that a wide variety of attachments can be connected to it. A compact mini-unit is good for everyone, but it costs a lot of money. Even Chinese manufacturers have begun to significantly raise prices in recent years. Therefore, some craftsmen make small units with their own hands, and the quality of these mechanisms is not inferior (sometimes even superior) to factory products.
Before starting such work, you should understand how this or that unit is structured, how it works, and what its features are. Such equipment on a farm is needed, as a rule, for 3-4 types of work, so when creating a unit you can “place accents”, for example, strengthen the frame (if it will bear an increased load) or install wider wheels if the main work will be carried out in field.
How to do it yourself?
Creating a miniature tractor begins with installing a frame, which can be made from tubes. Such a design should be made powerful, but at the same time it should not be very heavy. Often the frame is made double. Units with the so-called “breakable” frame with all-wheel drive from the GAZ-52 are also popular. The “breakable” frame makes it possible to turn the tractor along a small radius, which increases the maneuverability of the device. The most important blocks of a mini tractor:
A mini-tractor made independently at home begins with the development of drawings and a diagram. Taking a “related” project as a starting point, you can edit it and make your own adjustments. After an individual project has been prepared, it is drawn on a piece of Whatman paper. Next, you will need to assemble all the necessary components to make the basis of the future unit. The dimensions of the frame may vary depending on the purpose of the machine - it can be 1.5-2.5 meters long, 1.3-1.8 meters wide.
A very important component is the hydraulic drive; it provides many advantages in operation and makes it possible to control a wide variety of equipment. The hydraulic unit is especially valuable in this regard. Its presence will allow you to use a wide variety of attachments - from KUN to snow brushes. Hydraulics consists of:
- hydraulic cylinder 76x80;
- distributor P82;
- pump NSh12.
The pump runs at 1000 rpm and sometimes needs to be turned off. Things are not complicated with the engine; the power plant can be installed from any car or motorcycle.
The UD 25 engine is a good engine. It is a two-cylinder unit with a capacity of 12.2 liters. s., engine volume – 0.43 liters. The model is very successful, although it is no longer produced, but there are a huge number of similar units on the secondary market. This model costs no more than 8 thousand rubles. The gearbox can be taken from a VAZ or Ant engine. If the tractor is used in field conditions, then it is rational to take 20-24-inch wheels. The front beam is prepared simply:
- two “cams” are assembled, which can be taken from a Zhiguli;
- a square is made from a pipe (45x45 mm) by welding;
- Corner-posts “4” are attached to the frame by welding, turning “cams” are mounted and secured to them, and the steering is installed.
The beam of the mini-unit has a swinging mechanism, which is taken from the VAZ together with the cross. You can also take a similar element from UAZ. It is very important that axles have congruent gearboxes. This must be done so that the wheel rotation coefficient is the same. The gearbox is taken from any car. With 2 boxes the mechanism will be even more functional.
It is important to consider that when installing a hydraulic booster, its maintenance requires a certain amount of engine power. If the engine is low-power, then it is better not to install a hydraulic unit. The PTO begins to rotate from the engine crankshaft; accordingly, it depends on the number of revolutions of the power plant. There is also a synchronous PTO; its rotation coefficient is related to the gear ratio of the mechanism. This function is in demand, for example, during a sowing campaign.
The creation of a point suspension allows the use of additional equipment for equipment. The three-point suspension is also very important, it must be dynamic horizontally and vertically, which makes it possible to better control the car. It is advisable to put the brake on the rear wheels. You can take ready-made units from VAZ, and you can also “borrow” brake pads there. The clutch can be removed from any old Zhiguli or GAZ. The steering is also taken from the VAZ. It is better to provide a cabin for the unit; then it will be more comfortable to work, and labor productivity will increase noticeably. This unit can be made from pipes with a diameter of 20-25 mm, which are welded to form a frame. It can then be upholstered:
What to make a chassis from
To assemble a mini tractor, you need to prepare its chassis. It includes wheels, front and rear axles, and transmission elements.
When choosing wheels for a mini tractor
the purpose of using the latter should be taken into account. If the unit is being built for transporting and pulling loads, then a disc diameter of 16 inches will be sufficient. When using a tractor in field conditions, it is better to use more massive wheels with discs with a diameter of 18 to 24 inches.
If your tractor has only a rear drive axle, then the front beam is made
simple enough.
To make a homemade front axle, as well as its rear analogue for an all-wheel drive unit
, you will need to take 2 identical chassis units, for example, from a VAZ or Moskvich car, and shorten them. You can learn how to shorten the bridge from a VAZ car from this video.
Important! Axles must have the same gearboxes, with the same gear ratio. Otherwise, the front and rear wheels will rotate at different speeds when the tractor moves.
Since the bridges already have a built-in mechanism for transmitting rotational motion to the wheel axle, there is no need to make a homemade gearbox.
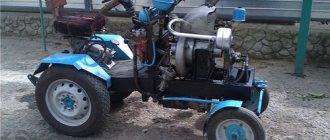
Description of the design of a homemade mini tractor
New, powerful, reliable.
The article briefly describes the stages of manufacturing the chassis of a homemade mini tractor. Author of the idea, design and main parts of the mini tractor: Mikhail Alexandrovich Lvov
A short digression to the article (from the author)
. in the summer of 2016, to my shame, for the first time in my native lands I found myself on the Kvarkush plateau
(Ural Mountains).
The climb to the plateau takes about an hour or two, which is certainly difficult. Probably at the moment of the next ascent, the idea came to me to make such a unit to facilitate the ascent itself and, at the same time, to travel along the plateau. The plateau itself is really huge and the views that open up after the climb are simply amazing. Of course I want to get everywhere. It takes a very long time to walk. Initially, when designing the ministerator, the task was to make a reliable and simple unit from available spare parts, so VAZ
spare parts were taken as a basis.
Drive motor for mini tractor Lifan 190FB-D, 15 l/s
15 l/s was taken as the drive engine of the mini tractor.
and output shaft diameter
25mm
.
The engine has an electronic starting system and a 3 Amp
. The electronic starting system allows you to start the engine by simply pressing a button; this type of engine also provides mechanical starting.
Mini tractor transmission (variable gearbox)
The K-1 transmission kit was taken as a basis, consisting of a “Safari” variator on a 25mm
, driven pulley assembly, as well as the “RUBENA” belt.
To transfer useful torque from the driven shaft to the chassis of the mini tractor, a set of sprockets for the Voskhod chain was used, consisting of a drive sprocket Z=14
(for the Voskhod chain) and a driven sprocket
Z=43
(for the Voskhod chain).
The drive sprocket Z=14
is fixed to the driven pulley shaft under a key.
For the driven star Z=43
, a crown was used, for which a flange of the required diameter with holes was machined, and a blank with splines was also made.
Making a homemade caterpillar for a mini tractor
The caterpillar and tracks for the homemade mini tractor were made from two rubber-fabric conveyor belts 8mm
.
The dimensions and width of each strip, as well as the stops, were developed independently (Mikhail Aleksandrovich Lvov). Metal corners were made as caterpillar tracks, which were placed at a distance of 140 mm
from each other. The corners were fixed to the tape using bolts.