Homemade mini tractors are not a new thing among homeowners and farmers. Anyone who has the desire and is good with tools and drawings can make such equipment independently and without any problems. The main thing is diligence in work and attentiveness. One of the options for creating a homemade tractor is to make a mini tractor from an Oka car. And now we will tell you how to do this in more detail.
Areas of use
A mini-tractor, assembled independently, can completely replace Uralets, Bulat 120, Belarus 132N, Yanmar, Kubota and Scout. The areas of application are almost the same. Special vehicles made from Oka have all-wheel drive and have all the necessary characteristics for agricultural work. Thanks to ergonomics and ease of operation, the owner of the equipment will be able to get rid of most of the physical work.
Even a person without experience can make a mini-tractor from Oka with his own hands. Such special transport is suitable for work for which purchased transport is used:
- digging up root crops;
- application of root fertilizers;
- weed removal;
- uprooting of small trees;
- formation of beds;
- soil cultivation;
- planting root crops and other crops (using additional equipment).
Attention! This multifunctionality is ensured by the ergonomic design.
Using the VAZ rear axle
To do this you will need a few materials:
- steel tubular blanks 60x30 and 25x25 mm;
- wheels and springs from the rear axle of a Zhiguli;
- sheet pieces of steel from 0.8 mm thick;
- channels, duralumin sheets from 2 mm thick.
The trailer body can be assembled in various ways. One of the most common options is wooden with metal corners and screw fastenings. The working process is as follows:
- The wooden frame is attached to the metal structure of the rear axle.
- Metal parts are welded together.
- The transverse crossbars are made from a 25x25 mm profile; tubular blanks are useful for the spars.
- From 25x25 mm corners we make a metal frame for the frame and weld it to the lower bridge.
- Next, the beams are connected.
- Using springs we connect the spars to each other. To do this, the edge of the springs is carefully placed on the axis of the beams. The beam is connected to the central part of the structure with stepladders.
- The last part is a triangular drawbar, which is welded from metal pipes. The drawbar is welded to the metal frame.
All that remains is to build a transition from the trailer drawbar to the walk-behind tractor.
Advantages and disadvantages of a homemade mini-tractor
The first reason for converting the Oka into a tractor with your own hands is efficiency. Buying a factory model can hit your wallet hard. At the same time, an unnecessary car has all the necessary characteristics to create a MT. The functionality of such special equipment will not differ and can be expanded by installing additional parts. Even if we limit ourselves to standard transport capabilities, they are sufficient to carry out all agricultural work on a summer cottage or in a garden, the area of which does not exceed 10 hectares.
A small tractor from an Oka car quickly pays for itself due to its low cost. Mechanisms for special equipment can be obtained free of charge or purchased at a symbolic price. The only drawback will be the lack of warranty, because such parts are removed from old and broken vehicles. You can purchase additional components from an official dealer, but the price of a homemade mini-tractor will rise significantly.
The presence of special equipment on the site always simplifies life, because a person has to spend less effort on physical work. However, self-assembly of MT has its disadvantages:
- No warranty. If a factory vehicle breaks down in the first year, the owner can contact a service center where free repairs will be made. When assembling a tractor from an old car, this is not possible. You will have to purchase parts and replace them yourself.
- Difficult to find mechanisms. Oka is an old car, so components are rarely found in stores. Before you start remodeling your car, you need to check the functionality of all parts. If any of them turn out to be faulty, you must ensure that a replacement is available before starting assembly. Otherwise, it will turn out that the necessary components are not available for sale.
- Need for knowledge. It will be difficult for a person to assemble special vehicles on his own if he has not previously worked with drawings and does not have technical skills.
- Collection of documents for Gostekhnadzor. Any vehicle used for agricultural work must be registered with the relevant authority. To travel along the road access area, equipment must comply with all standards.
Attention!
If the owner plans to drive a mini-tractor on public roads, it is necessary to obtain a license.
What stages do you need to know about?
The cars of the Ural Automobile Plant are completely inconvenient in terms of comfort, but incredibly reliable, and this is exactly what a mini-tractor needs
Or you can pay attention to another car and make a mini tractor from LUAZ. Which doesn’t change the essence of the task too much: find as much free hardware as possible, from which you will eventually get all the necessary components for the right machine
We say “over time”, since building a mini tractor with your own hands is quite a long process.
If we consider the process of such construction step by step, then first you will need detailed instructions. This material is not such, if only because there are no drawings you need. This is not surprising: everyone creates drawings for their own tractor themselves, or downloads the documentation they like on the Internet.
Before you start assembling this unit, choose the most suitable place, believe me, this is important
The next step after drawing up all the plans, drawings and choosing the right location is the search for the main components. The main components of any mini tractor are:
- Engine (UAZ is quite suitable).
- Transmission device.
- Chassis.
- Steering.
- PTO.
- Suspended means or several.
Let's assume you managed to find absolutely everything you need. It will be best if you can get spare parts from the same car model at your disposal, since this guarantees you a completely problem-free pairing of spare parts into a single whole.
When assembling a mini tractor from an UAZ, remember that the width of the wheels is of considerable importance. That is, if you just want to drive your mini tractor on the roads, then a width of 13 inches is enough. If the main purpose of the unit you are assembling will be plowing on heavy soil, then find wheels 18 inches wide.
Preparation of drawings and details
You can’t start work without a ready-made plan. Converting the Oka into a mini-tractor will be successful if everything is done according to the drawings. For a frame structure, you need to stock up on two spars - right and left. You will need the same number of crossbars: 1 on each side. The first ones are made from channels No. 10, for the second, the profile of structural elements No. 12 and No. 16 is suitable. Elements made from a transverse beam are suitable.
The main part that needs to be removed from Oka's car is the engine. It must comply with the standards prescribed in the legislation of the Russian Federation. It is especially important to take this into account if the mini-tractor will be used on additional access. The power of the engine determines what licenses you will have to obtain for such special vehicles. It is best if the old car used a 4-cylinder engine.
Self-assembly of a tractor from vehicle elements
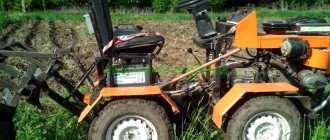
A mini tractor, assembled with your own hands from automobile parts, is a more serious vehicle with a powerful engine, hydraulics, a full-fledged control system and suspension, and even an all-wheel drive option is possible. Since this is already a serious technique with a large weight of parts, it is necessary to complete the entire structure thoroughly.
Important Excavators-planners for earthmoving work
At home, it will not be possible to calculate the strength limits and permissible loads, so the entire structure as a whole must have safety margins.
The first step is to make a frame from channels. The channel is cut according to the prepared diagram, then the cut parts are welded to each other. The frame is selected taking into account the weight of the engine and other loads. Spars and hubs are made of durable profile pipes. The means of mounting the motor must exactly match its main structure. For all-wheel drive tractors, the axle is mounted on the frame. The location for installing the transmission is selected so that it is on the same axis with the crankshaft and looks directly at the center of the shaft.
A special frame is welded under the steering column in the front part of the frame. The channel cavities serve as protection for electrical wiring, hydraulics and the fuel system. They are attached there using mounting rings or flagella. And lastly, they mark and prepare a place for the saddle.
- fracture or double with hinges;
- whole.
The first option is more suitable for four-wheel drive tractors. It is difficult to manufacture. An additional locking box from Niva will be required. And some more improvements to the chassis. Two frames are attached using automotive hinges. To transmit power to the rear wheels, a shortened crankshaft is usually used.
The one-piece frame has the best strength indicators. To maintain the required geometry, it is made in a trapezoidal shape. This will allow the installation of a beam with a subsequent increase in the wheel track. This system allows the tractor to be installed together with a loader. But taking into account the loads, the frame must have high strength.
After the frame is fully prepared, the step-by-step assembly of the remaining components begins. First, the axle and wheel axles are installed.
It is necessary to organize a caterpillar track. The simplest option is a roller with tires and wheels. The bridge is borrowed from any rear-wheel drive car. Wheels are selected in accordance with the intended work that the tractor will perform. For loose arable land, wide wheels with a large radius are needed. This will give greater clearance to the unit's suspension. It is advisable to increase it to 40 centimeters or more. This way, in the field, he will not disturb the dirt with his knee. It is better to borrow the bridge from UAZ. It has side gearboxes with a high gear ratio.
The choice of engine depends on the purpose of the tractor. For plowing land and transporting small loads, a low-power motorcycle engine with 15-20 horsepower is suitable. For more serious work, a powerful engine of about 50 horsepower is required.
Usually, engines from a “kopek” or other VAZ models are installed as traction force. Buying them is not difficult. However, the fuel consumption of such engines is more than 10 liters.
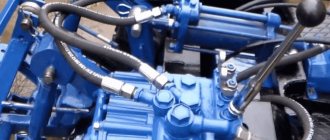
After the engine, the transmission is installed. Suitable for GAZ or UAZ. It has a good gear ratio. A shortened shaft is used to transmit torque. The steering and saddle are installed last. To install the steering, the king pins are placed on the front axle of the mini tractor. Trunnions are attached to the top of the kingpins, and a lever control is attached to the bottom. They are connected to each other by a rotary rod. The steering gear is connected to the transverse rod using a bipod. All that remains is to connect the hydraulics, electrical wiring and fuel system and the tractor is ready for the first tests. Whether a tractor requires a body or not, each owner decides for himself.
What to pay attention to when remodeling
The frame design of a mini-tractor made from Oka comes in two types. The first is when the internal combustion engine and the driver’s seat are on the same platform. In this case, the assembly will be the simplest, because It is enough to fasten 4 channels in the form of a rectangle. You can use 4*4 cm corners. However, such material requires the additional installation of metal pipes with a square cross-section. Without them, the structure will not be strong enough to support the driver and all the parts.
It is important to make the structure strong. The slightest gaps and defects in size can cause damage. When registering such a vehicle with Gostekhnadzor for use on additional access points, the owner will 100% face a refusal due to non-compliance with technical assembly standards. To strengthen the frame, you will need front and rear crossbars. Another element that will make the structure strong are the cross beams installed under the engine and seat.
Homemade mini tractor with oka engine
- Homemade mini tractor with oka engine
- How to make a LAWN at your dacha. Step-by-step instruction
- How to make a bench from a log without a single nail with your own hands
- Gazebo alone in one day
- DIY gazebo made from old pallets
- BATH WITH YOUR OWN HANDS
- DIY garden path
- Do-it-yourself pool at the dacha
- Do-it-yourself fountain in the country
- Do-it-yourself pond in the garden. Master class from specialists
- Growing watermelons, tips, watermelon in the country, how to grow watermelon in a greenhouse
- How to build an alpine slide
- DIY ventilated wooden fence
- DIY COUNTRY TOILET and SHOWER
- Do-it-yourself fence from corrugated sheets
- DIY crafts for the garden with your own hands. 30 ideas
- DESIGN OF FLOWER BEDS AND PLANTING FLOWERS WITH YOUR OWN HANDS. General principles and step-by-step guidance
- Pallet furniture. DIY sofa made from pallets
- Interesting ideas for a small cottage. DIY // FORUMHOUSE
- HOW TO MAKE A GAZEBO FOR YOUR Cottage WITH YOUR OWN HANDS
- MASTER CLASS! CONCRETE GARDEN PATH UNDER STONE!
- DECORATIVE PERGOLA AND WITCH FROM WILLOW WITH YOUR HANDS!
- BATH - HOW MANY ERRORS IN THIS WORD
- Gazebo alone in one day
- DIY sauna
- DIY paving slabs - economical and simple
- DIY country toilet
- Do-it-yourself septic tank (autonomous sewerage)
- Homemade mini tractor from a walk-behind tractor. Design overview.
- DIY stand for PEONIES. Master Class
- Heating a gazebo or veranda for relaxation
- Barbecue from a gas cylinder in three hours!!!
- Autonomous heating with your own hands. Economical battery boiler for heated floors
- Useful DIY inventions for home and garden
- How to build a house quickly and inexpensively
- Frame sauna in three weeks
- Autonomous heating with your own hands. Simple, cheap and without pipes.
- How to make a dining table for a summer house. A very unusual idea!
- How to paint eggs? Simple and original tips
- DIY greenhouse
- Do-it-yourself drip irrigation for your dacha at no cost
- Convenient DIY Greenhouse for Cucumbers.
- Construction of a house without initial capital. REAL STORY
- How to make a paradise for children at your dacha?
- DIY brick barbecue
- Interesting ideas for a small cottage. With your own hands
- Do-it-yourself chicken coop in the country
- How to make beds with your own hands
- DIY fencing for flower beds
- How to make a flowerbed from stones
- How to decorate the yard of a summer cottage
- How to make a budget summer shower in the country
- How to set up an irrigation system in your garden
- Do-it-yourself smokehouse in the country. Harvest beds.
- Decorating your summer cottage with your own hands
- DIY Chinese gazebo
- WOOD-LOADED TRACTOR
- Homemade sprayer for a mini tractor
- DIY packaging for quail eggs.
- Drinker - do-it-yourself bird dispenser
- Homemade pumpkin harvester.
- Feeder for goats.
- Homemade woodworking machine
- Reel for watering hose
- Homemade rotary mower with an autonomous engine. Review/Homemade tractor
- DIY cultivator.
- Homemade reversible plow for MTZ motorball, review
- Steering. Mini tractor assembly (series 6)
- Engine installation. Mini tractor assembly (5 series)
- Preparing and installing the gearbox on the frame. Assembling a mini tractor (Part 4)
- Frame with swivel unit. Assembling a mini tractor (Part 3)
- We shorten the gearbox. Mini tractor assembly (Part 2)
- We shorten bridges. Assembling a mini tractor (Part 1)
- DIY mini tractor
- DIY bunker feeder
- Grain crusher
- DIY hay press
- DIY chicken feeder made from a pipe.
- Harrow for walk-behind tractor
- Hay rake. Motoblock Zubr
- Rabbit breeding: How to make cages for rabbits correctly!
- Homemade mini tractor from a VAZ 2102 with an engine from a walk-behind tractor
- DIY drinking bowl
- Homemade trailer. Body lift
- Homemade two-axle trailer.
- Homemade rear lift for the T-25 tractor.
- Homemade rake for harvesting hay.
- homemade rotary mower for a walk-behind tractor paired with an adapter
- DIY broiler cages
- Quail cage in 45 minutes.
- Homemade seeder with your own hands for precision seeding!!!!
- DIY incubator
- Adjusting the mounted plow before plowing. Adjustment hinged plow before plowing
- Trailer for walk-behind tractor
- DIY MINITRACTOR - review
- How to make a cultivator at home
- Garage-workshop with attic
- how to properly harness a horse to a Russian arc harness
- Tested for myself: how to shoe a horse?
- Stewed rabbit without oven
- Polycarbonate greenhouse Volna Farmer. Master class on assembly
Required Tools
It is impossible to do without a screwdriver and wrenches. They will be needed at all stages: from dismantling the old car to attaching parts to the new frame. Even when using ready-made structures, we must not forget about the grinder and discs for cutting metal. Special transport will be unreliable if at least one element does not correspond to the dimensions specified in the drawings. Most spare parts are attached to nuts and bolts, which should also be in stock. An electric drill is needed regardless of the elements used.
Most people who decide to make a mini-tractor from a walk-behind tractor or Oka purchase all the tools separately. However, in specialized stores you can find KIT kits, which include the necessary devices for assembling such equipment. They are selected depending on the available parts. Additionally you can purchase:
- brake fluid containers;
- backs and seats;
- axle shaft locking levers;
- brake drums;
- tow hitch pins;
- mechanisms for a mower or shovel;
- lifting axles;
- driven and drive sprocket chain;
- lifting mechanism shaft;
- intermediate tension roller.
Attention!
When purchasing additional elements, it is important to check the quality of the metal, otherwise the part will have to be replaced after a year of using the tractor.
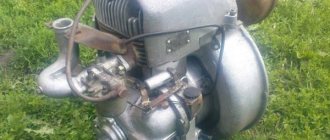
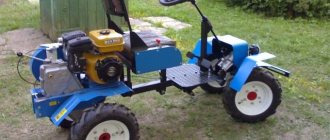
Homemade mini tractor with Oka engine
A minitractor built by a craftsman from spare parts from domestic auto equipment: photos, descriptions, and also a video of a homemade minitractor in action.
This tractor was built by the craftsman Ivan, let's take a closer look at its design.
The homemade engine is equipped with an internal combustion engine and gearbox from Oka, and a transfer case from Niva. Number of gears: forward 4 4 low; back 1 1 downgraded. The bridges were taken from Moskvich-412, shortened, only I did not weld the axle shafts, cutting off the standard one, cutting splines (when I asked if we could do this at our plant, they told me it was like a finger on asphalt), so I made them not welded but solid (700 mm track) .
An additional crankshaft pulley from a Volga, Gazelle car (from a generator for two belts) so far one stream under the belt is free - plans include a pump for pumping water.
We disassembled the Oka gearbox, took out the gear with the satellite housing assembly from the gearbox and welded the satellite gears together (but not with the housing, it is cast iron, and the gears are steel).
As a pump, I used what was in abundance on the farm (power steering pump from BMW), a ZF lobe pump, max. pressure 115bar (plus I opened it up and plugged the pressure relief valve, so I think now it’s capable of more.)
The pulley from the motor to the pump is approximately 1k3. Hydraulic distributor P80-2-022 (with floating position).
Muffler from a Chinese scooter (for obvious reasons, I chose the lightest one).
The wheels are also from BMW525 E28 (14 inches), after some minor modifications they become like original ones (narrowed from 6 inches to 4.5 inches).
The crosspiece in the swivel assembly is from the front Nivov cardan (the outer flanges were taken and slightly sharpened for a larger bend angle).
The gear shift mechanism is made on ball joints of the front stabilizer rods of the BMW730 E32.
The hydraulic system is all new, with the exception of the pump, the front cylinder is from MTZ-80, the rear cylinder is from a combine. I selected new hoses of the appropriate length. Two-section distributor with floating position. Hydraulic tank from BMW 528 E28 (1.2 l).
Homemade blade - sheet metal 4 mm.
It starts in any gear (minimum speed is about 1 km/h at idle; maximum is about 35 km/h). Brakes on all wheels.
The minitractor has overall dimensions:
- Length 2500 mm (with a moldboard but without a plow for now).
- Width 900 mm.
Next are a couple of videos about a homemade mini tractor:
Body
The first thing that attracts attention when viewing photos representing LuAZ tuning is the changes regarding the car body. The semi-supporting body of the “Volyn” with a spar frame allows you to implement quite bold experiments
Here actions are possible in two main directions - improving what is already there. Or a complete redesign of the body.
The first option usually includes installing roll bars, painting the body with modern materials, installing an off-road body kit and a yoke. A common option is also to replace standard lighting fixtures, which allows not only to transform the car externally, but also to significantly improve the illumination of the space in front of the car. The standard headlights leave much to be desired in this regard.
Also, additional equipment is often installed that may be needed during an off-road trip - various winches and other self-towing devices.
The second option is to remove the roof and install safety showers instead, providing for the use of a removable awning if necessary. The design of the car allows you to cut off the roof pillars, and even make the windshield drop down, in imitation of army “jeeps”. This type of tuning requires a much larger amount of work, but can significantly change the appearance of the “Volyn”, which does not sparkle with design delights.