Operating principle
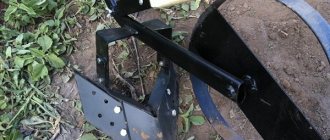
The key part of a manual hiller is the cultivator or plow. It is he who will do what is done manually with a hoe or hoe - plow the soil. This plow, using its sharp end (“nose”), digs slightly into the soil and distributes it on its sides, covering the potato rows with soil.
If the hiller is a homemade model made from a bicycle, then the cultivator will be mounted on its frame. By slightly changing the structure of the unit, grabbing the steering wheel, you can control the device, directing it in the desired direction. The movement of the hiller itself is carried out due to a single wheel in the front part of the frame.
The essence of the work of a manual hiller can be summarized more briefly using the following algorithm:
- the cultivator crashes into the ground;
- the operator of the apparatus, using the steering wheel, directs the hiller in the desired direction and moves it forward;
- movement is carried out due to the existing wheel.
Device control
When the engine starts, the rotation of the working body with knives begins. In this case, it is necessary to hold the cultivator in place with the help of a coulter, which is deepened into the ground. After processing this piece of soil, the unit is lifted by the steering wheel, thereby releasing the coulter, and the cultivator moves to the next place. Further, similar actions occur.
This iron assistant can process up to 6 acres in one day, provided that the soil is normal and without roots. The depth of loosening depends on the length of the blades and engine power and can reach from 17 to 22 cm. For loamy and heavy soil, you need to install a motor of about 3 kW.
The process of creating a hiller
The manufacturing process can be divided into 5 stages:
- The mount on the rear wheel is cut so that in the end there is only a “triangle” from the bicycle frame.
- The cultivator will be placed instead of the wheel, and it must be fixed there.
- Screw or weld the cultivator. This should be done efficiently, because this part of the hiller will bear the greatest load.
If the cultivator will be screwed on, then tighten the nuts as tightly as possible, otherwise the manual hiller will not last even a couple of days. This is where both nut and bolt wrenches come in handy. By operating them simultaneously, you will be able to secure the parts firmly and for a long time.
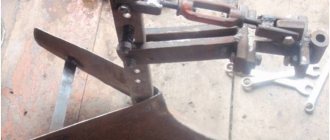
- Next, the offset of the cultivator is adjusted (how far/close it is). This is done for the purpose of convenience during the hilling process, so as not to trip over the cultivator blades.
- The previously removed steering wheel is tightly twisted in place of the saddle.
Chopper for trimmer
For many summer residents, weeding is problem No. 1. Especially if the plot was purchased recently, and before that it had not been cultivated for a couple of years. And gardeners often dream of a mechanical hoe. It won't be difficult to do if you have a trimmer available. This attachment is attached to the trimmer according to the principle of a trimmer knife.
Making a hoe attachment
Cut a circle out of a thick sheet of iron (preferably stainless steel), there should be a landing hole in the center, and holes should be drilled on the entire surface. Secure the sharpened bolts in them using a washer and nut. The result is a design that resembles a hedgehog. It is with these very thorny bolts that weeding will be done.
Creation of a cultivator section
If you were unable to find/buy/remove a cultivator, you can make it yourself.
Creating a basic cultivator is quite simple. In fact, this is the same plow. Two plates are attached near the base, which form an angle directed forward (towards the wheel). As the hiller moves, the plates will divide the soil into 2 parts and hill up the potato rows with the raised soil.
However, the following requirements for this part should be adhered to:
- the total width of the blades should be equal to 2/3 of the row spacing of the potato bushes;
- the cultivator should go 10-15 cm underground;
- The angle of the blades should be close to 90 degrees - this way they will perfectly pick up the soil.
After carrying out a full range of work, you should end up with a full-fledged manual hiller that does its job perfectly while growing potatoes.
To familiarize yourself with the device in more detail and understand how to properly make such a homemade hiller, you can watch the following video:
If you operate the hiller together, the hilling process will be significantly simplified and the efficiency of the work done will significantly increase. To operate a manual hiller in pairs, you need to attach a regular belt to the front of the unit.
You can attach some kind of weight to the back. This improves penetration into the ground, which, again, increases work efficiency. But at the same time, it will be more difficult for such a unit to move forward due to the increase in mass.
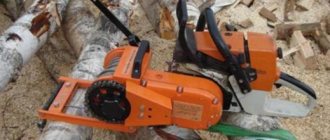
From a chainsaw
Many different attachments have already been invented for chainsaws that expand the capabilities of this unit, for example, a cultivator, a drill, a boat motor, and also a scythe attachment. You can see what it looks like in this video. If you want to make a trimmer out of a chainsaw, the most you can make is a lawn mower on wheels, since the engine of the unit is quite heavy, and it will not be possible to apply the above-described options for making trimmers (with a bottom drive) to it.
Therefore, the trolley is made first. It can be welded from a 25x25 mm corner. The frame dimensions should be 500x600 mm. The wheels are attached to the corners of the frame.
Next, you need to unscrew the “steering wheel” and tire from the unit. The cart handle can be made from water pipes. The “steering wheel” is screwed to it. It is also necessary to lengthen the fuel hose and throttle cable.
When installing the trolley handle, make sure that it does not block the winder (starter).
The gasoline engine is installed (screwed through the holes to secure the tire) onto the frame so that the gearbox is rotated 90 degrees and the shaft is at the bottom.
Now all that remains is to attach the cutting tool to the shaft of the unit. This is done as follows.
- It is necessary to weld a small piece of pipe, 80 mm long and 50 mm in diameter, to the “star” of the device. It is better to cut the pipe on a lathe so that the ends are perfectly straight.
- Next, find a pipe with a slightly larger diameter - equal to 58 mm. It also needs to be cut to a length of 80 mm. Thus, you will receive a telescopic shaft, which is connected using 2 bolts (m6) located opposite each other. The bolts must have locknuts. Below is a diagram of how the trimmer head is made, which is used to secure the cutting tool.
Several holes need to be made in the telescopic pipes so that the height of the knives above the ground can be adjusted.
It is better to make a knife of such a design as in the following figure.
Due to the fact that movable knives are attached to the disk with rivets, they will simply bounce off when they encounter a stone or a dry branch . This will protect the shaft and gearbox from damage that may occur when the tool jams.
The rivets that hold the knives to the disk must be metal.
The diameter of the disk (made from 4 mm sheet steel) should be 180 mm. The knives are made from strips 30 mm wide and 120 mm long, cut with a grinder from a hacksaw blade for wood.
Other types of hillers
There are many schemes for creating hillers. Next we will consider other methods.
From a bicycle wheel and fork
If you have a front bicycle fork and a wheel for it, then you can create a hiller using the following technology:
- 2 pipes need to be welded at an obtuse angle;
- a bicycle handlebar is attached to a long pipe (it would be wiser to weld it so that it does not fall off during operation);
- A cultivator is attached/welded to the junction of both pipes, below.
The final output will look like this:
Creating such a hiller is much simpler than the one mentioned earlier. However, different types of units should be used for different purposes.
From a children's bike
You will need a metal bicycle with 3 wheels:
- the saddle and front wheel are removed and removed;
- cultivator blades are welded on the inside of the frame near the wheels;
- the angle of their placement is selected individually (it affects how the hiller will move: along the rows or between them).
It is recommended to weld the blades so that the angle is directed towards the worker’s feet and opens from the front. Thus, the hiller will move on the ground not between rows, like previous varieties, but along the row itself. The advantage is that each of the cultivator blades will process the row from two sides at once:
But it is important to remember that if the children's bicycle is too low, then the taller the potato plants, the more difficult the hilling process will be (damage to the sprouts will directly affect the health of the tubers).
This completes the creation of a homemade potato hiller, and you can begin the process of hilling the beds. Making this device is not difficult, especially in comparison: work a little with a welding machine and get great efficiency in your work, or hill up each bed yourself.
Summer is about to come, and most of our free time will be occupied with gardening chores. Surely the main ones involve growing potatoes. After all, it is this crop that has become almost the main one in our gardens and tables. This means you know how difficult it is to hill up rows of potatoes by hand. There are many devices designed to make this work easier, and one of them is a hiller. You can make it yourself from an old bicycle.
How is the hiller used?
Those who hill potatoes with their hands know how much pain comes from standing in a bent position for a long time in the back, shoulders and arms. Even if you use a relatively comfortable flat cutter with a long handle, this is unlikely to save you from discomfort. Therefore, it is very important during hilling to minimize bending and holding this position for a long time. Whatever they say about the need for physical activity, gymnastic exercises and working in the garden are very different things. Thanks to its height, the hiller will help you carry out work without bending your back. There are many ways to make this device from improvised materials (not to mention buying a ready-made factory model), but it would be a good idea to keep costs and labor to a minimum. An old bicycle, no longer suitable for performing direct duties, is perfect for this. It's the perfect height, the right shape, the handlebars are at the right level, and it weighs a little.
It's very easy to turn an old broken bicycle into a useful tool for gardening.
Let's look at the principle on which a manual hiller works.
The main part of the device is the plow, which can be conical or arrow-shaped. It is he who plows the ground, going 10–15 cm deep into it. The plow blades must be located at a certain angle in order to move the soil between the rows to the required width as they move and fill the potato row with the raised soil. The width of this part depends on the width of the rows.
A plow of a suitable shape is the main component of the hiller
The plow is mounted on a bicycle frame with a handlebar. By means of the steering wheel you control the unit. And the movement of the device along the bed is ensured by a wheel in front of the frame.
That is, in simple words, the algorithm of actions when working with a hiller looks like this:
Deepen the plow into the ground;
Move it forward using the wheel;
Direct the unit forward and, if necessary, to the sides with the steering wheel.
Hilling will be much easier with such a simple and convenient device
The potatoes will be hilled faster, and most importantly, easier than if you did it with a sledgehammer, processing each bush.
Note! This method of hilling using the device in question is equally suitable for beds planted using both ridge and row methods.
Making a hiller from a bicycle
If you have been friends with tools for a long time and bear the proud title of “jack of all trades,” then assembling such a device will be nothing more than entertainment for you for a couple of hours. But hilling from an old bicycle is so simple that even a beginner will not have difficulty doing it.
What materials and tools will you need?
Everything you need is probably in your garage. As a last resort, it is not difficult to get any component anywhere - from friends, neighbors, in a store or in a trash bin.
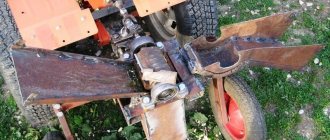
1. The cultivator part, that is, the very plow that plows the soil. If you are dealing with welding, you can weld it by positioning the blades at a suitable angle. Otherwise, it is easier to use a ready-made cultivator section from a tractor.
2. An old bicycle frame. It would be good if it had a wheel and a steering wheel. Well, or you will need to find them separately and connect all these parts.
The bicycle frame will become the body of the future hiller
1. The rubber must be removed from the wheel so that the rim remains bare. The metal cuts into the ground well, providing better stability, and it will be easier for you to control the device.
2. To work you will need bicycle wrenches and wrenches.
Step-by-step description of the process
Making a hiller consists of several stages.
Note! Remember safety precautions while working. If necessary, wear gloves or mittens, protect your eyes with goggles, and your respiratory tract with a respirator.
Preparatory stage
First, you need to prepare your bike frame for the next steps. Remove the handlebars, saddle, rear wheel and pedals. Free the front wheel from the tire and tube so that only the rim remains.
Disassemble the bike, removing all unnecessary parts from it
Prepare the plow (cultivator) section for mounting in the place where the rear wheel was. To do this, weld the mount to the section.
Unit manufacturing stage
Trim the rear wheel mount so that only the frame triangle remains. The section of the tractor cultivator is screwed onto the cut area, close to the area where the pedals were attached. Tighten the nuts tightly with a suitable wrench. You may need two such wrenches: one to hold the bolt, the other to tighten the nut.
Use a bicycle wrench and a wrench at the same time to make it easier to tighten the nuts.
Adjust the extension of the plow section so that during hilling it is convenient for you to walk at a certain distance from the unit. Instead of the saddle, install the handlebars and tighten the connection tightly with a bicycle wrench. Adjust the height of the steering wheel to suit your height.
You will also need to tighten the front fork as tightly as possible, or better yet, weld it tightly so that it does not turn during the hilling process.
If you do not have a ready-made cultivator section, you can weld it yourself or order it from a specialist welder. In this case, you must adhere to the rules:
The width of the hiller should be 2/3 of the width of the row;
The angle between the welded blades should be about 80–90° so that the part grips the ground well.
Remember safety precautions when welding! If violated, you can get mechanical injuries, thermal burns from drops of molten metal and slag, or electric shock.
You can make working with the hiller even easier if you work in pairs. Place a belt on the front of the machine that the first person can pull on while the second person operates the machine. You can also attach a weight to the bottom of the hiller to help the plow cut into the ground better.
From the Bulgarian
Most often, a homemade electric trimmer is made on the basis of an ordinary grinder, which is available to every home craftsman. This tool is almost ideal for converting into a trimmer. It has more power and a higher number of revolutions per minute than store-bought machines. In addition, the standard nut used in the grinder to secure the discs already has holes through which it is easy to insert a fishing line (cord).
So, there are many options for what to make a barbell (holder) from. The simplest one is a wooden holder that is longer than for a shovel. An angle grinder is attached to the end of it at the desired angle using regular tape. The fishing line is inserted into the 2 holes of the nut, after which it is tightened. Thus, in a few minutes you get a trimmer with which you can mow the grass without any problems.
To ensure safe operation of a homemade device, you can improve it by making a protective casing (how to do this will be discussed later).
For advanced craftsmen who have a welding machine, we can recommend a more advanced design for securing the grinder and protective casing. It is made of an aluminum tube (serves as a holder) and a metal square profile. Looking at the figure below, you can understand the principle of making the holder.
The grinder is secured to the holder with bolts inserted into the holes that are intended for attaching the handle to the device.
The following photo shows what this design looks like from below.
Read also: Constant water pressure pump
Next, the “original” casing of the angle grinder is removed, and instead of the disk, either a fishing line or a metal disk blade is installed.
By the way, you can also screw the holder (bar) to the holes for attaching the handle when you want to make a simple trimmer that is easy to assemble and just as easy to disassemble if you need to use the grinder for its intended purpose.
To make it more convenient to hold the trimmer in your hands while working, and for it not to rotate around the axis of the rod, you can attach a side handle made from a bent pipe to it.
How else can you use a bicycle to make a hiller?
The method discussed above is not the only one. You can make a hiller from a front bicycle wheel with a fork. You will need two more pieces of metal pipe, welded at an obtuse angle. A bicycle handlebar is attached to a long pipe on top. It is also better to weld it for reliability. At the junction of two pipes, a cultivator is attached from below.
It’s even easier to make a hiller from the front wheel of a bicycle
You can also make a hiller out of a tricycle for children. To do this, remove the seat and unscrew the front wheel. But a ready-made cultivator from a tractor is not suitable for this option. It will be better if you weld the blades at a certain angle on the inside of the frame next to the wheels. This design is designed for movement not along the row, but along the row.
As you can see, gardening chores can be significantly reduced, and you can easily make a hiller, which will become your assistant, yourself. In addition, you will also repurpose old, no longer useful things, turning them into useful devices. And if you have time to make the appropriate replacement attachments, the hiller can be used as a cultivator, or to weed and loosen beds. Good luck!
If you have some skills, you can easily make a cultivator with your own hands from ordinary scrap metal or used parts from equipment. Such a homemade cultivator will certainly be inferior in terms of productivity, but will significantly facilitate manual labor and many gardening jobs.
From a vacuum cleaner
A trimmer from a vacuum cleaner engine is made according to the same principle as from an angle grinder. The motor must be mounted on a rod, and either knives or a plastic or metal disk must be attached to the motor shaft, into which the fishing line must be inserted. The top of the cutting tool is covered with a protective casing.
To prevent dust and small particles of mowed grass from getting into the motor removed from the vacuum cleaner, it can also be hidden in a plastic casing made from a sewer pipe, as shown in the following photo.
Since the motor in the vacuum cleaner is high-speed, it needs to be cooled. Therefore, under the washer into which the fishing line is inserted, it is recommended to insert a homemade disk with slotted and curved blades so that it acts as a fan that creates a vacuum. It is required so that air is sucked through the hose from above and cools the engine.
In order to ease the load on the hands of the mower operator, the unit can be installed on a platform with wheels. In this case, you will get something similar to a lawn mower.
To secure the fishing line, you can also use either a pulley with a suitable mounting hole or a plastic wheel from a cart.
Cultivator: purpose and characteristics of types
Cultivators are very convenient and popular agricultural tools used to perform surface loosening of the soil, as well as destroying weeds, applying fertilizers and cutting furrows for irrigation activities. When choosing a model of such equipment, you must be guided by the following basic parameters:
- relief features of the site;
- useful area of the site;
- qualitative composition and characteristics of the soil;
- scope and criteria of assigned tasks.
Depending on the purpose, there are several main types of agricultural cultivators:
- continuous tillage during pre-sowing tillage with simultaneous harrowing;
- inter-row tillage of the soil and simultaneous fertilizing of cultivated crops with basic mineral fertilizers;
- pre-sowing tillage, represented by loosening and layer-by-layer grinding of the soil, as well as the destruction of weeds, leveling and compacting the soil.
Equipment can also be classified depending on the operating mechanisms:
- electrical equipment
used on small plots of land. Operation is ensured by electricity. The equipment is lightweight, compact in size and does not emit harmful substances into the environment. Disadvantages include low power and low mobility; - battery equipment
designed for soil treatment in small areas. The difference from electric models is sufficient mobility while maintaining small dimensions; - Gasoline equipment
is the most popular due to its high performance. Such units are quite powerful, mobile and convenient. The main disadvantages of the application are the emissions of harmful substances into the atmosphere, as well as the need to regularly perform competent maintenance.
Another fairly popular type of garden equipment among owners of country property is a hand-held cultivator, represented by a simple design in the form of bent hook fingers or metal stars, which are attached to a metal holder. Such homemade products allow gardeners to quickly and easily cultivate the soil
, and for manufacturing you will need the correct drawings, a little time and available tools.
How to make a cultivator with your own hands
Of course, reliable and high-performance devices cannot be cheap, so many gardeners prefer to make simple but effective designs themselves. Properly designed hand cultivators are economical,
do not require refueling and can replace several tools at once, including a shovel, hoe and rake. Such devices take up minimal storage space.
Homemade disc rotary cultivator
It is not too difficult to independently make a rotary disk tool designed not only for soil cultivation, but also for leveling the cultivated area. A correctly assembled structure allows you to level the surface, harrow the area, and break up clods of earth. The main parts of the unit are represented by a disk, an axle, a bushing, large and small brackets, a rod, a pipe and a handle.
Spherical-type working parts in the form of convex disks must be welded to bushings that fit onto the axle. Using a cotter pin, the axial ends are fixed in brackets. Using a special ledge, a pipe is passed through a large bracket, as well as handles and a crossbar. The diameter of the rod is 2.4 cm with a length of 25 cm
. This part is welded onto a small bracket. A rod with a cross section of 1.6 cm must be screwed into the rod, which should partially protrude above the surface of the crossbar.
The main difficulty in manufacturing the unit is represented by the need to give the disks a neat spherical shape using fairly strong hammer blows. The angle of the disk installation relative to the movement must be adjusted using wing nuts that are attached to the crossbar.
How to make a Tornado cultivator with your own hands: drawings and manufacturing steps
In the gardening market, a relatively simple, in terms of design, but quite effective device called the Tornado cultivator is increasingly found. This unit is a kind of corkscrew, mounted on a vertical stand and having a horizontal handle.
The easiest way to make this version of manual equipment yourself is to use ordinary gardening forks and a plastic handle attachment for the cutting. The step-by-step technology for manufacturing a homemade Tornado unit is as follows:
- prepare a piece of plastic pipe, the length of which should be 50 cm;
- the diameter of the plastic blank should slightly exceed the thickness of the plastic handle attachment;
- the pipe must be carefully cut lengthwise, which will allow you to turn it out and put it on the handle, and then secure it with electrical tape;
- a correctly assembled handle has edges protruding on both sides of the handle by about a quarter of a meter;
- The teeth on the forks need to be given a corkscrew shape characteristic of the working unit using a regular hammer.
The bends on the teeth should imitate as accurately as possible the shape of the working part of the original Tornado cultivator.
Homemade manual cultivator from a bicycle
To make a convenient and durable unit yourself using available materials, you need to prepare an old bicycle frame and one wheel. The step-by-step method for assembling such an agricultural unit is as follows:
- fix the cultivator head on the frame, which can be used as ready-made parts of an old device or a self-made structure based on steel rods;
- install a frame, which is best used as a small plow;
- such a homemade cultivator is controlled using a handle made on the basis of a standard steel pipe;
- install a crossbar from a pipe with a diameter of 20-30 mm.
It is recommended to secure all parts of the structure assembled from the bicycle with a reliable bolt connection. To ensure ease of control, the unit is complemented by a medium-sized wheel, which is secured with locknuts. This version of the cultivator is optimal for removing weeds between the beds.
Homemade manual cultivator with attachments (video)
How to make an electric cultivator
There are several known options for manufacturing such a device, but the most popular variety is a homemade electric cultivator based on the engine of a conventional meat grinder:
- the gearbox and electric motor are located on the frame;
- the working parts of the mechanism are fixed to the output shaft of the gearbox;
- The steering wheel and wheels are attached to the frame.
The device moves independently or manually, using a pair of handles on which the engine start button can be located.
Standard set of parts and materials required for the manufacture of an electric cultivator:
- engine from a meat grinder;
- tubes and angles;
- medium-sized bicycle wheels;
- screw and crowbar;
- welding machine, hammer, pliers and a set of wrenches.
Self-production technology:
- adjust the parts to the size of the engine from the meat grinder and assemble the frame;
- weld a couple of corners onto the gearbox housing;
- weld a couple of pipes to the corners on the gearbox;
- bend the ends of the welded tubes to make it easier to grip the handles and weld a crossbar to add rigidity;
- grind the shaft out of scrap and secure the cast iron bushing of the meat grinder, then weld the screw that acts as a lug.
When a homemade electric cultivator moves at high speed, the screw breaks the soil into large lumps. In the process of slow movement, the rolled soil acquires a finer structure.
The productivity of this design is about three hundred square meters at a time. Average electricity consumption varies within 2 kW.
From a drill
The simplest mower is made in a matter of minutes from a drill or screwdriver . But first you must make a knife from a sharpened metal plate with a hole drilled in the center. A bolt is inserted into this hole and tightened with a nut.
Next, the bolt is clamped in the drill chuck, and the trimmer is ready.
Since a drill with this attachment does not have a protective casing, such a tool is quite dangerous for the user. To protect yourself, you can place the drill, like a grinder (discussed above), on the handle of a shovel or on an aluminum pipe.
Also, to protect the user of the mower from knives, a casing can be attached to the drill (attached to a plastic pipe and placed on the body of the device).
The drill is attached to the rod using clamps.
How to choose the right ready-made cultivator in the store
The process of choosing such a technically complex product as an agricultural cultivator does not cause difficulties, but requires mandatory consideration of the following nuances:
- power parameters for gasoline models are expressed in horsepower, and for electric models in kW;
- the standard power range, regardless of engine type, is 4-8 hp, but the optimal and most economical power is 6.0-6.5 hp.
- the value of the working width is determined by the distance between the leftmost and rightmost cutter, but in amateur models it is limited to 85 cm.
- the presence of four or more cutters in the working body of the equipment makes it possible to change the working width towards decreasing and increasing;
- in a medium-static mechanism, the tillage depth is most often 330 mm, but if necessary, you can choose more or less productive models;
- a significant part of low-power and light models are equipped with one standard gear, which allows forward movement, and a small force helps to turn the unit in the direction required for work;
- on heavier models, the presence of reverse gear is a necessity, allowing you to give heavy equipment the desired direction;
- The engine can be two-stroke or four-stroke, which has a direct impact on the power of agricultural equipment.
It should be noted that two-stroke engines are easier to maintain, but quite noisy. When choosing factory models, you must also remember that a flat cutter exclusively trims all newly emerging shoots, and the use of flat cutters allows you to make a kind of batch from the soil.
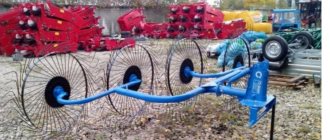
Traction wheels
Designed for use of walk-behind tractors in different conditions. They will cope perfectly with the load when transporting heavy objects, and are simply useful for driving on roads and flat surfaces.
Thanks to the special herringbone tread pattern, pneumatic traction wheels can also be easily used for heavier work - plowing, cultivating, hilling, etc. This type of tread allows you to work on sticky or loose soil without much difficulty, without fear of that the unit will get stuck.
Typically, this type of wheel has fairly wide tires (more than 20 cm) and a large rim diameter (40 cm or more).
Special types of traction wheels for walk-behind tractors are solid and lug wheels.
Solid wheels are characterized by increased strength and a more powerful tread.
Lugs are a special type of wheel, consisting of steel rims and special teeth, which are shaped like the same herringbone tread. Although this type of wheel is not large, its weight and design allow it to perform work even on the most difficult soils.
How to make a cultivator with your own hands (video)
The most popular and highly productive models of cultivators are sold at a fairly high cost, but are equipped with a whole set of replaceable working parts, which makes their use convenient and multifunctional. However, the presence of a relatively small area for processing makes it possible to use self-made, practical units.
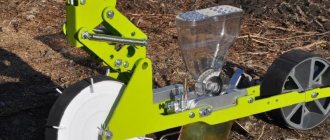
A cultivator is an agricultural equipment that is designed to loosen soil. This tool is an indispensable assistant on a summer cottage, without which cultivating the land can become a real headache. Modern cultivators are quite expensive, so not every summer resident can acquire such a unit. The way out of this situation is a homemade cultivator, which will cope with the task no worse than purchased equipment. Therefore, further we will consider how to make a cultivator at home.
Top 5 best gas trimmer attachments for weeding
Before ordering a trimmer attachment, read the description and characteristics of the top designs. Study their advantages and disadvantages, value for money. Well-known manufacturers: Bosch, Echo, Elitech, Husqvarna, Patriot, Oleo-Mac, Stihl, etc. The best attachments for gasoline trimmers are:
- KAAZ Kat-MC250P for VSP255S;
- ECHO PAS-Tiller Cultivator for PAS-265ES;
- KR400MP MAKITA 195710-3;
- Oleo-Mac CULT;
- for TAC petrol mowers.
KAAZ Kat-MC250P for petrol mowers VSP255S (244G03)
The cultivator attachment for the VSP255S trimmer has a subsoiler, thanks to which you can change the plowing depth. Suitable for processing small gardens. Due to its compact size, the nozzle is suitable for cultivating soil cultivated around flowers in flower beds, loosening the soil around trees and in hard-to-reach places. It effectively fights weeds. More details:
- price: 9990 rub.;
- characteristics: suitable for Caiman VSP255S, knife material – high-strength steel, working width – 240 mm, depth – 360 mm, manufacturer – Kaaz (Japan);
- advantages: wide range of action, ability to adjust plowing depth, strength;
- cons: fits only on one trimmer model.
ECHO PAS-Tiller Cultivator for brush cutters PAS-265ES
This attachment was created specifically for the PAS-265ES brush cutter for the purpose of processing small areas, flower beds and lawns. It is compact, but not effective for weeding large areas. The design is characterized by good strength and durability. It can replace a whole range of working tools for the garden. Weeding will be quick and effective. Options:
- price: 17800 rub.
- characteristics: manufacturer – ECHO (Japan), compatibility – with PAS-265ES, gross weight – 3.36 kg;
- pros: compact, maneuverable, high quality workmanship, easy installation;
- cons: expensive, suitable for one brush cutter.
KR400MP MAKITA 195710-3
The trimmer attachment from the Japanese manufacturer will greatly simplify the care of your summer cottage, small garden or garden. It is also well suited for landscaping lawns and flower beds. Weighs slightly less than other analogues for weeding. The design is generally reliable, made of metal. The cutting element is cutters. Options:
- price: 17160 rub.
- characteristics: tool model – EX2650LH, DUX60Z, width – 16 cm, cutter diameter – 23.2 cm, manufacturer – MAKITA (Japan);
- pros: good efficiency, high reliability, ideal for weeding small areas;
- cons: high cost.
DIY cultivator construction
On the agricultural equipment market, cultivators are represented by various models, which differ in power, design, dimensions and capabilities. These can be manual, electric, gasoline units and walk-behind tractors.
Although you are unlikely to be able to construct a walk-behind tractor with your own hands, lighter manual devices for cultivating land will be within the power of every summer resident. Next, we will consider several models of homemade cultivators that can be made at home:
- cultivator "Tornado";
- bicycle-based cultivator;
- chainsaw cultivator.
Return to contents
How to make a “Tornado” type cultivator?
The easiest design to implement is the Tornado cultivator. This device resembles a corkscrew, which is equipped with a vertical stand and a horizontal handle. To make such a model you will need the following tools and materials:
- hacksaw for metal;
- hammer;
- file;
- spring steel belt or ordinary pitchfork;
- wooden stalk;
- plastic pipe;
- plastic handles;
- insulating tape.
The attachment for the “Tornado” can be made in 2 ways: from a fork and spring steel. In the first case, the attachment for the tool will be an ordinary fork, the teeth of which must be given the desired bend with a hammer. After this, the nozzle is attached to a wooden handle. To make this DIY cultivator easy to use, you need to buy plastic handles at a hardware store, which are used for various equipment (forks, shovels, sap, etc.).
A piece of plastic pipe 50 cm long will serve as a lever. When choosing the diameter of the pipe, keep in mind that it should be slightly larger than the thickness of the plastic handles
. The plastic pipe is cut at both ends so that they turn out and fit onto the handles. To fix the handles more securely, you can use electrical tape. As a result of this operation, you should get a lever that protrudes from the handle on both sides by 20-25 cm. The last stage of work will be attaching the handle to the lever.
As a nozzle, you can also use a steel strip 0.5 m long, 20 mm wide and 1.0-1.5 mm thick. The tape is bent into a loop and attached to a wooden handle. In this case, the edges of the tape are carefully sharpened with a file, which will make it easier to work with such a cultivator.
Return to contents
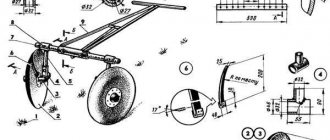
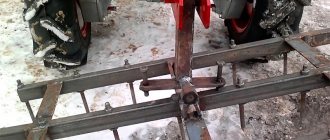
Homemade cultivator based on a bicycle
To make a cultivator of this type with your own hands, you need to prepare:
Figure 3. Diagram of a homemade cultivator made from a children's bicycle.
- welding machine;
- hacksaw for metal;
- pliers;
- a set of keys;
- bicycle frame and handlebars;
- wheel;
- pointed paw;
- fasteners;
- paper;
- pencil.
First, you need to make a diagram of the future product on a sheet of paper. In Fig. Figure 3 shows an example of a cultivator made on the basis of a bicycle. After this, install the cultivation paw on the bicycle frame using a fastening block and secure it well with bolts so that it does not dangle during the work.
The cultivator wheel should not be too large or too small, because in both the first and second cases such a device will be inconvenient to work with.
As a control element, you can use a bicycle handlebar or metal tubes welded together in a T-shape. After installing each element, it is necessary to check the reliability of its fastening. After assembly is completed, the cultivator can be painted in a practical color to give it a beautiful appearance.
Anyone who has experience is familiar with the manual technology of hilling bushes.
In order to facilitate this process, you can make a hiller out of a bicycle with your own hands.
Additional attachments
In addition to the cultivator attachment, stores have many other devices that are mounted on the trimmer, these include:
- Drill. When installed on a gasoline trimmer, you can work without electricity.
- Lopper. It works on the principle of a hacksaw.
- Gardening scissors. With their help, it is easy to trim bushes, trees and tidy up hedges.
- Aerator. Destroys the crust on the surface of the lawn.
- Height cutter. Using this attachment you can remove branches at a height of up to 4 meters.
- Snow blower. Designed for removing snow from garden paths and areas.
The downside of all these useful attachments is their high price. Also, when equipped with any attachment, the weight of the trimmer will increase by 5-6 kg; not everyone will be able to work with such a tool.
To make your gardening easier, you need to purchase several different trimmer attachments. If your budget is limited, then you can make accessories for brush cutters yourself.
Operating principle
It’s easy to understand how your labor costs will be reduced. The operating principle of a homemade potato hiller is simple.
Did you know?
In Europe, potatoes began to be grown in the middle of the 16th century.
The main part of the unit, which goes 10-15 cm deep into the ground, is made conical or in the shape of an arrowhead. The blades are placed at such an angle that the soil between the rows moves apart to the required width and covers the row. The width will depend on the width of the row. This part is attached to a bicycle frame with handlebars. It is the steering wheel that controls the entire unit. And what makes the job easier is the wheel that moves in front.
Thus, the process of hilling potatoes is carried out by the following steps:
- we go deep into the ground;
- move it using a wheel;
- We control the unit using the steering wheel.
The process of hilling potatoes is easier than if you did it manually with a glander, hilling each bush separately. The work goes much faster and with better quality. This treatment is suitable for plantations planted in rows and ridges.
How to make a potato hiller with your own hands
You can understand how to make a potato hiller with your own hands by reading our article. This is not difficult to do for the owner who has the necessary tools, an unnecessary old bicycle, a section and, of course, the desire.
Materials and tools
To make a manual potato hiller, you need, first of all, a cultivator part. Here you can use a ready-made section of a conventional tractor cultivator; you can weld the cultivator by placing the blades at the desired angle. You will need the frame of an old Soviet bicycle with one wheel (26-28 inches). It is better to remove the rubber from the wheel, leaving the rim “bare”. The metal cuts into the ground better, so the finished unit is easier to control. There should be a handlebar on the frame. Naturally, you will need both bicycle wrenches and wrenches.
Electric cultivator device
Using the example of the “Mole” mini-cultivator, well known since the 1980s, you can try to create a similar thing yourself. At first, it will be imperfect, but as you gain experience in making homemade products, such equipment becomes not only easy to use, but also multifunctional, and ultimately indispensable on your own plots of land. In order to make an electric cultivator with your own hands, the drawing and diagram are presented in the pictures.
Essential elements
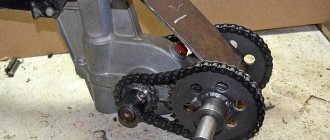
The drawing shows the optimal version of the device. If desired, it can be simplified based on the availability of the necessary parts and the direct purpose of the unit. For example, you can remove the gearbox and shift handle and transfer the engine rotation through the intermediate shaft directly to the working element with knives. In this case, the clutch serves as a belt tensioning roller - this is also removed. And also for ease of control, you can assemble a single-wheeled cultivator.
The rotation speed of the loosening knives is controlled by the diameter of the driving and driven sprockets. By the way, instead of them and chains, various pulleys and belt drives are used. This lightens the weight of the unit and eliminates noise. In addition, the belt slips when the working knives hit stones or bush roots, which has a beneficial effect on the operation of the motor.
Three-phase motor connection diagram
Here Cp is the working capacitor. Simplified connection is often used
, that is, without Wed. When starting the engine, the starting capacitor Sp is connected and then disconnected. To do this, use a button (Kn) from an old washing machine or a circuit breaker, which is used on home electricity meters.