Over the long period of its production, the Belarus MTZ 80 tractor was equipped with two types of cabins: a small one with catalog number 70-6700010 and a large unified one with catalog number 87-6700010. Frame units differ from each other: in size, shape, glazing, internal placement of controls, space for the control panel, placement of the heating and ventilation system.
Possible cabin modifications
Among all the options, it is worth noting first of all the installation of a small cabin.
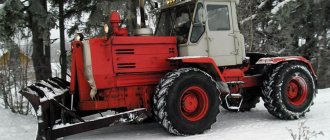
In this case, the modification is aimed not so much at increasing comfort for the driver (rather, on the contrary), but at expanding the capabilities of the car. Installing a small cabin gives a noticeable reduction in the overall height of the tractor, which literally opens up new possibilities - the machine can easily drive into gates and openings with a height of 260 cm. In the photo of the MTZ cabin it is easy to recognize by the changed proportions of the tractor - it becomes more squat, because loses 28 cm in height.
Many people prefer to tune the tractor themselves
Tuning options
The most interesting options can be seen when considering the tuning of the MTZ 82 tractor with a large cabin. Improvements are being made in the following main areas:
- improving working conditions (window tinting, replacing the stove and ventilation, installing a radio, replacing the seat);
- improvement of appearance (body painting, installation of attachments);
MTZ tractors were designed at a time when they didn’t think about driver comfort, and there weren’t many opportunities for this. Today, tractor owners have access to all the achievements of the automotive industry, from films on glass to climate control systems.
Of course, not every driver will invest in high-quality air conditioning for their workhorse, but in the midst of summer field work, maintaining a comfortable temperature in the cabin is very important. This can be achieved not only by improving ventilation and installing climate control equipment, but also by tinting windows
Modern films effectively block ultraviolet and thermal radiation and provide comfort in bright directional light.
Be sure to read: Pump MTZ 80
The same goes for the stove. Standard devices performed well in temperate zones, but when working in northern latitudes, it may be necessary to install more powerful equipment, as well as add ventilation ducts to ensure uniform airflow into the cabin.
Replacing seats is a relevant upgrade for drivers who spend several hours a day at work. Buying an ergonomic driver's seat is not a problem; installing it in a limited cabin space is more difficult. It is recommended to install high chairs of small sizes.
For greater comfort of the tractor driver, the seats in the cab are replaced
A music system is a great way to improve your work efficiency. The main thing is to choose the installation location so that the driver can conveniently adjust the sound and switch recordings without being distracted from the controls. An interesting option is on the side above the window. The subwoofer is placed behind the seat, and the speakers are placed on the sides to achieve even sound.
Illumination of the dashboard and interior is necessary not only for night shifts, but also for those living in northern latitudes with short winter daylight hours. The optimal choice is economical and durable LED lights. They provide a sufficient amount of bright, even light in the cabin and do not overload the battery. Less bright LEDs are chosen for the dashboard than for interior lighting.
A tractor that frequently moves between work sites can be equipped with a navigator with a GPS tracker. This is really useful for tracking movement and counting machine hours. And it is necessary for those who use the tractor not for work, but as a means of active recreation - the circle of such owners is narrow, but makes up a significant share in tractor tuning.
Body decoration is not only a luxury, but also a means of ensuring safety. A brightly painted tractor is visible from a distance in a field or forestry; it is clearly visible on the road in difficult conditions (fog, snowstorm)
If desired, you can use airbrush, but before doing this it is important to carefully prepare the surface, since any unevenness will distort the design
Be sure to read: Repair of power steering on MTZ-80
Powerful headlights are another way to ensure comfort at work and safety on the road. Headlights and lanterns are subject to the same requirements as for passenger car lighting: they must be within the legal brightness range and not overload the battery.
You can also see tractors with decorative moldings and radiator grilles, sill guards and wheel caps. There are bodies stylized as steampunk, with interestingly designed exhaust pipes and decorative grilles.
Design and internal arrangement of modern MTZ cabins
Modern MTZ 80 cabins, like MTZ 82, are presented in the form of a rigid frame and a sealed structure, which is attached through shock-absorbing cushions, thereby reducing the level of vibration and vibrations that appear during various work tasks. A lighting shade and a sun visor are attached to the cabin frame, as well as a hanger on which outerwear or other items can be hung.
For work in the hot season, microclimate devices are provided, in particular, air conditioning, opening windows and a sunroof. Experts know that when working in summer, the temperature in the cabins can reach 60-65 degrees, this is especially noticeable during long continuous work.
MTZ cabs are equipped with a comfortable seat and control levers
Air conditioners installed in modern MTZ tractors can reduce any temperature to 20-25 degrees in just 5-10 minutes. Also, it is worth noting that the glass installed in the frame of the cabins of the Minsk Tractor Plant products is made on the basis of a heat-absorbing substance, due to which excessive heating of the air inside the cabin is almost completely eliminated.
At the same time, the Minsk Tractor Plant equips models 80 and 82 with cabins that receive air purified from dust, smoke and other harmful factors. This is achieved through the use of a multi-stage air filtration system. However, in order for the microclimate to meet the requirements, it is necessary to keep the windows and hatch closed.
Cabins on MTZ 80 and cabins on MTZ 82 allow you to work in comfortable conditions, both in summer and in winter. The cabin heater is a stove that is connected to the engine cooling system and has several operating modes that allow you to set the desired temperature, regardless of the weather outside.
The role of the stove is not only to heat the cabin, but also to prevent the windows from fogging, in particular during rain, snow or fog. Moreover, if there is no need to use the stove, for example, in the warm season, it is very easy to turn it off - just turn on a special tap.
Distinctive advantages of MTZ cabins
A distinctive feature of the cabins of all modern MTZ tractor models is the possibility of a 360-degree view. You can understand this simply by looking from the outside at what a tractor with an MTZ cab looks like.
Almost completely glazed side doors, large front and rear windshields, and even a glass sunroof built into the roof, as well as additional viewing windows mounted on the cab walls, all provide such broad visibility that increases comfort while driving. In addition, large rear-view mirrors are installed on the outside of the cab on the right and left sides, which are easy to adjust.
Description of cabins
The MTZ-82 offers two types of cabins:
- large or unified;
- small or low profile;
- There are also old-style cabs that can be seen on used tractors.
The production of cabins for MTZ tractors began in 1958. Initially, the design was removable, which made it possible to use the cabin either completely closed or in the form of an awning. The old-style MTZ cabin had the same angular shapes as today, but simpler materials were used in the casing, and the glass was smaller. Its use significantly improved the working conditions of tractor drivers, since dust easily accumulated under the awning, and it also provided almost no protection from noise. In 1974, serial production of the updated MTZ-80 model with various modifications began. Improvements have been made to visibility, noise and vibration levels, and the instrument panel has also been modernized. Today, strong sheet steel and profiles connected by welding are used for production. Insulation is placed under the inner lining, which at the same time provides sound insulation. Four shock absorbers provide vibration protection.
The tractor has several cab options
Tractor owners who had the opportunity to compare old and new cabs note that modern models have:
- excellent visibility due to the increased window area;
- comfortable microclimate due to high-quality insulation of windows and doors, as well as a rational heating and ventilation system;
- the presence of windshield wipers at the front and rear, which facilitates work in dusty and dirty conditions (for example, when harvesting in wet weather);
- convenient placement of controls and instrument panel;
- stairs with handrails on both sides;
- soft seat with torsion bar suspension and adjustable height, tilt and distance to the steering wheel;
- improved interior design.
Be sure to read: Attachments for minitratcore
Optionally, air suspension and hydraulic shock absorbers can be installed, the rigidity of which can be adjusted.
Small cabin
Low-profile MTZ 82 with a small cabin of reduced height were designed primarily for work in warehouse and industrial premises. The height of such a tractor is only 2600 mm. This allows the machine to easily drive into gates and openings with a height of 260 cm. Otherwise, the small cabin has the same parameters and characteristics as the large one; they are completely interchangeable and do not require additional modifications. At the same time, enough space is maintained above the operator’s head so that a person of average height can work comfortably and safely.
Important Review of the Belarus MTZ-92P universal tractor and its modifications
Dimensions:
- length - 195 cm;
- width - 140 cm;
- height - 1450 cm.
- weight - 380 cm.
Small cabin MTZ
Low profile
A small or low-profile cabin is installed when performing work related to:
- loading pallets in warehouses;
- movement in openings, tunnels, under bridges;
- repair of floors and ceilings in premises;
- transportation of goods indoors;
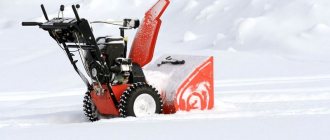
- clearing snow in historic areas with low arches or under trees with low-growing branches.
Large cabin
Installed on the vast majority of tractors used in field work and any open area where height does not matter.
Dimensions:
- length 180 cm;
- width along the wings - 160 cm;
- total height - 160 cm;
- height from the wing - 95 cm.
- weight - 380 kg.
Unified
A large or unified cabin is installed in the following cases:
- field work;
- work in forestry, road and site construction;
- digging trenches, planning slopes and slopes;
- transportation of goods.
In all these cases, it will provide operator comfort and will not affect the performance of the tractor.
Large MTZ cabin
Manufacturing technology
A win-win technique in making a cabin yourself would be to use certain constant parameters in the design, from which you can start to build the frame. Such constants in this situation are the dimensions of standard glass for a factory-made cab. Linking to the glass sizes will ensure, one way or another, the most identical dimensions of the frame, which will organically fit into the overall design of the machine.
The idea of tying it to the external dimensions of the original cabin does not make sense in this situation, since it will not be possible to repeat the dimensions, configuration of factory frame elements and the accuracy of welding of the structure under normal metalworking conditions.
Use templates
The simplest solution to the issue of modeling is to make several templates that will help you avoid mistakes in dimensions and will help in the manufacture of both individual elements and when welding them together into a single frame structure.
Since we decided to take the factory dimensions of the glass as a basis for modeling the frame, the first thing we need to do is to make several templates from sheets of chipboard or other rigid sheet material. Using fixing clamps and templates, it will be convenient before directly welding the structural elements to set and check by measurement their correct relative position.
The main condition when making a frame template for glass is a mandatory overlap plus 10-8 mm to the net size of the glass on each side; this gap will ensure that the glass can fit into the profile rubber seal of the opening.
Other templates are made to establish the correct relative position of the front and rear parts of the frame and its side walls.
Front and rear cab frame
The first step is to weld two identical frames using a windshield template and a 50X50 mm pipe. These parts will be the basis for welding the frame into a solid structure.
The main point when making two identical frames is maintaining the corners according to a template in the form of an isosceles trapezoid. Having completed the complete preparation of the frame parts, the first step is to fasten the parts at the corners with turned welded tacks, thus providing the opportunity to correct errors if the structure fails. After checking the frame for compliance with the dimensions and parallelism of all the planes of the same name, the glass is tentatively installed in the opening on a rubber profile. If successful, all joints are finally welded and the open ends of the pipes are welded, having previously firmly fixed the welded structure.
Next, two gusset frames for the lower small side front windows are welded to one of the finished frames, simultaneously forming a 600 mm wide opening in the center to accommodate the hydraulic unit of the tractor hydraulic system. It is important to maintain the symmetry of the angles of inclination of the outer parts of small openings, since the lower beveled profile of the cabin and the plane of the door crease will be formed along it.
Frame formation
At this stage, to form the overall volume of the cabin, a template is used that emulates a longitudinal section of the cabin, which will ensure the correct distance between the front and rear walls of the frame, taking into account the inclination of the windshield and rear glass, as well as the placement of side windows and doors. The length of the longitudinal template is formed by the total length of the templates for the side and door openings, the width of the reinforced vertical pillar (100 mm), the corresponding overlaps for the door rebate and installation of the side glass.
After the longitudinal template is installed, the upper corners of the same name on the front front frame and rear frame are welded with pipes, forming a rectangular roof contour. Naturally, before tacking, the consistency of all angles and dimensions of the structure being welded is checked.
Next, to continue the formation of the side openings of windows and doors, after mandatory control measurements, the resulting structure is fixed with temporary tacks using metal pipes. The rigid position of the front and rear frames will allow both sides of the frame to be formed as identically as possible, where the error should not exceed more than 3 mm.
Door openings
The next step is to separate the door opening and side window by welding a reinforced vertical pillar perpendicular to the longitudinal roof pipe. Having a side window template, a complete side frame is immediately formed by welding the lower pipe between the rear frame and the reinforced B-pillar.
Forming a doorway is the most difficult process; maximum scrupulousness will be required in terms of maintaining parallels and angles when organizing a break in the doorway. It is immediately recommended to make the upper door frames from 25x50 pipes. For a normal door rebate, the frame should cover the upper door opening between the reinforced middle and front pillars with a vertical gap of 10 -12 mm.
The first step is to weld a horizontal pipe for the door threshold, one end of which is welded to the outer lower corner of the small frame, and the other (the rear edge of the threshold) remains free for connection with the strip from the rear edge of the break line of the door leaf. When forming a threshold, it is important to maintain parallelism to the line of its position with the horizontal break line of the door frame and other horizontal longitudinal elements of the frame, and the angle of inclination of the outer edge must fully correspond to the inclination of the bevel of the outer side of the lower small frames (trapezoids). Taken together, the continuation of the inclined outer edge of the threshold forms the inclined plane of the door up to its fracture line. After welding both thresholds, it is necessary to take measurements to ensure that the position of both elements is completely symmetrical.
The final stage connects the free edge of the threshold and the reinforced frame post, forming a complete door opening. Here, when welding, it is also necessary to ensure compliance with the fracture plane of the door and the strict horizontal position of the bend line itself. To form the upper connection point, it is necessary to bend the edge of the lower salted post. To facilitate bending, you can use a gas burner to heat the metal. Having a ready-made door opening, a complete door frame is welded using door glazing templates with gaps along the rebate on the awning side of 3 mm, on the lock side 8-10 mm.
The final stage
Subsequent operations in the manufacture of the cabin are secondary and do not constitute much complexity: to install seals in the perimeter of the openings, they are scalded with a mounting strip (noodles) and corner gussets, door canopies are welded in, locks and door handles are installed, critical welded joints can be reinforced with welded overlays into the plane of the roof A cross beam can be welded between the tops of the reinforced posts to provide security and additional rigidity.
Welding of the cab fastening parts to the frame, stiffening ribs under the driver's seat, bottom, rear wall and wings is carried out in place, installing the frame on the tractor frame and ensuring that all gaps are maintained in relation to the wheels, fuel tanks and hydraulic unit.
It is better to make the cabin roof with small curved overhangs and boxes for the upper front rear lights. The inner side of the roof is equipped with fastening elements for installing insulation and decorative upholstery. The wings and cabin entrance steps are made similarly to the original ones.
Having carried out a full check of all welds, in the state of the cabin being rigidly attached to the frame, markings and slots are made for all drives of controls and wiring. After ensuring the operation of all controls, after priming and painting, dust and noise insulation and interior upholstery are performed.
Tuning the cabin of MTZ 80, 82
All changes inside the tractor are carried out to improve comfort in the cab. In modifications of tractors produced quite a long time ago, there are no such convenient devices as a radio tape recorder, additional lighting, or a navigation system.
Additional devices are easy to find on sale. This significantly expands the possibilities of tuning the MTZ 80 cabin in terms of using diodes in the lighting, installing a comfortable seat, and tinting the windows.
Improving vehicle performance
One of the most popular areas of internal tuning of a tractor is improving the cross-country ability and traction parameters of the machine.
An interesting option is the installation of a GAZ-66 bridge. When carrying out such work, it should be taken into account that:
- It will be necessary to manufacture an intermediate gearbox that ensures transmission of revolutions;
- To attach it to the tractor, you need to weld a special bushing to the bridge;
- The gearbox of the main pair of the new bridge needs to be shortened so that it stands in the center.
In any case, it is better to trust such work to specialists. Timely maintenance helps maintain the power of tractor equipment. It is possible to increase power by replacing the turbine or the entire engine with a more powerful one.
Often, when tuning MTZ, it pays to install the best units from other tractors of the brand.
But these works will have to be legalized by registering with the authorized bodies. Also keep in mind that the price of a “remodel” may be comparable to the cost of a new car.
Where to buy spare parts for tuning the MTZ cabin?
On our website you will find the most complete range of spare parts for vehicle modernization.
If you don’t know how to choose components, call the manager by phone. A specialist from our company will help you not only quickly select the necessary parts, but also organize delivery to any city in Russia.
DIY cabin for MTZ tractor
It happens that one of the equipment elements fails. Tractor cabins are no exception. Tractors without cabs can also be used, but the number of possibilities and level of comfort are reduced to almost zero, especially in bad weather.
Many of those who have their own minitractor with a cab also note its superiority over devices that are not equipped with this part. It is easiest to build a structure for the “habitation” of tractor drivers on a device with a small cabin; units with a large cabin will require much more time and effort.
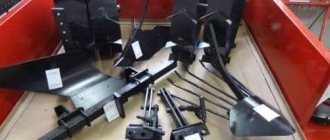
The easiest way is to make a single-seat cabin with a frame made of durable steel. To complete this homemade project you will need the following parts:
Drawings of a homemade MTZ cabin
- work space of sufficient size;
- steel sheets 1-2 mm thick;
- welding installation;
- carpentry and joiner's tools;
- a hacksaw, or better yet a grinder with a metal disc;
- a set of power tools, including a screwdriver and an electric drill with metal drills;
- pipes made of durable steel (suitable from old motorcycle frames);
- bolts with nuts, self-tapping screws and other components intended for fastening something;
- wooden blocks measuring 1.6 cm by 6 cm;
- set of glasses (back, sides and front).
The work process can be divided into the following stages:
- draw a drawing of the future product, taking into account all the dimensions you need. Front windows are usually taken as a basis. Also, when choosing dimensions, keep in mind that there should be at least 20-25 cm from the operators head to the roof;
- Based on the intended dimensions, cut the wooden beam, then connect it together with self-tapping screws;
- position the pipe along the outer contour of the beam and adjust all the joints that exist, then spot weld;
- align all existing joints parallel and cover the corners with the profile;
- turn over the assembled part of the structure, place it on a flat surface and weld the glass openings;
- prepare 1.2 mm metal for the roof and 2 mm for the wings and floor, cut it strictly following the dimensions in the drawing. It is optimal to cut metal using a grinder with an appropriate disc;
- form the base of the doors from the profile frame. By the way, doors must be equipped with gas lifts;
- Based on the position of the side windows, set the angle for the rear and center pillars. After this, cut the central one and weld the transverse post;
- cut a pipe with a diameter of 10 cm lengthwise. Weld a steel sheet to each half, which will act as a roof, and connect it to the common part of the frame. The roof and frame should be connected by spot welding or bolts;
- the last stage involves covering the inside of the product. Take foam rubber and cover the metal base of the cabin with it. Cover the foam rubber with leatherette, using metal screws for good tension.
Having completed all the steps, all you have to do is purchase a comfortable chair on which the operator driving the tractor will sit. You can buy a chair, or you can, if you wish, rummage around in the garage or ask your friends, maybe someone is planning to throw away what you are looking for.
A cabin for a mini tractor with your own hands, of course, will not replace the factory model, since manufacturers of modern tractors equip them in compliance with all modern standards, but if there is no money to buy a new part, then you can use your own strength, mind and hands. A homemade MTZ cabin is a fairly common occurrence among owners of this equipment. However, the most common thing in everyday life is the cabin for a mini tractor, which many also make on their own.
MTZ-80.82 Tuning Cabin, steering, how to remake the stove
The idea of combining diesel and gas is far from new. For several years now, companies have been operating in our country that, for a fee, supplement diesel engines with gas cylinder units.
However, these companies mostly work with automobile engines (dump trucks, tractors and various cargo vehicles). However, a tractor can also be converted, eventually replacing up to 80% of diesel fuel with natural gas.
- First, we install the gas supply system to the engine, install all the necessary sensors, install the injection reducer and electromagnetic gas injectors.
- Then we install a suitable diesel fuel supply limitation system. It all depends on the type of motor. So, for example, an electronic actuator is installed on engines with a mechanical fuel pump, and on engines with electronically controlled fuel systems we install a special control unit that limits the supply of diesel fuel.
The advantages of the gas-diesel modification are obvious:
- Diesel fuel saving.
- The time of using the tractor without refueling is almost doubled.
- Safe to use.
- Increased engine overhaul period.
Half-track and 8-wheel tractor
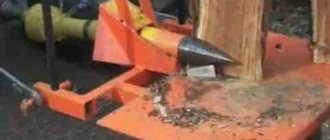
An effective means of increasing the cross-country ability of tractors of the MTZ family is to install on them a so-called “half-track”, which consists of two rubber-metal tracks and two sets of tensioning devices. The caterpillar, in turn, covers the drive wheels, as well as installed additional tension wheels.
The half-track installation looks like this:
- A balancer with a tension wheel is assembled.
- The drive and guide wheels of the tractor are installed on the track.
- The tractor step is removed.
- Tensioners are installed.
Spring shock absorbers are located. The half-track tension wheels are installed to the track size, which must be equal to the track of the tractor wheels. The tracks are stretched by lugs onto the ground so that the location of the bosses on them coincides with the direction of the tread pattern of the tires of the driving wheels of the tractor. The wheels are covered with tracks. The tire pressure of the tractor wheels is checked (it should be 0.137 MPa for the rear wheels and 0.216 MPa for the tension wheels) and the track tension is adjusted.
8-wheel tractor MTZ-3522
Another option to increase the tractor's maneuverability and reduce its pressure on the ground is to convert the equipment to an eight-wheel base. This modification is best carried out in a specialized center.
Installation of the GAZ-66 bridge at MTZ
Another tuning option aimed at improving the MTZ’s cross-country ability, as well as its traction characteristics, is the installation of a GAZ-66 axle
This type of alteration is extremely complex, so we strongly advise you to carefully study this issue on the Internet, and when working directly, pay attention to the following points:
- To transmit speed, it will be necessary to make an intermediate gearbox.
- A bushing should be welded to the bridge to secure it to the tractor.
- The drive can be supplied from some 150-horsepower MTZ (if, for example, you install a GAZ bridge on the 82nd Belarus).
- If the gearbox of the main pair of GAZ-66 extends beyond the width of the tractor, then it is better to shorten it. So it will stand in the center, like at the MTZ bridge.
Ways to increase the power of MTZ tractors
As obvious as it may seem, one of the main ways to, if not increase, then at least maintain the power of any tractor is to carry out timely maintenance and repairs - do not forget about this.
Driver's seat
The tractors are equipped with single-seat cabins with increased sealing, a rigid, high-strength frame that protects the driver from turning over the agricultural machinery. The comfortable seat is equipped with seat belts, torsion bar suspension, and a hydraulic shock absorber.
If necessary, the driver's seat is adjustable in position and degree of rigidity. Additional comfort is provided by adjusting the steering wheel to suit the height and build of the driver, which guarantees ease of entry and control.
Control system
MTZ 82.3 was the first version of the MTZ 82 tractor, where the manufacturer introduced electro-hydraulic drives into the control system, significantly increasing control ergonomics. For this purpose, the transmission is equipped with a separate hydraulic system that ensures the operation of multi-disc hydraulic clutches. Thus, this drive with push-button control on the side panel received differential locking systems for the rear axle, a rear PTO gearbox, and FDA drive modes. The tractor is equipped with the most modern control panel with a liquid crystal screen, which provides complete control of the status and operation of all tractor systems.
Important Features of operation and repair of Chinese front loaders
Control mechanisms
Depending on the model of agricultural machinery, the layout of the tractor cabin may differ. Often, engine operation is controlled through a lever, a fuel pedal, an emergency stop handle, or a radiator shutter flywheel. Other controls include a starter switch, additional levers, handles and buttons.
The internal equipment consists of such parts as:
- Transmission controls: handle, differential lock, pedals, brakes, gearbox, lever and PTO shift lever and other elements.
- Attachment control system: canopy locking levers, regulator switches, hydraulic hook activation handles, handwheel, etc.
- Attachment control system: canopy locking levers, regulator switches, hydraulic hook activation handles, handwheel, etc.
- Units and systems for the functioning of electrical equipment: dimmers, headlight switches, turn signals, sound warning buttons, actuation of windshield washers, etc.
- Instrumentation indicating water temperature, air, oil, and fuel pressure levels. There are also indicator lights, an ammeter, and a tachometer speedometer.
The cabin also has a heating and cooling unit mounted on the left side of the driver's seat. It is represented by an external air intake, filters, water tanks, heaters, coolers.
Technical data MTZ-80
MTZ-80 in field work
In the table you can find out detailed data on special equipment provided by the official manufacturer.
| Parameter | Meaning |
| Full name | "Belarus" MTZ-80.1 |
| engine's type | D-240 |
| Vehicle traction class | 1.4T |
| Power parameter (for diesel version) | 59 (80) kW/l. With |
| Total number of gears - forward/reverse | 18/4 |
| Dimensional information (length*height*width) | 3815*2470*1970 mm |
| General track on the front wheels | 1200*1800 mm |
| General track on the rear wheels | 1350*2100 mm |
| Weight of the Belarus MTZ-80 tractor | 3160 kg |
| Design speed range | From 1.3 to 13.5 km/h |
| Agrotechnical clearance | 470 mm |
| Machine turning radius | 4.1 meters |
According to the table, the tractor did not have any special parameters, then why was it so popular?
Engine
The success of the car lies in the design of the engine. Namely, the gearbox mechanism of the MTZ-80 tractor was at that time the most advanced in the history of tractor construction. The diesel engine was marked D-240, which indicated a four-stroke version, with a built-in water cooling principle. The hydraulic system of the MTZ-80 tractor was equipped with a working volume of the cylindrical part of 4.75 liters. The nominal engine speed was 2200 rpm. The internal combustion chamber is of a semi-separate type. The total weight of the engine is no more than 430 kg.
In some models, the gearbox design of the MTZ-80 tractor was improved due to the introduction of a pre-heater of the PZHB-200B series. Based on the operating manual, we can conclude that the special equipment was equipped with two versions of the trigger mechanism for the MTZ-80 tractor transmission circuit: electric starter, and also functioning due to the trigger mechanism of the built-in carburetor device.
Transmission
An important part of special equipment is the gearbox.
If you pay attention to the design of the rear axle of the MTZ-80 tractor, you will notice that the machine has a mechanical and also a 9-speed gearbox with a built-in reduction gearbox. This made it possible to develop a multifunctional speed switching circuit
Moreover, 18 speeds in forward mode and 4 speeds in reverse. By default, the machine is equipped with a creeper, which can be used when performing certain jobs.
In some models produced after 1985, an upgraded engine cooling system of the MTZ-80 tractor with a hydraulically controlled gearbox operating principle was installed. This made it possible to smoothly switch gears during heavy loads of special equipment. A comprehensive cooling system for the MTZ-80 tractor was installed, which made it possible to switch within four speeds. At the same time, the clutch of the MTZ-80 tractor did not disengage while the machine was operating. On the rear axle, the clutch device of the MTZ-80 tractor was equipped with a differential system that was modern at that time. In older models produced before 1985, the differential clutch adjustment of the MTZ-80 tractor was done manually.
Improved MTZ-80
Brake control
The brake control system of the machine, as well as the steering control of the MTZ-80 tractor, provides the following options:
- Main worker.
- Additional auxiliary.
- Parking brake mechanism.
- Spare brake designs.
Brake control models can be adapted to a specific operation option for the electrical wiring diagram of the MTZ-80 tractor.
Cabin
The driver's cabin has a convenient and comfortable design. The main structure is made of thin sheet steel. The internal part is thermally insulated, all necessary conditions for the operator’s work have been created, including convenient control of the electrical circuit of the MTZ-80 tractor. In the manufacturer's operating instructions, you can familiarize yourself with the data on the power system of the MTZ-80 tractor.
Fuel consumption
An equally interesting point will be information about the fuel consumption of the MTZ-80 tractor. It is interesting that the operating manual indicates only the basic fuel consumption rate of the MTZ-80 tractor, which takes into account the operation of the machine without load - approximately 5 liters per hour. But if we take into account the operating condition under load, then the fuel consumption of the MTZ-80 tractor is approximately 9-13 liters per hour.
MTZ-80 with attachments
For calculation it is recommended to use this working formula:
P=0.7 x R x N, where
P — estimated hourly consumption, kg/hour
0.7 is a conditional coefficient for converting the unit of measurement of the engine power of special equipment known to us from kW. pm.
R – conditional parameter of specific permissible fuel consumption, gkW/hour
N – engine power, hp.
Steering tuning
Sometimes experts recommend carrying out work such as remaking the MTZ-82 steering, in other words, putting the steering column of an agricultural vehicle in order. Sometimes modifications to the MTZ-82 tractor steering column end with its adjustment so that the steering wheel is in a comfortable position.
However, for a number of craftsmen this does not end there; altering the steering makes working on the tractor more convenient. Remaking the MTZ steering column will require some skills and a fairly significant amount of time, but the result will exceed all expectations. The stove takes approximately the same time, namely the process of its conversion.
The same applies to the modification of the turbocharger and the modernization of the MTZ-80 in terms of providing it with special nozzles for the dispenser.
Equipment and conditions
In addition to the standard set of metalworking tools for cutting, drilling, and stripping, taking measurements, there are several pieces of equipment that will make the task easier both in terms of labor costs and increase quality and accuracy.
For convenient welding of frame parts, it is advisable to have or make a welding table, which, with its zero level working plane, will ensure the same arrangement of the elements to be welded and eliminate the tedious climbing around the structure on your knees.
It is convenient to fix parts before tack welding by having in your arsenal a set of manual clamps, which will also allow for fine adjustments of dimensions after control measurements of the elements being welded. Direct welding of parts is more convenient and best done using semi-automatic welding.
Installing a dispenser on an old-style MTZ 82
The main difficulties when installing the dispenser on tractors of the earliest production MTZ 82 (80) is fastening the bracket for the hydraulic cylinder to the bridge beam in the absence of installation space. The network shows the experience of practitioners from several options for solving this problem using clamps on the beam or direct welding of the bracket.
Bracket on the bridge beam
The most acceptable solution that ensures a reliable connection is the following technology, which is feasible under normal plumbing conditions:
- A place is marked for a platform for attaching the bracket to a beam of the appropriate size for the contact plane of the part. The measurement is carried out by applying a hydraulic cylinder with the rod extended to the middle position (100 mm), provided that the edge of the rod is connected to the rotary lever in the straight position of the wheels and the symmetrical reach of the left and right axle axles of the bridge relative to the axis of movement of the tractor. In this case, the location for the connection area between the bracket and the bridge is determined by the coincidence of the eye of the second edge of the hydraulic cylinder with the hole of the bracket. The matching hole must match the installed bridge track. It should be taken into account that, in the case of a minimum track set, the cylinder is connected to the rightmost hole of the bracket (along the path of the tractor), with a maximum track to the far left.
- Having determined the location of the platform by attaching the cylinder and bracket to the bridge beam, they begin to prepare it. To ensure the connection of a flat part, it is necessary to bring the semicircular surface of the bridge beam as close as possible to the flat one by surfacing the metal with electric arc welding and subsequent surface treatment with a grinder grinder wheel.
- After obtaining a more or less flat surface, prepare a tire from a sheet of steel with a thickness of 15 -20 mm corresponding to the contact area of the bracket of the size. The holes on the tire are marked and drilled using the holes in the bracket. Cut the appropriate threads for the four bracket mounting bolts and adjust the diameter of the two threadless holes for the pins.
- At the final stage, the manufactured part is applied to the prepared welded area on the bridge beam and welded with a seam along the perimeter with maximum observance of the level of the horizontal position of the tire plane. Thus, a flat platform will be created for a tight fit and reliable connection of the bracket to the bridge without the use of milling.
Important How to sharpen a chainsaw chain at home correctly: with a round file, angle grinder, grinder, using a drill, on a machine, PowerSharp
Making a cabin for a tractor - sequence of actions
So, it’s time to look at the sequence of operations for making a tractor cabin at home. All work should be performed in the following order:
- First of all, we mark and determine the dimensions of all components of the future cabin. We take the dimensions of the front glass as a basis, after which we draw a contour on a sheet of chipboard, adding to it the thickness of the sealing material and 2 mm for the general tolerance;
- Based on the measurements obtained, we cut a wooden beam, connect it using self-tapping screws and place a pipe or profile along the outer contour, adjust all existing joints and carry out spot welding. We set all joints to be parallel, and then close the corners with a profile (the dimensions of the profiles are shown in the figure);
- We turn the frame over, place it on a flat base and weld the openings for the glass;
- We prepare metal for the roof (thickness 1.2 mm), floor and wings (thickness 2 mm). We cut it strictly according to the markings (it is better to use a grinder). Please note - the roof can be of very different configurations and sizes, but its height should be approximately 15-20 cm above the driver’s head;
- We make the front frame in a one-piece variation, and the doors are necessarily equipped with gas lifts. The base of the doors is formed from a profile frame, initially made on side tacks, followed by installation of a central pillar. Based on the position of the side glass, we set the angle for the central and rear pillars, after which we cut the central pillar at the required height and set (grab) the transverse pillar;
- We cut a pipe with a diameter of 100 mm lengthwise and weld a steel sheet to each of the resulting halves, acting as a roof, and connect it to the common frame using metal bolts or spot welding;
- We complete the work with the inner lining of the resulting cabin, for which we use foam rubber, leatherette and special glue. We glue the foam rubber to a metal base, cover it with leatherette on top and make a screed using self-tapping screws.
That's all. All that remains is to choose a seat for the cabin - you can buy it at almost any car market. The main thing to remember is that its back should be flat and low.
Summarizing
As you can see, the homemade cabin is not anything overly complicated. Yes, working with it requires increased attention, a certain amount of time and patience, but at the same time, its production is quite within the capabilities of every tractor owner who wants to save money and do everything on their own.
Cabin and its design features
MTZ tractors are equipped with a single-seat, sealed cabin, with a rigid and durable frame that protects the driver when the tractor tips over or turns over.
For greater comfort while driving, rubber shock absorbers are used and there is no rigid attachment to the body. The rear window and roof can be opened if necessary (they are held in this position by a special rocker mechanism), providing natural ventilation of the cabin, and when closed they are fixed using clamps. The rear window has two opening positions - full or partial. Each of the doors is equipped with a lock; latches are installed on them on the inside, while the left one is also locked with a key from the outside.
The internal and external door handles are mounted on a single rod and remain in a stationary position when the locks are closed. To open the door, the handle must be turned up. Climbing into the tractor is made easier by installed handrails and a step with two steps on it.
Individual floor elements in the gearbox area and under the driver's seat are made in a removable variation, which allows, if necessary, minor repairs to be carried out without dismantling the cab.
What you need for a homemade cabin
The kit requires the following list of materials:
- Standard set of windows for the tractor cab. Yes, by the way, in order not to bother with minor differences in the sizes of the windshield and rear glass of the cabin, for a homemade version it’s easier to take a couple of windshields.
- For the main structure of the frame, a square pipe of 50x50 mm (the thickness of the body of the professional pipe is 3 mm).
- Rectangular pipe 50x100 mm for a reinforced part of the frame, ensuring safety in case of emergency overturning of the tractor.
- Profile pipe 20x20 for the roof.
- Sheet metal for the roof is 1.5 mm thick, for floors and wheel boxes - a sheet of at least 2 mm thick.
- A metal strip 20 mm wide and 0.7 -0.5 mm thick, welded into the perimeter of the cabin openings for installing rubber seals.
- Locks for doors (can be used from a gazelle), door handles with a lock.
- For the manufacture of cabin doors, a rectangular pipe of 25x50 mm.
- Canopies for doors and break-away windows.
- Rubber profile seal for installation of cabin glazing and opening openings of doors and windows.
- Welded brackets for installation and dismantling of the cabin.
- Pillows for attaching the cab to the tractor transmission housing.
- Set of rear view mirrors with brackets.
- Set of headlights, side lights and turn signals
- Driver's seat and material for noise and dust insulation, decorative material for upholstery, standard rubber cabin floor mat.
- A set of electrical devices and wires for installing electrical wiring in the cabin.
Controlling the parameters
To control the operating parameters of all main components, assemblies and mechanisms of the tractor, the instrument panel is used. It is located on the front panel of the cab directly in front of the tractor driver and includes a standard set of instruments and warning lights. This is a speedometer, oil pressure and engine temperature indicator, on-board electrical network monitoring devices and others.
The devices have a familiar round shape and are located in an easy-to-read combination. A quick, experienced glance at the instrument panel is enough to sufficiently assess the operating parameters of the tractor systems. When any indicator goes beyond the permissible limits, bright warning lamps immediately signal, allowing you to make a decision to stop operating the machine and begin searching for and eliminating the problem that has arisen.
For operation in the dark, the instrument panel has a backlight, when turned on, the instrument readings are easy to read. All devices are pointer type with a scale divided into zones. Under normal operating parameters of the tractor mechanisms, the instrument needles should be in the green zone of the scale. If the instrument needles leave the green zone, this indicates deviations in the operation of the tractor. In this situation, work stops until the problem is clarified and eliminated.
How to make a cabin for a MTZ tractor yourself?
Detailed instructions for making a cabin for a Belarus tractor.
List of necessary devices and tools. The tractor cabin is the main workplace of the tractor driver, and the overall productivity of his work largely depends on how convenient and comfortable it is. But what to do if the cabin fails for some reason? You can’t live without it, but buying a new one costs a lot of money. However, there is a fairly simple solution - you can make a cabin for the tractor with your own hands, which, in fact, is what will be discussed in our material.