Coon for the rear linkage of the MTZ tractor
What is a KUN on a MTZ tractor? This is one of the types of attachments that is widely used on the MTZ tractor and not only. This device, due to the hydraulic system, allows you to perform various works. The decoding of KUN is as follows - “universal mounted hay hauler”.
One of the most popular models of this equipment is considered to be KUN 10. The model is manufactured at the facilities of Salskselmash, an advanced Russian plant specializing in attachments. The first model KUHN 10 came off the assembly line in 1973. As a result of constant improvement, KUN 10 has significantly increased its functionality. For reference: the versatility of the model allows it to be used on T-40, LTZ and YuMZ tractors.
Advantages of KUHN
The MTZ 80 tractor equipped with KUN is characterized as:
- Universal - can perform partial work instead of a bulldozer, loader and even an excavator. In view of this, KUN is used during construction and installation work in the agricultural industry.
- Productive.
- Reliable unit.
Homemade rear KUN at MTZ
The cost of factory KUN for a tractor is not affordable for everyone. Therefore, it makes sense to cover the topic of making a homemade KUN.
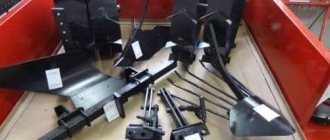
Thanks to the hydraulic system, you can install a homemade KUN on the MTZ tractor, and you will not need many materials and tools. The human factor plays a big role, because not everyone knows how to handle a tool. The main equipment for the technological process is a welding machine. Experience with this equipment is important, because high-quality seams affect the strength and reliability of a homemade kun.
You will also need a metal cutting tool. As a rule, a grinder or even a gas cutter is used. Well, the standard ones will come to the rescue: a hammer, a set of keys, sledgehammers.
About the nuances
- Three hydraulic cylinders are required. Two of which will serve to rotate the bucket. The task of the third (largest) cylinder is to lift the bucket along with the boom. How to choose the power of hydraulic cylinders? — the selection of power depends on the weight of the loads and the length of the boom.
- You need to take care in advance of the metal elements that will represent the basis of the entire structure - these are trusses, corners, plates. The thickness of the listed elements directly depends on the future perceived load.
- As soon as the drawing of the homemade KUHN is ready, you need to purchase hinged cylindrical joints.
- The first step is a drawing, then a search for equipment and parts, tools. Thus, you can save money if you have information in advance about the required amount of materials.
Manufacturing instructions
- Initially, you should weld the frame of the future homemade KUN. The frame is a rectangle, the lower part of which is below the level of the edges. Installation on the MTZ tractor is carried out by the lower part of the frame. In the center of the KUHN structure there is also another rectangular frame, it consists of two plates. Its fastening is carried out by welding to the lower and upper edges. This frame is designed to hold a large cylinder (at the bottom). A spacer will be permanently attached to the top. Four hinges are installed on the top edge. For cylinders changing the angle, two central hinges are installed. The outer two hinges serve for the boom. The selection of the height of the base depends on the needs, in each case individually.
- The arrow consists of several components. The part of the arrow that is attached to the base is about 65% of the length of the entire arrow. The next part of the arrow is attached to the long part, the angle between them is 30 degrees. People call an arrow of this shape a “boomerang”. The result is two curved profiles with three connection points. Down the center and at each end. Another end of the main cylinder enters the frame, which is secured to the central part by welding seams.
- The central part is a hinged cylindrical joint. Why articulated? – is explained by the need to attach a lever to it, which controls the bucket. The lever consists of two elbows; on one side it is connected to a bucket, and on the other side to two small cylinders. The fasteners of the previously listed parts are mounted on hinges. You need to know: experienced mechanics advise performing the central part together with the hinge joint. Otherwise it will be difficult to put it on.
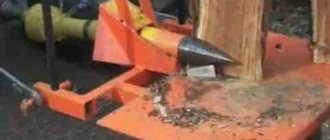
- Let's move on to the bucket. The ladle can be welded or bought from a factory, which is optional. It is not uncommon to see a forklift instead of a bucket used to pick up bales.
- Is it necessary to weight the front part if the stem length is more than 2 meters? - Yes need. In this case, a box or basket is welded onto the frame, where concrete blocks are stacked and sand is poured.
The choice is yours: buy a factory-made KUN or start developing homemade equipment. The final choice depends on financial capabilities and, of course, desire. It is also proven here that it is quite possible to make and install KUN at MTZ. Good luck to you.
Bucket repair
During operation, the buckets of excavators, loaders, including front-end loaders, are subject to a lot of wear.
To restore their functionality, they need repair and restoration of buckets, as well as strengthening or modernization. The rate of wear depends on operating conditions and soil type. The ones that suffer the most wear and tear are:
- bucket teeth;
- knife cutting edge;
- tooth adapters;
- bottom, side cheeks;
- bucket brackets.
The degree and type of load on these areas is different: the bottom is subject to impact, the side walls are subject to sliding, the edges of the knives, teeth and areas between them are subject to abrasive action. Accordingly, high-quality repair of excavator buckets requires taking into account all these nuances.
The difference between loader buckets, including front-end and grab-type ones. The main differences are the attachment to the supporting structure, as well as the capacity, depending on the scope of application.
- cable - used on cable mechanical excavators, most often double-jawed, attached to a lattice boom, a damper is used to prevent swinging. Due to insufficient load from the weight of the grab, they cannot work with dense soils;
- hydraulic - rigidly suspended, attached to the excavator instead of a bucket on the handle of a backhoe. They can be used to develop dense soils due to the ability to create the necessary pressure for cutting into the soil, which does not depend on their mass. Periodically, it is necessary to restore the bucket holes to ensure continued performance.
- Bucket, front loader. The bucket is mounted on a supporting frame, on a special boom or handle. Loading occurs only while the vehicle is moving, unloading occurs by tipping the bucket. The main application is loading, as well as moving bulk and various construction materials. Therefore, repairing a front loader bucket is different from repairing clamshell buckets.
- The buckets of multi-bucket excavators are mounted on working chains and have a capacity less than that of a conventional excavator.
Possible malfunctions that require repair of loader-excavator buckets:
To prevent such malfunctions, it is necessary to regularly perform technical inspections, routine diagnostics, as well as periodic repairs of excavator buckets, which will eliminate the possibility of unplanned downtime of special equipment.
Procedure for repairing loader or excavator buckets
Due to severe operating conditions, repairs are performed as needed; the frequency depends on many factors and is not a constant. For repairs, welding (electric arc, argon, automatic welding), boring, milling, grinding work, as well as abrasive processing are used.
Our company’s specialists have the necessary practical experience, qualifications and equipment to carry out the modernization and repair of this equipment.
Work is carried out in Moscow
- Acceptance of the product from the customer for diagnostics.
- Disassembling the bucket, depending on the design features.
- Visual inspection, defect detection, measurement of parts. If defects are identified that cannot be restored or their restoration is impractical due to the high cost, it is recommended to replace the attachment with a new one.
- Repair work:
- replacing damaged or worn surfaces;
- front loader bucket repair;
- hole restoration;
- replacing the bottom of the bucket;
- welding cracks:
- correction of deformities;
- restoration of geometry, location of axes;
- replacing the cutting edge of the bucket;
- applying an additional layer of metal;
- tire pad;
- replacement of adapters, crowns;
- surfacing of teeth, bucket crowns;
- replacing bushings;
- repair of hooks;
- armor welding;
- welding of an excavator bucket;
- equipment modernization.
- Assembly.
- Testing and elimination of identified defects.
- Sending the repaired product to the client.
To determine the cost and timing, as well as to perform repair work, you must contact our representative.
What kind of loaders are used in subsidiary farms?
Enterprises produce serial models, which are multifunctional attachments. Often, the MTZ multifunctional tractor is used as the basis for the unit, which is most common in agriculture, has front and rear linkages with power take-off mechanisms and hydraulics, ensuring coordinated operation of the mounted devices.
MTZ tractors are the most common type of equipment in agriculture
The tractor can be equipped with:
- a bucket (front loader) used when working with soil and when moving bulk materials;
- forks , allowing for various operations with piece goods;
- jaw grippers , which are used in timber processing and for loading bulk cargo;
- haystacks for working with hay;
- rake grids for collecting haylage;
- manipulator installations necessary when moving single loads;
- KUN attachment , which allows you to work with various interchangeable mechanisms;
- telescopic cargo boom.
Depending on which drive is used in the operation of the mechanisms, loaders are classified into: electromechanical, mechanical or hydraulic units.
Attachments to the tractor, depending on the tasks, can be installed on the front or rear linkage. Manipulators are often mounted on the rear linkage, and haystacks, forks or a front loader are mounted on the front linkage. The installation option is largely determined by the operational characteristics and technical capabilities of a particular tractor.
KUHN on MTZ-80, 82: rear linkage
The main differences between the MTZ-80 and MTZ-82 attachments. Main technical characteristics of KUNs for MTZ.
One of the most common and simplest types of special attachments, of course, can be called KUN at MTZ, which has become a kind of popular name - a common name for any similar type of attachments for tractors. KUN is a universal mounted hay hauler, which is essentially a tractor front-end hydraulic loader for moving, lifting and lowering various large loads.
However, if KUN is initially a hay hauler, this does not mean that it cannot work with other loads and materials that are not even remotely included in the category of hay and silage, and are not related to agricultural work. The range of application of tractors with similar attachments is very wide and varied. For example, in the same excavation work, it is capable of moving large masses of soil from one place to another, covering any distance. Advantages of front mounted equipment and technical capabilities
Slightly different equipment is installed on different modifications of Belarusian tractors, with minor technical and operational changes. Here the ratio of the load capacity and the canopy sweep may vary, which in one way or another directly affects the operation of the equipment and its tasks during operation.
1. MTZ - 80 with KUN is equipped with a prototype of the PF - 1 attachment, which has the following technical characteristics:
- weight of lifted loads up to 1 ton;
- lifting height limit up to 3.5 meters;
- the weight of the loader itself is 900 kg;
- maximum speed of cargo movement is up to 20 km/h.
Kun, tractor bucket - types, DIY production, video
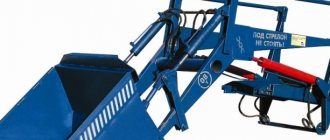
A tractor bucket is a type of loader for heavy equipment. According to the principle of operation, this is a standard front loader; a hydraulic system is responsible for its operation. KUHN turns equipment into an excavator, tractor loader, leveler or bulldozer.
The universal mounted bucket was originally made for the purpose of loading silage or hay. But the scope of application of this equipment has expanded significantly, which is why they are actively used in warehouses for transporting goods, in construction, for landscaping, and for snow removal.
Advantages of a tractor front loader:
- Convenient for maintenance, since all components are within reach and can be easily replaced;
- Quick installation and dismantling of various canopies;
- Reliable (this is not always the case with a homemade loader);
- High load capacity;
- The reinforced hydraulic system simplifies the operation of the unit.
Pros and cons of making a homemade kun for a tractor
A tractor kun is a useful equipment for farming that allows you to level the top layer of soil, break up rubbish heaps and load trucks. Of course, such multifunctional special equipment is quite expensive. In this regard, many enthusiastic farmers decide to assemble a loader themselves, especially since making a kun for a tractor is not as difficult as it seems.
The most important advantage of a homemade kun is its low cost. Naturally, you will have to spend a little money during assembly, but at the final price, homemade tractor loaders will still be significantly inferior to their factory-made counterparts.
Characteristics of rear-mounted loaders
The rear mounted loader consists of the following structural elements:
- sliding lifting device with carriage;
- a working boom equipped with mechanisms for fastening working tools;
- working elements: jaw grips, buckets, forks, dumps, rigging equipment, etc.
Diagram of a homemade loader How the equipment works (cycle):
- The tractor moves to the required point, and the working tools are lowered.
- The working elements of the loader are inserted into the load and it is grabbed.
- The equipment is lifted and the cargo is transported to the unloading point.
- The load is being tipped or lowered.
Homemade bucket for the rear or front hitch of a tractor
Farmers are interested in how to make a homemade bucket for the rear linkage of a tractor. Agricultural machinery, for example, mini tractors or walk-behind tractors, is now available on almost all farms. Even those who farm exclusively for themselves try to either acquire such equipment if their budget allows, or make it with their own hands, using a car and its components as a basis. The most popular equipment purchased on the market is the products of the Minsk Tractor Plant, especially the MTZ-82 tractor.
Design Features
The KUN for equipment has the shape of an arrow, which is controlled by four hydraulic mechanisms - two help lift loads and two control the angle of inclination of the bucket. The drive is taken by the chassis, the system of which acts as a connector for attaching the bucket to the machine.
All loader controls are located in the operator's cabin and are not complicated.
You can choose other additional canopies to equip a tractor with KUHN:
- Buckets with a volume in the range of 0.35 - 1.5 m3;
- A fork device that performs work in agriculture and during loading;
- Log grabber. With its help, the equipment can be actively used for collecting firewood;
- Clamps for bales and rolls;
- Rake bars that help remove hay and hay;
- Jaw blade.
We invite you to familiarize yourself with a step-by-step recipe for making goat's milk cheese.
Basic parameters of a tractor with a bucket:
- The rake grid and other aggregated working parts have a load capacity of 500 and 800 kilograms;
- Loading height with a bucket and rake grid – 2.5 and 3.5 meters;
- The angle when unloading the bucket is 55 – 65 degrees.
The dimensions and performance of the bucket determine the chassis parameters. It is used to attach equipment to the tractor.
You can get acquainted with the specifics of how special equipment works with buckets in the video.
Is it possible to make a bucket for a mini tractor with your own hands?
Even after purchasing agricultural equipment, some farmers try to modernize it, not wanting to spend money. Schemes for making some useful structural elements yourself come to the rescue. Thus, recently a bucket for a minitractor has become very popular, or rather, a bucket for an MTZ-82, designed with your own hands.
Mounted elements can be useful at any stage of agricultural work, be it sowing or clearing the area of dirt or snow. Tractor attachments are of the following types:
All these elements are controlled directly from the driver's cab. Hydraulic installations are used for this.
Due to the fact that the MTZ has a universal hydraulic design, any equipment can be mounted on it.
Next we will look at how to make a homemade bucket for a mini tractor with a rear linkage. A homemade bucket for a mini-tractor can perform a fairly wide range of tasks. The equipment is not very large in size, and is also multifunctional. It is recommended to use it both in small rural farms and on large farms or during the construction of any structures. Depending on the characteristics of a self-made mini tractor bucket, it can carry quite heavy loads and even dig up the ground to a depth of 3 m. All this allows the author of the homemade product to:
- Perform a number of basic earthworks.
- Create ditches or pits into which the foundation will be thrown.
- Transport various materials from one place to another.
- Load and transport harvested crops or fertilizers.
What is important to consider when producing a hitch?
It is advisable to start manufacturing special equipment if you have the necessary materials and tools. It is important to correctly evaluate the craftsman’s experience with a welding machine and other metalworking devices.
Diagram of the hinged mechanism
The first stage in the production of equipment for a tractor is the preparation of the necessary drawings. You can simplify the task by taking a freely available standard document. The specification contains the necessary parts, indicating their sizes. Using it, the calculation of the material required for the manufacture of a homemade loader, as well as metal fasteners, is made.
A mini-tractor loader manufactured in accordance with the drawing and technology will be an excellent assistant in your work.
Materials and tools needed for work
During the manufacturing process, you cannot do without a welding machine, an angle grinder, and improvised tools.
Even to make the simplest model of a tractor hitch, you should have:
- metal profiles and sheets, the thickness of which depends on the dimensions and load on the equipment;
- swivel joints;
- three hydraulic cylinders (can be taken from old equipment): a large one for raising the boom, two small ones for tilting the bucket.
How to make a KUN for MTZ with your own hands
It is imperative to make drawings of a homemade KUN so that there are no problems with cutting the metal into individual elements. Let's look at how to make such equipment yourself:
- You will need profiles and sheet metal. The thickness of the materials must correspond to the load that is planned.
- You will need to purchase several hydraulic cylinders - 2 large ones to lift the bucket, and 2 smaller ones. They are needed to adjust the inclination level and equipment parameters.
- Cylindrical joints, without which it is impossible to assemble the entire structure of the wheel unit.
About the nuances
- Three hydraulic cylinders are required. Two of which will serve to rotate the bucket. The task of the third (largest) cylinder is to lift the bucket along with the boom. How to choose the power of hydraulic cylinders? — the selection of power depends on the weight of the loads and the length of the boom.
- You need to take care in advance of the metal elements that will represent the basis of the entire structure - these are trusses, corners, plates. The thickness of the listed elements directly depends on the future perceived load.
- As soon as the drawing of the homemade KUHN is ready, you need to purchase hinged cylindrical joints.
- The first step is a drawing, then a search for equipment and parts, tools. Thus, you can save money if you have information in advance about the required amount of materials.
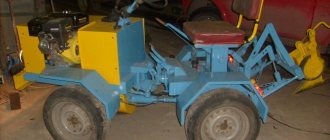
Coon for the rear linkage of the MTZ tractor
What is a KUN on a MTZ tractor? This is one of the types of attachments that is widely used on the MTZ tractor and not only. This device, due to the hydraulic system, allows you to perform various works. The decoding of KUN is as follows - “universal mounted hay hauler”.
One of the most popular models of this equipment is considered to be KUN 10. The model is manufactured at the facilities of Salskselmash, an advanced Russian plant specializing in attachments.
The first model KUHN 10 came off the assembly line in 1973. As a result of constant improvement, KUN 10 has significantly increased its functionality.
For reference: the versatility of the model allows it to be used on T-40, LTZ and YuMZ tractors.
Advantages of KUHN
The MTZ 80 tractor equipped with KUN is characterized as:
- Universal - can perform partial work instead of a bulldozer, loader and even an excavator. In view of this, KUN is used during construction and installation work in the agricultural industry.
- Productive.
- Reliable unit.
Homemade rear KUN at MTZ
The cost of factory KUN for a tractor is not affordable for everyone. Therefore, it makes sense to cover the topic of making a homemade KUN.
Thanks to the hydraulic system, you can install a homemade KUN on the MTZ tractor, and you will not need many materials and tools.
The human factor plays a big role, because not everyone knows how to handle a tool. The main equipment for the technological process is a welding machine.
Experience with this equipment is important, because high-quality seams affect the strength and reliability of a homemade kun.
You will also need a metal cutting tool. As a rule, a grinder or even a gas cutter is used. Well, the standard ones will come to the rescue: a hammer, a set of keys, sledgehammers.
About the nuances
- Three hydraulic cylinders are required. Two of which will serve to rotate the bucket. The task of the third (largest) cylinder is to lift the bucket along with the boom. How to choose the power of hydraulic cylinders? — the selection of power depends on the weight of the loads and the length of the boom.
- You need to take care in advance of the metal elements that will represent the basis of the entire structure - these are trusses, corners, plates. The thickness of the listed elements directly depends on the future perceived load.
- As soon as the drawing of the homemade KUHN is ready, you need to purchase hinged cylindrical joints.
- The first step is a drawing, then a search for equipment and parts, tools. Thus, you can save money if you have information in advance about the required amount of materials.
Manufacturing instructions
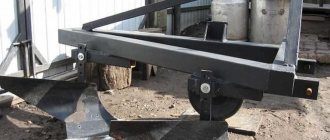
- Initially, you should weld the frame of the future homemade KUN. The frame is a rectangle, the lower part of which is below the level of the edges. Installation on the MTZ tractor is carried out by the lower part of the frame. In the center of the KUHN structure there is also another rectangular frame, it consists of two plates.
Its fastening is carried out by welding to the lower and upper edges. This frame is designed to hold a large cylinder (at the bottom). A spacer will be permanently attached to the top. Four hinges are installed on the top edge. For cylinders changing the angle, two central hinges are installed. The outer two hinges serve for the boom.The selection of the height of the base depends on the needs, in each case individually.
- The arrow consists of several components.
The part of the arrow that is attached to the base is about 65% of the length of the entire arrow. The next part of the arrow is attached to the long part, the angle between them is 30 degrees. People call an arrow of this shape a “boomerang”. The result is two curved profiles with three connection points. Down the center and at each end. Another end of the main cylinder enters the frame, which is secured to the central part by welding seams. - The central part is a hinged cylindrical joint.
Why articulated? – is explained by the need to attach a lever to it, which controls the bucket. The lever consists of two elbows; on one side it is connected to a bucket, and on the other side to two small cylinders. The fasteners of the previously listed parts are mounted on hinges. You need to know: experienced mechanics advise performing the central part together with the hinge joint. Otherwise it will be difficult to put it on. - Let's move on to the bucket.
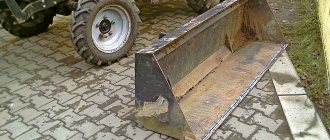
The ladle can be welded or bought from a factory, which is optional. It is not uncommon to see a forklift instead of a bucket used to pick up bales. - Is it necessary to weight the front part if the stem length is more than 2 meters? - Yes need. In this case, a box or basket is welded onto the frame, where concrete blocks are stacked and sand is poured.
The choice is yours: buy a factory-made KUN or start developing homemade equipment. The final choice depends on financial capabilities and, of course, desire. It is also proven here that it is quite possible to make and install KUN at MTZ. Good luck to you.
Source:
Technology for the production of tractor attachments
First you need to prepare the base. It is a rectangle formed by square pipes or corners. Another rectangle is fixed in the center of the base, where a large hydraulic cylinder will be installed. A spacer and four hinges (for the cylinders and the boom mechanism) are fixed on the top edge.
Tractor boom diagram
The boom is made of two metal profiles connected at an angle of 30 degrees. The end of the base and the hydraulic cylinder mount are fixed to it (from above).
A cylindrical hinge is installed in the middle of the boom. Movably fixed sections are also mounted here, connecting small cylinders and a crossbar necessary for attaching the base of the bucket.
A ladle is made from one large and four smaller steel rectangular plates, one of the sheets is welded at an angle.
If the boom is more than two meters long, there is a high probability that the tractor may tip over. To eliminate a possible problem, the front part of the special equipment is equipped with a counterweight.
MTZ front end counterweight kit
Disadvantages of homemade devices
When producing a homemade forklift, you may encounter some problems. The need to purchase missing parts or materials can cause a significant increase in the cost of the device. The quality of the manufactured device directly depends on the qualifications of the craftsman, on the competent calculation of the parameters of the product and its individual parts.
In many cases, it is cheaper and more reliable to purchase a used tractor rear loader.
Related video: Homemade loader on a mini-tractor
Publications on the topic
Description and technical characteristics of popular MTZ excavator models
Self-installation of a septic tank in a private house
Self-installation of xenon
How to make a homemade loader for the rear linkage of an MTZ tractor: drawings
To make a homemade loader for the rear linkage of an MTZ tractor, drawings, you should carry out an audit in your utility rooms. You need to evaluate whether you have enough materials and tools to make such a unit for the tractor.
The role of loaders in subsidiary farming and preparation for production
Every farmer needs a front loader for his mini tractor on his farm. Unfortunately, not everyone can purchase it, given the high cost. The way out of the situation is to reorganize your equipment. You can make a homemade tractor loader if you have the skill to carry out such work, as well as a sufficient amount of materials and tools.
Based on practice, a loader for a mini tractor goes very well when paired with an MTZ tractor, which is manufactured at a Belarusian plant. These machines are most often found on farm plots. It is equipped with hydraulics and is suitable for mounting attachments.
A loader on a mini tractor will save money. Having selected the necessary tools and materials from your own storage facilities that have been lying around for a long time without use, with skillful hands you can make this equipment for the rear linkage. You can set its parameters yourself, which is an advantage.
If there are no materials and funds to make such an addition for a mini-tractor, then the cost of purchasing them can exceed the price of a ready-made factory loader. And homemade loaders cannot be compared in quality to purchased ones. But you can purchase a used unit with a rear suspension much cheaper.
You need to start working on creating the necessary equipment with your own hands from the drawings. It is necessary to think through all the subtleties and dimensions.
If you don't have experience designing graphics, look for standard drawings. The assembly drawing must consist of a specification that lists all included assemblies and parts, as well as materials.
Using this documentation, calculate the amount of materials and fasteners.
You will need the following tools:
- welding machine (the conditions for safe operation on the tractor will depend on the reliability, strength and durability of the structure, so this operation should be carried out efficiently and professionally);
- grinder or gas cutter for metal;
- handy tools - you can’t do without hammers, adjustable wrenches, sledgehammers, etc.;
- to create the structure, you will need rolled profiles and metal strips; their parameters are determined based on the load the installation will be subjected to, based on the planned functions;
- since the loader will be equipped with a bucket with a boom, in order to lift it, a large hydraulic cylinder will be required; to be able to control the bucket at different angles of inclination, 2 small cylinders will be required.
Having determined the load of the installation, you should calculate the required number of articulated joints that help the unit operate under load.
Cutting materials with your own hands should be carried out strictly according to the drawings; this will contribute to the economical disposal of them and will help to better imagine the future product and make the right decision to give the greatest strength and reliability.
Technology for creating a homemade loader
Manufacturing begins with 2 rectangular frames. The first of them - the main one - is made with your own hands with a lower element that extends beyond the edge. They will also attach the base to the rear of the tractor.
The second frame for the rear linkage is made of strips and fastened with a spacer, which is located at the top, and with a hydraulic cylinder at the bottom. Thanks to the support, a stationary position of the frame is ensured.
Hinges are attached to the upper edge: in the central part there are 2 hinges for the upper hydraulic cylinders and a pair of hinges for the switch mechanism. The height of the frame is determined by expediency.
The boom mechanism is a prefabricated structure. A working element, a lever, is attached to its center, the hinge. The entire mechanism is a triple folded double structure that is secured to each other at the ends and in the center.
The finished boom can have a final length of 2 m or more, so it is equipped with a counterweight. The counterweight is placed in a basket welded to the frame at the front of the machine. Concrete blocks and sand in bags will be used as a counterweight.
To produce a ladle you need to have sufficient qualifications. If you don’t have one, it’s better to purchase a ready-made one in a special store. The bucket can be replaced with a forklift for bales or pallets.
Conclusion
Thus, a mini tractor, the loader of which is made in a handicraft way, will become an indispensable assistant in your subsidiary farm.
Source:
Instructions for dismantling and installing the bucket
Reading time: 3 minutes
We will send the article “Instructions for dismantling and installing the bucket” to you by E-mail
How to install a bucket on an excavator?
PRECAUTIONARY MEASURES
When you remove the axle, stand to the side of the bucket. When the axles are removed, the Bucket may tip over.
If the work is carried out by two people, make sure that the levers are operated by an experienced operator. If operated incorrectly or driven too quickly, the second worker could be killed or seriously injured.
When installing or removing the axle, you may be injured by flying metal chips. To remove and install axles, use a soft-faced hammer or drift. Always wear safety glasses.
DISASSEMBLY OF AN EXCAVATOR BUCKET
1. Rotate the boom in the direction of the longitudinal axis of the machine. Place the bucket on level ground with the handle approximately vertical. Secure the bucket so that it does not move.
2. Remove the hinge pins of the hydraulic plungers
- remove the locking pin on the bucket swing rod and remove the pin
- remove the locking pin on the handle rotation rod and remove the finger
- Raise the bucket approximately 20 mm above the ground. Gradually adjust the position of the tipping rod using the bucket hydraulic plunger to remove the load from the axis of the hinged connection of the rod with the bucket.
- knock out the axis of the hinged connection of the rod with the bucket using a wooden, nylon or copper drift. If necessary, you can hit the drift with a hammer.
ATTENTION! Do not hit the axle itself with a heavy sledgehammer, so as not to damage or jam it.
3. Pull back the handle
— retract the hydraulic plunger of the bucket so that the tipping rod is separated from the bucket, and remove the sealing rings.
— using the boom hydraulic plungers, gently lower the toe of the handle to remove the load from the axis of the hinge joint between the handle and the bucket.
- knock out the axis of the hinged connection of the handle with the bucket using a drift.
— move the handle away from the bucket and remove the o-rings.
INSTALLING AN EXCAVATOR BUCKET
ATTENTION! Installation of the bucket is NOT carried out in the reverse order of dismantling
1. Clean the hinge pins and holes in the bucket bosses. Check how the axles fit into the boss holes
2. Position the bucket along the axis of the machine and in front of the machine
3. Place the two O-rings connecting the handle to the bucket onto the internal bosses of the bucket
4. Retract the bucket plunger, place the toe of the arm between the pivot plates and align the holes. Insert a 0mm diameter steel bar into hole L
. The position of the handle should be close to vertical.
5. Align the holes for the hinge axis on the tipping rod with the holes in the bosses of the bucket and insert another rod with a diameter of 0 mm into hole M.
6. Raise the boom until the bucket leaves the ground and hangs on the bars.
7. Using the bucket controls, rotate the bucket to the open position so that the holes in the tip of the arm and the bucket are well aligned, and the teeth and visor of the bucket are 20 mm from the ground.
ATTENTION! in this position, the bucket is in equilibrium, suspended on a steel rod M, passed only through the holes of the tipping rod.
8. Remove the steel rod from the holes in the bucket bosses and the toe of the handle and insert the hinge pin into these holes.
9. Align the locking pin holes in the axle and boss and insert the locking pin.
10. Lower the bucket to the ground and place it in a comfortable position.
11. Take out the second steel rod M and combine the tipping rod with the lugs of the bucket. Pull the tilt rod outward while holding the O-rings in place at point C. CAREFULLY push the tipping rod forward until it aligns with the bucket lugs.
ATTENTION! Be careful not to get your fingers pinched.
12. Install the locking device.
13. Make sure the seals are installed correctly.
14. Lubricate the axles of the hinge joints with grease.
This is the sequence for dismantling/installing an excavator bucket. If you doubt that you can independently remove and install this type of attachment, leave a request to the service center. Our company’s specialists will return your equipment to working order in the shortest possible time. Call toll free number: 8
(800) 500-87-93.
Tractor rental
Rent a tractor in Moscow for snow removal at a price of 14,000 rubles. / shift (7 hours).
- Tractor delivery within 30 minutes in any district of Moscow .
- Free delivery within Moscow.
- Tractor services for clearing snow from the area can be paid for either in cash (to a Sberbank card) or by bank transfer.
- order a tractor from our company 24 hours a day, 7 days a week, for any period of time.
We offer tractors and loaders for rent for snow removal in Moscow.
Published 20 Sep 2022 03:50 © Dmitry - Rental of special equipment in Moscow and the Moscow region
The Belarus tractor is equipped with special attachments: a blade and a brush. Designed for cleaning roads and courtyards from snow in Moscow.
| Blade width: | 2.5 m. |
| Width of utility brush: | 1.8 m. |
| Rental price: | 14,000 rub. |
Published 20 Sep 2022 03:40 © Dmitry - Rental of special equipment in Moscow and the Moscow region
The JCB 3CX is equipped with a special jaw (loading) bucket for cleaning and loading snow.
| Bucket width: | 2.4 m. |
| Bucket volume: | 1 cu. m. |
| Load lifting height with front loader, m: | 3,23 |
| Rental price: | 14,000 rub. |
Additionally equipped with a hydraulic hammer. The equipment is reliable and will quickly cope with any task.
Published 20 Sep 2022 03:30 © Dmitry - Rental of special equipment in Moscow and the Moscow region
The tractor is equipped with a jaw (loading) bucket. It can be used as a bulldozer, scraper, grader or loading bucket to load snow into the back of a dump truck for removal.
| Bucket type: | Loading equipment |
| Bucket volume: | 0.8 cu. m. |
| Maximum unloading height: | 2.65 m. |
| Load capacity: | 850 kg. |
| Rental price: | 14,000 rub. |
Published 20 Sep 2022 03:20 © Dmitry - Rental of special equipment in Moscow and the Moscow region
The MTZ 82 tractor is equipped with special attachments: a front loading bucket. Designed for cleaning and loading snow into dump trucks for subsequent removal.
| Bucket type: | Loader Bucket |
| Bucket volume: | 0.7 cu. m. |
| Maximum unloading height: | 3.1 m. |
| Load capacity: | 1000 kg. |
| Snow removal with a tractor, price: | 14,000 rub. |
Bucket repair
Specialists of the Msvarka company offer you all types of work on bucket restoration!
Repair work may include:
- elimination of defects in welds connecting components;
- restoration of the original geometric shape;
- filling and repairing cracks on the bottom and side walls;
- repairing damage to traction and lifting eyes;
- restoration of the cutting edge and welded teeth (adapters);
- strengthening the design of the buckets.
Other defects associated with working under conditions of increased loads when developing heavy soils and moving oversized cargo cannot be excluded.
For many years we have been strengthening, converting and repairing tractor and excavator buckets.
Repairing a bucket on site is not an easy task; you need to have significant experience, skills and tools in order to carry out repair and welding work efficiently and as quickly as possible. It is the combination of quality and efficiency that distinguishes us from other performers.
- Responsibility
- Maximum efficiency
- The best price-quality ratio!
Repairing a bucket on a tractor
A bucket installed on special equipment is the main tool, the condition of which determines the possibility of effective operation of the mechanism and its performance. Replacing a worn and defective bucket with a new one is a very expensive operation that will require a significant investment of money.
Therefore, it is much easier, cheaper and no less effective to order tractor bucket repairs
using modern welding materials technologies,
strengthen the design of the working body of the mechanism or completely restore it even after serious damage that may occur during long-term operation and significant loads.
Causes of breakdowns
The need to repair the bucket of an excavator , front-end loader or tractor is associated with extreme operating conditions of the working part of earth-moving equipment . Work is constantly accompanied by large dynamic loads and an abrasive effect on the surface of the working body. Therefore, restoring a bucket is a normal maintenance activity for special equipment, but it must be carried out using professional welding and metalworking equipment by qualified specialists. Otherwise, it may happen that the standard operating life of the mechanism will not be ensured and the repair will have to be done again.
+7 (999) 834-06-27
+7
(Whatsapp)
M-welding - high-quality repair of ladles of any complexity!
Our company has all the necessary equipment, tools and fittings to repair excavator and loader buckets in case of breakdowns of any complexity. Therefore, you can order tractor bucket repairs
and be confident in the guarantee of high quality. If necessary, during repairs we can perform the following types of work:
- metal welding;
- surfacing and penetration of cracks;
- abrasive and heat treatment;
- mechanical alignment;
- metallization, tempering, hardening and some other work.
These are technologies that are required for repairing products made of especially strong steels and alloys. Extensive experience in performing work and knowledge of the design of the ladle allow us to choose exactly the method of metal processing that is necessary in this case.
We guarantee that after repair, the bucket of a front loader or tractor will fully work out its standard operating life, subject to normal operation of the mechanism. This will be ensured by compliance with metal processing technology and professional welding work.
How to make a homemade bucket for a mini tractor
As a rule, you make a bucket for a tractor yourself using a special hydraulic installation, as well as adjustable supports. This makes it possible to make the operation of the tractor more reliable, and control of the attached equipment as simple as possible.
Making a bucket for a mini tractor with your own hands is not so difficult. Many farmers who have already done this post their work online, so finding diagrams and drawings related to the design is quite possible.
Those who have made attachments themselves argue that you will first need to make the most reliable load-bearing element. As a rule, its role is played by a frame made of metal corners welded together. Sometimes it is permissible to use a frame that was on an old mini tractor (if you had one).
In addition, you need to take care of installing a special support platform, which is attached to the sides of the installed frame. It is necessary to ensure the presence of support shoes that will prevent the tractor from tipping over when working with the bucket. To construct them, you need to use metal pipes, the diameter of which is about 10 cm.
In addition, you need to make the ladle itself. Usually, for this purpose, metal sheets are used, bent to the desired shape, as well as 2 pairs of hydraulic cylinders, thanks to which you can make a lifting boom. In some cases, it is allowed to use hydraulic units borrowed from trucks.
It is possible and not even very difficult to make a bucket for a mini tractor yourself, but this process is labor-intensive and can take a lot of time. In addition, if you are not confident in your abilities and have never done anything like this before, it may be better for you to go to a store and buy a structure there. If this is not your first time making something and you strictly follow the drawings, then when welding of good quality, such a homemade product will not be inferior to the finished product made by the factory, either in performance or in reliability of use.