Types of plows for mini tractors
Among the main types there are:
- plowshare-dump;
- rotary;
- disc plow.
The plowshare-moldboard type is currently considered obsolete. It uses the traction force of the tractor to loosen the soil with wedge-shaped plowshares. It works exclusively along a straight path, 2-4 blades are attached to the frame. A mini tractor with a plow of a similar design is suitable for plowing already developed and tested land in order to reduce the cost of expensive equipment.
Tractor with reversible plow
The disc plow is used exclusively for difficult soil: rocky, clayey, clogged, as well as virgin soil. The sharp discs are attached to a single frame by movable spindles. While the tractor is moving, this mount helps the discs move and cut through hard soil.
The main difference between imported models and Russian ones is that domestic ones are not afraid of moderately contaminated soil, which is common among the main areas for farming in Russia. Difficulties in operation for imported ones lie in problems with the delivery of spare parts. Among the well-known brands, LS plowshare and moldboard is a model for working on a medium-power tractor, RT rotary is for a mini tractor.
Rotary plow for tractor
A rotary plow for a mini tractor is the most common and convenient type. Its blades are created in such a way that they balance each other. Two blades of workers plow the ground, the other two level it. When moving back, they change places, the plow turns independently.
This allows you not to turn the tractor and plow around and save time and fuel. Since the ground is simultaneously leveled by the same working blades, there is no need to use a milling machine in the field. Further sowing and creation of furrows for seeds is simplified.
Unlike other modifications, where the plow is driven by the movement of the machine, the rotary one rotates using a power take-off shaft (PTO). The soil processed by this type is more crushed and loosened, so the rotary is ideal for cultivating rice fields.
Rotary plow for tractor
It is capable of loosening the soil to a maximum depth of up to 50 cm, which is twice as much as other types. Also, rotary plows for modern mini tractors are used in conjunction with disk plows for cultivating virgin soil; adjusting the plow to a mini tractor allows you to do this without problems.
Plow at MTZ
The Belarusian Tractor Plant is very popular these days, so plows for MTZ 80 and 82 tractors, with an average power of 80 horsepower, have become widespread. Any mechanisms with a rear PTO connection are suitable for these tractors. Among them, the PLN and PSK (PSKu) series are distinguished.
The plow for MTZ 82 from the PLN series is used to perform work with heavy and light soil, due to the difference in modifications. These plows are created specifically for the MTZ tractor. The simplest, 3-hull 3-35 plow for MTZ 80. It is suitable for clean land of no more than 1-2 hectares, it is afraid and breaks from strong roots and large stones. The depth of the furrow is 20-30 cm.
PLN 4-35 has a double configuration: disc knives on the skimmer and side grooves. It is capable of cultivating soil at a speed of 8 km/h. It is 4-hull, the coulter width is 260 mm, the depth is 25 cm. It can cultivate fields of up to 10 hectares without loss of productivity. The next modification, rotary model PLN 4-80, 3-hull, also does not like clogged soil, depth 18 cm.
For unclogged soil with a moisture content of no more than 30% and a resistance of 0.09 MA, use MTZ 82 with a PSK plow. This is a modern and universal three-furrow plow for the MTZ minitractor and MTZ 80, capable of working as a chisel or rotary-reversible plow. It has only positive reviews. The chisel option involves simple deep plowing in straight lines without turning or mixing the soil.
Mounted reversible plow PNO- (3+1) -42
Unlike the PLN, the PSKu plow (universal modification) does not lose adhesion to the ground during sudden compaction of the rock thanks to the chisel design. The productivity of the PSK is 50% higher than that of the PLN, with a fuel consumption of 8 liters less per hectare.
The PSKu-3 model is suitable for clean soil for sowing crops to a depth of 15-35 cm. It has two working blades, and the width of the layer of soil being processed with a ploughshare is 600 mm. It is possible to install an additional blade to loosen the soil. 5 buildings, total plowing width 3 meters, maximum speed during operation 10 km/h, which is even higher than that of PLN 4-35. This is the optimal PSKu option for the average farmer; it allows you to install a lot of additional equipment.
Rotary plow: a tool for high-quality plowing
A rotary plow, in fact, has the same scope of application as a conventional plow, with the difference that it works faster and is more productive. Although there are some peculiarities of its operation. Thus, it is certainly easier to cultivate virgin lands densely covered with wild plants with a rotary plow. The soil thrown by the rotary plow shares is better crushed and mixed, which is an advantage when cultivating certain types of soil.
The quality of plowing provided by such a plow is very high. The depth of plowing can reach up to 23 centimeters, which, according to most agronomists, is considered the maximum permissible depth - deeper plowing would raise infertile layers of soil to the surface and bury fertile ones to a depth, which means that instead of doing good, it would cause harm.
A rotary plow is often used to plow rice fields, and, as you know, not any soil-cultivating unit is suitable for this. There are units that have an extended range of applications and combine the functions of a rotary plow with the functions of a potato digger and rototiller.
How to adjust the plow at MTZ
A properly configured and adjusted plow plows the ground to a depth of 35 cm. Its poor assembly or improper adjustment can lead to the soil being processed poorly and the equipment quickly becoming unusable.
The device consists of several components:
- a knife designed to cut soil vertically;
- skimmer - designed to remove the top layer of soil along with weed roots (optional element);
- ploughshare (or flat cutter) - a knife to cut the soil horizontally;
- dump - loosens and turns over a layer of earth;
- support wheel - allows you to get support in a horizontal plane;
- field board - sets the direction of movement vertically.
There are several categories of plows, differing in the method of attachment to the MTZ-82 tractor. Among them:
- Trailed is a frame-trailer standing on 3 wheels.
- The semi-mounted one is connected to the MTZ-82 hitch on one side, the other side is equipped with a support wheel on which it rests.
- The mounted one is completely connected to the mounted system and can be controlled using hydraulics.
Setting up the PLN-3 plow (this is exactly the type of equipment found on Belarusian tractors) does not take much time. Setting up the MTZ-80 plow should be carried out in a specially designated place. In order to adjust the plow on the MTZ, it is necessary to install underlays under the left and support wheels of the tractor and plow, the width of which will be equal to the size of the future plowing. After this, the device and its shares should be lowered onto the platform. Using the support wheel screw, it is tightened until it comes into contact with the lining. A diagram of how to properly adjust the plow on a tractor can be found on the Internet.
See » Main disadvantages and technical characteristics of the MTZ-1025 Belarus tractor
Next, we set up the plow itself: it must be leveled using the tractor hitch brace and the central link. The main thing is to place it parallel to the site on which it is located. The frame must be connected to the top link when using an automatic coupler through a special hole.
Between the hinges you need to install a left brace equal to 51 cm - this value cannot be changed during operation. Next, the required depth of soil loosening is set on the stand - 2/3 of the specified depth.
The movement of the plow must be smooth and stable. If the frame warps and is at an angle to the ground, it means the adjustment is incorrect. The plow on the MTZ-1221 is adjusted in the same way.
general description
Compared to a revolving or disk one, it has a slightly more complex design. Movable shares on the axle in such equipment are secured by means of shafts. Based on the principle of operation, rotary plows can be compared with conventional cultivators. Plowing the land when using them is done by turning the axis. In this case, two ploughshares are usually responsible for cultivating the soil itself, and two more for loosening it. When turning, the shoulder blades change places. After using a rotary plow, there is no need to use a loosening cutter.
The first two lines belong to the light series, but differ in that at first we find light tractors with a fixed mount, later we find hand loaders that can be used next to the tractor. In the third category, however, we see that accessories for medium-sized tractors range are also equipped with mechanical displacement. In the fourth and final category we find the medium and heavy series curling loaders, which are even more robust than the previous ones, but are exclusively designed for conventional fixed mounting.
Such equipment operates faster than circulating equipment. As a result, when using it (even on difficult soils), it moves more quickly, which saves time on plowing.
Do it yourself
If there is no opportunity or desire to purchase ready-made equipment, you can make a plow yourself
Please note that scrap ferrous metal lying around at the dacha or in the garage is not suitable for a homemade design
All elements bear a fairly high load, so only alloy steels and metals that can withstand dynamic loads are applicable here. Before starting assembly, we recommend preparing drawings.
A schematic representation of the product will help you determine the amount of material, think over the method of aggregation to the tractor, and calculate the optimal angle of the share.
First you need to make a frame: this is a welded structure from a thick-walled pipe or channel. We recommend that you immediately determine the mounting location for the main elements of the plow, in particular the drawbar, support chassis and plowshares.
Then we make a plow stand: a metal plate with adjustment holes. This element allows you to adjust the plowing depth and ensures the optimal angle of entry of the plowshare into the soil.
The ploughshare and coulter are made of tool steel. The bending angle of the coulter is 80 degrees, the ploughshare: 150. Please note that these are average values; the optimal bend can be calculated independently. It is better to make the ploughshare removable, this will simplify sharpening the cutting edge before use.
A metal sheet with a thickness of at least 3 millimeters is suitable for making a dump. To adjust the angle of inclination, the blade can be connected to the opener using door hinges.
After installation, the plow, assembled with your own hands, must be adjusted on a flat surface, and control plowing must be carried out.
Please note that homemade production will cost half as much as purchasing the most budget plow model. At the same time, you can make changes to your own design, improving the product
DIY plow
Equipment of this type, even used equipment intended for a mini-tractor, is, as you may have noticed, quite expensive. Finding such a cultivator for a walk-behind tractor is quite difficult. Therefore, many owners of farms and household plots would probably like to know how to make
Making such equipment yourself is actually not particularly difficult. The stages of assembling a rotary plow look something like this:
- a cylindrical blade is made;
a ploughshare is installed into a metal sheet at an angle of 45 degrees;
the ploughshare is docked with the side shield;
the blade is attached to the ploughshare;
the resulting working part is welded to the base of the plow made of a metal pipe;
on the other side, a mount for a walk-behind tractor is welded to the pipe.
Of course, a homemade rotary plow will need to be supplemented with an axle with wheels. This element is welded from below at the final stage.
The tractor is equipped with a large number of additional tools for various purposes. The plow is necessary to plow the land before planting any of the existing crops unless no-till is used.
The choice should always begin with defining its goals. For example, soil after perennial grasses and fresh soil that has not seen any tools require completely different equipment.
How to make a cultivator for a mini tractor with your own hands
Agricultural workers who have various improvised means “hidden” in the barn should think about making a homemade cultivator for a mini tractor with their own hands. Considering that the cost of store-bought models is quite high, craftsmen can save a lot.
To make a cultivator with your own hands, you first need to understand whether you have all the necessary elements. If they are not available, then you need to purchase them at a specialized store.
This is due to the fact that the working elements of the cultivator will be in constant contact with moist soil, which acts as a rather aggressive oxidizing agent.
A tractor driver who is thinking about making a tool should have the following materials at his disposal:
- pipe made of steel material more than 2 m long;
- square plates made of steel material measuring at least 15x15 cm;
- rectangular plates with a flat cross-section (20x25x5 cm);
- fasteners (bolts and nuts) at least 20 pieces.
Also you will need to use:
- drill - be sure to have a set of different drills;
- welding machine and electrodes;
- grinder and metal cutting discs;
- wrenches of different sizes.
The choice of specific plate sizes, as well as other equipment, depends on several factors. Firstly, these are the dimensions of the mini-tractor or walk-behind tractor on which the cultivator will be installed. Secondly, you should decide how the tool will be attached to the tractor and what type of connection it will have. Thirdly, you need to focus on the type of tool for cultivating the land that the agricultural worker uses.
Imported or domestic?
In addition to “Belarus” and “Dofgan”, there are, of course, many other models of rotary plows on the market today. If desired, a farmer can purchase both imported and domestic equipment of this type. The main advantage of models produced by Russian companies is maximum adaptability to the climatic conditions of our country. Such plows, unlike imported ones, can be used on heavy clay soils. They can also be used on lands containing small stones.
This is very interesting to use because grasses and pruning the fruits of the plant in practice means not depriving the soil and surrounding plants of these nutrients, which will eventually turn into useful fertilizers. With the second system, cutting with blades in the classic sense, you have the ability to retrieve broken herbs, perhaps turning them into hay for animals. Using a small plow, it is also possible, with a simple cultivator, to turn the land beyond the cyclical end of the harvest. Typically, their construction line allows plowing to be done without the handler being too tired.
Among imported equipment, Chinese models are most often sold on the domestic market. They cost about the same as domestic ones. Plowing the ground using them is quite convenient. Domestic farmers also have no special complaints about the reliability of such equipment. However, imported plows have one rather significant drawback. It is quite difficult to find spare parts for them. In addition, unfortunately, many old imported rotary plows are sold on the market today, repainted to look like new ones. Another disadvantage of such models is that the instructions for their use are usually written in Chinese.
Finally, one of the most used uses by farmers, that is, the use of a towable trailer. It is very useful for those who have to do small and short transport. Applied to the rear like any other accessory, it essentially transforms the drivetrain into a four-wheel drive with just as much room for the driver.
The range of accessories continues with buffers. They serve to create precise seedlings or irrigation slopes, and are often aided by additional wheels that support them. Some pulley models also use them directly behind the milling machine.
Kinds
There are several types of tractor hillers on the modern market.
Lister equipment for a mini-tractor is considered the simplest model. Work with the ground is carried out thanks to the presence of a pair of connected and slightly spread wings. The thin stand prevents overloading when the moving device is immersed in the soil
It is important to mention that the lister hiller does not have the ability to adjust the grip, that is, the width of the rows must correspond to the equipment, and not the canopy adapt to the existing beds. The working width of the device is always fixed and ranges from twenty-five to thirty centimeters
This gap is sometimes not enough to process large areas, which, of course, is a disadvantage of this variety. A model with a variable working width is considered more convenient for use, which indicates the possibility of adjusting the space being processed.
- The disc hiller is considered a universal device, very convenient to use. Such equipment allows you to cultivate the land not only during planting, but also when the potatoes are actively developing. Models made of alloy steel and equipped with special rolling bearings instead of sliding bushings are considered to be the most reliable. The large diameter and thickness of the discs are also important.
- The next type of hillers is called propeller-type devices. As you can guess from the name, soil hilling in this case occurs with the help of propellers. These parts rotate, crush clods of earth, and then transport them from the space between the rows to the beds themselves. As a rule, propeller-type hillers are mounted on moving vehicles with two forward gears. This condition is necessary so that in second gear, the power of which reaches 180 rpm, in addition to loosening, the earth is also thrown over.
It is worth mentioning that many craftsmen make such attachments on their own from available materials, fortunately the Internet contains a large number of suitable drawings and instructions. The role of discs is usually played by lids from old pans without an enamel coating. The diameter of the circles in these cases varies from forty to fifty centimeters, and the edges of the lids must be sharpened and, if necessary, slightly bent. A circuit is assembled from pipes and bushings, onto which the discs are then attached. The frame itself also has to be equipped with wheels for movement.
How to choose a rotary plow for a walk-behind tractor?
Mini tractors are usually used for plowing land only on large farms. Summer residents and owners of small plots in the countryside often use walk-behind tractors for this purpose. Of course, a rotary plow can be combined with such low-power equipment. Cultivators of this type most often initially come complete with a walk-behind tractor. But, of course, you can purchase rotary equipment separately.
The power of walk-behind tractors ranges from 3.5 to 10 liters. With. Based on this indicator, you should choose a rotary cultivator. Unfortunately, universal plows of this type, designed for all models of walk-behind tractors, practically do not exist on the market. Therefore, most likely, you will have to purchase a used model from a walk-behind tractor kit of the same brand.
Plow from a Russian designer - features and advantages
To be able to plow the land more efficiently, experts advise using a Zykov plow.
It quickly cuts and turns the soil, so the owner of the site can get rid of a large number of weeds. Such a plow consists of the following elements:
- Support part;
- A ploughshare fixed to the body;
- A stand designed for mounting the unit on a walk-behind tractor;
- Field board for stability;
- A feather for turning over the soil in order to obtain an evenly treated area.
To hill various crops, it is necessary to use a hiller or a plow that has two working sides. It is large in size and makes it possible to completely get rid of harmful weeds, fill the row with soil, and cut trenches for planting. Such a plow can have a fixed or variable working width. The main difference between the two is the use of moving wings that allow you to adjust the working width.
Features of work
When using a rotary plow, active shares throw the soil in one direction only. At the same time, passive ones compare the ridges, lifting them. When turning the tractor, such a plow does not make loops at the end of the row. This becomes possible due to the mobility of its axis. When moving back, the plow simply turns on its own.
It is worth remembering, finally, that the design and construction of these machines are entirely in Italy to guarantee their complete quality. A driveshaft is standard on all models. A cultivator is a tool used in agriculture to work the land. It differs from traditional tractors in having limited power and driving the vehicle on foot from the driver. On the other hand, the motor of the pot can be called a variant of the cultivator, designed exclusively for crushing the earth, mounted on a rotation axis directly from the blocks instead of wheels.
Plow for t 40
Plow for tractor T-40: adjustment and configuration
The mounted double-furrow plow PON-2-30 on the T-40 tractor is used for plowing soils with a resistivity of no more than 6 N/cm² to a depth of 25 centimeters, as well as for plowing fields whose slopes do not exceed 10º. Plow structure
The plow is equipped with a symmetrical frame, capable of rotating relative to the longitudinal axis of the horizon by 180º under the influence of the rotation mechanism. Mounted on the plow frame are two left-turning and two right-turning bodies, installed in pairs at opposite ends of single posts, two left- and two right-turning skimmers, as well as two disc knives.
The plow turning mechanism consists of a hydraulic cylinder, a spur gear and a gear sector. The gear is installed at the front end of the longitudinal axis of the frame, passed through a hole in the hitch bracket. The sector that meshes with the gear is hingedly fixed to the attachment mount. When oil enters the left cavity of the hydraulic cylinder, the rod turns the sector, which, by turning the gear, lowers the right-hand turning housings into the working position. When oil enters the right cavity, the left-turning housings are lowered.
This plow is used for plowing using the shuttle method. There is no need to divide the field into paddocks. Having reached the end of the field, the plow frame is turned 180º. When plowing on slopes, layers fall down the slope. Working speed when plowing is up to 6.3 km/h, and the working width is 60 cm.
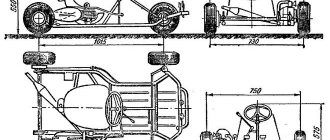
Plow on T-40: 1 - right-hand turning bodies; 2 — left-hand turning housings; 3 - skimmers; 4 — support wheel; 5 — hitch; 6 — rod; 7 — gear sector; 8 - gear; 9 - hydraulic cylinder.
Technical characteristics of a double-furrow plow
| Productivity ha/h | up to 0.54 | up to 0.81 |
| Plow working width, m | 0,6 | 0,9 |
| Number of cases, pcs.: | ||
| — legal practitioners | 2 | 3 |
| - left-hand turning | 2 | 3 |
| Machine weight, kg | 515 | 605 |
| Overall dimensions, mm: | ||
| - length | 1850 | 2500 |
| - width | 1250 | 1450 |
| - height | 1600 | 1590 |
| Plowing depth, cm | until 22 | |
| Operating speed, km/h | until 9 | |
| Distance from the supporting plane of the housings to the bottom plane of the frame, not less than, mm | 650 | |
| Distance between bodies along the plow path, mm | 650±25 | |
| Body grip width, mm | 300±20 | |
| Type of shell | half-screw | |
| Transport speed, km/h | by tractor speed | |
| Ground clearance, not less, mm | 300 | |
| Availability factor | 0,98 |
Preparing for work and adjusting the plow on the T-40
Preparation of the plow consists of checking its technical condition and correct assembly; installation of working parts on the plow; preparing the tractor for work and installing the plow on t 40; adjusting the plow to a given depth.
The correct assembly of the plow is checked on a level surface.
The field surface of the stand and the field board must lie in a single vertical plane. The field edges of the blade and ploughshare should similarly be in a common vertical plane and protrude beyond the surface of the stand by 5-8 millimeters. The permissible deviation of the top point of the field edge of the blade from the vertical plane is no more than 10 mm. The toe of the trapezoidal share and the rear end of the field board must be in the same plane of the field side of the plow body.
The deviation of the rear end of the field board towards the furrow should not exceed 5 mm.
For chisel-shaped shares, the nose should be placed 10 mm below the rear end of the field board and the heel of the share; the toe of the ploughshare should extend 5 millimeters towards the field.
When adjusting the plow, it is necessary that the console rotates on the stand at an angle of 20º, and the disk rotates freely on the axis without any jamming. The plowing depth is adjusted by changing the position of the support wheel using adjusting bolts.
T-40 tractor with plow
Operation of the T-40 tractor with a mounted plow
During plowing, the plow in the furrow must move steadily, without moving to the side or in the direction of travel, as this can cause uneven plowing depth.
The uniformity of movement of all plow bodies along the plowing depth is adjusted by changing the length of the central link, the left and right braces of the rear tractor linkage. The horizontal position of the frame will ensure the correct movement of the plow: when the plow body is tilted to the left, it is necessary to shorten the left or lengthen the right linkage brace and vice versa. In the case when the front body plows deeper than the rear one, it is necessary to lengthen the central link.
08.06.2018
Description of assembly work
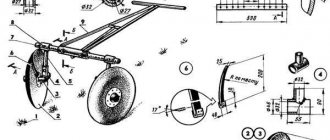
Drawing of a simple plow for a mini tractor and walk-behind tractor.
The main load-bearing element of the equipment in question is the frame onto which the remaining components are attached. It is made of a metal profile with a round or rectangular cross-section, 2-3 mm thick. The working bodies and auxiliary elements of the plow are attached to the frame part. The shape of the frame corresponds to the number of working tools of the plow and the selected control elements.
Geometric features of the plow
Plow share diagram.
The presented drawing shows the structure of the plow blade body of the plow. The share (I) is the lowest part that cuts into the soil. The layer of earth moves to the dump (IV), which turns over, crumbles and moves the soil into the furrow. The field board (II) serves as a guide for the movement of the plow and does not allow it to move towards the uncultivated arable land. The stand (III) secures the working tool to the supporting frame and rigidly holds the knife in working condition. The share consists of a toe, blade and heel (1, 2, 3), which ensure successful penetration into the ground. The upper, furrow and field edges (6, 4, together with the wing (5) and the mouldboard chest (7) due to their geometric parameters ensure proper movement and loosening of the formation. The design of the plow with two bodies allows for optimal plowing of small plots of land using mini tractors. On the Internet you can find many videos describing the operation of such devices.
Plow shank attachment
The stand is equipped with adjustment holes to adjust the required plowing depth. It is made of a metal plate 8-12 mm thick to provide sufficient rigidity to withstand high loads during operation. The stand is bolted to the frame; the angle of inclination of the body should ensure normal penetration of the cutting edge of the ploughshare into the soil.
Making a drawbar and fastening a wheel
Connection of the main components of the plow.
The frame is attached to the mini tractor using a standard pin coupling device or a homemade drawbar. The first can be taken from old, worn-out equipment and welded to the front part of the supporting structure, the second can be made with your own hands in the form of a drawbar with a handle (examples can be seen in various videos on the Internet). There are straight and V-shaped drawbars, with the second being more preferable. It dampens lateral vibrations of the plow and ensures straight movement.
One of the additional and control parts of a homemade land implement is a field wheel. It serves to ensure ease of movement and prevent the working tool from sinking into the soil. These tasks can be performed by one wheel, but on advanced designs these functions are divided into two elements. The field wheel is attached to the frame with an adjustable bracket to ensure the required plow settings.
Fastening and manufacturing of the working body of the plow
To make the main working tool of a plow with your own hands, you need to make a ploughshare and a moldboard. The plow body must be made of alloy steel with improved strength characteristics. In Soviet times, methodological centers of agricultural engineering advised strengthening plow bodies with spring steel overlays when cultivating parched and virgin lands. A good workpiece for the production of cutting parts is a used circular saw blade, the material of which has increased strength and rigidity. The ploughshare has a wedge shape with a working angle of 40-42º. It is recommended to attach the ploughshare to the blade with bolts or rivets to allow removal and regular sharpening.
Blade installation
The blade is made of a metal sheet 3-4 mm thick, followed by bending by gas welding or on a roller machine. It’s easier to make a homemade dump from a pipe with a diameter of 500-600 mm. First, a template drawing is made, then it is applied to the workpiece, cut with a gas cutter and sanded. The blade is rigidly mounted to the plow stand by welding.
Adjustment of equipment for a mini tractor is carried out on a level area with a hard surface. The field wheel is installed on a stand adjusted to the plowing depth. The ploughshare is lowered until it stops with the supporting plane, and the heel should be parallel to the surface of the ground. The stand is fixed in the selected position and the equipment is ready for use. To check that the plow settings are correct, you need to do a test plow.
The plow assembly is shown in more detail in the video:
Advantages of a homemade element
The ability to independently manufacture a cultivator-hiller for a mini tractor allows you to significantly save money. In addition, such an element is easy to assemble: you need a diagram of the components from the Internet, but you can also draw up drawings yourself to construct a mini tractor with your own hands.
Among the advantages of homemade cultivators for mini tractors are the following:
- availability of necessary materials;
- ease of assembly;
- significant time savings when cultivating soil on a personal plot;
- high-quality loosening and hilling of the soil, quick removal of weeds;
- in order to make a good tool, minimal cash costs are enough - basically, the summer resident already has all the necessary materials and tools and uses them for other needs.
The main thing you need to remember before you decide to make a tool yourself is that without careful preparation you won’t get a high-quality cultivator. Therefore, before starting assembly, all materials must be treated with special anti-corrosion agents.
Remember a couple more recommendations that will help make the tool more effective in its work
When designing, you need to pay attention to the crumbling angles - they can be either universal or flat-cutting. And in order for the furrows to remain even after loosening, it is necessary to install a loosening paw on walk-behind tractors
Source
Main advantages
The rotary plow is, in fact, the most modern type of attachments designed for soil cultivation. Its use provides farmers with the following benefits:
- there are no large clods of earth on the field after processing;
the soil is maximally saturated with oxygen;
It is widely used by those who have limited land, but for this reason they do not want to give up agricultural mechanization in order to carry out classic seasonal work. In this practical guide to choosing between a walk-behind tiller or a walk-behind tractor, we'll look at the main features of the two; for the first, we will also analyze the main additional tools that can be applied. The final section will of course focus on the profit proposition for purchasing and maintaining this type of machine.
the number of working passes is reduced;
tractor fuel consumption is reduced and tire wear is reduced.
Also, the use of a rotary plow allows you to reduce the cost of weed control and ensures the most uniform mixing of organic matter contained in the soil. This modern equipment does not leave any furrows on the field. This, in turn, significantly improves the moisture and air exchange of the earth. When using a rotary plow, the farmer is able to carry out a series of successive cultivations.
We will answer, in particular, questions such as: when to use? What materials are their various components made from? How should the geological conformation of the soil determine whether a motor cultivator is better than a hoe? Because because of them, the decision to choose between a motor cultivator or a motor zappa is moving.
The main characteristic of the engine cultivator, which distinguishes it from a conventional tractor, is its special volumetric shape, practically developing on a rotating axle, at the ends of which two wheel wheels are installed. Then the conduction, as already mentioned, comes from the person following the medium, passing through the joint type "delta" steering wheel.
Exploitation
Before starting work, the equipment must be configured and checked. The first step is to check the presence of all parts, as well as their condition, after which it is assessed whether the bolted connections are well tensioned
It is immediately important to pay attention to adjusting the position of the hiller. If it is necessary to increase the height of the ridge, the disks are brought closer together, their installation angle increases, as well as their depth. Reducing the height of the ridge is carried out by moving the discs apart, as well as reducing the specified parameters
Reducing the height of the ridge is carried out by moving the discs apart, as well as reducing the specified parameters.
To change the space between the disks, you will have to slightly unscrew the nuts on the brackets, change the position, and then tighten them again. To adjust the installation angle, loosen the bolts. Next, the hillers are lined up in the desired position, the bolts are tightened again. In the case when a change in the depth of the depth is required, again it will be necessary to unscrew the bolts, correct the situation, that is, raise or lower the hiller itself, and then fix everything back. It is not customary to place hillers on the front hitch of a mini-tractor, so they are secured at the rear using a double hitch.
When everything has been checked and adjusted, the operation of the hiller should be checked in an empty area; if something is not in order, adjust it again
During a test run, it is important to note both the functioning of individual parts and the entire mechanism. When you start using the hiller, you should avoid making sharp turns at the end of each bed.
You need to turn smoothly in first gear of the mini-tractor. If a sharp turn still needs to be made, then at this moment the coupling with the hiller should be raised.
When a mini-tractor needs to be transported to a storage location or to a new cultivated area, this must be done exclusively in the transport position. In the case when a vehicle together with a hiller needs to be transported over a long distance along unsatisfactory routes, then this must be done using vehicles, partially disassembling the agricultural equipment and fixing its position. In general, the operation of a hiller for a mini-tractor must be carried out in accordance with the instructions supplied with the attachment, in compliance with safety requirements.
After work, the hillers must be cleaned of plant residues, soil and dirt. You should immediately inspect the equipment and assess whether everything is normal. If necessary, the fastenings are immediately tightened. The hiller should be stored for a long time in a dry room with the necessary protection from emerging moisture. Before moving the device there, it should be cleaned, wiped dry and lubricated with a thin layer of special lubricant.
In a protected room, the equipment is fixed in a stable position, after which, if necessary, it is tinted with paints and varnishes. The drums with bearings are washed separately, dried and treated with a suitable product.
Where can I buy a model for a mini-tractor?
Thus, rotary plows are used quite often by homestead owners, as well as small and medium-sized farmers. In small farms, such equipment is usually mounted on a mini-tractor. For each model of such equipment, in most cases, only the rotary plow designed specifically for it is suitable. MTZ, for example, is the brand of mini-tractors most often used by farmers. It is believed that for such models it is best to use attachments, which are also sold by Dofgan. But, of course, there are also universal rotary plows on the market, which can be used with almost any tractor.
In short, it is very convenient for those who have little reason, but despite this, do not want to break their backs with hoes and minibuses. Regarding fatigue, we also stand in an intermediate position here. If it is true that the motor cultivator is a self-propelled machine, however, in any case it is necessary to direct it and make it in the right direction.
Is a hoe more tiring than a mower?
In terms of physical exertion, hoeing can be said to be fatiguing, since the fatigue required to guide the medium is added to that required to measure the thrust performed by the hooves on the ground. On the contrary, it can also happen that, without sinking enough to the ground, it will "run" along the ground, increasing the speed of the tow.
Many farmers are, of course, interested in where they can actually purchase such attachments. The easiest way to buy the most suitable one for a mini tractor in a particular case is, of course, from a company specializing in the sale of agricultural aids. Also, many farmers, in order to save money, purchase used equipment of this type. You can buy a used rotary cultivator, for example, via the Internet, according to an advertisement.
Choose between motorized cultivators or motorized cultivators according to the agricultural work being done. The most common use is milling the soil in the preparatory period before spring sowing. Taking advantage of the rear power takeoff, there is a real milling machine with rotating pads that impact the ground as they move.
The same task, of course, is assigned to the classic walk-behind tractor. You can always cut the grass with this machine. There are two possible ways, although they are not very different from each other: the first is to use a grass trimmer; the second - when using a mower, but in the rear of the vehicle. A grass trimmer is very similar to a grinder, but instead of feathers, there are several hammers that repeatedly strike the soil, atomizing excess grass as well as fruiting plant trimmings.
Do-it-yourself mini tractor from a walk-behind tractor - manufacturing procedure
Before you start manufacturing a mini tractor based on a walk-behind tractor, you will need to prepare the materials necessary for the work. Conversion kit includes:
- welding machine;
- screwdrivers and wrenches;
- electric drill and a set of various drills;
- grinder and a set of discs for working with metal;
- set of nuts and bolts.
Suitable drawings will help you assemble a tractor from a walk-behind tractor correctly. In them you will find information about the order in which to connect the parts and which fastening method is suitable for their reliable installation.
Converting a walk-behind tractor into a mini tractor is carried out in the following order:
- A mini tractor based on a walk-behind tractor must be equipped with a strong, reliable frame. It must withstand an additional pair of wheels, plus the load carried in the tractor will put pressure on the supporting structure. To make a durable frame, metal pipes or angles are best suited. Be sure to keep in mind that the heavier the frame, the better the grip of the minitractor with the road, and the better the quality of plowing. The thickness of the frame walls is also not very important - the main thing is that they do not bend under the pressure of the cargo being transported. You can cut the blanks for making the frame using a grinder. Then all the parts are connected to each other first with bolts, after which they are finally welded to each other. To make the frame stronger and more reliable, equip it with a cross beam;
- Immediately after manufacturing the frame, it can be equipped with a hinged mechanism, through which the small tractor will be equipped with additional accessories. The hitch can be installed both in the front and in the rear of the supporting structure. If in the future the manufactured minitractor is planned to be used in tandem with a trailer, then a tow bar should be welded to the back of its frame;
- At the next stage, the homemade product is equipped with front wheels. To do this, it is best to equip the mini-tractor being manufactured with two ready-made hubs with brakes provided on them. Next you need to secure the wheels themselves. To do this, take a piece of steel pipe whose diameter fits the front axle. Next, attach the wheel hubs to the pipe. Drill a hole in the central part of the pipe, which is necessary for mounting the product to the front of the frame. Then install the tie rods and adjust them to the frame using a worm gear. After installing the gearbox, install the steering column. The axle at the rear of the tractor being manufactured is mounted through pressed bearing bushings. The wheels used must be no more than 15 inches in diameter. Smaller parts will lead to the front part of the unit “burying”, and larger wheels will significantly impair the maneuverability of the mini tractor;
- At the next stage, it is necessary to equip the minitractor with an engine from a walk-behind tractor. It is best to install the motor at the front of the unit, as this will improve the balance of the agricultural machine when operating with a loaded trailer. To install the motor, arrange a reliable mounting system. When installing the motor, do not forget that the power take-off shaft must be secured coaxially to the pulley located on the rear axle of the mini-tractor. The force on the wheels must be carried out using a belt drive. The video will tell you more about converting a walk-behind tractor into a mini tractor.
A self-made tractor will remain equipped with a reliable brake system and a high-quality hydraulic distributor, which is necessary for the proper operation of the unit with attachments.
The best models and their characteristics
Of the domestic plows, the PM-20 and 25 models are especially popular today among small and medium-sized farmers, as well as among owners of household plots. They are designed specifically for attachment to mini-tractors. These double-body rotary plows with three-point coupling have the following technical characteristics.
Finally, one of the most important accessories is a snow blower for those who live in the mountains and often need to clear the roads. There are two types: one with an adjustable front blade; while the second takes a different criterion, being a turbine and spraying the snow with force in one direction and with a fully adjustable jet.
Safety Guidelines for Wheel Loaders and Motorcycles
With a quick but comprehensive description of the machine and its main areas of use, we talk about an equally important subject, that is, the maintenance and safety of the environment during use. Unfortunately, hundreds of work accidents occur in Italy every year, mainly due to agricultural work, and often the supply of self-propelled vehicles and work, including gardeners and motorcycles.
New plows PM-20 and 25 cost approximately 70 thousand rubles. The companies that sell them usually offer delivery to any region of Russia. The manufacturer also provides a one-year warranty on them.
Of the imported models of rotary plows, farmers most often purchase RT-120 and 125. The technical characteristics of these double-frame plowshare models are presented in the table below.
Maintenance and preservation of the motor cultivator and motor zappa
The first safety standard is to follow the instructions in every owner's manual that every machine has.
Here are the main signs. When connecting the vehicle to the above equipment, carefully follow the instructions in the manual and always with the engine off and the vehicle in a flat and comfortable position. When driving the mower, adjust the maneuver to human height; since most cars only work if they are constantly running on a lever attached to one of the two dumbbells, and leaving the engine stopped, keep a close eye on the original mechanics; so don't look for convenient artifacts that can turn into deadly installations for the driver. Make sure that the controls are located in the locations specified by the manufacturer and, above all, that they are clear and understandable to the user. it happens that you can go straight from the front to the background; there must be mandatory intermediate placement; Likewise, it is not possible for the reverse gear to operate at the same time as the power socket and then the mounting tool. Finally, avoid running the engine in enclosed areas to avoid exhaust fumes, which if inhaled in excess can cause poisoning. When starting, define an area in which there are no strangers except the operator. . Storage = when an instrument is placed temporarily or for an entire season. RT-120 and 125 plows are produced in China. They can be used with any mini-tractors with a power of 18 hp or more. With. They are aggregated at three points. You can purchase rotary plows RT-120 and 125 in Russia from dealers or via the Internet. The price of new models starts from 70 thousand rubles. Used equipment of this brand can be purchased for 30 thousand rubles.
If the storage area is at risk of fire or where sparks may occur, ensure that there is no fuel left in the tank. In any case, wait until the engine has cooled before returning it to the vehicle. If the tank must be emptied, always do so outdoors. . However, the builder's manufacturer states that the commercial vehicle complies with the safety and health requirements of European directives.
How to Choose a Forklift or Hoe
They are partly the same for any other agricultural input: primarily to assess the actual need to avoid wasteful and unused expenses over many years. Make a preliminary assessment, understand what type of model your case is: that is, consider the horsepower and power of the engine, as well as additional accessories that can make your case. In other words, there is absolutely no need to buy a car that offers the option of installing a snow plow when compared to others when your home is centrally located and more at sea level!
Of course, there are not only Chinese rotary plows on the Russian market. If desired, you can purchase a European model of similar equipment for a farm or personal plot. For example, mounted tools from the Italian company Berta are quite popular among farmers. A rotary plow of this brand will most likely cost more than a domestic or Chinese one. The cost of such models starts from about 85 thousand rubles. The table below shows some technical characteristics of the Berta plow.