Homemade bucket for the rear or front hitch of a tractor
Farmers are interested in how to make a homemade bucket for the rear linkage of a tractor. Agricultural machinery, for example, mini tractors or walk-behind tractors, is now available on almost all farms. Even those who farm exclusively for themselves try to either acquire such equipment if their budget allows, or make it with their own hands, using a car and its components as a basis. The most popular equipment purchased on the market is the products of the Minsk Tractor Plant, especially the MTZ-82 tractor.
Is it possible to make a bucket for a mini tractor with your own hands?
Even after purchasing agricultural equipment, some farmers try to modernize it, not wanting to spend money. Schemes for making some useful structural elements yourself come to the rescue. Thus, recently a bucket for a minitractor has become very popular, or rather, a bucket for an MTZ-82, designed with your own hands.
Mounted elements can be useful at any stage of agricultural work, be it sowing or clearing the area of dirt or snow. Tractor attachments are of the following types:
All these elements are controlled directly from the driver's cab. Hydraulic installations are used for this.
Due to the fact that the MTZ has a universal hydraulic design, any equipment can be mounted on it.
Next we will look at how to make a homemade bucket for a mini tractor with a rear linkage. A homemade bucket for a mini-tractor can perform a fairly wide range of tasks. The equipment is not very large in size, and is also multifunctional. It is recommended to use it both in small rural farms and on large farms or during the construction of any structures. Depending on the characteristics of a self-made mini tractor bucket, it can carry quite heavy loads and even dig up the ground to a depth of 3 m. All this allows the author of the homemade product to:
- Perform a number of basic earthworks.
- Create ditches or pits into which the foundation will be thrown.
- Transport various materials from one place to another.
- Load and transport harvested crops or fertilizers.
Making kunas with your own hands
The use of a mini tractor makes the equipment truly versatile and productive, in a few minutes turning the equipment into a convenient loader, bulldozer, or compact construction equipment. However, the cost of equipment, including low-power models, often exceeds the financial capabilities of small farms. What should farmers do in this case? Load bales, crushed stone, grain manually, spending an order of magnitude more time and effort... Or resort to making a universal hitch yourself.
For this purpose, you will need to stock up on tools for cutting metal, a welding machine, a set of adjustable wrenches, a sledgehammer and a hammer. In addition, for self-assembly you will need:
- drawings and equipment assembly diagrams indicating the dimensions of each element;
- metal profiles, steel pipes and sheet metal for the manufacture of a frame for kuns;
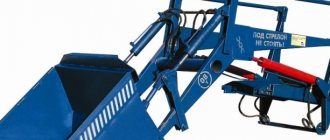
- hydraulic cylinders and hinges, movable hydraulic booster (for the lifting mechanism, bucket control);
- work bucket
This part can be purchased used or welded from existing sheet metal. Moreover, it is not necessary to bend a metal sheet to the shape of the bucket. You can cut the steel into rectangles of the desired size and weld them together, paying special attention to the welds. The durability of the product directly depends on their quality.
If you have competent drawings and follow welding rules, the functionality, durability and performance characteristics of homemade products are often not inferior to factory models. However, when working with homemade kun and factory-made products, you should remember to follow the operating recommendations. The equipment can only be used for its intended purpose, carefully monitoring the bucket while lifting/lowering loads.
How to make a homemade bucket for a mini tractor
As a rule, you make a bucket for a tractor yourself using a special hydraulic installation, as well as adjustable supports. This makes it possible to make the operation of the tractor more reliable, and control of the attached equipment as simple as possible.
Making a bucket for a mini tractor with your own hands is not so difficult. Many farmers who have already done this post their work online, so finding diagrams and drawings related to the design is quite possible.
Those who have made attachments themselves argue that you will first need to make the most reliable load-bearing element. As a rule, its role is played by a frame made of metal corners welded together. Sometimes it is permissible to use a frame that was on an old mini tractor (if you had one).
Do-it-yourself kun at MTZ: dimensions, drawings, photos, videos
The main differences between the MTZ-80 and MTZ-82 attachments. Main technical characteristics of KUNs for MTZ.
One of the most common and simplest types of special attachments, of course, can be called KUN at MTZ, which has become a kind of popular name - a common name for any similar type of attachments for tractors. KUN is a universal mounted hay hauler, which is essentially a tractor front-end hydraulic loader for moving, lifting and lowering various large loads.
However, if KUN is initially a hay hauler, this does not mean that it cannot work with other loads and materials that are not even remotely included in the category of hay and silage, and are not related to agricultural work.
The range of application of tractors with similar attachments is very wide and varied. For example, in the same excavation work, it is capable of moving large masses of soil from one place to another, covering any distance.
Advantages of front mounted equipment and technical capabilities
Slightly different equipment is installed on different modifications of Belarusian tractors, with minor technical and operational changes. Here the ratio of the load capacity and the canopy sweep may vary, which in one way or another directly affects the operation of the equipment and its tasks during operation.
1. MTZ - 80 with KUN is equipped with a prototype of the PF - 1 attachment, which has the following technical characteristics:
- weight of lifted loads up to 1 ton;
- lifting height limit up to 3.5 meters;
- the weight of the loader itself is 900 kg;
- maximum speed of cargo movement is up to 20 km/h.
2. MTZ-82 with KUN is equipped with a more advanced PKU-0.8 device than its prototype, which is somewhat narrower than its predecessor and lacks some parts, which include the so-called “rocker” with a quick-change mechanism.
- weight of lifted loads up to 800 kilograms;
- high-rise ceiling up to 3.5 meters;
- weight of the mounted loader up to 700 kg;
- maximum travel speed with load up to 20 km/h.
If PKU - 0.8 is attached directly to the tractor frame, naturally disrupting the uniformity of the load during operation and putting pressure on the frame with the entire loaded mass, which leads to premature breakdowns when working with heavy loads, then PF - 1 is equipped with its own frame, attached under the tractor to the rear axle , which evenly distributes the entire load.
In addition, PF-1 uses slightly more powerful cylinders, while the boom and other parts with mechanisms are made from reinforced (thickened) metal. Consequently, despite all the external similarities, the KUN on MTZ of different models still has significant differences in operation.
Note
Many skilled mechanics make the KUNS they need with their own hands, producing quite working and acceptable attachments. This does not mean that it is necessary and possible to refuse to purchase a high-quality factory product, but it does not exclude this possibility.
However, any homemade KUHN, even one manufactured according to all the rules and regulations, is certainly technically inferior to its factory-made counterparts.
How to make a KUN for a tractor with your own hands
A homemade KUN at MTZ is a special attachment that is designed to expand the functionality of the tractor. Installing a homemade or purchased KUN on the rear linkage of an MTZ tractor improves the operation of the machine.
What is the purpose of KUN at MTZ?
Such equipment is driven by a hydraulic system, which makes it possible to perform the following types of work:
- Build houses outside the city.
- Repair the road surface.
- Carry out various earthmoving works.
- Carry out loading and unloading operations.
The homemade product installed on a mini tractor with KUN can be of two types:
- Equipment type PF-1, which has its own supporting frame. This homemade KUN is attached to a tractor, which protects the machine from overturning. Such equipment weighs about 900 kg, is driven by hydraulic cylinders, has a load capacity of 1 ton and a speed of 20 km/h.
- The PKU-08, which is a more modern modification of the PF-1, is also installed on the rear linkage of the MTZ 82. It is not difficult to attach a homemade KUN or a KUN assembled by your own to a tractor. But it is worth considering that PKU-08 differs from MTZ in carrying less load than the previous arm of the equipment. The PKU-08 weighs only 700 kg, reaches a speed of up to 20 km/h, and is capable of lifting 800 kg of cargo at a time.
The kuna model on MTZ 80 or MTZ 82 is produced at the Salskselmash plant, which specializes in agricultural machinery.
KUN 10 is a functional and practical boom, created specifically for the specified MTZ models. Kun can also be installed on a Chinese tractor.
Although the equipment works better with Minsk technology. Among the advantages of KUN 10 it is worth noting such characteristics as:
- Versatility. The Belarus tractor is capable of being a loader and performing earth-moving work like an excavator. The machine is also used as a bulldozer or leveler.
- Compactness. The installation of KUN 10 at MTZ allows the equipment to be used in the city and on small construction sites. Therefore, such a tractor is constantly used for landscaping territories, digging holes and trenches, laying communications, etc.
- High level of productivity.
- Reliability.
- Ease of use.
- Easy to use.
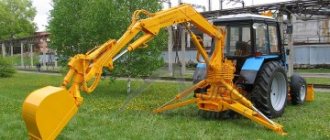
KUN for wheeled tractors has the following design:
- The boom, which is controlled by four hydraulic mechanisms, two of them are used to lift loads, and another two are used to adjust the angle of inclination of the bucket.
- The drive that powers the chassis. Its system also has the option of a connector, with the help of which it is connected to the tractor.
- The boom control panel is installed in the tractor cab.
- Buckets can have different volumes, which vary from 0.35 to 1.5 m³.
Characteristics of a homemade unit
Homemade KUN for a mini tractor: installation features.
The manufacturer offers buckets of various sizes, fork equipment (needed for agriculture and loading and unloading), rake grids for collecting hay, straw, and mown grass.
Grabs for logs are sold separately, so KUNs are used for logging. Additionally there are grippers for bales and rolls. You can also find jaw dumps in stores. The basic equipment for a homemade KUN for a mini tractor may vary.
The dimensions of KUN 10 can be different, depending on the modification of the equipment. The carrying capacity of the rake grid, dumps and grabs is 500 and 800 kg.
The equipment bucket rises to a height of 2.5 m, and the rake grid - to 3.5 m. The unloading angle of the bucket, on average, ranges from 55 to 65º.
The performance and size of the equipment depend on the chassis that needs to be mounted on a homemade mini tractor or other self-propelled unit.
Buying attachments is expensive, so you can make a KUN for MTZ with your own hands.
Assembling and installing such a tool is simple, you just need to draw up a diagram of the equipment and mark on it the place where it will be mounted on the wheeled tractor.
A homemade KUN is attached to the rear linkage of an MTZ 80 or 82. This is much easier than installing a KUN 10, which is available in a front modification.
A homemade tractor differs from a factory one and has several significant advantages:
- Ease of mounting.
- Selection of the length and height that is necessary for specific work on the ground or at a construction site.
- You can use scrap materials left over from other equipment.
In order to make a KUN for a homemade or factory tractor, you need to stock up on the following equipment:
- welding machine;
- tools for cutting and cutting metal;
- sledgehammer;
- hammer;
- wrenches.
If you have no welding experience, then you should find a specialist who knows how to work with the machine. This determines the quality and reliability of welding seams, on which the installation and duration of use of the KUN largely depends.
How to make a KUN for MTZ with your own hands
It is imperative to make drawings of a homemade KUN so that there are no problems with cutting the metal into individual elements. Let's look at how to make such equipment yourself:
- You will need profiles and sheet metal. The thickness of the materials must correspond to the load that is planned.
- You will need to purchase several hydraulic cylinders - 2 large ones to lift the bucket, and 2 smaller ones. They are needed to adjust the inclination level and equipment parameters.
- Cylindrical joints, without which it is impossible to assemble the entire structure of the wheel unit.
When you have all the necessary tools and materials, you can begin the process of assembling the KUN with your own hands.
You can find drawings and diagrams on the Internet, on specialized forums and websites, or you can create them yourself.
This will allow you to cut the metal so that there is a minimum amount of waste. You can contact design firms, where employees will help you create a good drawing of the future attachments for the tractor.
The loader must consist of two rectangular frames. One of them - the external one - should be larger. It is this that is aggregated, i.e. Attaches to the rear tractor of the tractor. The inner rectangular frame is cut from sheet iron. Large hydraulic cylinders must be welded to the bottom of the frame, and a spacer must be installed on top. It is needed to create a stiffening rib.
The majority of the structure is the boom attachment, accounting for more than 70%. To install it, you will need the help of another person who should know how to install it correctly. The product is placed closer to the frame and connected to the cylinder.
Then you need to attach the middle part to it, after which the bucket is hung. It is worth taking into account such an important nuance as the relationship between the length of the boom and the stability of the tractor. If the boom radius is more than 2 m, then a counterweight must be installed on the front frame.
This will allow the MTZ to stand firmly on the ground and not tilt in different directions while carrying loads.
The installed bucket is made independently, also from sheet metal. The elements must be welded so that a structure similar to a boomerang is obtained. It should have 3 attachment points - in the center and along the edges.
More on the topic: repair of the front drive axle MTZ-82
Homemade bucket for the rear or front hitch of a tractor
To carry out work on large farms or personal farms, it is impossible to do without process automation. Loaders make it easier to carry out work on land management, clearing the area of unnecessary debris, loading crops, and transporting various cargoes. The industry has launched the production of several models of such devices, but if there is a lack of funds to purchase them, you can make a loader for the rear linkage of a tractor yourself.
Do-it-yourself loader for the rear linkage of a tractor
For many owners of private farms (personal subsidiary plots), a loader on the rear linkage of a tractor is very, very interesting.
Why? Because purchasing a highly specialized unit (loader) is too expensive, and a thrifty owner is unlikely to spend a lot of money on it.
It is much easier to modernize an existing tractor on the farm.
What is needed for this? First, metal (you will need a lot of it). Secondly, a special tool. Thirdly, straight arms.
Best base
As practice shows, a homemade loader on the rear linkage of a tractor works best on the equipment of the Belarusian MTZ. In addition, it is very common in Russia. Before starting work, you need to familiarize yourself with the pros and cons of the solution in question.
Let's start with the first ones. The undeniable advantages of the created attachments are:
- the ability to select the length and height of unloading as needed in specific conditions;
- savings - just look at the current prices for loaders to appreciate its scale.
The second - disadvantages - include:
- less power compared to factory loading and unloading equipment;
- the need to have a special tool, as well as a large amount of metal.
By the way, in the absence of the latter, experts recommend abandoning the idea of creating a loader yourself and purchasing an inexpensive used model. It's both faster and cheaper.
What will you need?
So, you finally decided to make a loader for the rear linkage of the tractor with your own hands. Here's a list of the tools you'll need:
- equipment for cutting metal - cutter (gas) or grinder (angle grinder);
- adjustable wrench, hammer, sledgehammer, etc.;
- welding machine.
The welding unit must be working properly. The fact is that the main characteristics of the future loader depend on the quality of its work: durability, strength, reliability.
If we talk about materials, you will need the following:
- plates and profiles (in both cases metal) are the basis for the future design. The thickness of the elements should be selected in accordance with the tasks that will be performed;
- hydraulic cylinders - at least three pieces: two small and one large. The first will be responsible for changes in the angle of inclination of the bucket, the second - for lifting;
- cylindrical type hinge joints.
At the preparation stage, it is also necessary to develop a drawing of a loader for the rear linkage of the tractor. Of course, the task is not easy. However, below you will find all the necessary materials.
Step-by-step instructions for creating a loader
Step one is making the frame. It will have the shape of a rectangle, and the lower part (which will be aggregated with the rear canopy) should extend beyond the edges. In the center of the frame there will be another frame (the same shape). It consists of two plates.
A cylinder and a spacer are subsequently attached to it - at the bottom and at the top, respectively. There should be 4 joints (hinges) on the top edge: 2 outer ones for the boom, 2 central ones for the cylinders.
The height of the boom should be chosen based on your own preferences.
The frame shown in the figure includes:
- Rack.
- The lifting cylinder is hydraulic.
- Support.
- Lift frame.
- Tilting cylinder.
- Working body (bucket).
- Traction.
- Bracket.
- Pointer.
- Bracket.
- Traction.
- RVD.
- Same as 12.
- Bracket.
- Lever arm.
- Latch.
- Lever arm.
- Sidewall.
Now about the arrow. It is a prefabricated structure. Its central part should be a hinged joint (cylindrical).
It is to this that the lever will be attached, through which you can control the working body. These are two elbows to which a crossbar and a pair of small cylinders are attached.
In general, an arrow is two curved profiles, connected in three places at once: in the center and at one and the other end.
A finished boom length of 2,000 mm or more is a good reason to equip a counterweight. It is placed in the front part of the tractor, welding a basket onto the frame, in which, if necessary, blocks (concrete), metal weights or sandbags are placed.
If you have extensive experience working with metal, you can make a ladle yourself. Otherwise, you will need to buy a ready-made one. If you occasionally have to work with bales or pallets on your farm, consider making a forklift at the same time.
by HyperComments
Source: https://vsepogruzchiki.ru/frontalnie/pogruzchik-na-zadnyuyu-navesku-traktora.php
Front loaders for tractor Belarus 82.1 | Topic author: Charvi
We discuss the designs, advantages and disadvantages of the front loader equipment available on the market for Belarus tractors.
MTZ (Abheek) Front-end loader MKDU82B Agramak The basic equipment of the MKDU-82B series machines is based on the use of a new generation of front-end, wide-universal loaders with a quick-release hydraulic lift and semi-automatic change of working parts. Main advantages: - Hitching or detaching the loader from the tractor - within 2-3 minutes without using tools. — The support included in the basic package (frame for mounting the working tools) allows you to change the working tool (bucket, forks, etc.) in 1 minute without using tools.
Reliable locking of the working element is carried out by lightly turning the lock handle. — The mechanical parallelogram ensures maximum parallelism between the lifting of pallets and the closed bucket. — To protect the loader and tractor from overloads, an overpressure valve is provided in the hydraulic system. — The hydraulic lift is connected to the tractor’s hydraulic system using hydraulic quick-release connectors without the use of tools. — The mechanism for connecting the hydraulic lift panels to the frame with a wedge gate ensures long-term and reliable operation without backlash. — All articulated joints have a lubrication system, which increases the service life of the loader.
Characteristics: Weight of the loader without working parts, kg 650 Lifting height of the loader boom at the lower hinge, m 3, 8 Load capacity, kg 1000
Tags: Homemade bucket for the rear linkage of a tractor
Homemade loader mounted on the popular MTZ tractor
Very often, farmers are faced with a problem when they need to buy a loader, but the purchase can cost quite a large sum. If you have enough tools on your farm, as well as quite a lot of metal, you can make your own loader for the rear linkage of the tractor.
Homemade loaders mounted on MTZ
As an example, you can take the MTZ tractor, since it is one of the most common equipment on the farm, and also has its own hydraulic system and the ability to install attachments at the rear. Also, although a front loader can carry significantly larger loads than a rear loader, it is much more difficult to mount. For this reason, we will consider a mounted loader on the rear canopy of a tractor.
So, what are the advantages of a homemade forklift:
- If the farm has the necessary tool or was planning to buy it, and also has the necessary metal that is simply lying idle, then you can save a lot of money;
- You can choose the length and unloading height of the future product yourself.
Disadvantages or what problems may arise:
- If you still don’t have tools and metal, then it would be more advisable to purchase a new or used loader, since independent production may not only be comparable in cost, but also significantly exceed it;
- Such a loader will be weaker than the factory ones;
Necessary materials
You will need a small amount of tools and materials for a homemade loader on the MTZ rear linkage, but the main factor is the ability to handle all the necessary tools.
Tools:
- The main tool will be a welding machine. It is very important to be able to use it, since the strength, reliability and durability of the entire structure, as well as the safety of the tractor driver, will depend on this.
- You need a precision tool to cut metal. In this case, a grinder, a gas cutter, and the like are suitable. The main thing is that the cut is accurate and even.
- Next, you just need a variety of tools that are usually available on all farms: these are adjustable wrenches, a sledgehammer, hammers, and the like.
Details:
- It is necessary to purchase or remove 3 hydraulic cylinders from unused equipment: one large one, which will raise the boom with the bucket, and two small ones to change the angle of inclination of the bucket itself. The power of the cylinders is selected depending on the length of the boom and what weight needs to be worked with.
- It is necessary to obtain metal profiles and plates, of which the further structure will consist. Their thickness is also selected to suit the tasks assigned to the loader.
- Cylindrical hinge joints are needed, but their selection should be done only after drawing up a drawing of the entire structure. This is necessary not only in order to obtain the required quantity, but also to know the load that they must cope with in the future.
- First, you need to prepare a drawing of the entire structure, and only then cutting the metal, welding and assembly. This is necessary not only in order to use the material as efficiently and economically as possible, but also to better understand the future design and achieve maximum strength. About the design below.
Step-by-step instruction
If you follow the instructions, you won’t have any problems creating your own loader for the MTZ attachment:
- First you need to make the frame of the base of a homemade loader for a tractor. It is a rectangle, the lower part of which extends beyond the edges, since it must be installed on the rear canopy of the tractor. In the center of this frame there is also a rectangular frame, which is made of two plates and welded to the upper and lower edges. A large hydraulic cylinder will be attached to this frame at the bottom, and at the top there will be a strut that is attached to the back and holds the entire frame in place. There should be four hinge joints on the top face: two in the center for the upper cylinders and two outer ones for the boom. The height of the base is determined according to needs.
Drawing of a homemade forklift lift frame
1 – stand; 2 – boom lift hydraulic cylinder; 3 – support; 4 – lifting frame; 5 – hydraulic cylinder for tipping the bucket; 6 – ladle; 7, 11 – traction; 8, 10 – bracket; 9 – pointer; 12 and 13 – high pressure hoses; 14 – bracket; 15, 17 – lever; 16 – clamp; 18 – sidewall.
Drawing of a rack for fixing attachments
1 – sidewall; 2, 3, 4 – bracket; 5 – catcher; 6, 10 – lever; 7 – clamp; 8 – rod; 9 – spring; 11 – latch; 12 – axis.
The video shows a homemade loader on a tractor in action:
Popular KUHN models
Depending on the load capacity and fastening system, there are two current KUN models:
- PF-1. Has its own supporting frame. Such a KUN for a tractor is mounted on the rear linkage. This minimizes the risk of the machine overturning when handling large loads;
- PKU-08. The equipment is compact and ergonomic and is mounted on a semi-frame. In this case, the balance of the tractor is disrupted and it can easily tip over.
Do-it-yourself MTZ rear-mounted loader – Special equipment
Mounted loaders are multifunctional devices used for mechanized movement and transportation of piece and bulk cargo, as well as the development and transfer of soils of the first and second categories.
Loading devices produced in various modifications are used in agricultural production, industry, road, industrial and housing construction, municipal and forestry.
Loader Metal Fakh on the front linkage of the MTZ tractor
Inferior to specialized excavator and loading complexes in terms of productivity, mounted loading devices are significantly superior to them in terms of seasonal loading and functionality.
Classification of mounted loaders
Types of loaders based on MTZ
Depending on the type of working parts and the specifics of the operations performed, loaders are divided into:
- Bucket loading devices equipped with a bucket articulated with a boom, used for developing and moving soil and loading operations with bulk cargo.
- Tractor quick-release hydraulic front loaders with a two-level hydraulic frame of the KUHN lifting device. KUN is one of the most common types of mounted tractor loading equipment, which received its common name from the successful model of the universal hay hauler, which is aggregated with BELARUS tractor equipment. Equipped with various replaceable working elements, KUNs, which differ from other types of loaders in the speed of changing working elements and dismantling the entire mechanism, are used for developing and moving soil, operations with agricultural products - straw rolls and ricks, haylage, silage, manure, fertilizers, and performing warehouse work with packed and unpacked cargo, snow removal, etc.
- Equipped with lifting forks that carry out picking up, transporting and unloading piece goods - forklifts.
- Jaw loaders with working bodies in the form of massive metal jaws that close when gripping are used to move long loads in logging and when performing warehouse operations with bulk substances.
- Equipped with a grabber mounted on a lifting frame, consisting of a rake and cap grating, for picking up and placing hay.
- Rake grids designed for the selection and transportation of light haylage, which are loaders with working elements made of long fingers. Unlike drag rakes, rake grates select light haylage, lifting it up and moving it in front of you.
- Hydraulic manipulator loaders are designed for lifting and moving solid and packaged cargo in warehouse and field conditions, using a two-part crane device with rigging that rotates around its axis as a working mechanism.
Among the mounted loading devices, telescopic loaders equipped with a telescopic load boom with variable reach are also distinguished. Models of such loading mechanisms, with dimensions comparable to other types of loading equipment, have a large coverage area.
According to the type of drive of the working elements, loading mechanisms are divided into electromechanical devices that use the booms of the working element, mechanical loading units and hydraulic loaders equipped with hydraulic cylinders.
Using tractor attachments to install loading equipment
Depending on the specific conditions of work, loading mechanisms aggregated with tractor equipment can be installed on both the front and rear linkages of base machines.
Thus, hydraulic manipulators are often installed on the rear linkage along with the trailed or semi-trailer transport platforms they serve, and haystacks, rake bars and bucket loading mechanisms are installed on the front linkage.
The choice of installation option also depends on the technical capabilities and operational characteristics of the base tractor and their compliance with the parameters of the loading mechanisms.
Design and principle of operation of mounted loading bucket and fork devices and KUNS
The main structural elements of mounted loaders are:
- Sliding lifting mechanism with a carriage (forklifts) or a working boom with universal or special mechanisms for fastening working parts (bucket loading devices);
- Working elements - pick-up fork, articulated buckets of various types, jaw grips, rake grids, soil and snow dumps, rigging equipment, etc.
A special feature of the KUN design is the ability to quickly install and dismantle loaders of this type and their replaceable working parts without the use of additional equipment.
Source: https://spectehnica-mo.com/pogruzchik-na-zadnyuyu-navesku-mtz-svoimi-rukami/
Valentin Kozhedub | Topic author: Rebeca
testing a loader as a crane.
V (Caris) why suddenly? ! the hitch is designed for lifting loads! from the front frontal you can break it faster. and in this version, if you start to take a heavy load, then the tractor just rears up and that’s it.
Maxim (Rebeca) and my papalam was breaking the gap
V (Caris) is it really from the rear load? This means the gap was cracked, and the loader finished it off.
Maxim (Rebeca) didn’t stick a knife in the front, but pushed the loaded cart and broke it. Who did I buy this tractor from? I tore out the central screw with a piece of the hydraulic tank; he had a bucket hanging on it
V (Caris) I sympathize... anything can happen...
Operating rules
During the manufacture of a front loader, manufacturers pay due attention to the safety of the operator during operation.
When using small machines, you need to monitor the overload so that the small equipment does not tip over. This can be prevented by installing protective systems.
It is also worth following simple recommendations when operating a tractor with a bucket:
- When moving, the scoop must be in the down position;
- It is important to ensure that the KUN is lifted correctly during operation;
- Special equipment (including a tractor with two buckets) must be used strictly for its intended purpose.
When purchasing a mini tractor, you should make sure that important options and elements are available. So, if necessary, it is enough to purchase a tractor bucket and other canopies that can be attached to special equipment.
Homemade ladle
You can make a KUN for a mini tractor with your own hands, while saving money on the purchase of this device. You need to acquire a metal sheet (with a thickness of six millimeters), metal scissors, welding, iron pipes of various diameters.
The KUN for the tractor is made according to a simple scheme:
- The fasteners are welded to the box and motor. The structure is reinforced from below with a metal corner;
- The KUHN itself is manufactured. It is enough to cut a sheet of metal into rectangles, which are then welded into one structure. Welding must be of high quality so that the finished structure lasts longer. Pipes and rods with a diameter of 10 and 5 centimeters, respectively, are suitable for the racks;
- Installation of hydraulic booster. For its mobility, a sleeve with a diameter of about 3 centimeters is suitable;
- The support pipe is welded to the front of the unit, then the racks are combined and reinforced with “kerchiefs”;
- For normal rotation of the bucket, a cylinder installed on the right is used.
To make your own bucket, you need to know how to use welding and understand mechanics. If in doubt, it is better to purchase ready-made equipment that can be attached to the Kioti tractor and other popular models of equipment.
Kun, tractor bucket - types, DIY production, video
A tractor bucket is a type of loader for heavy equipment. According to the principle of operation, this is a standard front loader; a hydraulic system is responsible for its operation. KUHN turns equipment into an excavator, tractor loader, leveler or bulldozer.
The universal mounted bucket was originally made for the purpose of loading silage or hay. But the scope of application of this equipment has expanded significantly, which is why they are actively used in warehouses for transporting goods, in construction, for landscaping, and for snow removal.
Advantages of a tractor front loader:
- Convenient for maintenance, since all components are within reach and can be easily replaced;
- Quick installation and dismantling of various canopies;
- Reliable (this is not always the case with a homemade loader);
- High load capacity;
- The reinforced hydraulic system simplifies the operation of the unit.
Popular KUHN models
Depending on the load capacity and fastening system, there are two current KUN models:
- PF-1. Has its own supporting frame. Such a KUN for a tractor is mounted on the rear linkage. This minimizes the risk of the machine overturning when handling large loads;
- PKU-08. The equipment is compact and ergonomic and is mounted on a semi-frame. In this case, the balance of the tractor is disrupted and it can easily tip over.
Design Features
The KUN for equipment has the shape of an arrow, which is controlled by four hydraulic mechanisms - two help lift loads and two control the angle of inclination of the bucket. The drive is taken by the chassis, the system of which acts as a connector for attaching the bucket to the machine.
All loader controls are located in the operator's cabin and are not complicated.
You can choose other additional canopies to equip a tractor with KUHN:
- Buckets with a volume in the range of 0.35 - 1.5 m3;
- A fork device that performs work in agriculture and during loading;
- Log grabber. With its help, the equipment can be actively used for collecting firewood;
- Clamps for bales and rolls;
- Rake bars that help remove hay and hay;
- Jaw blade.
Basic parameters of a tractor with a bucket:
- The rake grid and other aggregated working parts have a load capacity of 500 and 800 kilograms;
- Loading height with a bucket and rake grid – 2.5 and 3.5 meters;
- The angle when unloading the bucket is 55 – 65 degrees.
The dimensions and performance of the bucket determine the chassis parameters. It is used to attach equipment to the tractor.
You can get acquainted with the specifics of how special equipment works with buckets in the video.
Homemade ladle
You can make a KUN for a mini tractor with your own hands, while saving money on the purchase of this device. You need to acquire a metal sheet (with a thickness of six millimeters), metal scissors, welding, iron pipes of various diameters.
The KUN for the tractor is made according to a simple scheme:
- The fasteners are welded to the box and motor. The structure is reinforced from below with a metal corner;
- The KUHN itself is manufactured. It is enough to cut a sheet of metal into rectangles, which are then welded into one structure. Welding must be of high quality so that the finished structure lasts longer. Pipes and rods with a diameter of 10 and 5 centimeters, respectively, are suitable for the racks;
- Installation of hydraulic booster. For its mobility, a sleeve with a diameter of about 3 centimeters is suitable;
- The support pipe is welded to the front of the unit, then the racks are combined and reinforced with “kerchiefs”;
- For normal rotation of the bucket, a cylinder installed on the right is used.
To make your own bucket, you need to know how to use welding and understand mechanics. If in doubt, it is better to purchase ready-made equipment that can be attached to the Kioti tractor and other popular models of equipment.
Operating rules
During the manufacture of a front loader, manufacturers pay due attention to the safety of the operator during operation.
When using small machines, you need to monitor the overload so that the small equipment does not tip over. This can be prevented by installing protective systems.
It is also worth following simple recommendations when operating a tractor with a bucket:
- When moving, the scoop must be in the down position;
- It is important to ensure that the KUN is lifted correctly during operation;
- Special equipment (including a tractor with two buckets) must be used strictly for its intended purpose.
When purchasing a mini tractor, you should make sure that important options and elements are available. So, if necessary, it is enough to purchase a tractor bucket and other canopies that can be attached to special equipment.
A tractor cart is mechanical equipment for transporting goods.
Structural and functional characteristics of the trailer A wood splitter is a specialized device that is used for splitting wood and logs, as well as for potato hillers for tractors - an indispensable type of equipment, the main purpose of which is For large landholdings and farms, the winter season is a true test. Frequent snowfalls Plowing the land with a tractor is one of the modern ways of intensifying agriculture, which has become possible. A hay mower for a tractor is an indispensable tool that helps to quickly get rid of weeds and bring Cultivators are among the main types of attachments. They are designed to loosen the top layer. A tractor-mounted sprayer simplifies the care of cultivated plants. Depending on the selected type
Among other advantages of a garden tractor, it is worth noting its multifunctionality and versatility - suitability for a wide range of jobs and areas of operation. These properties are guaranteed by tractor attachments - a set of additional implements and mechanisms that allow you to combine a whole range of autonomous devices in one unit.
Types of attachment adapters for tractors
The modern range of tractor auxiliary equipment is extremely diverse, which makes it possible to use it in several sectors of the national economy. Among them:
I. Agriculture:
- plows;
- tractor harrows;
- seeders;
- potato and garlic planters and diggers;
- multi-row seeders;
- fertilizer spreaders;
- mowers;
- sprayers;
- trailer;
- cultivators;
II. Construction:
- coon for a tractor;
- motor drill;
- trencher;
- rippers;
- winch;
- loader;
- cargo trailers;
III. Utilities:
- snow shovel;
- sprinkler;
- devices for washing concrete and asphalt;
- dispersers of sand and chemical reagents for melting ice;
- rotary snow blower;
- bulldozer bucket;
IV. Forestry industry:
- skidding attachment;
- loader.
You can buy them ready-made or make them yourself.
Methods for connecting attachments to a tractor
There are 3 mechanisms for aggregating the tractor with auxiliary attachments:
- hitch mechanism and hitch;
- towing devices;
- power take-off shaft (PTO).
The tractor hitch acts as a connector for lighter and smaller adapters. Modern tractors are produced with a three-point hitch. Although older models have a classic two-point hitch.
The hitch is used to aggregate the tractor with a trailed or towed device. Located in the area of the lower links of the hinged mechanism.
According to the method of connection, couplings are distinguished:
- universal;
- hydroficated;
- automatic.
Towing mechanisms are represented by hooks equipped with shock absorbers and locking blocks.
The PTO is a working unit that receives torque from the power plant and transmits it to the active attachment for tractors. Depending on the location, tractors come with rear and front PTO. Outdated units that were produced without a PTO can be improved with a homemade power take-off system.
Technology for the production of tractor attachments
First you need to prepare the base. It is a rectangle formed by square pipes or corners. Another rectangle is fixed in the center of the base, where a large hydraulic cylinder will be installed. A spacer and four hinges (for the cylinders and the boom mechanism) are fixed on the top edge.
Tractor boom diagram
The boom is made of two metal profiles connected at an angle of 30 degrees. The end of the base and the hydraulic cylinder mount are fixed to it (from above).
A cylindrical hinge is installed in the middle of the boom. Movably fixed sections are also mounted here, connecting small cylinders and a crossbar necessary for attaching the base of the bucket.
A ladle is made from one large and four smaller steel rectangular plates, one of the sheets is welded at an angle.
If the boom is more than two meters long, there is a high probability that the tractor may tip over. To eliminate a possible problem, the front part of the special equipment is equipped with a counterweight.
Coon for the rear linkage of the MTZ tractor
What is a KUN on a MTZ tractor? This is one of the types of attachments that is widely used on the MTZ tractor and not only. This device, due to the hydraulic system, allows you to perform various works. The decoding of KUN is as follows - “universal mounted hay hauler”.
One of the most popular models of this equipment is considered to be KUN 10. The model is manufactured at the facilities of Salskselmash, an advanced Russian plant specializing in attachments.
The first model KUHN 10 came off the assembly line in 1973. As a result of constant improvement, KUN 10 has significantly increased its functionality.
For reference: the versatility of the model allows it to be used on T-40, LTZ and YuMZ tractors.
Advantages of KUHN
The MTZ 80 tractor equipped with KUN is characterized as:
- Universal - can perform partial work instead of a bulldozer, loader and even an excavator. In view of this, KUN is used during construction and installation work in the agricultural industry.
- Productive.
- Reliable unit.
Homemade rear KUN at MTZ
The cost of factory KUN for a tractor is not affordable for everyone. Therefore, it makes sense to cover the topic of making a homemade KUN.
Thanks to the hydraulic system, you can install a homemade KUN on the MTZ tractor, and you will not need many materials and tools.
The human factor plays a big role, because not everyone knows how to handle a tool. The main equipment for the technological process is a welding machine.
Experience with this equipment is important, because high-quality seams affect the strength and reliability of a homemade kun.
You will also need a metal cutting tool. As a rule, a grinder or even a gas cutter is used. Well, the standard ones will come to the rescue: a hammer, a set of keys, sledgehammers.
About the nuances
- Three hydraulic cylinders are required. Two of which will serve to rotate the bucket. The task of the third (largest) cylinder is to lift the bucket along with the boom. How to choose the power of hydraulic cylinders? — the selection of power depends on the weight of the loads and the length of the boom.
- You need to take care in advance of the metal elements that will represent the basis of the entire structure - these are trusses, corners, plates. The thickness of the listed elements directly depends on the future perceived load.
- As soon as the drawing of the homemade KUHN is ready, you need to purchase hinged cylindrical joints.
- The first step is a drawing, then a search for equipment and parts, tools. Thus, you can save money if you have information in advance about the required amount of materials.
Manufacturing instructions
- Initially, you should weld the frame of the future homemade KUN. The frame is a rectangle, the lower part of which is below the level of the edges. Installation on the MTZ tractor is carried out by the lower part of the frame.
In the center of the KUHN structure there is also another rectangular frame, it consists of two plates. Its fastening is carried out by welding to the lower and upper edges. This frame is designed to hold a large cylinder (at the bottom). A spacer will be permanently attached to the top.Four hinges are installed on the top edge. For cylinders changing the angle, two central hinges are installed. The outer two hinges serve for the boom. The selection of the height of the base depends on the needs, in each case individually.
- The arrow consists of several components.
The part of the arrow that is attached to the base is about 65% of the length of the entire arrow. The next part of the arrow is attached to the long part, the angle between them is 30 degrees. People call an arrow of this shape a “boomerang”. The result is two curved profiles with three connection points.Down the center and at each end. Another end of the main cylinder enters the frame, which is secured to the central part by welding seams.
- The central part is a hinged cylindrical joint.
Why articulated? – is explained by the need to attach a lever to it, which controls the bucket. The lever consists of two elbows; on one side it is connected to a bucket, and on the other side to two small cylinders. The fasteners of the previously listed parts are mounted on hinges.You need to know: experienced mechanics advise performing the central part together with the hinge joint. Otherwise it will be difficult to put it on.
- Let's move on to the bucket.
The ladle can be welded or bought from a factory, which is optional. It is not uncommon to see a forklift instead of a bucket used to pick up bales. - Is it necessary to weight the front part if the stem length is more than 2 meters? - Yes need. In this case, a box or basket is welded onto the frame, where concrete blocks are stacked and sand is poured.
The choice is yours: buy a factory-made KUN or start developing homemade equipment. The final choice depends on financial capabilities and, of course, desire. It is also proven here that it is quite possible to make and install KUN at MTZ. Good luck to you.
Source: https://traktorspec.ru/oborudovanie/kun-na-zadnyuyu-navesku-traktora-mtz.html
Pros and cons of making a homemade kun for a tractor
A tractor kun is a useful equipment for farming that allows you to level the top layer of soil, break up rubbish heaps and load trucks. Of course, such multifunctional special equipment is quite expensive. In this regard, many enthusiastic farmers decide to assemble a loader themselves, especially since making a kun for a tractor is not as difficult as it seems.
The most important advantage of a homemade kun is its low cost. Naturally, you will have to spend a little money during assembly, but at the final price, homemade tractor loaders will still be significantly inferior to their factory-made counterparts.
The second important advantage of the kun is that such an excavator can be used to work not only with domestic MTZ or Agromash tractors, but also with Kioti, Subaru tractors, as well as equipment from other imported brands.
The third advantage of a homemade kun is the simplicity of its design - this greatly simplifies its repair and maintenance.
The main disadvantages of creating a homemade loader include:
- a shortage of certain materials and equipment on the farm will lead to its purchase, which significantly increases the cost of a homemade kuna;
- Before assembly, you will need to practice a little in working with a grinder, a welding machine and a drill - this will allow you to more confidently hold the equipment in your hands directly when making a kun, as well as achieve better quality and balance when operating a tractor with a bucket.
In addition to the listed disadvantages, one more drawback should be highlighted in the form of a large amount of time spent on production. However, a properly made tractor bucket will quickly pay for itself due to its versatility and reliability.
Front loaders
A minitractor with a front loader can perform tasks similar to those of a coon. The difference between the mechanisms is quite small and it lies in the methods of fastening and load capacity. A front bucket with a special leveling mechanism is installed on an agricultural machine for:
- loading and unloading crops, hay, land, firewood;
- loading bulk building materials;
- transportation of various goods;
- transportation, movement of timber (large logs, boards, wooden beams);
- leveling earth embankments, digging trenches;
- snow removal, roadway clearing.
Easy to install. The loader is easy to operate. Withstands heavy loads and makes the work of farmers and owners of small summer cottages easier. Depending on the power, the hitch allows you to lift, move and transport loads weighing several hundredweight. This has a positive effect on the efficiency of completing the tasks assigned to farmers and builders. However, not every farm can afford to purchase a factory model.
The device is quite expensive. A homemade loader on a homemade mini tractor will allow you to fully carry out work on a farm or private construction site without unnecessary costs.
How to make a loader yourself and what will be needed for such a homemade design? First of all, you need to stock up on patience, drawings and materials for assembly. Such a homemade product will consist of several basic elements:
- steel frame structure;
- hydraulic system;
- chassis used on small-sized tractors;
- attachments used depending on the type of work (These can be buckets of various capacities, fork equipment, a jaw blade and even a log grabber).
To assemble the structure yourself, you will need not only materials, but also a number of technical skills. Such as the ability to read blueprints, work with metal, and use welding. If you don’t have such experience, it’s better to discard experiments and buy an affordable factory model of a loader.