A tower crane is a special device designed to perform lifting and transport operations at mid- and high-rise construction sites. The advantages of the technology are that you can set the level of boom lift, change the reach and rotation of the crane, and move it around the construction site. Therefore, the sale and rental of tower cranes is in demand. But, in any case, it is important to know how the tower crane is installed and dismantled. We will talk about this further.
Varieties of installation methods
Cranes can be installed in the following ways:
- lifting the tower, counterweight and crane boom using its own load rope and building up the tower below;
- with the help of a boom pulley, the tower connected to the boom is raised;
- gradual increase in the height of the tower as large elements are assembled;
- combining all of the above methods.
How to check if the faucet is installed correctly
It is necessary to have a detailed understanding not only of how a tower crane of 50 tons or more is erected, but also of what methods can be used to check the correctness of its installation. After a tower crane is installed on a construction site, it should be subject to routine maintenance checks. Only in this case will all mechanisms of special equipment function smoothly and smoothly.
The most dangerous factors for construction equipment are:
- extreme loads;
- long-term operation without proper inspection and maintenance.
Therefore, in order not to expose the special vehicle to any risks, after the crane is installed at a construction site, it is mandatory to test all the functions of the electrical and mechanical components, the braking system, safety devices, alarms, and equipment controls.
After the crane is assembled, a thorough check is performed on the following parameters:
- The current state of the metal structure, in particular, all its welded joints. At this stage it is necessary to identify traces of rust, deformation and tears. It is also necessary to check the condition of such important elements as the driver’s cabin, stairs for moving around the structure, fences, platforms and other components.
- Operating condition and degree of wear of the hook and suspension components.
- Condition and quality of fastening of all cargo ropes.
- What do the blocks, fastening elements, and suspension components of a construction crane look like externally?
- If the electric tap is powered from an external network, check the quality and reliability of the grounding.
- Find out what the relationship between the mass of the counterweight and the ballasts is, and then compare the resulting figures with the parameters specified in the technical data sheet of the device.
Our company’s employees will always be able to clearly demonstrate how real professionals assemble a crane. To do everything properly, instructions are used that tell how tower cranes of various models and lifting capacities are installed on construction sites.
Features of crane installation
Installation and dismantling of tower cranes occurs in accordance with the manufacturer’s passport and instructions. Particular attention should be paid to checking the resistance of the insulating layer of wiring and grounding devices.
The crane's entry to the construction site can be of the end or side type. It determines what the entry device on the route will be. With the end type, you need to make sure that the levels of the access road and the subgrade coincide.
So, let's look at how a tower crane is mounted. Installation occurs in the standard way - by lifting the folded tower forward. The installation process differs depending on the design diagrams of the cranes, methods of building up the tower and the transport length of the crane during transportation.
Initially, you need to arrange the site and ensure the availability of all elements of equipment and tools. After this, the remote control panel with the electrical circuit for controlling the crane is connected to the electrical network. The tower is installed on the mounting stand, after which the spacers are raised and the block fencing is installed. The stand is mounted in working position. Then the rolling trolley is rolled out, the running frame is installed and secured on the crane runway. The final installation process involves loading the counterweight and securing it to the turntable. Next, the head section of the boom is lowered and suspended on a cargo rope.
It is worth considering that the tower is built up by using a mounting rope, which is stored on the winch drum.
To install tower cranes using these methods, truck-mounted cranes with a lifting capacity of 3 and 5 tons and anchor devices for securing the mounting braces are required.
Tower mobile cranes with a rotating tower are brought to the installation site, as a rule, in a form prepared for installation with the tower and boom folded back (towards the counterweight) or forward. Ropes and electrical equipment are not dismantled during transportation of such cranes.
To install cranes with a rotating tower, almost no additional lifting equipment or anchor devices are required, since the cranes are mounted using their own crane mechanisms and at the same time have sufficient stability. In addition, when installing cranes with a rotating tower from the transport position to the working position, there is almost no need to resort to dangerous and labor-intensive steeplejack work. All this allows you to reduce installation time to 1-2 shifts.
Tower crane installation methods have a significant impact on performance: the faster the installation, the lower the cost and the higher the use of the crane in construction.
Preparatory work. By the time the tower crane is delivered to the construction site and before its installation begins, it is necessary to carry out preparatory work: – lay the crane tracks; – prepare entrances to the crane tracks for the crane; – bring the electrical wiring to the installation site of the crane and ground it; – prepare installation and rigging equipment and inventory; - install anchor devices for fastening mounting braces for installation of stationary tower cranes.
Before laying the crane tracks, the installation site must first be planned using a bulldozer. The minimum distance between the crane runway and the building depends on the design of the crane and is determined by the safety conditions of the work. The distance between the protruding parts of the crane and the building at a height of up to 2 m from the level of the rail head must be at least 1 m. The length of the laid tracks is determined by the dimensions of the building being constructed.
The installation site must have access roads for the crane and vehicles to enter. At the entry points of the crane and vehicles, sand is poured directly onto the crane tracks over the sleepers and boards are laid.
The laid section of the crane runway is grounded. The grounding loop is connected to the crane tracks.
A distribution box is installed next to the tracks (usually in the middle of the crane runway) and connected to the in-building electrical network. Before starting installation, check the supply voltage. It is not allowed to install a tap when the network voltage drops by more than 15% of the nominal value. For the installation of stationary cranes, during the preparatory work, installation masts, winches, pulleys, inventory anchors, trestles, etc. are installed. The use of inventory equipment makes it possible to reduce the labor intensity of the work and shorten the installation time of the crane. A complete list of installation equipment and inventory is determined by the crane operating instructions.
Mounting masts, winches and pulleys are standard equipment. Inventory trestles are used as adjustable stands for various elements (most often for a tower). If there are no inventory trestles, sleeper cages can be used as linings.
Anchor devices are constructed only when installing cranes with a fixed tower. They serve to secure the mounting braces that hold the crane tower. The inventory anchor (Fig. 66) is a metal welded frame loaded with prefabricated reinforced concrete blocks. The anchor device is secured against shifting using a coulter. Inventory anchors for mounting cranes type BKSM-5-5A are secured to the rails. Some frames also have a mounting winch. Mounting pulley blocks are attached to the welded frame.
During the lifting of the tower, the blocks are moved to the sides from the axis of the inventory frame, so the mounting pulley in plan looks like an elongated triangle, which ensures a stable position of the boom when installing the crane.
Driven piles, building elements, etc. are sometimes used as anchors. In this case, the reliability of the guy ropes is checked by calculation.
As a rule, no additional equipment is required for the installation of mobile cranes, with the exception of jacks.
Before installation begins, the installation equipment, as well as the components and mechanisms of the crane, especially the ropes, are carefully inspected. Any defects found are corrected. The holes, axles and pins are cleaned of dirt and rust and coated with a thin layer of lubricant. The axles and pins should fit into the holes with light hammer blows. Check the condition of elements with threaded connections (bolts, nuts, jacks, etc.): if the threads are damaged (dents, broken threads, etc.), replace the faulty elements. Before installing the crane, it is necessary to replace the ropes if the number of broken wires exceeds the accepted rejection standards.
Rice. 66. Inventory anchor 1 - opener; 2 — blocks of mounting pulley; 3 - brake; 4 - electric motor; 5—frame; 6 — winch; 7 - worm gear
Installation of crane type BKSM-5-5A
Among cranes with a fixed tower, the most common are BKSM type cranes. The installation methods for these cranes are also applicable to other fixed tower cranes.
Crane installation using a working boom
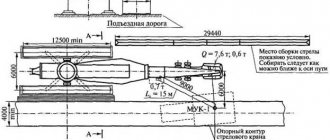
The crane is delivered to the installation site in the form of enlarged units, which are then connected to each other. To install the crane, a platform 80 m long is required.
Installation is carried out in the following sequence (Fig. 67): first, the running frame is mounted on the crane tracks and loaded with ballast. Then, using a truck crane, the portal is assembled on the ground and secured to the support lugs on the running frame. The upper part of the portal is raised and rested on the sleeper cage. Using a truck crane, the tower is assembled on crane tracks and connected to the portal. Next, the head, cabin and counterweight console 3 are attached to the tower in series. For ease of connection, the rods of the counterweight console are made folding. In this case, a sleeper cage 2 is placed under the tower in the place of the boom support hinge.
Rice. 67. Installation diagram of the BKSM-5-5 crane using a working boom 1-way frame; 2 - sleeper cage; 3 — counterweight console; 4— mounting pulley; 5 - side pulls; 6 - working boom; 7 - anchor rod; 8 - anchor device
To lift the tower to the running frame of the portal, a working boom is secured on the opposite side of the support lugs.
A 10-fold mounting pulley is placed between the tower head and the head of the working boom. The ends of the ropes of this pulley are passed through the head blocks and stored: one end - on the drum of the cargo winch, the other end - on the drum of the jib winch.
The working boom is secured by an anchor rod with an anchor device. By turning on the boom winch, the boom is raised to the mounting position until the anchor rods are tensioned. In this position the boom is secured with side braces.
The tower is raised by a cargo winch to a height of 100-150 mm to check the functionality of all components. Then, lowering the tower onto the sleeper cage, turning it on again raises the tower to the position shown in Fig. 67 dotted line. To facilitate the movement of the counterweight console until it is lifted off the ground, a plank flooring is first placed under it.
After the tower is lifted, the working boom is lowered and the installation rope is removed from the drums of the cargo and boom winches, and the working ropes are wound onto them.
Next, hang the counterweight and boom. The crane is ready for use.
Sometimes, to speed up installation, the crane and boom are assembled using an inventory mounting boom or a working boom taken from another crane.
Crane installation using a falling boom
For installation using a falling boom (Fig. 68), the crane is completely assembled on the ground in the following order: a running frame is installed on the crane tracks and secured with grips to the rails. An assembled tower with a rotating head is attached to the frame. In this case, the upper part of the tower rests on mounting trestles 1. Then a boom 5 and a counterweight console 2 with a load 4 are attached to the head of the tower. After this, the rope of the boom pulley is stored, the last thread of which is secured to the drum of the boom winch installed on the counterweight console 2. Then the rope of the cargo pulley is tied, the working branch of which is secured to the drum of the cargo winch.
Simultaneously with the assembly and preparation of the crane for lifting, inventory mounting devices are installed: a falling boom 8 connected to the crane by a rod 7, a mounting pulley 9 and an anchor device 10. An inventory winch is used as an installation winch.
The boom of another crane of the same type is used as a falling boom.
When the installation winch is turned on, the boom 8 is lowered, as if falling into position, while simultaneously lifting the crane tower along with the boom, the counterweight console and the counterweight.
Rice. 68. Installation diagram of the BKSM-5-5 crane using a falling boom 1 - mounting inventory trestles; 2 — counterweight console; 3 - boardwalk for movement of the counterweight during lifting; 4 — counterweight; 5 - boom; 6 — jib pulley; 7—traction; S - falling arrow; 9 — mounting pulley; 10 - anchor device
Then the boom is raised using a boom winch to the working position shown by the dotted line in Fig. 68. With the described installation method, the tower takes a vertical position smoothly, without jerking, and the counterweight keeps it from tipping over.
This installation method makes it possible to reduce installation time by more than 2 times and completely eliminate dangerous and labor-intensive steeplejack work.
Installation of a crane using a falling chevre
This method was also developed by TsNIIOMTG1 for BKSM type cranes. The advantage of the method is that the installation of the crane does not require an anchor device, and the length of the installation platform is only slightly greater than the full height of the crane. The portal and crane tower 2 (Fig. 69), including the rotating and fixed heads, are assembled in the usual manner using a truck crane and mounting trestles. Then a cabin, a counterweight console with a counterweight, and a boom assembly with a cargo trolley are attached to the tower. The arrow head is supported on a trestle mounted on the lower section of the tower.
Rice. 69. Installation diagram of a BK.SM type crane using a falling chevre 1 - counterweight console; 2 - tower; 3 - boom; 4 — brace chain hoist; 5 - tragus; 6 — mounting pulley; 7 - frame; 8 — mounting beam; 9 - chevre
An assembly crane beam with an assembly pulley 6 is placed under the portal frame with the ballast laid on it. Then the working ropes are stored on the crane, and the drums of the boom and cargo winches are left free. Mounting winches are remote controlled. To avoid theft of the running frame during installation, it is attached to the rail track using rail clamps and additionally tied with wire.
Simultaneously with the preparation for lifting the crane, the mounting chevron 9 is assembled, which consists of two booms connected at the top and bottom by transverse trusses.
Both supports of the mounting chevron are connected to the crane beam with ropes. The head part of the chevre is connected by a double mounting pulley with a crane beam and a double brace pulley with a support hinge. The rope of the assembly pulley is attached to the drum of the cargo winch, and the rope of the bracing pulley is attached to the jib winch.
Installation begins with lifting the chevre to a vertical position using a boom winch, while the cargo winch is turned on for lowering, and the installation chain hoist is released.
After the chevre is lifted, the cargo winch is turned off, and the boom continues to wind the rope of the hauling block, pulling the crane tower to the head of the chevre until the counterweight console lifts off the ground. At this moment, turn off the boom winch and turn on the lifting cargo winch. The chèvre descends, “falls,” and the tower simultaneously rises to a vertical position. The lifting equipment is then dismantled. The installation and berthing ropes are removed from the winch drums and the cargo and boom ropes are reeled in, respectively, and the boom is raised to the working position. The crane is ready for use.
Installation of crane MSK-10-20
Since the MSK-10-20 crane has a large load moment and a height of 35 m, it is transported from site to site in the form of three enlarged units: a running frame assembled with a turntable, a tower base assembled with a boom head, and a tower top assembled with the base of the arrow.
The crane is installed on a construction site using a jib winch, a jib hoist and a 10 or 16 ton jib crane. The installation sequence is as follows: first, the chassis with the platform is transported onto the crane runway by a tractor (Fig. 70). Remove the connections connecting the weather vanes to the running frame, disconnect the guy wires and spread the weather vanes so that the running bogies are above the rails.
Rice. 70. Installation diagram of the MSK-Yu-20 crane a - delivery of the crane base; b'—joining the base with the lower section of the tower; 8 — docking and preparation for lifting the tower; d — raising the boom to the working position; 1 - drawbar; 2 — pneumatic wheels; 3— support posts
Using a stretcher, the weather vane is fixed in this position. The running bogies are turned in the direction of the rails. Using a jib crane, the drawbar of the mounted crane is lifted 100-150 mm above the fifth wheel and the tractor is driven away. Slowly lowering the drawbar, two bogies are placed on the rails and the drawbar is disconnected. Using a jib crane or jack, the chassis is raised enough to lift the wheels off the ground. Then the wheels are removed from the axle shafts. Slowly lowering the running frame, install two other running trolleys on the rails.
Using adjusting screws, the braces set the running frame along the axis of the track, and the braces are fixed with control strips.
Then the lower part of the tower, previously laid out next to the running frame, is installed on the sleeper cages and the base of the tower is connected to the platform using a jib crane.
The upper part of the tower with the base of the boom is laid out on the sleeper cage (Fig. 70) and the tower and boom are connected using a crane. Ballast weighing 2 tons is strengthened in the center of the turntable. Support posts are mounted on the platform. Using a jib crane, counterweight plates weighing 30 tons are installed and secured. The ropes are stored according to the reeving diagrams (Fig. 71). The cargo rope is not secured to the boom winch drum. The crane is equipped with the necessary equipment, connected to an external electrical network, and panels are installed to control the boom winch during installation. The running trolleys are secured with rail clamps. Carefully inspect all rope fastening units, check the presence and tightness of bolts, nuts, washers, pins, and support holders. Particular attention is paid to the correct reeving of ropes and guys, the integrity and serviceability of blocks and thimbles. Check the reliability of fastening of all elements of the tower and boom.
Rice. 71. Scheme of reeving the ropes of the MSK-Yu-20 crane 1 - jib winch drum; 2 — lower pulley pull; 3 - jib rope; 4 — jib pulley; 5 — pulley pulley, upper; 6 — boom stand guy; 7 — boom head guy; 8 — boom head blocks; 9— tower head blocks; 10 — cargo rope; 11 — hook suspension; 12 — cargo winch drum
Using a boom winch and a boom pulley, lift the tower with the boom 100-150 mm from the supports and hold it in this position for 10 minutes. In this case, special attention is paid to the condition of the brakes and the fastening of the ropes. Raise the tower with the boom into a vertical position (Fig. 70) and rigidly secure the base of the tower to the platform support posts with bolts.
Then disconnect all the boom fastenings to the tower and raise the boom to the working position by turning on the boom winch.
The cargo rope is secured to the drums of the boom and cargo winches. Pull out the canopy and install removable braces. Install limiters for rotation, movement, load capacity, lift height, boom lift and check their operation, install an anemometer. Test the operation of all mechanisms at idle. The crane is ready for use.
What to pay attention to when installing
Tower cranes can be mobile or non-mobile. This parameter determines how the tower crane is lifted and how long its installation will take. Non-mobile options are distinguished by a non-rotating tower type. Accordingly, the installation process takes about 3 weeks using additional lifting mechanisms.
Mobile cranes are installed faster, within 3 days. The advantage of this technique is that it can be quickly prepared for operation and there is no need to use additional equipment.
The transportation of these two types of cranes also differs. In the first option, the crane is disassembled into individual elements, and in the second, the entire equipment is transported.
How are cranes installed on construction sites?
Many people are interested in how a crane is assembled and how labor-intensive this process is. To install the unit, workers erect a special pedestal. A tower structure is installed on top of it and firmly fixed. Using an auxiliary crane, the slewing support mechanism is moved to the required location and securely fixed.
From this point on, you need to figure out how to scale up a 25 ton tower crane. One by one, experienced workers attach all the other components of the tower structure - the tower itself, the rotating platform, a device for raising and lowering the load, as well as a mechanism that changes the reach of the boom.
Watching how a tower crane is lifted for construction work, you can notice that with the help of the crane mechanism’s own boom, individual sections of special lifting equipment are moved and assembled. Speaking about how high-rise cranes of different lifting capacities are assembled, it should be noted that for these purposes a frame mounting structure is used, the front part of which is removable. In addition to the crane itself, cranes that perform support functions are installed in a similar way.
Knowing how a crane is assembled at a construction site according to all the rules, you can significantly reduce the time required for standard construction work.
Specifics of dismantling work
We figured out how they are assembled, now let’s look at how tower cranes are dismantled. The crane must be disassembled according to the assembly algorithm. The difference is that all actions are performed in reverse. When disassembling into individual components, additional taps can be used. The structure of the finished building itself is used as an anchor.
So, installation and dismantling of a tower crane is not a difficult job, but it requires a detailed study of the accompanying documentation for the equipment. Carrying out all the work according to the specified algorithm, it is not difficult to achieve the desired result.
How a tower crane assembles itself and a video of how a crane is assembled at a construction site
It is also interesting to learn how a tower crane assembles itself on a construction site. In this case, as in the previous one, a strong concrete foundation is created for special equipment, which will not allow a heavy structure that is gaining height to collapse to the ground. A thematic video on how a crane is assembled at a construction site and how a tower crane assembles itself on a construction site will allow you to take a closer look at this process.
Let's look at how a tower crane is assembled during the construction of high-rise buildings further, after strengthening the concrete platform:
- With a few blows from a heavy sledgehammer, the sections are firmly held together using a special device called “mounting pins.”
- The second section is mounted using a similar principle.
- The third section, which in crane operator circles is called a “telescope” because of its characteristic appearance, is put on the previous sections, like a stocking.
- At the next stage, the crane operator’s working cabin is installed, as well as a special turntable.
- The boom is mounted on the ground, which is subsequently lifted to the cabin using a truck crane and then securely attached.
- After completing these steps, the crane begins to assemble itself.
You should pay attention to how tower cranes are assembled independently:
- Using an arrow, the device grabs the next section and pulls it towards itself, raising it to the required height.
- The device places the next section inside the telescopic element.
- The next section is attached to the finished base and rises to a height of three meters.
- Next, the device brings the next section, which similarly falls inside the telescopic section.
Once all the parts of the construction crane have been assembled, you can use it for work.
How is a crane assembled?
No global construction project is complete without a crane. And most often, several “steel giants” work at a construction site at once to maintain the continuity of construction of the structure. Some cranes reach a height of 200 meters, so how do they get to the construction site? Consider the assembly of a tower crane.
The collection begins with the construction of a powerful monolithic foundation. Sometimes, if a crane needs to be moved around a construction site, crane tracks are installed.
Next, the base is mounted using a truck crane, and in parallel, the ground assembly of the boom and counter-boom occurs.
To further expand the crane, it is required to mount it to a minimum height. A mounting clip is installed on the first two sections.
Afterwards the rotating section, the crane boom, the counter-boom and the counterweight are joined.
When the crane is assembled to a minimum height using a mounting clip, the growing process occurs. The crane independently picks up the missing sections and increases to the required height.
This technique allows you to reduce the cost of special machines. It is also convenient for the construction of high-rise buildings, when a variable crane height is required. Upon completion of the work, the reverse disassembly process occurs.
Rent of a truck crane and special equipment
No construction is complete without special equipment. And, if it is not possible to provide the construction site with your own equipment, a crane rental service comes to the rescue. rents out truck cranes and cargo-passenger lifts for all types of construction and restoration work. Crane rental is a convenient service that is becoming increasingly popular. Renting a crane with Real Crane Invest means working equipment, equipped with all the necessary documents, because by providing a crane for rent, our company makes sure that the equipment is fully operational and regularly undergoes technical inspection. Qualified consultation is also provided, if necessary.
Sample applications are here.
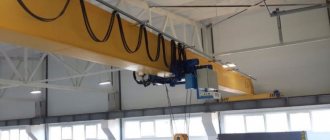
Tower crane structure
Essential elements:
- tower;
- working boom;
- support part;
- slewing support;
- control cabin;
- working devices (winches, blocks, pulley ropes, etc.).
The supporting part consists of supports and a counterweight that prevents the structure from tipping over. The counterweight consists of reinforced concrete blocks weighing 1 ton or more. The slewing bearing carries electrical communications, and winches and cargo trolleys are also installed on it. Its main function is to transfer loads to the non-rotating part and ensure rotation of the turntable. The tower and boom are the largest metal structures that allow you to lift and move cargo. They are manufactured in such a way as to minimize the wind load and, consequently, the risk of capsizing.
The cabin contains all controls and provides the operator with comfortable working conditions.
Assembly steps
Assembly order:
- Installation of the turntable and running frame.
- Installation of a portal with a tower. Cabin installation.
- Lifting the crane and assembling the boom.
If you look at the video of how a construction crane is assembled, you can see that at the first stage the work is carried out using two truck cranes. This is a fairly compact and mobile equipment that can drive to any place on the construction site. One crane brings the trolley under the supports on the rail tracks, and the second installs the turntable. The truck crane also installs reinforced concrete blocks, which act as counterweights. If there are railway tracks in close proximity to the site, it may be more appropriate to use a railway crane.
The portal and tower are also mounted using a truck crane. He also lifts the driver's cabin up. The cabins are divided into two types - for work at a height of up to 20 m and high-altitude, for work at a height above 20 m. The tower is assembled into several sections in height, after which a special “telescopic section” is installed, due to which the rest will subsequently be mounted.
The connection and fastening of the turntable truss and portal units is done manually using hinged bolts, which are secured using a regular sledgehammer. Also, manual connection and adjustment of electrical equipment and fixing (reserving) of steel ropes are carried out.
At the same time, the boom is being assembled. It consists of metal lattice sections. Assembly takes place on the ground, in a horizontal position. The boom is installed using a truck crane. After this, at the final stage of work, you can see how the tower crane assembles itself. The boom picks up one section and pulls it towards the tower until it is inside the telescopic section. After fixing the hinged bolts, the “telescope” is raised to the height of the section and the cycle is repeated. Thus, the height of the tower is increased to the required one. The process ends with testing and official acceptance of the equipment into operation.
Preparation
Tower cranes are brought to the construction site in disassembled form, then workers assemble them on site. The structures are heavy, so the site must be prepared before installation.
The mechanism consists of the following parts:
- Tower.
- Cabin designed for the driver.
- Console. It is necessary for counterbalance.
- Arrow. Load-lifting mechanism.