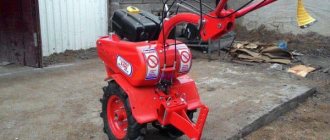
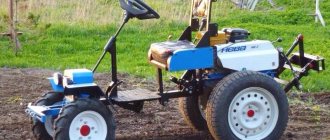
A walk-behind tractor is a worthy replacement for mini tractors in small farms and household plots. Equipped with a diesel or gasoline engine, depending on the power, in one work shift it is capable of processing an impressive area, plowing it manually would take many times longer.
Homemade assembly of a power unit (motoblock) is impractical due to the high cost and complexity of the process. But its main working body - the plow - is a simple matter to make and assemble with your own hands, as we will see in this article.
Plow on a walk-behind tractor: varieties and their design features
A plow is a special device for plowing the soil, equipped with a metal share.
Designed for loosening and turning over the top layers of soil, which is an important part of pre-sowing and fall treatment. Initially, plows were pulled by people, and somewhat later by farm animals. Today, a plow on a walk-behind tractor is one of the options for using this mounted auxiliary equipment, in addition to a tractor or mini tractor. Depending on the shape of the main working elements, plows on walk-behind tractors are:
- plowshares;
- dumpless;
- disk;
- rotary;
- combined.
By type of ploughshare:
- screw;
- cylindrical;
- semi-cylindrical.
Based on the number of working parts:
- single-body plow on a walk-behind tractor;
- double-hull;
- multi-hull models designed for extremely complex tasks.
In addition, plows for walk-behind tractors, according to the specifics of fastening, are divided into conventional and reversible.
Homemade attachments for walk-behind tractors
For medium and high power walk-behind tractors today, suppliers and manufacturers offer a huge amount of attachments and accessories that provide mechanization of many operations. However, despite such attractive offers and ready-made options for supplying kits, many owners prefer to make attachments for the walk-behind tractor with their own hands. And the reason is not that homemade ones are cheaper. Not at all, if we take the cost of materials, then this is absolutely not true. The problem lies elsewhere. Do-it-yourself tools for a walk-behind tractor are, for the most part, tools that are universally selected according to their quality parameters and meet the needs of a specific person.
This approach to the formation of a fleet of agricultural machinery makes it possible to take into account in the process of designing and assembling equipment all possible features of both the site and the owner himself.
The equipment being developed for the unit is conventionally divided into equipment:
- universal purpose;
- highly specialized focus;
- auxiliary equipment and devices to simplify the control of the walk-behind tractor.
Universal tools include, first of all, adapters and various types of trailers, which make the walk-behind tractor a universal transport platform both for transporting goods and as a convenient vehicle. Some models of walk-behind tractors are capable of reaching speeds of up to 25 km per hour. Although the comfort of a mini tractor is still far away here, you no longer have to walk.
Highly specialized types of equipment are most often designed to perform only 1 or a maximum of 2 operations. However, these are the tools that are most in demand in terms of consumer qualities for high-quality soil cultivation, performing operations to care for crops, harvesting feed, and even used in construction. In part, it should be noted that among special-purpose homemade products, relatively simple types of tools predominate - plows, cutters, hillers. This is something that can be done from scrap materials and using the simplest power tools. But more complex elements are manufactured using units from other equipment.
And, of course, what makes it easier to control is a counterweight on the walk-behind tractor, wheel weights and anti-slip chains - all this allows you to work with the unit all year round.
How to make a plow on a walk-behind tractor with your own hands?
A plow on a walk-behind tractor with your own hands is not a transcendental thing, but quite real.
Thanks to proven drawings and high-quality materials, this process is reduced to several successive stages, ultimately resulting in a unit with low cost and high production resource. The plow for the walk-behind tractor shown in the drawing is considered universal.
In order to make a homemade plow for a walk-behind tractor, you need to remember the following nuances:
- deviation from the standard dimensions of a proven design may result in breakdown of the unit;
- for a plow it is worth considering a mounting stand that would allow it to be adjusted and installed on the walk-behind tractor itself. It is best to choose all-metal plates 1 cm thick for these purposes. By adjusting the stand, you can set the desired plowing depth;
- the blade must withstand heavy loads. For this, the most suitable material would be sheet steel of standard thickness. The main thing is not to overdo it with the bend. It is advisable to use a gas heater to heat the pipe and bend it in the direction required according to the drawing or workpiece;
- ploughshare - a composite plow mechanism that directly interacts with the ground, preferably made of high-alloy steel or a special grade of steel “Sormite”. The difference in the thickness of the top and bottom layers will ensure uneven grinding and long-term work without sharpening.
Let's consider some options for a homemade plow on a walk-behind tractor.
Types of plowing implements
To increase the efficiency of the work performed, it is extremely important to carefully consider the question: which agricultural implements are best to choose for motor vehicles. There are the following types of implements for plowing the soil:
There are the following types of implements for plowing the soil:
- double-body (2-sided);
- negotiable;
- disk;
- rotary (active);
- turning.
There are also several options for fixing them:
Let's look at some soil cultivation devices in more detail.
Rotary (active)
A rotary plowing tool for motor vehicles is compared to an iron comb, which makes it possible to plow the soil. These types of agricultural implements of various modifications can have a variety of configurations. But these modifications are connected by the fact that their design becomes wider at the top, which makes it possible for these devices to pour soil to the side of the furrow.
An active plow actually has the same field of application as an ordinary implement for plowing the soil, with the only difference being that it functions faster and is more productive. However, there are certain features of its use. Thus, with a rotary device it is much easier to cultivate uncultivated lands that are abundantly overgrown with wild plants. The soil thrown away by the plowshares of this agricultural implement is better crushed and mixed, which becomes a plus when cultivating certain types of soil.
Read also: Motoblocks Khoper 1100
When selecting a tool for plowing the soil, you need to take into account the availability of the option of adjusting the cutting depth and degree of inclination for greater work efficiency.
Reversible (rotary)
A tool for plowing soil of the reversible type is collapsible; this is probably the best option, since sharpening or rotation of the knife is possible.
You should decide what size the plow will be - which directly depends on what modification of motor vehicle you are using.
For more effective use of the implement for plowing the soil, it is necessary to adjust the tool; for this it is advisable to use a coupling device (it is possible without it).
To make adjustments more accurately, it is worth taking into account a number of basic provisions:
- it is necessary that the longitudinal axes of the unit and the regulator are aligned;
- vertical position of the beam.
Such an installation will make it possible to carry out agricultural work more productively. But it is also necessary to use extensions on the axle shafts and iron wheels with weights for all kinds of tasks.
With a drawing and certain skills, you can create a rotary plow yourself from steel with high structural strength. Therefore, it costs nothing for such a homemade device to withstand heavy loads while working on a plot of land.
When using this equipment for motorcycles, you must adhere to several recommendations:
- the device should not have a thin stand, a shortened blade, or a small thickness of the body sheet;
- An instruction manual must be present.
Double-body (2-sided)
Double-sided agricultural implements (hiller, also known as tiller, double-winged plow, tiller) are used to loosen the soil around plants, rolling it to the base of the stems of various crops. Additionally, weeds are eliminated between the rows. With such tools, you can cultivate the ground, cut furrows for planting plants, and then fill them up by turning on the reverse gear of the unit. Such designs are distinguished only by the width of the working grip - variable and constant. The difference between them is solely in the moving wings, which adjust the width of the working grip.
A device that, with a constant working width, operates with light motor vehicles (up to 30 kilograms), with a motor power of up to 3.5 horsepower. Their distinctive feature is 12 mm racks (protect the unit from overloads).
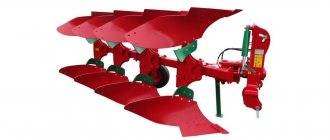
Reversible plow for walk-behind tractor: do it at home
The reversible (reversible) plow to the walk-behind tractor is externally distinguished by its curved shape, which helps turn the top layer of soil by 1800.
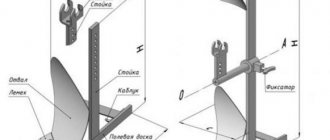
It has gained enormous popularity on hard soils, where conventional loosening does not bring the expected result. Its device is the most complex among other varieties. A universal version of a reversible (reversible) plow is shown in the figure.
The size of the structural elements is detailed in the drawing.
To invent it you will need to do (notations according to the drawing):
- plowshares (a) made of steel. It is desirable that they be removable for possible sharpening or modernization. The cutting part is processed on an anvil and sharpened. The lower one is designed for cutting into the soil, the upper one turns over the cut layer. The strength of the latter can be strengthened with a corner welded to it;
- form a dump, there are several ways to do this. According to one of them, a steel pipe with a diameter of no more than 6 cm is taken, to which a cardboard blank is attached. There should be about 20 0 between the generatrix of the pipe and the stencil;
- side part of the stand (b);
- spacer plate (c);
- base of the product (d);
- corner (d);
- stand (e).
The diagram shows the assembly sequence of the rotary plow, where 1 is the share, 2 is the side part of the stand and 3 is the auxiliary sheet.
A variation of the standard reversible plow is the Zykov rotary plow, the distinctive feature of which is the reinforcement of the plowshares with steel blanks on bolted ties and a large angle of attack. An additional wheel can be used to ensure structural stability.
In the proposed drawing it is highlighted in yellow.
Assembly
If everything was done correctly in the previous steps, assembly should not cause significant difficulties. To do this, you will need a sheet of steel with an area of at least 25 cm². All parts are welded to it, including the side shield.
Such work requires special care, since parts of the future agricultural implements must fit well and the angles must match. The side shield, which ensures stability and reliability of the assembly, is connected to other elements by spot welding. If a discrepancy in the geometric configuration is noticed, the shape of the blade can be easily corrected with a hammer.
See » The most popular Viking walk-behind tractors and possible attachments
Share attachment
This structural element is attached with its rear surface to the blade and the side plane of the frame. The latter, using a welding machine, is attached to the spacer element and the plate base, to which the thrust steel angles for the ploughshare are attached.
All parts of the structure should protrude a few millimeters beyond the side shield. The steel sheet used for precision assembly of the structure is separated from it with a chisel or a hand-held circular saw with a cutting disc installed. Weld seams should be sanded, and the plowshare and blade should be sanded with fine sandpaper.
Rotary plow on a walk-behind tractor: advantages of the unit
It has the most advanced form for plowing virgin soil and areas overgrown with weeds to a depth of about 30 cm. A homemade rotary plow includes:
- curved shares;
- axis.
The walk-behind tractor on which such a tool is mounted must have a working power take-off shaft. It is he who drives the axle, and she – the plowshares.
Homemade rotary plows for walk-behind tractors are most often found with disk mechanisms. But drum, blade and auger plows are also known. Indispensable for applying fertilizers and controlling weeds.
DIY disc plow
A disk plow on a walk-behind tractor or a hiller plow is a special device used for cultivating the soil before planting tuber crops.
Lays furrows for planting potatoes, beets, celery, and hills them. Below is a diagram and drawing of the hiller
Its structure includes:
- 2 – disks;
- 3 – fist;
- 4 – bracket;
- 5 – axis;
- 6 – scraper;
- 7 – driving beam;
- 8 – screed;
- 9 – handle.
The number 1 indicates the work area.
Discs can be taken from an old seeder. Their installation is carried out at an angle to improve the productivity of arable work. Attaching the hiller to the walk-behind tractor through the hitch bracket. The T-shaped plow leader is screwed to it with bolts and a stopper. At high speed, the hiller may begin to slip. Therefore, you need to work with it only at low speeds or with paired wheels.
According to another instruction, the disk plow for the walk-behind tractor begins to be assembled by cutting out an equilateral corner. The toe is welded to it, and then through the thrust bar and the heel. The discs are mounted on special hinges, which are welded to ensure their symmetrical position to the common axis.
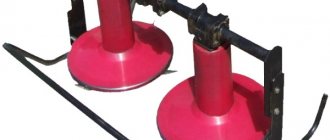
Weights
Weights are used to add more weight to the structure. This is necessary in cases where the equipment “jumps” over the soil and operates intermittently.
Weights can be used both for the walk-behind tractor itself and for attachments to it.
Weights for the Neva walk-behind tractor
The official manufacturer offers to buy weights on its website. There are two types.
The first ones are made in the form of disks; they are designed to weigh down the wheels or axle of the walk-behind tractor. The discs improve the soil-clinging properties; the weight of one disc is 10 kg.
The latter are produced in the form of a cylinder, which is attached only to the pin of the walk-behind tractor. Thus, burdening its frame, the weight of one such cylinder is 17 kg.
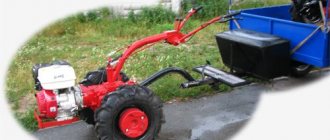
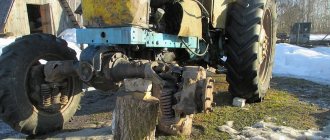
Do-it-yourself plow to a walk-behind tractor from a horse-drawn tiller
An equally viable idea is to recycle an old horse-drawn plow into a walk-behind tractor.
A full description of the process is given in the video. A feature of all horse plows without exception is their heaviness, created by a bulky moldboard. If such a plow is installed on a walk-behind tractor without modification, the ground will not tilt. This is a big plus, since the horse plow share will not undergo any changes.
To make a plow from a horse horse into a walk-behind tractor you will need:
- make your own blade, which is cut according to a pre-drawn drawing from a steel blank (3 cm thick). For accuracy, it is advisable to make a cardboard template;
- after cutting, the stainless steel blade is given a special shape;
- remove the horse blade and install a homemade one instead;
- remove the handles that were on the vertical axis;
- Instead, weld metal fasteners through which the plow will be hung to the walk-behind tractor.
- If during field testing it turns out that the converted horse plow does not throw well, the ploughshare should be slightly bent so that it can cut deeper into the soil.
Installing a plow on a walk-behind tractor: step-by-step steps
Before you attach the plow to the walk-behind tractor and start setting it up, the draft unit itself must go through a number of preparatory procedures. They boil down to:
- transporting the walk-behind tractor to where it will be used;
- dismantling the wheel travel, which is replaced by lugs. Otherwise, the equipment will begin to slip and may get stuck.
Once these requirements have been met, installation of the plow can begin.
It means:
- fastening the plow to the hitch of a walk-behind tractor with nuts, which will allow you to independently set its operating parameters in the future;
- prepare two fastening pins with which to attach the hitches and plow to the shackle.
This completes the task of installing the plow and you can move on to the next one.
Rotary plow design elements
The rotary plow is universal, so it can be used on walk-behind tractors for plowing the soil. Unlike a conventional unit, which turns the soil in one direction with a ploughshare, a rotary plow carries out plowing work much faster, which is achieved due to the presence of a manual turning mechanism on a standard single hitch. For this reason, tillage with the unit is more efficient. Returning to the beginning of the previous row for normal turning of the soil when plowing with a single-body device slows down the pace of tillage.
The product has 3 design planes:
- Bottom horizontal runner.
- Lateral vertical runner.
- Front blade.
A high-quality unit must have the following properties:
- The horizontal lower plane of the skid of a plow with the plowshare and moldboard removed, placed on the surface of the table, must coincide with it, which is observed if the table is pushed tightly against the wall, taking into account the coincidence of the vertical wall and the side vertical plane of the skid.
- The lower cutting edge of the plowshare of the product is located 10 - 20 mm lower than the horizontal plane of the skid, passing below.
- The location of the side cutting edge of the share and the side cutting edge of the blade runs in a straight line, and the parts themselves protrude 10 mm beyond the lateral vertical plane of the skid.
- The installation surfaces of the plow and ploughshare form an angle of 15 - 20° between themselves.
- The working surface of the installed share is adjacent with its front part to the blade in one plane without a gap.
When finishing work with the plow, the polished surfaces should be cleaned of soil. Then they are watered with machine oil or lubricated with Litol-24, rubbing with a rag. This helps protect polished surfaces from corrosion.
How to adjust a plow on a walk-behind tractor?
Adjustment is an extremely important point on which the performance of not only a homemade or factory plow, but also a walk-behind tractor depends.
To correctly set up a plow on a walk-behind tractor, you need to pay attention to three key parameters:
- width;
- plowing depth;
- incline.
Work progress:
- set the width along the edges, for which the edge should not move above or below the soil hook;
- Place the walk-behind tractor stably on stands to set the depth required for plowing. It must be remembered that it varies by season (in winter up to 0.25 m, and in spring about 0.2 m);
- adjust the attachment of the plow to the walk-behind tractor;
- make bolt fastenings so that the rear of the plow is in the same plane with the soil;
- remove the walk-behind tractor from the stand.
The setting is considered complete if the steering wheel is located at the level of the operator’s waist.
Auxiliary equipment for walk-behind tractor
Among the necessary improvements to the walk-behind tractor in the form of attachments, it is recommended to make, in addition to all of the above, the following elements:
- wheels with lugs for working on loose soil;
- lift;
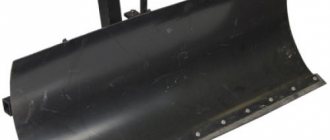
- mounted bucket-blade for snow removal.
For wheel designs used as movers for walk-behind tractors on arable land, wheels with rubber tires are used. Experience and ability to work with ready-made structures, for example, steel rims from car wheels, will tell you how to make wheels for a walk-behind tractor with lugs yourself.
To do this you need:
- 2 steel wheels from a car;
- corners 25x25 cm;
- electric welding;
- Bulgarian;
- tape measure and pencil.
The corner is cut into segments of 35-40 cm. The rims of the disk are marked into equal segments. It is best if there are 8 or 10 of them. Marks are made and corners are welded at the marks.
It is better to make a do-it-yourself lift for a walk-behind tractor from a piece of pipe with a diameter of 100 mm. The lift itself is made in the form of a roller on a bracket. If necessary, it changes its position and makes it possible to lift the walk-behind tractor onto a support. In its normal position, the lift shaft is located in front of the unit and is used as a support roller when overcoming ditches and ruts.
It is recommended to assemble a bucket for a walk-behind tractor with your own hands if you plan to use it as a snowblower.
The ladle can be made:
- made of sheet metal 1.5-2 mm thick;
- hard plastic with a knife at the bottom made of a metal strip;
- from plywood 8-10 mm thick or OSB board 10-12 mm.
The bucket is rigidly fixed to the walk-behind tractor frame. To make work easier, you can make a rotating device to change the angle of inclination of the cutting plane to the road surface.
In order for the bucket to work for a long time, a support ski is placed in front on a bracket. This will make cleaning safer. The cutting surface will be at a certain height above the ground and will not touch the ground.
You can improve your home motorcycle equipment to suit your requirements without high costs. After all, you can assemble attachments for a walk-behind tractor yourself, doing everything yourself.
Plow on a walk-behind tractor: review of popular models and their characteristics
Although industrial modifications are inferior to home-made analogues in terms of costs, they are highly reliable and durable. There are many different models on the modern market, which differ not only in requirements for soil quality, but also in the technical parameters of the power plant itself.
Plows for the Salyut walk-behind tractor
"Salut" is a well-known brand of cultivators and walk-behind tractors. Thanks to the plow, the soil is plowed to a depth of up to 25 cm. They function with the following types of plows:
- reversible, suitable for dense soil - the heaviest of those considered;
- single-hull without coupling, the weight of which is 9.55 kg with a plowing depth of up to 200 mm;
- a Zykov rotary plow weighing 9 kg, which loosens 20-25 cm of the top layer of soil.
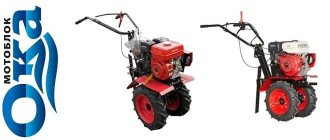
Plows on the Mole walk-behind tractor
The Krot motor cultivator is known in several modifications - MK-1 and Mk-2. Both are perfectly compatible with universal reversible plows.
For better adhesion to the surface, it is necessary to purchase additional lugs. Technical characteristics of the "Mole" plow:
- Processing width – 20 cm;
- Plowing depth – 20 cm;
- Weight – 8 kg.
Plows for the Neva walk-behind tractor
The Neva walk-behind tractor has several basic modifications, including MB-1 and MB-2.
They differ in power and transmission. Therefore, they are equipped with different adapters. MB-1 is compatible with a universal single-body plow without a hitch, as well as the P1 20/3 model. The latter covers a row 22 cm wide and is adapted to over-compacted soils.
MB-2 works with:
- plow “Mole” (1-furrow), weighing 8.5 kg;
- 2-turn with 15 kg weight and 20 cm processing;
- single-furrow plow P1-20/2 (8.5 kg).
Plow for MTZ walk-behind tractors
The following plows can work with the MTZ-09N motor cultivator and other modifications of the manufacturer:
- universal reversible PU-00.000-01, made of steel and having a specific ridge shape;
- P1-20/3, smaller in size than the previous one;
- reversible double-sided with feather-shaped ploughshare. Together with such a plow, the walk-behind tractor can be operated at a speed of 2-5 km/h.
The universal plow of the PU series has gained great popularity. Its features are:
- light weight;
- ease of transportation;
- fastening with a conventional hitch;
- track width 30 cm;
- adjustability of plowing depth, which is max. can be 25 cm.
In addition to those mentioned above, plows for walk-behind tractors with a support wheel, which are adjusted by a screw mechanism, have become extremely popular among consumers.
Features of work
Attachments make it possible to expand the scope of application of the Salyut walk-behind tractor. You can effectively carry out absolutely all the work typical of rural areas. Undoubtedly, before starting work you will have to thoroughly understand the instructions, because the effectiveness of the equipment is, first of all, the correct settings and adjustments.
Rotary plow
Using a rotary plow, which has left and right multi-directional plows in its design, you can plow in forward and reverse directions. For the most effective work, it is better to choose a model with a plow adjustment, that is, the ability to adjust the cutting depth and tilt angle.
Plow installation:
- depress the pedal;
- fix the stand;
- after that the entire structure is rotated 90°.
Zykov's plow
Zykov's plow is significantly different in appearance from other models. The video review clearly shows that its main differences are carefully selected angles and a completely different profile of the plow-mold surface, which makes it possible to better paint the soil and turn over the layer. Such plowing almost completely eliminates weeds.
Here is a review of plowing with a Zykov reverse plow on a Salyut walk-behind tractor
Double sided plow
A double-sided plow (hiller) is used for hilling agricultural crops and destroying weeds. This device is used to cultivate the soil and cut a furrow for planting plants. Subsequent backfilling is done by turning on the walk-behind tractor in reverse. The units are distinguished with variable and constant working width.
A device with a non-adjustable width works in conjunction with a lightweight walk-behind tractor; 12 mm racks reliably protect it from overload. The most widespread are hillers with variable widths that can be adjusted. Such plows work perfectly in combination with Salyut 5DK walk-behind tractors. However, they have one drawback - the soil crumbles after passing.
Dutch hiller
Less known is the Dutch hiller, which forms narrow wedge-shaped furrows due to the movement of its wings not only to the sides, but also upwards. The formed bed ensures better contact of the planting material with the soil. Structurally simple, easy to manufacture, cheaper in cost.
Disc dipper
The disc hiller is much more productive, but its price is 3-4 times higher than usual. However, according to reviews, owners do not return to their previous devices after working with a disk hiller.
The Salyut walk-behind tractor with a Japanese engine is the most successful choice of agricultural equipment in terms of a combination of proven quality and reasonable price.