You can, of course, buy beautiful factory models of Stirling engines, such as in this Chinese online store. However, sometimes you want to create yourself and make a thing, even from improvised means. Our website already has several options for making these motors, and in this publication, check out a very simple option for making a Stirling engine at home.
Check out 3 DIY options below.
How to make a working Stirling engine at home?
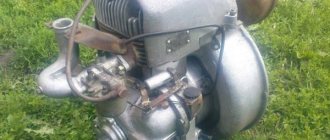
Dmitry Petrakov, by popular demand, has filmed step-by-step instructions for assembling a powerful Stirling engine relative to its size and heat consumption. This model uses materials that are accessible to every viewer and widespread; anyone can acquire them. The author selected all the sizes presented in this video based on many years of experience working with Stirlings of this design, and for this particular specimen they are optimal.
This model uses materials that are accessible to every viewer and widespread, thanks to which anyone can acquire them. All the sizes presented in this video were selected based on many years of experience working with Stirlings of this design, and for this particular specimen they are optimal.
Products for inventors Link to the store.
With feeling, sense and arrangement. Stirling motor in operation with a load (water pump).
The water pump, assembled as a working prototype, is designed to work in tandem with Stirling engines. The peculiarity of the pump lies in the small amount of energy required to perform its work: this design uses only a small part of the dynamic internal working volume of the engine, and thus has a minimal effect on its performance.
New design and appearance of MK II
At that moment I realized that a major upgrade was needed in order to get a good and efficient engine. Digging through my technical reference books and books, I implemented upgrades to all thermodynamic components in the gas loop. The following were redesigned: a 316 stainless steel heating cylinder head with internal and external fins, a foil for the regenerator, a finned cooler, and a new thin-walled stainless steel displacer.
Ribbed stainless steel Stirling engine heater inside and outside
My friend and Stirling enthusiast John Archibald agreed to prepare drawings from my design sketches and use his skills as a machinist to help create some of the more complex parts. It took a few more years to get all the new components, but at the end of 2012, the MK II version of the engine was ready and assembled.
Cooler with fins for Stirling engine
Stirling motor from a tin can
To make it, you will need available materials: a can of canned food, a small piece of foam rubber, a CD, two bolts and paper clips.
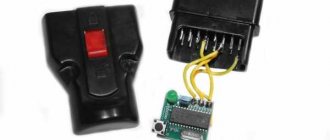
DIY electronics in a Chinese store.
Foam rubber is one of the most common materials used in the manufacture of Stirling motors. The engine displacer is made from it. We cut out a circle from a piece of our foam rubber, make its diameter two millimeters less than the inner diameter of the can, and its height a little more than half of it.
We drill a hole in the center of the cover into which we will then insert the connecting rod. To ensure smooth movement of the connecting rod, we make a spiral from a paper clip and solder it to the cover.
We pierce the foam circle of foam rubber in the middle with a screw and secure it with a washer at the top and at the bottom with a washer and nut. After this, we attach a piece of paper clip by soldering, having first straightened it.
Now we stick the displacer into the hole made in advance in the lid and hermetically solder the lid and the jar together. We make a small loop at the end of the paperclip, and drill another hole in the lid, but a little larger than the first.
We make a cylinder from tin using soldering.
We attach the finished cylinder to the can using a soldering iron, so that there are no gaps left at the soldering site.
We make a crankshaft from a paper clip. The knee spacing should be 90 degrees. The knee that will be above the cylinder in height is 1-2 mm larger than the other.
We use paper clips to make stands for the shaft. We make a membrane. To do this, we put a plastic film on the cylinder, push it inward a little and secure it to the cylinder with thread.
We make the connecting rod that will need to be attached to the membrane from a paper clip and insert it into a piece of rubber. The length of the connecting rod must be made such that at the bottom dead center of the shaft the membrane is pulled inside the cylinder, and at the highest, on the contrary, it is extended. We set up the second connecting rod in the same way.
We glue the connecting rod with rubber to the membrane, and attach the other one to the displacer.
We use a soldering iron to attach the paper clip legs to the can and attach the flywheel to the crank. For example, you can use an CD.
Stirling engine made at home. Now all that remains is to bring heat under the jar - light a candle. And after a few seconds give a push to the flywheel.
Principle of operation
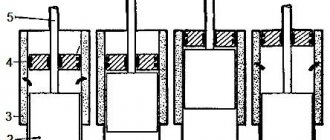
You can imagine a closed air volume enclosed in a housing with a membrane, that is, a piston. When the housing heats up, the air expands and does work, thus bending the piston. Then cooling occurs and it bends again. This is the cycle of operation of the mechanism.
It is no wonder that many people make their own thermoacoustic Stirling engine at home. This requires the bare minimum of tools and materials, which can be found in everyone’s home. Let's look at two different ways to easily create one.
How to Make a Simple Stirling Engine (with Photos and Video)
www.newphysicist.com
Let's make a Stirling engine.
A Stirling engine is a heat engine that operates by cyclically compressing and expanding air or other gas (working fluid) at various temperatures so that there is a net conversion of thermal energy into mechanical work. More specifically, the Stirling engine is a closed-cycle regenerative thermal engine with a continuously gaseous working fluid.
Stirling engines have higher efficiency than steam engines and can reach 50% efficiency. They are also capable of operating silently and can use almost any heat source. The thermal energy source is generated externally to the Stirling engine rather than through internal combustion as is the case with Otto cycle or diesel cycle engines.
Stirling engines are compatible with alternative and renewable energy sources as these may become increasingly important as the price of traditional fuels rises and in light of issues such as oil depletion and climate change.
In this project we will give you simple instructions on how to build a very simple motor
DIY
Stirling using a test tube and syringe
.
How to make a simple Stirling engine - Video
Components and Steps to Make a Stirling Motor
1. A piece of hardwood or plywood
This is the basis for your engine. Thus, it must be rigid enough to cope with the movements of the engine. Then make three small holes as shown in the picture. You can also use plywood, wood, etc.
2. Marble or glass balls
In the Stirling engine, these balls perform an important function. In this project, the marble acts as a displacer of hot air from the warm side of the test tube to the cold side. When marble displaces hot air, it cools.
3. Sticks and screws
Pins and screws are used to hold the test tube in a comfortable position for free movement in any direction without any interruption.
4. Rubber pieces
Buy an eraser and cut it into the following shapes. It is used to hold the test tube securely and maintain its seal. There should be no leakage at the mouth of the tube. If this is the case, the project will not be successful.
5. Syringe
The syringe is one of the most important and moving parts in a simple Stirling engine. Add some lubricant inside the syringe so that the plunger can move freely inside the barrel. As air expands inside the test tube, it pushes the piston down. As a result, the syringe barrel moves upward. At the same time, the marble rolls towards the hot side of the test tube and displaces the hot air and causes it to cool (reduce volume).
6.
Test Tube The test tube is the most important and working component of a simple Stirling engine. The test tube is made of a certain type of glass (such as borosilicate glass) that is highly heat resistant. So it can be heated to high temperatures.
Story
The Stirling engine is a heat engine that was invented in the early nineteenth century. The author, as is clear, was a certain Stirling named Robert, a priest from Scotland. The device is an external combustion engine, where the body moves in a closed container, constantly changing its temperature.
Due to the spread of another type of motor, it was almost forgotten. Nevertheless, thanks to its advantages, today the Stirling engine (many amateurs build it at home with their own hands) is making a comeback again.
The main difference from an internal combustion engine is that the heat energy comes from outside, and is not generated in the engine itself, as in an internal combustion engine.